
Revell-Monogram 1/32 Hawker Hunter FGA.9
By Michael Benolkin
History: The first Hunter prototype took to the air in 1951, with initial operational examples entering service by 1954. The early Hunters experienced a number of teething problems, from engine surges to fuel capacity. By the time the Hunter F.6 became operational in 1957, most of the ‘bugs’ had been worked out and the Hunter became one of the main fighters for the RAF. When the English Electric Lightning entered service as the RAF’s supersonic fighter/interceptor, Hunter F.6s were being released for conversion into the FGA.9 (Fighter, Ground Attack Mark 9) configuration. The Hunter was now a multi-role machine. The Hunter FGA.9, as well as other versions of the aircraft, served in Air Forces around the world, some well into the 1990s! In addition to Great Britain, Hunter operators included the Sweden, Denmark, Peru, India, Switzerland, Jordan, Iraq, Abu Dhabi, Rhodesia, Kuwait, Lebanon, Saudi Arabia, Chile, Singapore, Qatar, Kenya, and Oman. The Hunter was a solid machine and stable through all flight regimes, including supersonic. A good example of the Hunter’s solidity was an incident where the engine flamed-out on long final. The pilot successfully ejected out of the aircraft, but the unmanned Hunter continued to glide down final approach and slid to a stop on the runway on its belly. Damage to the aircraft was light enough to have the aircraft back in service within a few weeks! The Kit: Nevertheless, this kit is easily one of Revell-Monograms BEST 1/32 kits released to date. The kit comprises 170 parts, molded in light grey plastic or clear. The canopy and windscreen are the clearest and sharpest parts to come from R-M in this scale. The plastic is not as thick as I would have expected for a 1/32 kit, so all trailing edges are sharp. Details are mostly engraved, with raised details only present where appropriate on the full-scale aircraft. The kit features a nicely detailed cockpit, positionable flaps, landing gear and speed brake, positionable canopy, large external tanks on the inboard pylons, flattened tires, and a choice of smaller external tanks or rocket pods on the outboard pylons. The markings include an RAF 208 Sqn aircraft sporting older national markings or an RAF 45 Sqn aircraft with the later national markings. Construction: The cockpit color is basically a dark grey. Cockpit photos of the Hunter show the interior to be almost a flat black, so I painted all of the cockpit parts Testors Aircraft Interior Black. I took a technical pen loaded with gloss black ink and filled in the instrument faces, then picked out the raised dial markings with Flat White enamel on a fine brush. I finally added a drop of Future to the completed instrument faces to complete the effect of glass. Switches and knobs and lights were also painted according to reference photos. Assembly was accomplished with Testors Liquid Cement applied through a needle applicator. I have found that the liquid cement is vastly superior for assembling larger aircraft models because it is gap-filling when applied properly, while the resulting joint is more tolerant of flexing than other hobby adhesives (and there WILL be a lot of flexing before you finish this project), and dried liquid cement is easier to buff out of the plastic in case of accidents. The downside to liquid cement is the longer drying time. Building and painting of the subassemblies in this kit were done as specified in the instructions, except as follows: I chose I left the instrument coaming (part 20) off in step 8 until much later. This would come in handy, as I will explain later! I did not install the nose in step 9. Like the step above, this worked out to my advantage. I did not install the navigation lights in steps 14, 16 and 41 until the kit was nearly complete. When assembling the larger parts, such as fuselage halves, wing halves, etc., go slow. Apply a little liquid cement along a two-three inch section of the seam using the needle applicator. Squeeze the joint on and off until the plastic softens and there is a little plastic oozing from that section of the seam (gap filling!). Move on to the next section and repeat the process. Use plenty of rubber bands to hold the glued subassemblies together while the glue completely dries. This is a little slow, but the result is a tough joint that will tolerate handling and flexing. In step 20, carefully dry-fit the intake subassembly to the forward fuselage subassembly. Make sure that the intake edges fit into the slots on the forward fuselage and that the assembly is not upside-down. DO NOT CEMENT THE INTAKE SUBASSEMBLY TO THE FORWARD FUSELAGE! If all is well, the aft fuselage should slide over the intake subassembly and be glued into place against the forward fuselage. The wings fit snugly into the slots molded into the aft fuselage. The resulting joint is without step or gap. Bravo Revell! In step 24, all of the subassemblies come together to form something that resembles a Hunter. Now it was time to assess the weight and balance of the kit. In step 9, it shows that weight needs to be installed in the nose. After balancing the aircraft at the main gear mounts, I determined that 14 grams (1/2 oz) of weight would be required in the nose to keep the aircraft from tail sitting. Some time ago, I discovered that the model railroaders had these nice self-adhesive lead weights pre-cut into 7-gram increments readily available for ballast. I have found these to be very handy for projects such as It wasn’t until the aircraft was on its landing gear that I discovered the nose was still too light. That is where the late installation of the cockpit coaming came in handy. I installed a third 7-gram weight onto the forward cockpit bulkhead, and then installed the coaming. For you, go ahead and install 21 grams in that nose! Assembly and installation of the remaining details was straightforward. Painting: Markings: The kit decals are among the best that I have seen from any manufacturer. They are not thick, yet they are opaque and the register was spot-on. I applied the decals a few at a time, and once in their proper places, I dabbed away any excess water with a paper towel and applied Solvaset. The decals snuggled down beautifully. Once all of the decals were in place, I removed any remaining spots left from the decal adhesive and/or Solvaset, and sprayed the entire aircraft with Gunze Sangyo clear flat acrylic. Conclusions: NOTE: There are a number of aftermarket decals now available from Aeromaster and Xtradecal for this kit, including markings for many of the third world Hunter operators. As far as aftermarket details are concerned, TAC Scale Dynamics has produced a resin MB Mk.3 seat for this kit and a MB Mk.2 in anticipation of a Hunter F.6. There are rumors of cockpit detail sets from Flightpath and KMC, but frankly I don’t know that you would even notice the additional details. The problem with near-black cockpit tubs, as used by the RAF and USN in the 1950s and 1960s, is that nothing less than a halogen lamp will illuminate these cockpits enough to see much of the existing detail. The choice is yours. For Further Information: Hawker Hunter - Biography of a Thoroughbred, Francis K. Mason, 1985, Patrick Stephens Limited Hawker Hunter in Action, Glenn Ashley, Aircraft Number 121, 1992, Squadron/Signal Publications Hunter, Aeroguide 9, 1985, Linewrights Ltd.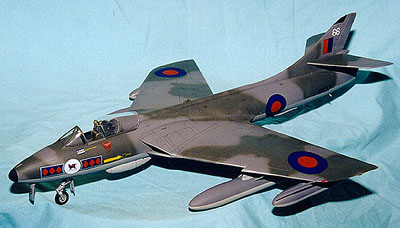
 The Revell-Monogram Hawker Hunter FGA.9 is a re-packaged version of the Hunter FGA.9/F.58 kit released in Europe by Revell of Germany. Unfortunately, the US release does not include the parts or decals to model the Hunter F.58 of the Swiss AF, which included a pair of AGM-65 Maverick missiles. Why these options were omitted on the US release is beyond me and was very disappointing.
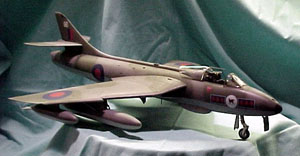 The box indicates that the Hunter is a Skill Level 3 kit, though there are no photo-etched parts or resin parts included. This is a 1/32 kit - subassemblies are large and require a little care in handling. The first step is to clear a nice spacious area to build this kit.
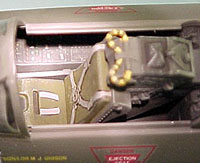
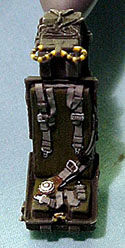 The ejection seat included in the kit is actually a great representation of the Martin-Baker Mk.3 seat. I also procured a TAC Scale Dynamics Mk.3 seat for this project and assembled and painted the two together. The principal difference between the two seats is the more accurate and detailed seat harness on the TAC seat. Nonetheless, I chose to install the kit seat in this project and save the TAC seat for a future Hunter.
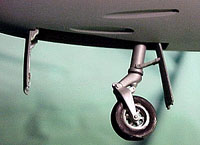 to not install the nose gear as called out in step 7, preferring to wait until after all of the camouflage painting was completed. The late installation of the nose gear resulted in a weaker joint, and in my next Hunter, I will install the nose gear in step 7.
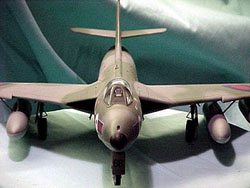 The intake subassembly in step 19 is particularly challenging. Be certain that you do not reverse any parts from the earlier assembly steps (11 & 12). Use plenty of cement and rubber bands to ensure that the intake trunks are solidly assembled.
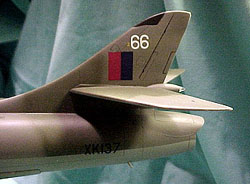 The unique FGA.9 tailcone should be joined to the aft fuselage in two steps: first, apply liquid cement around the fuselage-tailcone seam, adjust alignment, and allow to dry; then glue the fairing strips on the upper portion of the tailcone subassembly against the vertical stab base.
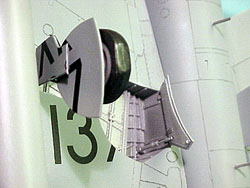 the Hunter. I installed two of the weights into the nose cavity and attached the nose cone.
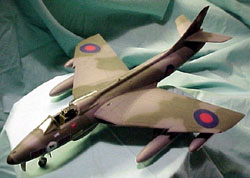
 The aircraft I am portraying is a 45 Sqn machine, sporting an RAF Dark Green and RAF Dark Ocean Grey over RAF Light Grey scheme. The external tanks were left off the aircraft and painted separately. Once the paint is dry and necessary touchups completed, I added the flat black nose cone and tail dielectric panel. This is the point where I take my technical pen loaded with grey ink and trace all of the engraved panel lines. I then take the pen with flat black ink and draw in the vent louvers. Next, I spray the aircraft with a liberal covering of Future Floor Wax to provide a smooth decal surface.
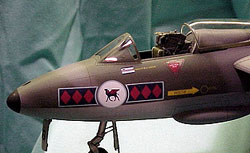 This is easily my favorite 1/32 offering from Revell-Monogram. While I still wish it had the Swiss options available in the European release of the kit, it has moved Revell-Monogram into a new spot on the 1/32 scoreboard. This Hunter kit is better that any of the current 1/32 offerings from Hasegawa, and is second only to Tamiya in this scale. I spent approximately 24 hours on this project, and I will be doing at least one more!
Hunter Squadrons of the Royal Air Force and Fleet Air Arm, Richard L. Ward, 1985, Linewrights Ltd.