
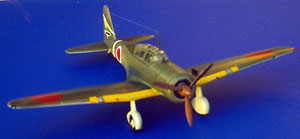
Nichimo 1/48 Ki-51 "Sonia"
By John Lester
History Though it was never a genuinely outstanding aircraft, the Mitsubishi Ki-51 served the Imperial Japanese Army Air Force from the China campaign to the end of the Pacific war, on all fronts and in all theaters. Its toughness, reliability and maneuverability made it a fine ground support aircraft. Commanders especially appreciated the ability to switch between tactical reconnaissance and ground attack configurations almost on a moment's notice. The "Sonia" was never withdrawn from operational service, even after the appearance of more modern Allied aircraft increased its vulnerability. In fact, it seemed almost irreplaceable and in 1944 the Tachikawa Army Air Force Arsenal (producing planes alongside Mitsubishi) set up a new production line to handle continuing strong demand. A total of 2385 aircraft were built between 1940 and July 1945, almost without interruption. The last aircraft were expended in mostly fruitless "kamikaze" attacks. Design work started in late 1937, in response to an Army request for a tactical support bomber derived from the earlier Ki-30 (code name "Ann") light bomber. The same design team responsible for the Ki-30 developed a smaller, sleeker, all metal low-wing monoplane with fixed landing gear. It accommodated a pilot and bombardier/navigator/gunner under a large greenhouse canopy, Unlike most other Japanese (and Allied!) aircraft, the Ki-51 remained virtually unchanged throughout its production life. Mitsubishi and the IJAAF considered it so good that the design was considered final. Only one attempt was made to improve the plane in 1941. One prototype of the Ki-70, with a more powerful engine and retractable gear, was built. The new airplane was only marginally better than its predecessor, and as a result never got beyond the prototype stage. The Kit Nichimo has recently re-released its line of 1/48 Japanese warplanes. I was very pleasantly surprised upon opening the box, almost shocked. The quality of the moldings was first rate, on par with anything Tamiya or Accurate Miniatures are doing today. Surface details are very finely engraved, parts are crisply molded, and some, like the pilot's telescopic sight, are a marvel of delicate, Preparation I decided to model a "kamikaze" aircraft after finding a good price on Aeromaster's "Special Attack Squadrons" decal set. This caused some problems down the road, since finding references was not easy. As usual, the good folks on the Japanese Aircraft Modeling Homepage Assembly Assembly was straightforward and generally trouble free. I started with the engine, which comes complete with two separate rows of cylinders, two separate exhaust collector rings, mounting frame and firewall. Detail is extremely good, and Now it was on to the interior. I built the model as a ground attack version, so I did not use parts B40, B43, A20, A21 and A22 (camera stuff). These would have been Silver, Next came I set the molds aside and continued with the wings. I placed a scrap of Lastly, the canopy was masked off and affixed using thinned white glue. After this had dried I airbrushed a light primer coat of Aluminum over the model. This revealed only a few seams and nicks that needed to be corrected. Painting, Decalling and Weathering Painting was straightforward. Using the Aeromaster booklet as a reference, I painted the area under the canopy Flat Black (actually, Flat The Aeromaster decals for a Ki-51 of the 72nd Shinbu-tai based out of Manse Air Base/Kagoshima Prefecture (May 1945) went on without a fuss. They responded perfectly to my usual dose of MicroSol. Since these aircraft came from a training command, Conclusion This is a great kit and I enjoyed building it (well, except for the landing lights, which turned out to be a real pain). The kit is great right out of the box, and with a little bit of work, even a guy like me can build a contest winner. It's certainly a nice change of pace from the usual WW2 subjects. I highly recommend it!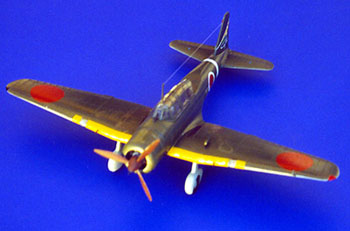
 and could carry up to 440 lbs. of bombs under the wings. Two 7.7mm MGs (later upped to 12.7mm) were ensconced in the wings, and another mounted in the rear of the cockpit. A 940 hp Mitsubishi Ha-26 II radial engine driving a three bladed, variable pitch propeller produced enough power for a maximum speed of 263mph at nearly 10,000 feet.
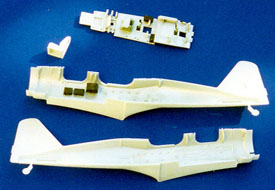 precision molding. The clear parts are nice and thin, and crystal clear. Decals are provided for four aircraft. They are rather bright, those who chose to model the aircraft in the instructions may want to raid the spares box for more subdued versions, especially of the hinomarus. The two-page fold-out instructions are in Japanese, but my kit included two pages in passable English detailing painting and construction. (Even better, the color recommendations for the engine and interior matched everything I've been able to research about IJAAF colors). Guidance for painting the exterior was a bit skimpy, but I decided not model the kit schemes (more on that in a minute), so that didn't bother me.
were kind enough to point me in the right direction. Koku Fan
 Illustrated issues #79 and #80 have several good photos of Ki-51s at the Hokoto Flight Training School and in Manchuria. Unfortunately, I was unable to find any good photos of kamikaze aircraft. "Sonias" used in suicide attacks were specially modified to carry a 250lb bomb under the centerline. They probably also had all the equipment stripped from the rear cockpit (and the radios as well) to lighten the load and make room for extra fuel (IJAAF practice was to fly suicide missions with only a pilot aboard). I ended up having to make a number of almost-educated guesses without the necessary references.
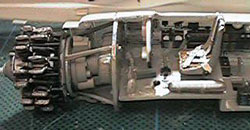
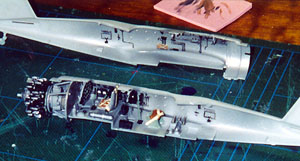 I almost ended up cutting open the cowl to display the engine. It seemed such a shame to waste that fine detail. Though I did find an excellent color picture in Ethell & Bodie's "PACIFIC WAR EAGLES in ORIGINAL COLOR" showing a wrecked Sonia, I couldn't make out how the front of the cowl attached with the access hatches removed, so I reluctantly enclosed the engine. Following the English paint guide, I used Gunmetal, Aluminum, Burnt Iron and Flat Aircraft Interior Black to paint the parts (all paints I used are Testors Model Master enamels, unless otherwise noted).
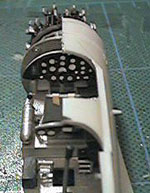 by the way. I put in the pedals and "sub-control stick" to busy the compartment up, though I suppose they would have been removed in preparation for the final flight. The recon version carried only eight of the ammo drums (B33); the ground attack 14 (use all B29 and B33 parts). I left them all off since no one would be sitting back there. They would have been Gunmetal drums with Khaki cloth storage bags if I'd used them. The rest of the cockpit fixtures were generally painted Aircraft Interior Black, with a "Bamboo Green" (actually, RAF Interior Grey Green) for the control sticks and seat frames. Seat cushions were Dark Brown. I used True Details photo-etched seat belts, as none were molded in the seats. These were painted Radome Tan with Aluminum hardware. The molded in wiring and sidewall details were adequate ... and since there are no aftermarket sets for this aircraft (and I didn't have the stomach for extensive scratch building), I used a combination of dry brushing and washes to bring these out. Instrument panels were Flat Black with White dial faces and Aluminum bezels. The only place the interior fell down was the pilot's seat, which is a shapeless blob. I replaced it with a seat stolen from the Tamiya Zero, maybe not exactly right, but it looks worlds better. This I painted Aluminum and scratched seat cushions from putty.
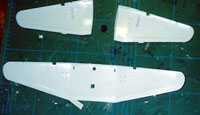 the fuselage and wings. Before joining the fuselage halves I sanded out the solid tail wheel supports for a more realistic look. Everything went together with absolutely no fuss, and despite a history of problems with seams, I had none on this kit. The wings likewise went together extremely well ... except for one detail. There are rather prominent landing lights on each wing outboard of the main gear. Nichimo did not include clear parts for these. I tried a number of approaches before deciding to mold the parts from clear resin. I scribed, sawed and sanded off out the area where these go after making a "mold" by pressing the joined wings into modeling clay. It took three days for the resin to cure before I could sand the pieces to shape.
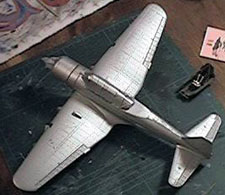 styrene behind the cut outs to keep the resin bits from falling into the wing when they were eventually put in. I also snipped the barrels from the machine guns and drilled out a hole for hypodermic tubing to slide into before gluing the wing halves together. The wings and stabilizers fit so well on the fuselage I needed only a hint of putty (up front next to the cowl). The three-piece cowling was assembled, and was such a tight fit that I merely needed to press it in place. Landing gear (minus the wheels - these were added at the end) were glued in place. Exhausts were scratch-built from thin aluminum tubing, since I had inadvertently lost one of the kit pieces! Lacking clear reference photos, I had to guess as to the mounting
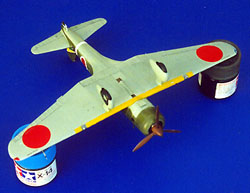 arrangement for the 250lb bomb. I used one of the kit's single 100lb bomb racks, cut to fit between the two belly windows. When I find a suitable Japanese bomb (the only ones I've found so far represent the converted naval shells used at Pearl Harbor), I'll make mounting clamps, and use fine wire to represent cables tat were probably used to secure it in place.
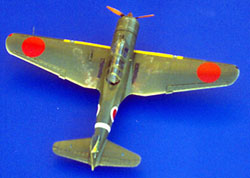 Aircraft Interior Black lightened with a little Gunship Grey for a faded look). The under surfaces, including the landing gear, was painted IJAAF Green-Grey. Once that had dried, I masked it off and airbrushed IJAAF Green over the top surfaces. Masking was removed and what needed touching up, was. The spinner and prop blades were painted with Military Brown/Insignia Red mix. The ID strips on the wings was masked an airbrushed "Deep Yellow".
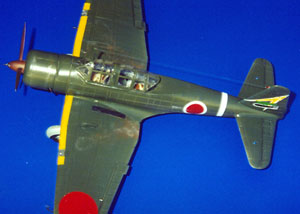 I kept weathering to a minimum. I used a toothpick and a small squares of masking tape to gently flake away the top color, revealing the Aluminum color below. I then painted the main and tail wheels with PollyS Grimy Black and glued the main wheels in position. Finally, the whole model was sprayed with Dullcote for a uniform finish and to seal the decals. After this had dried, I buffed it slightly with a scrap of flannel to bring out a small sheen. Then I removed the masking from the canopy, added a radio aerial made from 1lb test fishing line, and slipped the landing lights into position.
Many thanks to Hiroyuki Takeuchi and the rest of the folks at the Japanese Aircraft Modeling Homepage for all the help!