
Building a 1/48 Finnish Ju88A-4 using the Pro Modeler kit
By Juho Ala-Jaaski
History
In 1943, the only bombers in service with the Finnish Air Force were the Dornier Do17Z and Bristol Blenheim Mk.I/Mk.IV - which were both considered obsolete at the time. To bring the Finnish Air Force's bomber fleet up-to-date, around 30 Ju88A-4s were purchased from Germany. Most of them were to serve with the 1/LeLv 44 and mainly used to bomb Soviet railroads in Murmansk and in the Karelian Isthmus.
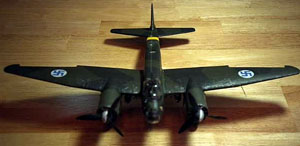
The Finnish Ju88A-4s had several unique features including removal of dive brakes (not in all aircraft, but most) and a fixed 20mm cannon in the ventral gondola for ground attack duties (although some aircraft had this cannon removed to save weight). All Finnish JU-88A-4s had an extra window in the bottom of the ventral gondola, and most didn't have the forward firing MG fixed on the front windshield. Some aircraft had sunshades on all machine guns.
The Kit
The kit I used for this project was the new Pro Modeler (PM) offering, but in the Revell-Germany's box, along with their instructions and decals, and an excellent decal sheet made by a Finnish company called InScale 72.
 The kit is fairly accurate, but the rudder is about 1mm too narrow, and the bottom window on the ventral gondola is also missing.
I didn't correct any of these errors, but if I was to do it over again I most likely would do so. I added the 20mm cannon to the ventral gondola and removed the forward firing machine gun, according to the real thing (JU-256).
Building the Junkers
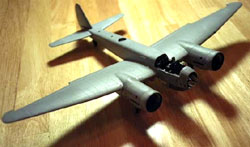
The kit is molded in medium grey plastic, with fine recessed panel-lines and good detail. The kit is the old unreleased DML offering, now boxed by PM in a Trans-Pacific agreement. PM has also added some parts, such as excellent clear parts (far better than on their Me410 in my opinion) and a totally new sprue, containing the engine nacelles and several detail parts.
Construction starts with the cockpit. The floor has some really nasty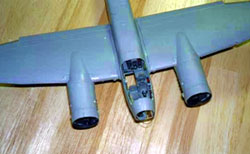 ejector marks, some of which need to be removed, but the seats and the radio equipment will cover the other ones. I added seat belts to the seats using lead-foil. Nothing was needed in the cockpit to convert it into a Finnish Ju88's cockpit, so construction was straightforward.
The cockpit walls are also separate, as is the nose onto which you attach the cockpit. I painted the cockpit medium grey, as I thought it looked better than RLM66, with black radio equipment, white and red dials, green ventral gondola gunner's foldable seat, aluminum rudder pedals, and brown radio-operator's headrest with tan seat belts and aluminum buckles. The fit of the fuselage halves was good. I didn't attach the upper formation lights onto the fuselage halves at this point as they would make sanding the seam very difficult. I painted the tail wheel well and strut dark green, as I couldn't find an RLM equivalent.
The fit of the nose to the rest of the fuselage was bad, and required a lot of sanding and filling to make it look like a panel line.
The bomb-bay part of the fuselage is also separate, dating from the original DML -G version.
The 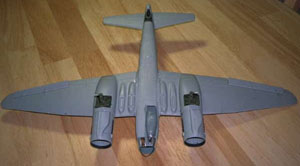 horizontal stabilizers and the vertical fin didn't fit well onto the fuselage and needed a lot of superglue to assemble and fill the resulting seams. I also had to add several pieces of sheet styrene along the fuselage seam to have at least some mating surfaces for the 2 halves as no alignment tabs are provided. I didn't correct the rudder on my model, so now it is 1mm too narrow, but this is not really noticeable after the model is completed.
The wings fit together well, with almost no filling necessary. The trailing edge is a little thick for the scale, but looks OK.
The landing gear is a pretty complicated assembly, consisting of over 8 parts each! I assembled the landing gear totally before gluing it in between the wing halves, as this works better then assembling the final shock absorber and the scissors to it after it has been glued to the wing as the instructions would have you do.
The main wheel struts don't fit well. I had to bend the supporting A-shaped rod to make it fit. Also, does anybody know what the funny looking arm that should go between the 2 strut beams is? Where does it go? I don't know, so I put it on the way it looked the best to me.
The wheels are not flattened, which is OK, as I haven't seen a picture of a Ju88 with "flat", on the ground tires yet.
I forgot to put on the wing leading edge light before gluing the wing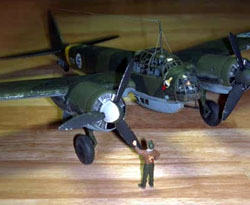 halves together, and this made attaching it a lot more difficult as it had been if done at the correct time. I got it in eventually, but this left several gaps around it, which I filled with clear drying white-glue. I attached the wings to the fuselage with superglue to achieve the correct V-angle. They didn't fit well at the bottom and I needed to fill the seam there with super glue, and then sand it smooth and rescribe the panel lines.
The engine nacelles fit together with no problem. I painted the engines flat black and then drybrushed them with silver to bring-out the detail and add realism. I also painted the attaching rods and the small intake rods in the little holes on the sides of both engines with silver. I assembled the nacelles according to the instructions (since I was painting the model by brush, I knew the exhausts wouldn't get in the way) but left off the engine fronts for after all the painting was done.
I also left off the little clear parts (mirrors?) that go on the cockpit side of the engine nacelles for after the painting was done, but more on that later.
The nacelles fit onto the wings pretty well, and I only had to press them hard while the glue was drying to get them to fit.
Painting
I 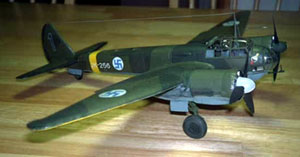 painted the model using Revell-Germany enamels. The scheme was from the InScale 72's decal sheet instructions, altered a little to simulate over-painted German "balkenkreuz"s and swastikas. I painted the undersurface of the model using paint a little darker and bluer than medium-grey to simulate weathered RLM65 using a wide brush. The upper-surface was painted in the standard German day-bomber splinter scheme of RLM70 (I mixed it from dark green and black) and RLM 71. There are no visible brush-marks on the model, due to the painting technique I used and to the enamels I used. The technique goes as follows:
- Paint both of the upper-surface colors using short strokes in the middle and longer ones on the edges. Always paint in the direction of the airflow!
- Paint the lower camouflage color using short strokes, starting with a lot of paint on the brush and gradually spreading it over a large surface.
- Do any touch up if required using a small, flat brush.
The spinners were painted RLM70 with 1/4th of the spinner painted light gray with a narrow white line in between. The wing tips were painted RLM27 yellow. The fuselage band came from the kit's decal sheet.
Weathering was done using an airbrush to paint black exhaust stains onto the engine nacelle sides and the bottom of the wing, right by the wheel wells. I also drybrushed a little silver onto the wing walk ways and to the leading edges, but this was done after the decals and a flat coat had been applied.
To achieve better adhesion, I applied a clear gloss coat 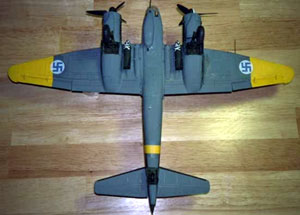 where the decals would go.
InScale 72's decals: InScale 72 is a little Finnish company specializing in markings for Finnish AC during WW2, both in 1/72 scale and 1/48th scale. I've used these decals before on my Finnish Brewster Buffalo, so I knew what to expect and what to watch out for.
The decals need a VERY glossy surface and plenty of Micro Sol to adhere properly. I had gloss coated the model earlier, so I was all set to apply the decals.
The first thing I did after receiving the decals was to decide on a scheme, and believe me it wasn't easy! The sheet contains markings for 8 schemes with both toned-down and white Finnish swastika emblems, but only for 2 AC. The sheet also includes markings for a Finnish Do17Z.
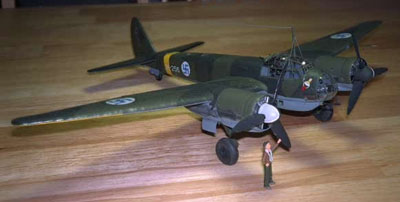
The decals went on fine, but needed a lot of Micro Sol to settle down into the recessed panel-lines. The Ju88A-4 I was modeling had the "FACE" emblem of the 1/LeLv 44. The "FACE" is the only unit emblem carried on Finnish Ju88s. It also had small squares of RLM70 on both side of the vertical fin due to the overpainting of the German Nazi swastikas.
After all the decals had been applied the panel lines were enhanced with a pencil and a flat coat was applied onto the model.
Final details
 Whew! Finally it was time for the final details.
First I added all the wheels. The main wheels had been assembled and painted earlier. As for the tail wheel, it's not molded as part of the tail wheel strut, so that eased painting immensely!
The main wheels were painted overall black, with pastels applied to the tire part to lighten it a little and to bring contrast. The tail wheel was painted black with a dark green hub and pastels to tone down the tire part.
Next I added the direction finding antenna and it's clear cover (with both a decal antenna and a plastic antenna provided which I used) on the top of the fuselage along with the pitot tube. The opening for direction finding antenna cover is too small, so I had to enlarge it to achieve proper fit. Next were the 2 formation lights on top of the fuselage, and the landing light on the bottom of the right wing. These were put on using white glue, with the hole for the landing light painted silver.
Next up were the 2 mirrors (?) on the inboard sides of both engine nacelles. These were painted black from the bottom, with silver triple dots each.
The frames for the canopy and front glazing were painted dark green RLM71 with the gondola being the same color as the underside of the fuselage, along with the bottom of the front glazing. I didn't make an extra window for the bottom of the ventral gondola, since I felt like I don't have enough experience making clear part or the tools to do it.
What I did make was the 20mm gun for the front of the gondola.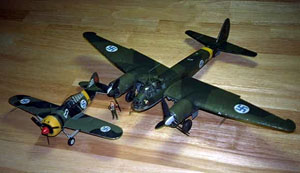 This was made using the "cushion" part from the kit's extra machine gun I had left, and a barrel from 1/35th scale German MG.42 with a scratchbuilt sight.
Before I attached these I put on the bomb sight, crash bars from stretched sprue to the inside of the front glazing, and all the machine guns - with the exception of the forward firing one - according to the decals sheet's instructions. The clear parts fit well, so I put them on using white glue, except for the joint between the 2 rear halves.
The last thing I added were the bombs (with faces painted on them according to a photo I have of the real thing), the stretched-sprue string antennas, and the direction finding loop and whip antenna to the bottom of the fuselage.
Well, there you have it, a Finnish Ju88A-4. It took me about 70 hours to construct, but I think it's definitely worth it considering the comments it got at a show I took it to recently. The model has won the best junior award in its category, and best of show junior AC, at a show here in Finland.