
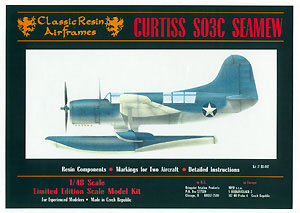
CLASSIC RESIN AIRFRAMES 1/48 Curtiss SO3C "Seamew"
By John Lester
THE PLANE
The Curtiss Model 82 was distinctive only in that it was almost certainly the ugliest aircraft the company ever built. It was built in response to a 1937 US Navy requirement for a replacement to the Curtiss SOC Seagull scout biplane then in service. The specifications called for operations from either sea or land bases, thus requiring easily interchangeable floats or wheeled landing gear. The Curtiss prototype beat out a Vought design despite some rather serious stability problems. These were finally resolved with the introduction of upturned wingtips and increased tail surfaces. The prototype XSO3C-1 first flew on 6 October 1939 and by July 1942 production aircraft began to enter service, starting with the USS Cleveland. Three hundred SO3C-1s were built before production switched to the SO3C-2. Two hundred fifty of the 456 total SO3C-2's built were allocated to the UK under Lend-Lease (though only 100 seem to have actually been delivered), with a more powerful engine, 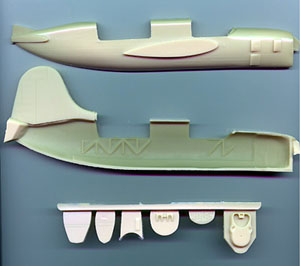 hydraulic brakes for the landplane version, and other refinements. The British designated the aircraft "Seamew"; a name later adopted by the US Navy.
The US Navy rapidly discovered the SO3C was not a stellar performer and withdrew the type from front line service. Many were converted for use as radio-controlled targets, including 30 "Queen Seamews" provided to the UK. Other British aircraft were used in Nos 744 and 745 Training squadrons to instruct air gunners and radio operators. Curtiss tried to improve the situation with a lighter weight, up-engined version, but only 39 of these were built before production ceased in January 1944.
THE KIT
I saw this kit built up at the National Model & Hobby Show over Halloween weekend.... and knew I must have it. I keep an eye on Squadron's web page for deals on new arrivals, and sure enough, the kit appeared at about $10 off retail ($68 US). That's still rather more than I like to spend, but I really wanted the kit, so....
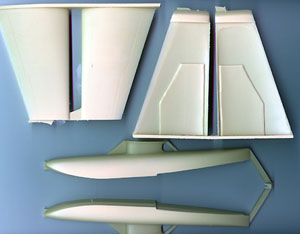 Upon opening CRA's sturdy box I found 3 bags of clear and resin parts and a one page (front and back) instruction sheet. All the separate bits are enclosed in sealed "pockets" within the larger bags, a nice touch that prevents them from sliding around and rubbing against each other. Parts are included for float versions and landplane versions, including horizontal stabilizers with one or two trim tabs. The boxtop advertises "markings for two aircraft" but my kit was missing these decals. A quick note to the distributor (Bringuier Aviation Products) resulted in a replacement sheet in just a week. The sheet consists of two styles of US National insignia and the name "War Junk". There are no serial numbers or stencils, though the pictures I have seen suggest some stenciling was present on the vertical tail at the least. As usual with PROPAGTEAM, they're crisp, perfectly registered and thin - so thin they could
 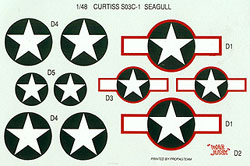 probably use an airbrushed coat or two of liquid decal film before application. Two decent vacuformed canopies round out the kit parts. I'm not 100% positive yet, but I'm guessing this is a replica of the first production version (SO3C-1), as the SO3C-2 had an arrestor hook and an under-fuselage rack for a 500lb bomb, parts for which are not included.
The resin parts are clean and mostly flash free. As with all resin kits, there are large runners on most parts that will require sawing and sanding. Exterior detail consists of very finely engraved lines, and crisp raised features where appropriate. Some of the larger parts are slightly warped - but my test fitting indicates this will be easily fixed when they're glued together. I doubt I'll even need to use the hot water method to bring them back to true. My dry fitting also indicates the parts should fit well, with none of the huge steps and gaps between parts that seem to be the hallmark of resin kits.
 Interior detail is adequate, about on par with the Monogram OS2U Kingfisher or PBY-5 kits. The RTO/gunner's flexible .50 cal MG looks to be a direct recast of the one found in the Accurate Miniatures SBD kits. Those modelers looking for a contest build will want to grind off the molded-in seatbelts and add photoetch bits to busy the interior up. It may be a good idea to replace the fragile antenna parts with styrene rod in the appropriate diameters as well.
All in all, this looks like a good kit. I'm a little disappointed at the lack of photoetch and other multi-media parts - but perhaps I'm becoming spoiled. Any extra detail, especially inside the cockpit, I can scratchbuild - and even if I don't, it will still look quite nice with the rest of my floatplane armada. I'd recommend this kit to the intermediate modeler looking to test his skills against resin, and anyone (except a total novice) who has a floatplane fetish like I do.