
Building the Academy/Minicraft F-15C Eagle in 1/48 Scale
By Steve Filak, Sr.
 |
|
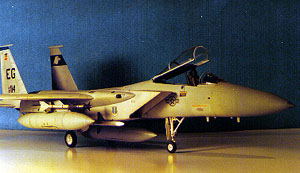
The F-15C Eagle has long been recognized as a formidable combat aircraft. From the onset of Operation Desert Storm, the F-15C proved its mettle, giving Coalition forces not only air superiority, but true 'air dominance'. This aircraft scored the highest number of aerial kills of any Coalition aircraft (over thirty!), and paved the way for strike aircraft such as the A-10, F-15E, F-117, and others to perform their tasks unhampered by an enemy air threat. I chose to model F-15C tail number 85-114, piloted by Capt. Cesar 'Rico' Rodriguez of the 33rd TFW, credited with three aerial kills. To accomplish this, I chose the Academy/Minicraft kit number 1685. Overall fit of parts is very good, with delicately recessed panel lines. Overall level of detail and outline are also quite good. One pitfall, however, is a profusion of ejector pin marks throughout the kit, especially inside the intakes. Fortunately, these are easily corrected with some superglue and auto glazing putty. Naturally, I started with the cockpit. The ACES II seat that came with the kit was somewhat lacking in detail, so I replaced it with a Verlinden seat. This drastically Since I didn't plan on cutting and moving any of the control surfaces, assembly of the rest of the kit was virtually straight out of the box. A few things to watch for: 1. Assembly of the forward/aft fuselage is very tricky. Sand both surfaces with medium sandpaper to give the cement at the joint some bite, find a starting point, and cajole the two assemblies to fit just a little at a time. I recommend lining up one side, attach with Tenax or superglue, and cement the other side after the first side dries. Even with this method, there will still be a seam to fill on both sides. 2. I noticed that there is an alignment problem when attaching the wings. The right wing went on just fine, but the left wing had a few degrees of dihedral. To correct this, I sanded the lower portion of the wing root, and used several short lengths of K+S metal tubing to spar the wings, which solved the problem. 3. Make sure that, when you assemble the intakes, mark them with a pencil as 'LEFT' and 'RIGHT' before attaching them. THEY ARE NOT INTERCHANGEABLE. I found this out the hard way, when I attempted to assemble them using the 'I- don't-need-no-stinking-instructions' method. Also, make sure the fuselage seam is filled and sanded to your liking before attaching the intakes- you won't be able to fix it later. 4. Take your time assembling the exhausts - they are loaded with ejector pin marks, which must be filled before assembly. Also, take your time aligning the individual pieces, or the nozzles will either not mate up on the edges, or go out of round and look really silly. You might want to use an appropriately sized dowel to check for roundness as you work. With basic construction complete, I then began painting the airframe. I airbrushed a coat of Model Master Light Ghost Gray over the entire model. As would be expected, I should mention that before I painted the first coat of Light Ghost Gray, I painted the outside of the vertical tails flat black. I then applied Verlinden's 'Aircraft Stenciling' (the white ones are far more suitable than the black letters for this task, but alas, both sheets are now out of production) in place of decals for the tail codes. After spraying the camouflage pattern and allowing things to dry, I used a piece of tape to carefully lift off the transfers to reveal the black lettering underneath. I've found that the first place contest judges look for decal silvering is on the tail of the aircraft, and this seems to solve that problem just nicely. No silvering here!
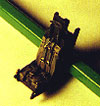
Weapons consisted of four AIM-7 Sparrows, and four AIM-9L/M Sidewinders. I painted these in a base coat of Light Ghost Gray. The rocket motors were all drilled out, then a short length of metal rod was temporarily superglued into each missile. I then chucked them in a drill press on low speed, and using a series of jigs which I designed for this purpose, I painted all striping and radomes. The jig for painting the radomes is shown here (moved out of the way), which is just an old credit card held in place by an 'extra hands' device. I used various other slotted jigs to paint the coding stripes. The only other addition to the kit was a pair of 610 gallon fuel tanks on the wing pylons, which I scarfed from and old Academy F-15E Strike Eagle. Most photos of Eagles during the Gulf War showed them carrying three tanks. At this point, the only thing remaining was to attach the landing gear and weapons/wing pylons, affix the canopy, and finish off with a coat of Testors Dullcote. Other than the minor problems mentioned above, I enjoyed building this kit, and I'll probably do another one somewhere down the line, maybe as a Mod-Eagle variant. That is, if I ever get these six other projects cleaned off my workbench. So many kits, so little time......... |
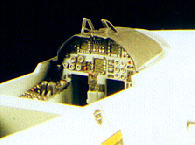 improved the appearance of the cockpit interior. I then proceeded to paint the tub and instrument panel gray, and the side consoles black. Detail painting then commenced. I painted all the dial faces on the panel with Model Master A/C Interior Black, as well as the MFDs. I then painted the dial faces with White oil paint, using a 10/0 long liner brush. I prefer to use oils for this application because of their longer drying time-if I make a mistake, I can fix it before it dries. Switches and knobs on the I/P and side consoles were picked out with White, Light Gray, and Red. I also completed work on avionics bay 5 at the same time, painting the avionics
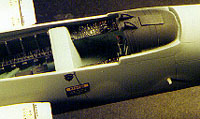 boxes with Metalizer Titanium.
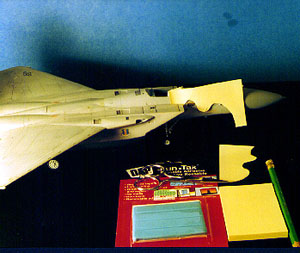 I then followed with Dark Ghost Gray to complete the camouflage pattern. I had done an F-15 in 1/48th previously and was unhappy with the results that I got spraying the pattern freehand, so I used what I call 'stand-off' masks to paint the camo pattern. These masks simply consisted of paper (in many cases, Post-It notes), cut to shape, and backed with a bead of Fun-tak adhesive to make the mask 'stand off' the surface of the model about a quarter of an inch. This produced a definitive, but subtly feathered pattern.
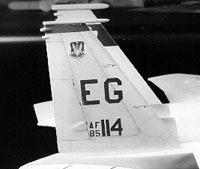 The decals supplied with the kit were terrible, and the few I tried to use shattered into a million pieces. I substituted them with Super Scale sheet number 48-414, as well as the data/stenciling sheet. These were overcoated with Future, and a panel line wash with Black/Raw Umber artists oils followed.