Building the New Hasegawa 1/48 Ju87D-5 Stuka
By Doug Nelson
 |
|
Famous in World War II as the instrument of the German "Blitzkrieg", the Ju87 Stuka served as the principal Luftwaffe dive-bomber throughout the World War II. A The Kit:
Fit of the major components is good, and most modeler’s should have no problems. As they are basically the same kit, those desiring a D-1, D-3 or D-7 (D-3 converted to night attack configuration) Stuka can simply add the wings from the B series Stuka to their D-5 kit for a simple conversion. Construction: Having just finished re-reading Hans Rudel’s book Stuka Pilot, I was now motivated to build the D-5 Stuka flown by Rudel as provided in the kit decals. As usual, we start The new engine cowling is represented by 3 pieces, which fit together well. Some dry fitting is necessary to get part N7 to fit properly, I recommend dry fitting the fuselage halves together after attaching the cockpit
The kit instructions would have you drill out the holes for the earlier B series outer wing bomb racks, but Hasegawa have added an addendum showing the proper hole to drill out for the D series bomb rack. Note that even the addendum does not quite show the proper holes to drill out either. On the starboard side the upper and lower holes are switched. A look at pre-sunk holes on the lower wing will make this apparent. Just make sure that you drill out the 2 diagonal holes on each side and things should work out fine! Don’t forget to drill out the four holes for the underwing radiators as well! Hasegawa provides dive brakes with this kit, and would have you drill them out as well at this time. However, only the first 125 or so D-5 Stuka’s were produced with dive brakes, and these were quickly removed in the field to save weight. The dive brakes were unnecessary as the Stuka was operating at low
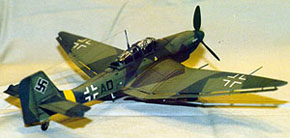
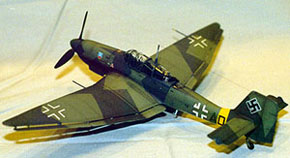
The fit of the wing to fuselage is good, with little cleanup required. On the B series kit, Be careful when removing the canopies from the sprue so you do not damage them. Hasegawa unfortunately has not adopted the practice of putting the sprue attachment points on the underside of the sill, as the sprue attachment points are on the lower framing. This does not pose a too difficult a problem though. Place a piece of masking tape over the ‘clear’ area of the canopy and sand off the remaining sprue attachment. This way sanding does not scratch the ‘clear’ area. Also note that the some of the raised lines The model was painted using Model Master II Enamels and a lot of masking for the RLM 70/71/65 splinter scheme! The end results make all that masking seem worthwhile. Decals are provided for 2 aircraft, a white-washed winter scheme on a D-5 from Stab/SG5 coded L1+CB, as well as Rudel’s splinter Overall, this kit was a pleasure to build with a few minor errors that were easy to correct. This kit is a required addition to any Luftwaffe modeler’s collection. I have two more to build myself and can’t wait until to get started on one of my favorites, the G series with those big 37mm canons under the wings!
References: Aero Detail #11, Ju87D/G Stuka Squadron Signal #73, Ju87 Stuka in Action Warplanes of the Third Reich by William Green The Official Monogram Painting Guide to German Aircraft 1935-1945 Model Art #356, Camouflage & markings of the Luftwaffe Aircraft, Vol 2
Other Books of Interest: |
 refinement of the earlier Ju87B series, the Ju87D series was designed to incorporate the new Jumo 211J engine. The ‘D’ series was also the first attempt to aerodynamically ‘clean-up’ the Stuka. Changes included a redesigned engine cowl, redesigned cockpit canopy and undercarriage spats as well as enlarged vertical tail surfaces. While the D1 through D4 shared the same wing as the earlier ‘B’ series, then D-5 was the first to incorporate a new extended wing to reduce the high wing loading caused by the increasing operational loads the Stuka was being required to carry.
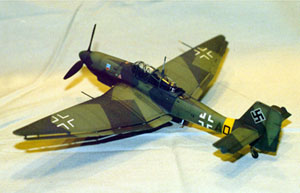
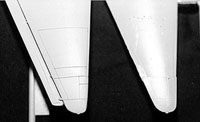 The outer wing sections will require some sanding and rescribing to achieve the correct shape as it appears that the mold extensions were not quite lined up resulting in a mis-alignment of the outer tip. Canopies are nicely done and clear as is typical with Hasegawa. The canopies are provided as separate sections to allow the builder to position them opened or closed. All control surfaces are molded in the neutral position.
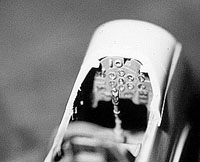 with the cockpit, and it is here that we find our first problem! Those who have read
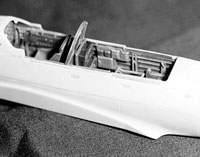 as it is slightly narrower than the rest of the cowl formed by parts N3 and N4. There is a nice opening for the supercharger air intake on the starboard (right) side. However, I recommend placing a piece of wire mesh, sheet styrene, black sandpaper or painted masking tape on the inside of the fuselage to prevent seeing straight into the empty engine compartment. You can leave out the air-induction cooler and oil cooler plug (part U8) until after the area around part N7 is pre-painted so it does not have to be masked.
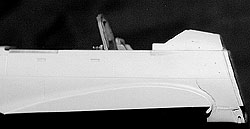 sidewalls and floor as mine seemed a bit too wide. After some sanding of the cockpit floor I was able to get the two fuselage halves to join together. I also found that parts N5 (upper forward fuselage) and N8 (lower forward fuselage) were too narrow for the fuselage. There are also a couple errors in this area of the kit as well. Hasegawa would have you use the join-line of part N8 and the fuselage as a panel line, but there is none there. Simply fill the joint (which you have to do anyway as it is slightly narrower than the fuselage), and then extend the curving vertical panel line around the wingroot to the lower edge of the fuselage. Hasegawa also have left the ‘flare’ underneath the cockpit canopy from the B series, however this should be sanded flush for the D series.
 Hasegawa have molded the flaps/ailerons in position. Unfortunately, molding limitations have led to the actuator rods being molded as large ‘fins’ on the underside of the wing. Purists will want to remove these ‘fins’ and replace them with scratchbuilt actuator rods. Fortunately, the finished Stuka is an impressive looking model, and this shortcoming is not readily noticeable.
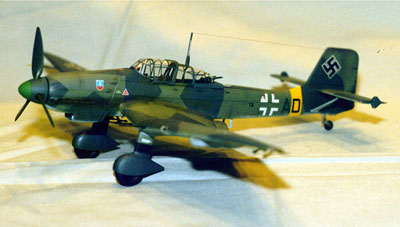
 altitudes by this point in the war. So unless your Stuka is going to be a model of a factory-fresh, just delivered initial production D-5 Stuka, leave the dive brakes off (this also makes it easier to apply the underwing National insignia). When attaching the bomb brace brackets (parts U5 and U6), be sure they are lined up properly or your bomb brace (part R1) will be crooked!
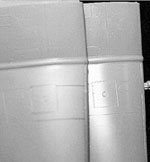 As mentioned previously, the mold extensions on the outer wingtips were not quite lined up, so some sanding and rescribing is necessary. Note that there appears to be an extra panel line on the lower wingtip that I cannot find in any of my references, so I filled it in. While on the wing, there is one more area that needs to be addressed. The instructions indicate that you will need to drill out a hole in the leading edge of the wing for the 20mm canons. However, I was unable to find a locator for these holes, so I drilled them in the leading edge centered under the teardrop shaped raised panel on each wing. This panel is a locator for the machine gun fairing on the short wing Stuka, but should not be present on the D-5, so after using it to locate the hole for the 20mm, sand it flush and continue the panel lines with your favorite scriber.
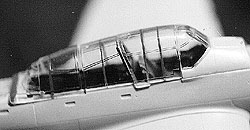 the tailplane struts were a bit short, but this has been corrected in the tailplane struts for the D-5. The cowling assembly also fits well to the fuselage/wing. Now this model is starting to look like a Stuka!
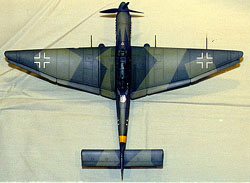 for the supporting framework are on the interior of the canopy. These frames should be masked and painted on the inside using RLM 66 Black-Grey. If you wish to have your cockpit canopy in the open position, don’t forget to cut open the slot in the rear top so that it can clear the antenna mast!
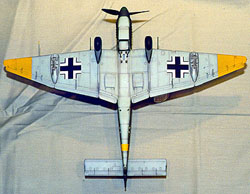 scheme D-5 coded T6+AD. The decals conform well, despite their apparent ‘thickness’ on the decal sheet. I recommend you do not use a decal setting solution on these decals. I tested a few of them prior to application on the model, and they tended to wrinkle up and stay that way when a setting solution was used! However, once the decals were applied directly off the backing sheet and had dried slightly, I was able to use a decal softening solution to get them to conform to the panel lines without any problems.