
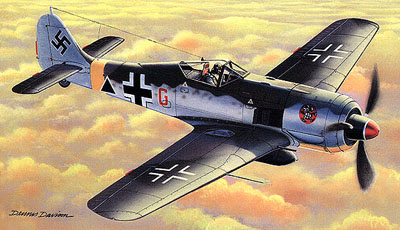
Building the Pro-Modeler 1/48 Focke Wulf-190
By Tony Goetz
 |
|
Introduction This kit is the DML kit, as you easily can see with the two side by side. There may be some minor retooling, but it's still the same kit. One change is that Pro-Modeler doesn't include the brass detail sheet, which included the turtledeck, seat belts, some armor plates in the cockpit, and the instrument panels. They have been replaced, though, with incredibly detailed plastic instrument panels, and other pieces that are probably better suited as injection molded. There are probably also some other changes, but this was the main one I saw. While looking over the pieces, I noticed that there weren't any clear parts. I guess that Fuselage assembly The first step in building this kit was assembling the cockpit interior. All pieces are The cowl is molded in five pieces (top, bottom, right/left fairings, and cowl ring), making for "interesting" assembly. Looking at the pieces, though, you can see why they did this. First, because of the limitations of injection molding, they could get detail on the sides of cowl, instead of a detailed top and bottom of the cowl, with clean sides. Also, it's not mentioned in the instructions, but most of sprue E appears to be parts for different versions of the FW-190, including other side bulges on the cowl that you can use to build the tropical version. An added bonus you can use if you know how it was used on the Focke Wulf. Another extra piece: there are two sets of fan blades for the engine. One set has 12 blades, the other 14. You may have to do research on the a/c you're building to find out which one to use. When assembling the cowl, the front ring doesn't seem to fit well-it seems much to big for the rest of the cowl. It may be a little too big, but I found that the real cowling ring had a thick armor plate around it, so it was larger. Unfortunately, I found this out after I had faired it in... The cowl doesn't fit too well to the fuselage, but there aren't many places that need to be smoothed out-only on the bottom at the wing root, and just above the exhausts. Don't attach the cowl until after you attach the wings like the instructions say; assembly would probably be difficult if you did. The forward fuselage cover (E1) doesn't fit very well to the fuselage, but this piece shouldn't. On the real airplane, this was one of the worst fitting components, and should just be glued on "as is". So don't worry about that misaligned hatch, it's correct. Wings The wheel wells are their own piece, and are really well detailed. There is a total of 8 pieces in the assembly, not including the landing gear and braces. I like that they made the cannons separate pieces, instead of trying to mold them into the main wheelwell piece (B1). When you glue it into the wing, only glue the back of B1 as the instructions show, which I found interesting. This Before you glue it all into the wing, remember to open up the necessary holes in the bottom of the wing (A3). If you build the Fw-190G-2, open the two holes for the bomb rack; if you build the G-3, open the same two, and the two on the outer wings for the drop tank mounts. A maximum number of 4 holes could be opened in the bottom of the wing, but there is actually a total of 45 molded into the wing. Some of these can be used to mount the included underwing cannons, which are also on sprue E, and are also not shown in the instructions. The other 41 can only be guessed at. Future versions, maybe? The wings fit together well, even over the wheel wells. The trailing edges are incredibly thin, and at the flaps are molded into the upper wing halves, about 1/16" undercut. This is good if you want to drop the flaps, since the flaps on the real airplane were inset from the trailing edge. The detail on the wings is great, and the ailerons don't have valleys between the ribs. In fact, you can barely see the ribs unless you hold the wing up to the light, which is another thing I like about the kit. I left the canon barrels (M7) off until final assembly, and it would be a good idea to do the same with the navigation lights (J4). Final Assembly If you added the brace inside the fuselage, the wings should fit well to the wing root. The only place that needed some filling and sanding at wing and fuselage seams was on the bottom of the fuselage at the end of the long wing panel. All body work on the fuselage and wings was done with Zap-A-Gap and 320, 500, and 1500 grit sand paper, except this area, on which I used MEK putty. The horizontal stabilizers take a little work to get them to fit perfectly, but nothing major; the hardest thing is aligning them, and that isn't too difficult. The bomb rack has nice detail, but unfortunately doesn't fit together very well at all, nor does it fit well to the fuselage. Since I built the G-2, I don't know how well the drop tank pylons fit, but they seem to go together nicely. Painting and Decals
The airplane is overall RLM 76 "Lichtblau", with 74 "Graugrun" and 75 "Grauviolett" upper surfaces. The mottling was done with 75 by attempting to airbrush individual mottling patches, then lightly spraying it over those to diffuse the spots. This paint job doesn't have to be exact to any standards- some mottling was dark areas like my I first painted the light blue over the whole airframe. This wasn't the final coat of it, though. Next I painted the RLM 74 over the general area it covered on the wings and fuselage, then the 75 after that had dried. To get the fuzzy lines on the wings, I traced the wing onto a 3x5" card, drew in the pattern, then cut it out. I glued a few pieces of 1/4" balsa wood to the underside of the stencil, then held is against the wing and sprayed RLM 75 normally. I repainted the 76 down the fuselage, and retouched the 74 and 75 where I airbrushed too far up the sides. When this had dried, I applied the mottling described above, and again sprayed the light blue to fade the stark paint job (Figure 5).
Conclusion
Pieces: 111; 106 gray, 5 clear in 6-7 bags Versions: FW-190G2 or G-3 Decal options: 4 Instructions: 15 pages, illustrated, 9 photographs |
 the sprue was just overlooked when manufactured. I decided to send them a note like they say on the first page of the instructions. I sent a letter on a Monday from Los Angeles to their offices in Morton Grove, Illinois (near Chicago). Exactly two weeks later I received a letter back from them telling me that the parts were out of stock, but that they'd send them to me when they became available. Now, though that didn't help the problem, I liked that they took the time to tell me they were out of stock, instead of just letting it pass until they had them; their customer service is great.
 well detailed, so there isn't much room for expansion, other than maybe adding seatbelts and some wires on the floor. I painted all components in the cockpit dark gray (RLM 66), but the instrument panels are intermediate gray (RLM 02); the instructions say to paint them 66, but other references say 02. Once I had glued the instrument panels together and installed them, I added the left and right consoles, then the seat (which is well molded and detailed!). The final steps in the cockpit were to add the control stick and the rudder pedals. The control stick seems to be too tall, but this can easily be fixed by taking some off the top of the stick with an X-Acto. The instructions aren't that clear on how to install the rudder pedals, but
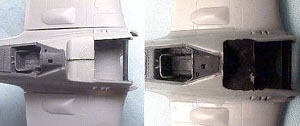 they can't be seen really well anyway. The completed cockpit really does look good! (Figure 1) Before assembling the fuselage, glue in the tail wheel. The tail wheel seems to be to long, they might have used drawings of a torpedo-carrying FW-190, which had the longer strut. This can be fixed by just cutting some of the base of the strut off, and gluing the tail wheel in higher. The cockpit doesn't seem to fit well inside the fuselage, but some scraping and sanding took care of that. However, when I test fit the fuselage to the wings, I saw that the gap between the wing and the wing
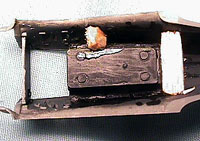 root was, to say the least, less than adequate (Figure 2-1). An easy fix: add a piece of scrap wood or plastic 3/4" long to the fuselage (Figure 3). This stretches the fuselage sides out far enough to fill in that horrible gap (Figure 2-2), and would probably have made fitting the cockpit easier, so do that first! I glued in the turtledeck (part N9) after I glued in the cockpit. You have to guess as to where this piece fits exactly, since there aren't any locating pins and, again, the instructions aren't very clear.
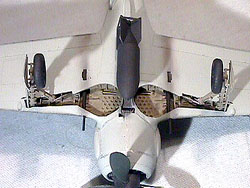 is probably so that you can adjust the weak forward part of the lower wing when you assemble the top and bottoms of the wings. Also, don't glue both sides of the wheel well at once; glue one side and let it dry, then do the other, as it acts as a spar, giving the wing the needed dihedral.
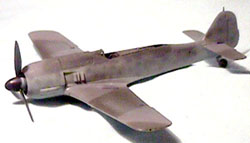 Almost all painting was done using Aeromaster "Warbird Colors". In addition to the standard black, white, aluminum, etc., you will need RLM 02, 66, 70, 71, 74, 75, and 76 (int. gray, dk. gray, black green, green, gray green, violet gray, and lt. blue). The instructions have some of the colors written wrong, but these are correct. The first thing I did after I bought these was add a few drops of Testors white scale tint, to bring the colors to scale.
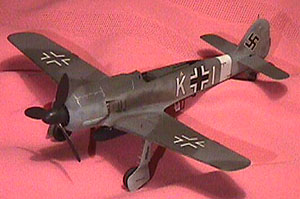 paint job, but some were hard spots against the fuselage. Don't worry about matching the box top or pictures for the mottling.
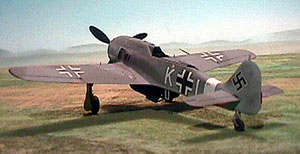
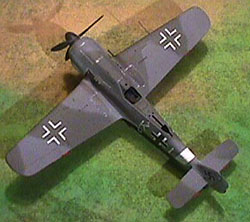 After letting the paint dry for a few hours, I glossed the areas for the decals using Future floor wax. Then I let this dry too. After letting this set for a while (about 2 hours), I applied the decals for aircraft 3. These decals applied easily with Microscale Micro Set, except for the white tail band. After about 5-10 minutes of debating which direction it actually went on, I finally had it sitting on the fuselage in the correct position, though there were some wrinkles at the top of the stripe. No problem: I finished the other decals, then before going to bed that night, slit the wrinkles and applied some Micro Sol. The next morning the decal was slightly better, but not completely. I also found that there was some silvering on one of the wing crosses, and I planned to touchup the decal with paint. First, though, I slit the decals along the panel lines and the wrinkles on the white band again and applied some more Micro Sol to help them pull down into the recesses. I set this aside for an hour or two, came back to it, and was surprised by the results. Not only did the Micro Sol pull the decals into the crevices, but it also pulled the fuselage band tight, and got rid of 90% of the silvering! I then applied another coat of Future, added any remaining parts, and gave it all a coat of flat coat.
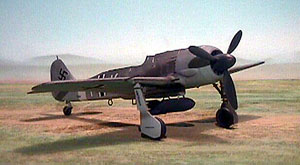 All detail is crisp and accurate. About the only thing I didn't like about the kit were the instructions. They were sometimes unclear about assembly, and I didn't like their color-coding for painting; They had various shades of gray for reference, and it was often difficult to tell between two different shades. The Pro-Modeler tradition of photographs in the instructions, though, proves useful if you are unsure about an area. I also liked that they give you a summary of what happened to each aircraft you can build. This is a great kit, and I would definitely recommend it to anyone.