
Tamiya's 1/48 Nakajima A6M2N Type 2 Floatplane Fighter ‘Rufe’
By John Lester
 |
The Airplane
Before the outbreak of the Pacific War, the Japanese military foresaw a need for fighter aircraft that could operate independently of established land. Considering Type 95 scout seaplanes were just as successful against the Chinese as were land-based aircraft, the Navy was convinced that floatplanes could hold their own against any existing foreign fighters. Due to their experience with seaplanes, Kawanishi Aircraft was ordered to start designing a purpose-built floatplane fighter (the 15-Shi, later known as the 'Kyofu' or 'REX to the Allies).
As the outbreak of war became more imminent, the Naval Aviation Headquarters proposed modifying Mitsubishi's outstanding A6M2 ‘ZERO’ to fill the role until the ‘REX’ could be delivered. Nakajima, another leader in floatplane development, was given the go-ahead to remake the ‘ZERO’ as the No. 1 Suisen (A6M2N). Under chief engineer Shinobu Mitsutake, three A6M2 Type O Model 11 fighters were converted by deleting the landing gear, adding a single main and two outrigger floats, adding a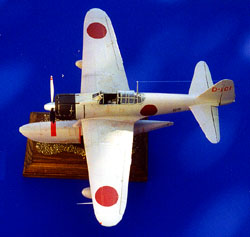 dorsal fin and enlarging the rudder, and sealing the main wings and fuselage to prevent corrosion. Testing at Yokohama and Oppama was successful, and mass production of the ‘Type 2 Float Plane Fighter’ began in July 1942.
Though performance was degraded compared to a ‘regular’ ‘ZERO’ (top speed dropped by almost 100kph and unrefueled range dropped over 400 km) the ‘RUFE’ was still a formidable opponent to the fighters then available to the Allies. Most of the 327 produced saw extensive combat service throughout the remainder of the war, particularly in the Solomons and Aleutians campaigns.
The Kit
The kit is everything you expect from Tamiya. There are two sprue trees of light grey plastic sporting some 48 parts, plus a clear tree with parts for a closed *and* open canopy, molded in beautifully clear, thin styrene. Decals for eight versions (four each grey and green/grey camouflage) are provided, along with an excellent instruction sheet. All parts were crisply molded with almost zero flash; and all sport delicate engraved panel lines that match up almost perfectly across seams. If you're looking for a pleasant respite from filing/sanding/scribing for hours on end, this is the kit for you.
I had a few small problems here and there, but all were easily overcome. There was a slight gap - just about .015 inch - between the left upper wing and the fuselage, just wide enough that I needed to insert a piece of sheet styrene between the two parts. After sanding it down to match the airfoil contour I found I didn't even need putty. There was also a small 'step' between the rear bottom wing and the fuselage; careful sanding and a small amount of putty fixed that. I built up the cowl and engine assembly separate, and did not install it until after the bulk of painting and weathering was complete. The instructions have you add modeling clay or similar weight to the front of the float before assembling it; I didn't put enough in and ended up super-gluing steel bb's to the back side of the engine in order to keep the model from sitting on it's tail.
There are aftermarket sets available for the A6M2, which can (pretty much) be safely used with this kit. Kendall makes resin cockpit and control surface sets, and photoetch cowl flaps; Eduard makes a photo-etch sheet for detailing the cockpit, including film negative backing for instrument dials; and Engines and Things makes (or made) a resin engine. I used none of these, contenting myself with adding True Details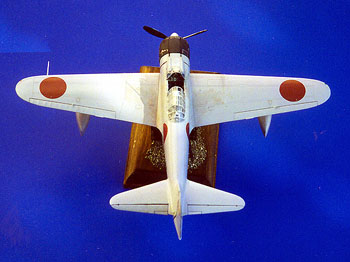 Japanese seatbelts and rudder pedals (brass). I also slipped pieces of tubing cut from hypodermic needles behind the openings for the wing guns to represent the 20mm cannons. The only other alterations I made to the basic kit were to drop the elevators and reposition the rudder. I had planned to drop the flaps as well - but the building frenzy was upon me and I had neither an aftermarket set nor trust in my scratchbuilding abilities, so the flaps stayed up. I drilled out the opening for the oil cooler (I assume) in the front main float strut and backed it with a screen made from a gauze bandage (who needs photoetch?) . Finally, I replaced the opaque 'glass' on the gunsight with a piece cut from the stiff clear plastic cover of a Dannon yogurt cup.
Painting the Model
The Tamiya instructions are vague about the interior color, suggesting a ‘transparent paint of bluish green. What I could find indicated that aotake (‘transparent bluish-green’, which is a blue tinted clear lacquer over bare metal) was probably correct for a Nakajima-built machine, so that's what the interior was sprayed, using Testors Model Master ‘Japanese Interior Blue’. I followed the rest of the Tamiya instructions, painting the instrumental panel 'aotake' before applying the instrument panel. The seat was painted aluminum, with medium green seat belts *three, not the usual four, since Zeros had only one shoulder belt), and the various bits of equipment FS 37031 Aircraft Interior Black. Highlights were dry-brushed and recesses washed, in the usual manner. As always happens, no sooner was the cockpit installed when I learned the sidewalls may have been 'aotake', but the instrument panel should probably have been a dark grey/black, and the seat not left as 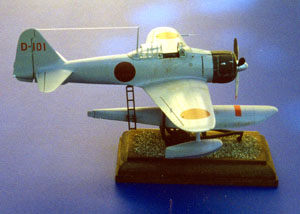 bare metal. In fact, the entire interior might well have been more accurate in a pale grey/green similar to RAF Interior green. Ah, well. Live and learn.
The three clear pieces making up the open canopy were dipped in a bath of Future acrylic floor polish. This was allowed to dry for two days, after which the framing was painted. First came a coat of Gunship Grey (FS 36118) to match the anti-glare fuselage color inside the glass, then the exterior coat of IJN Sky Grey. Select areas where wear might be expected were then dry-brushed with Testors Aluminum. All three pieces were set aside until the end of painting.
I wanted this aircraft to represent one that fought in the Aleutians, mainly because of the weathering challenges that brought. I gave the entire model a thin coat of a flat light grey as a primer. After fixing the scratches and other flaws this exposed, I sprayed areas likely to get the most wear (the cowl, sides and bottom of the floats, all leading edges, the fuselage around the cockpit, and wing areas between the guns and the fuselage with Testors' Metallic Silver (you'll see why in a minute). The cowl, exterior and interior, was then sprayed aircraft Interior Black. It's a dirty dark, dark grey that looks like flat black that's been out in the sun too long, which I find more realistic for black things that are supposed to look weathered (looks good on tires too). The rest of the aircraft got several good coats of Testors IJN Sky Grey. After this had dried, the area that would be under the canopy was painted Gunship Grey.
Weathering the Model
I wanted the airplane to look rather forlorn - rode hard and put away wet. Constant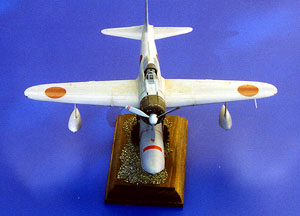 exposure to salt water and sea air corrodes everything, but these aircraft were made of an aluminum alloy (mostly) so there wouldn't be large amounts of visible surface rust. These planes still wore the overall grey applied at the factory, so it is unlikely they would show as many chips or as much peeling paint as aircraft that were overpainted green in the field later in the war. It's a pretty safe bet that ‘RUFE’s received the same red-brown primer as other IJN aircraft, and it's likely that more of this would have been apparent, especially against the grey top color, than dull silver of the bare metal.
The areas most likely to look 'purplish' were those with the most exposure to salt water, so that's where I started. I sprayed a 1:1 mix of Testors Napoleonic Violet and IJN Sky Grey in patches along all leading edges, the floats, and parts of the wings and fuselage where spray would have been kicked up the most. Sounds like a lot of violet - but it dried more grey than 'lilac' and actually looks quite subtle when viewed from more than 2’ away. I noticed at this point that the patches of lilac, which do not cover more than 1/5 of the aircraft's total surface, still fool the eye into seeing the whole airplane as that color - especially on a cloudy day.
How 'bout that.
After that had dried, I coated the areas where decals would go, as well as other small patches at random, with Future sprayed from my airbrush. Here again I was going for a patchy look, so even sections that were not lilac could still show the effects of the harsh climate. Markings and warning stripes came from the kit decals; ‘hinomarus’ came from Aeromaster's sheet of 'faded' national insignia (the kit decals were too bright). All the decals responded superbly to MicroSet/MicroSol. I had no problems with silvering or poor adhesion. I let everything 'cure' for two more days before gently wiping down the model with dish-soapy water (to remove any skin oils, excess solvent, etc. - especially important on light colored models to prevent discoloration and stains on down the road). Finally, I coated the entire airplane with Clear Semi-Gloss to protect the decals.
After the clear coat was dry I got down to the heavy weathering. I pressed drafting tape onto the areas where silver paint lurked beneath the color coats. When the tape was pulled off it brought small bits of the top color, r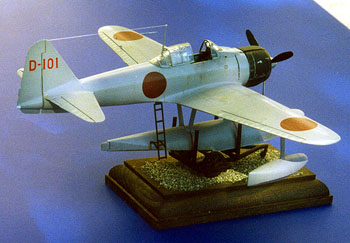 evealing the silver beneath. Quite convincing, especially on the cowl. I then used the tip of a toothpick to lightly scrape the edges of access panels, fuel doors, fasteners, etc., to get the same effect. Next, I dry brushed a red-brown mix similar to Testors Rust in the same areas where the paint was chipped, to represent the primer. I varied this color slightly by lightening and darkening it to show exposed primer at different stages of fading. Finally, I ground an old brush with just the barest hint of 'primer' color into the upper wing, between the access panels for the cannon and the cockpit. By swirling this around at random I was able to give the effect of paint wearing down to the primer through constant traffic (much like you see on a steel deck at the bottom of a ladder aboard ship). I also did this effect on the floats, along the line that would have been the waterline when the aircraft was in its element. I applied a thinned wash of sooty black to the areas behind the wing cannons, ejection ports and nose guns - sparingly, because I think this effect is often overdone. They didn't use black powder, for heaven's sake. Likewise, the areas behind the engine exhausts got a light staining - darker than the guns, but still not heavy. The areas where the ladder and trolley made contact with the airplane's skin were stained with a wash of rust, on top of chips and scratches. The airplane may have been aluminum, but it's a good bet that the trolley and ladder were not, and would have rusted badly in that environment.
Finally, I sprayed Testors Dull Cote in random splotches everywhere I expected sea spray to have hit the real aircraft. Real salt spray leaves a dull, crusty residue - and since I doubt Aleutian airplanes got thorough fresh water washdowns, I wanted to show that effect. Again, I didn't go too heavy here - the constant rain would have washed some of it off, and in any event, the entire aircraft would not have been encrusted in salt.
Displaying the Model
Normally, I impale my airplane models on a clear acrylic rod in an 'in-flight' pose, and attach them to a small wooden base. Something about the trolley Tamiya includes with the kit appealed to me, so I decided to beach this bird. The instructions are vague about painting this, suggesting black for it and the ladder. I sprayed both a base coat of Flat Black, then went over that with a ragged coat of Aircraft Interior Black. If these things weathered anywhere near as bad as the implements we used on the farm, I figured they'd be more rust than paint in the Aleutians. All the restraint I used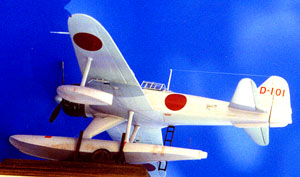 weathering the airplane was tossed out the window with the trolley. It received a heavy dry brushing of rust, followed by several thin washes of Testors Burnt Iron Metalizer. Tires were painted Euro I Grey.
The trolley was affixed to a small wooden base that started out life as a 50 cent craft-store plaque. I sanded this, then stained it a dark walnut color (to better contrast the light color of the airplane). When this was dry, I coated the top with spray adhesive shot through a pattern cut into a sheet of pattern. Fresh cat litter (the fine-grained clumping stuff) was spread over this to simulate the gravel found on the beaches of Attu and Kiska islands. The excess was wiped off and the whole thing given a coat of clear acrylic sealer. When this dried the trolley was superglued to it, and the airplane super-glued to the trolley.
To wrap up the project, I attached the cowl, canopy and all the 'fiddly bits' I'd left off to avoid breaking (pitot tube, radio mast, aileron mass balances, etc.). A length of fine copper wire was superglued in place between the radio mast and the tail and I was done.
All in all, it was a fun project despite a lot of work . Though the finished product isn't perfect, I'm pretty happy with it, and it looks good up on the shelf with the rest of my 1:48 naval air force.
Many thanks to Dave Pluth and the rest of the folks over at the WW2 Japanese Aircraft Modeling Home Page (www.j-aircraft.com) for all their kind assistance.