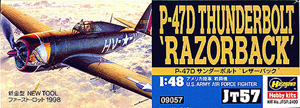
Hasegawa 1/48 P-47D
By Tom Cleaver

 The new P-47D "Razorback" continues
this high standard. Beyond the obvious fuselage difference, catered
to with a new sprue tree, the kit provides the early (narrow) Curtiss
electric propeller blades, with far more accurate outlines than their only
competitor, Monogram, and a very nice clear two-piece canopy. Cockpit interior
detail is better than most Hasegawa offerings, the primary difference between
this kit and the bubble-tops being the shape and layout of the instrument
panel. I am sure True Details will put out a resin cockpit for this model,
but it really didn't seem that necessary to me in constructing my review
kit.
The new P-47D "Razorback" continues
this high standard. Beyond the obvious fuselage difference, catered
to with a new sprue tree, the kit provides the early (narrow) Curtiss
electric propeller blades, with far more accurate outlines than their only
competitor, Monogram, and a very nice clear two-piece canopy. Cockpit interior
detail is better than most Hasegawa offerings, the primary difference between
this kit and the bubble-tops being the shape and layout of the instrument
panel. I am sure True Details will put out a resin cockpit for this model,
but it really didn't seem that necessary to me in constructing my review
kit. To me, one of the finest Second World
War sites on the internet is Dad
Rarey's Sketchbook,
compiled by his son, computer animation pioneer Damon Rarey. George
Rarey, known to everyone as Rarey (his wife thought that was his first
name the first several dates they had) was a successful commercial
artist in New York City before the war. In 1942, at age 25, he volunteered
for the Air Corps and became a fighter pilot, flying P-47 Thunderbolts
with the 358th Fighter Group of the Ninth Air Force. Being that he was
3-4 years older than his fellow pilots, his nickname was "Dad." Rarey
became the group artist, and was responsible for almost all the nose
art on the aircraft. The group was engaged in ground support missions
leading up to and through the Normandy invasion. On June 25, 1944,
Captain George Rarey, leading a flight of 4 P-47s hunting German transport
in Northwest France, attacked a truck convoy and was killed by a direct
flak hit on his fighter. It is reported that the death of Captain Rarey
threw the group into a deep funk, as he was considered "the best
of us." I have enjoyed visiting this site since almost the day
when I first got onto the internet, and I recommend it to you highly
if you haven't discovered it before.
To me, one of the finest Second World
War sites on the internet is Dad
Rarey's Sketchbook,
compiled by his son, computer animation pioneer Damon Rarey. George
Rarey, known to everyone as Rarey (his wife thought that was his first
name the first several dates they had) was a successful commercial
artist in New York City before the war. In 1942, at age 25, he volunteered
for the Air Corps and became a fighter pilot, flying P-47 Thunderbolts
with the 358th Fighter Group of the Ninth Air Force. Being that he was
3-4 years older than his fellow pilots, his nickname was "Dad." Rarey
became the group artist, and was responsible for almost all the nose
art on the aircraft. The group was engaged in ground support missions
leading up to and through the Normandy invasion. On June 25, 1944,
Captain George Rarey, leading a flight of 4 P-47s hunting German transport
in Northwest France, attacked a truck convoy and was killed by a direct
flak hit on his fighter. It is reported that the death of Captain Rarey
threw the group into a deep funk, as he was considered "the best
of us." I have enjoyed visiting this site since almost the day
when I first got onto the internet, and I recommend it to you highly
if you haven't discovered it before. I painted the cockpit interior pieces
before assembly. New research indicates that Thunderbolt cockpits were
not painted Zinc Chromate or Interior Green, but rather "Bronze Green," a
dark medium green. The paint meisters have declared that Euro-1 Green
is an acceptable color for this, so I used Gunze-Sanyo's Euro Green,
painting the throttle quadrants and other items with Tamiya semi-gloss
black, then picking out detail with dry brushed Testor's Model Master "Aluminum
Non-buffing" Metallizer paint. I used that on the cockpit walls
and floor and seat to show weathering from use and to bring out detail.
I also used the kit-supplied instrument panel decal; there are those
who think an instrument panel that isn't hand-painted is the work of
the devil, but I do not subscribe to that view. I painted the wheel
well interiors and the interior of the wheel well doors Yellow Zinc
Chromate, while the main gear legs were painted Olive Drab 43.
I painted the cockpit interior pieces
before assembly. New research indicates that Thunderbolt cockpits were
not painted Zinc Chromate or Interior Green, but rather "Bronze Green," a
dark medium green. The paint meisters have declared that Euro-1 Green
is an acceptable color for this, so I used Gunze-Sanyo's Euro Green,
painting the throttle quadrants and other items with Tamiya semi-gloss
black, then picking out detail with dry brushed Testor's Model Master "Aluminum
Non-buffing" Metallizer paint. I used that on the cockpit walls
and floor and seat to show weathering from use and to bring out detail.
I also used the kit-supplied instrument panel decal; there are those
who think an instrument panel that isn't hand-painted is the work of
the devil, but I do not subscribe to that view. I painted the wheel
well interiors and the interior of the wheel well doors Yellow Zinc
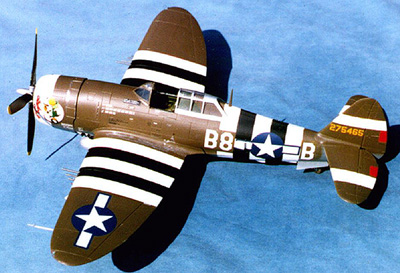
Chromate, while the main gear legs were painted Olive Drab 43. With all the interior areas masked
off with tissue paper stuffing, I then began the ID stripes. The Thunderbolt
had 18" white
stripes on the horizontal stabilizer outboard of the trim tabs, and
a 12" white stripe on the rudder and vertical stabilizer, just
above the trim tab. The forward 24" of the engine cowling is white.
D-Day Stripes for single-engine aircraft consisted of three white and
two black stripes on wings and fuselage, each 18" wide. I shot
white, masked it with drafting tape (no chance of pulling it up later),
shot the black stripes and masked all of that. I also shot the trim
tabs insignia red and masked them off.
With all the interior areas masked
off with tissue paper stuffing, I then began the ID stripes. The Thunderbolt
had 18" white
stripes on the horizontal stabilizer outboard of the trim tabs, and
a 12" white stripe on the rudder and vertical stabilizer, just
above the trim tab. The forward 24" of the engine cowling is white.
D-Day Stripes for single-engine aircraft consisted of three white and
two black stripes on wings and fuselage, each 18" wide. I shot
white, masked it with drafting tape (no chance of pulling it up later),
shot the black stripes and masked all of that. I also shot the trim
tabs insignia red and masked them off. The sheet I used was Aeromaster,
need I say more? Everything went down easily with Micro-Sol and was
allowed to dry overnight. I used the stencil decals from the kit sheet,
remembering not to put any on the invasion stripes, which were painted
over such things. The next morning I washed the model to remove any
decal solvent stains, allowed it to air-dry, then shot another coat
of Future. I then shot the model with a dullcote made of 2 parts Tamiya
Flat Base to 3 parts Future, applying it in three thin coats that left
a bit of "sheen" to
the surface, which duplicates what would be seen on an airplane that
had been waxed by the groundcrew, a common practice among USAAF fighters
in the ETO while the 9th A.F. squadrons were still based in England.
The sheet I used was Aeromaster,
need I say more? Everything went down easily with Micro-Sol and was
allowed to dry overnight. I used the stencil decals from the kit sheet,
remembering not to put any on the invasion stripes, which were painted
over such things. The next morning I washed the model to remove any
decal solvent stains, allowed it to air-dry, then shot another coat
of Future. I then shot the model with a dullcote made of 2 parts Tamiya
Flat Base to 3 parts Future, applying it in three thin coats that left
a bit of "sheen" to
the surface, which duplicates what would be seen on an airplane that
had been waxed by the groundcrew, a common practice among USAAF fighters
in the ETO while the 9th A.F. squadrons were still based in England.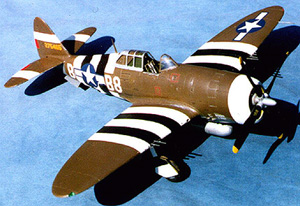 I
painted the canopy with Metalizer aluminum, as this had been replaced
on Rarey's aircraft. Tires were painted a combination of Flat Black with
a bit of dark grey and brown, and then when dry a lighter color was dry
brushed over to bring out tire detail and simulate dirt. I used a Tamiya
108-gallon paper tank from their P-51B kit instead of the kit-supplied
drop tank. I also used the Hamilton Standard paddleblade propeller,
since these had replaced the Curtiss Electric props on ETO P-47s in the
Spring of 1944. I airbrushed a thin wash of the "tire color" to
simulate oil staining aft of the engine cowling on the forward fuselage,
and exhaust staining underneath and also shot "gunfire stains" aft
of the gun barrels on the wings. I used clear nylon emergency repair
thread - widely available at your local grocery store - for the antenna
wire. The clear light lenses were attached and the airplane was complete.
I
painted the canopy with Metalizer aluminum, as this had been replaced
on Rarey's aircraft. Tires were painted a combination of Flat Black with
a bit of dark grey and brown, and then when dry a lighter color was dry
brushed over to bring out tire detail and simulate dirt. I used a Tamiya
108-gallon paper tank from their P-51B kit instead of the kit-supplied
drop tank. I also used the Hamilton Standard paddleblade propeller,
since these had replaced the Curtiss Electric props on ETO P-47s in the
Spring of 1944. I airbrushed a thin wash of the "tire color" to
simulate oil staining aft of the engine cowling on the forward fuselage,
and exhaust staining underneath and also shot "gunfire stains" aft
of the gun barrels on the wings. I used clear nylon emergency repair
thread - widely available at your local grocery store - for the antenna
wire. The clear light lenses were attached and the airplane was complete.