


 A Cold Henschel
over Rumania:
Building Hasegawa's 1/48 Henschel Hs129
By Will Riepl
History
The Hs 129 started its career in Rumanian service with a strike flown
in the early hours of August 15, 1943. Bombs were dropped on the town
of Kotovka, causing some damage. The Russians were quick to retaliate,
attacking the Hs 129 field at Kramatorskaya with Il-2s, destroying one
Henschel and damaging two others. With these opening moves, the life of
the Henschel Hs 129 in Rumanian service quickly fell into a standard pattern
for close support aircraft. Anti-aircraft defenses were the 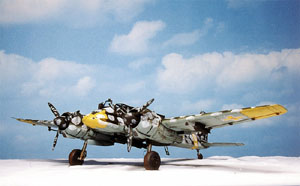 worst
enemy of the Hs 129, and the first Rumanian loss was from AA fire on August
19, 1943. A tribute to the durability of the airframe, though, this Henschel,
although severely crippled and the pilot wounded, managed to make it back
to the airfield, but crashed upon landing, killing the pilot, Petre Sârbu.
worst
enemy of the Hs 129, and the first Rumanian loss was from AA fire on August
19, 1943. A tribute to the durability of the airframe, though, this Henschel,
although severely crippled and the pilot wounded, managed to make it back
to the airfield, but crashed upon landing, killing the pilot, Petre Sârbu.
The fighting on the Russian front was intense and the Hs 129 was called
upon frequently to aid troops on the ground. The squadron was in very
close proximity to the front, only ten minutes flying time away. This
allowed the Hs 129 pilots plenty of time on target, as well as being able
to run many missions in a day. This wasn't necessarily a good thing, though,
as the higher sortie count also meant that much  more
time under the guns of the AA defenses, and the loss rate was quite high.
The Hs 129 pilots looked out for one another, though. Often times when
one of their planes would go down behind enemy lines or at the front,
another one would land and stuff the surviving pilot into the cockpit
or radio compartment and fly him out.
more
time under the guns of the AA defenses, and the loss rate was quite high.
The Hs 129 pilots looked out for one another, though. Often times when
one of their planes would go down behind enemy lines or at the front,
another one would land and stuff the surviving pilot into the cockpit
or radio compartment and fly him out.
The Soviet advances in 1944 pushed Rumanians back and a fighting retreat took place. Then, on August 23, 1944 a Royal Proclamation was made stating that Rumania would no longer fight in the war. This took everyone by surprise, and the Germans quickly stepped in and started confiscating all the planes given to Rumania. The Rumanian Air Force managed to hold onto some Hs 129s, though, and they took up the fight against Germany, flying through the end of the Second World War.
 The
Kit
The
Kit

When Hasegawa announced that they were going to do a 1/48 Henschel Hs 129, I was surprised and a little sad, as I have a stack of ESCI kits in the closet waiting to be built. Now that I've seen the Hasegawa kit, I'm going to have to shove those ESCI kits into the far corners of the kit closet. This new kit is simply superb. Looking inside, you see typical Hasegawa quality, with finely recessed panel lines, beautiful clear parts, and, once removed from the sprues, a quick-building kit.
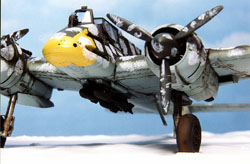
Of course, with this plane the most difficult decision is what markings
to put it in. There are so many interesting choices out there, from the
ones with the big belly gun 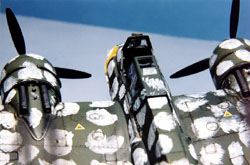 to
upward-firing mortars. After flipping through some books, though, I decided
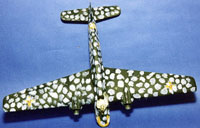
on a Rumanian one, as it had an interesting temporary white camouflage
that would be a bit of a challenge to do. With that spotted camouflage
and the cannon under the belly, I thought that it would make for one tough-looking
Henschel.
to
upward-firing mortars. After flipping through some books, though, I decided
on a Rumanian one, as it had an interesting temporary white camouflage
that would be a bit of a challenge to do. With that spotted camouflage
and the cannon under the belly, I thought that it would make for one tough-looking
Henschel.

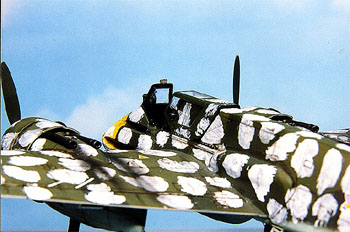
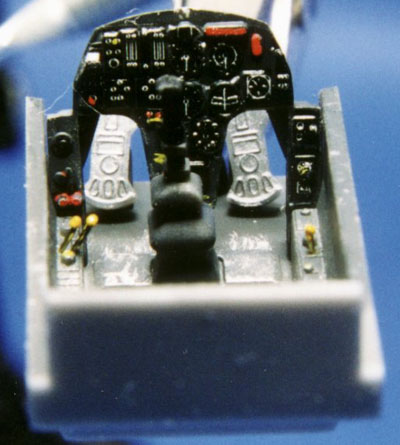
The first step was to do the cockpit. Hasegawa did something a little
interesting here. You've got three ways to do the instrument panel. You
can paint it all, drybrushing the instruments like you would with a Monogram
instrument panel, or you can use the decal. The way I did it, though,
was to paint the panel RLM 66 and then cut out the decal so that just
the instruments were used. Add a bit of red and yellow and five minutes
later you have one great-looking instrument panel. Once that was done
the rest of the  cockpit
was pretty simple. There's not much in there, as it was a pretty cramped
cockpit (the engine instruments were on the engines, in fact). I added
seat belts from paper and buttoned up the fuselage.
cockpit
was pretty simple. There's not much in there, as it was a pretty cramped
cockpit (the engine instruments were on the engines, in fact). I added
seat belts from paper and buttoned up the fuselage.
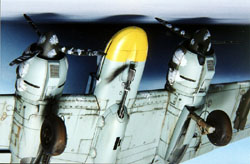
From there I turned to the wings. This kit has some definite left and
right side components, so be sure to use things in the proper places.
The engines got a basic paint/wash/drybrush treatment, as they aren't
too visible once the spinner and prop is on. Speaking of the props, the
Hs 129 had counter-rotating propellers, so be sure to keep those well
marked. I marked them with an "R" and an "L" to keep them straight. The
aileron supports took some care as well, and I did one wing at a time,
cutting the parts off one at a time so I wouldn't mix up some of the supports.
I left the engine instruments off until last, waiting until the plane was painted before putting them on. The same treatment
for the instrument panel applies here, and when they're done they really
look neat. I added a piece of plastic card stock to cover up the intake
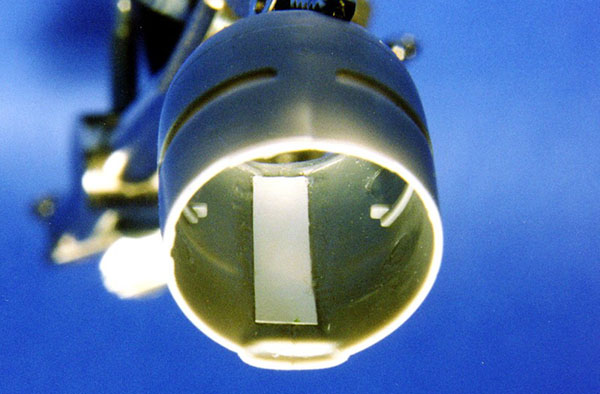
hole in the nacelle. Next up was the great belly cannon. About the only
thing that I did to the kit was drill out the barrel. Other than that,
the thing really looks good, especially compared to the ESCI kit. Once
that was on, it was time to paint.
until the plane was painted before putting them on. The same treatment
for the instrument panel applies here, and when they're done they really
look neat. I added a piece of plastic card stock to cover up the intake
hole in the nacelle. Next up was the great belly cannon. About the only
thing that I did to the kit was drill out the barrel. Other than that,
the thing really looks good, especially compared to the ESCI kit. Once
that was on, it was time to paint.
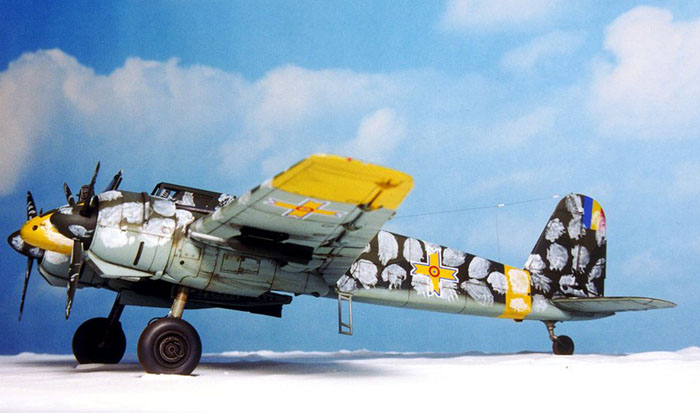
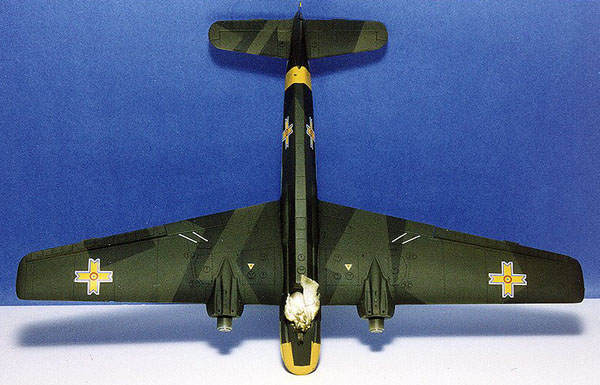
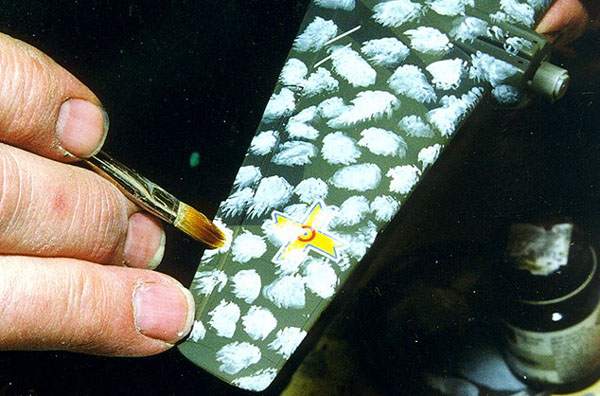
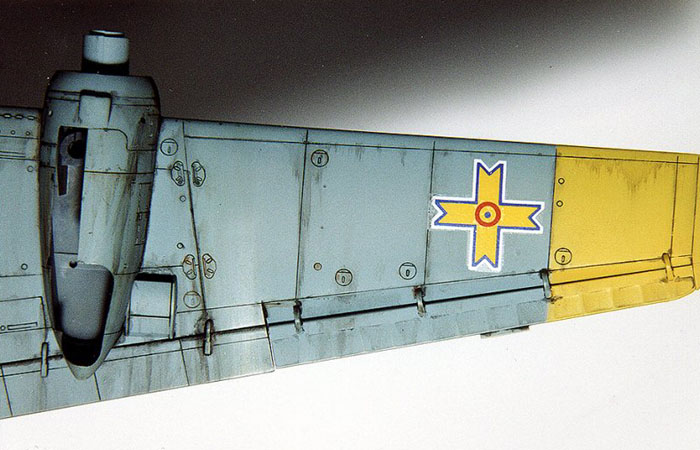
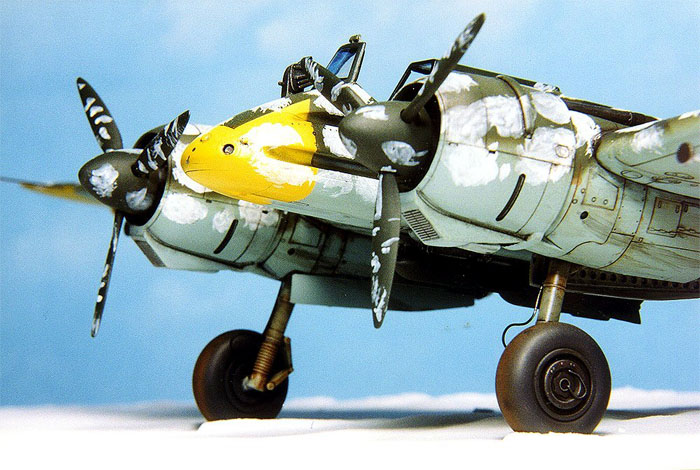
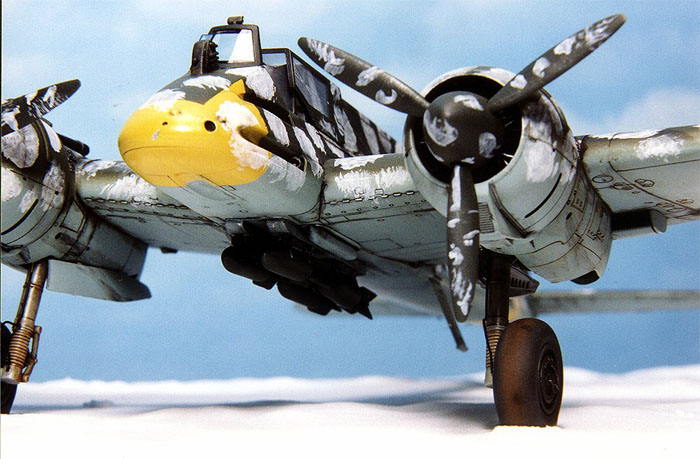
The Camouflage
 The
painting was the trickiest part of the whole thing. I started by painting
it up in the basic Luftwaffe splinter scheme of 70/71/65. I used Polly
Scale paints, as I really like their RLM71 color. I painted on the yellow
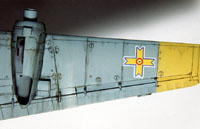
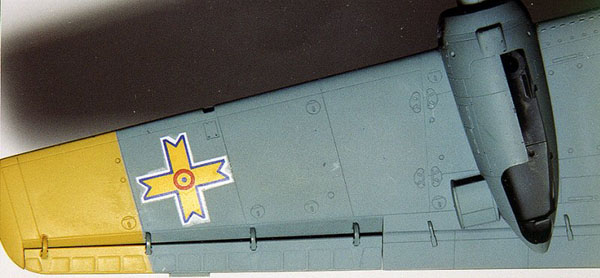
nose and wingtips, then started with the decals. I used the kit decals
for the fuselage band and other data markings, while the Rumanian markings
came from an Aeromaster sheet for foreign Bf109s. Once I had all the decals
on I sprayed it with a flat coat and got out the white paint.
The
painting was the trickiest part of the whole thing. I started by painting
it up in the basic Luftwaffe splinter scheme of 70/71/65. I used Polly
Scale paints, as I really like their RLM71 color. I painted on the yellow
nose and wingtips, then started with the decals. I used the kit decals
for the fuselage band and other data markings, while the Rumanian markings
came from an Aeromaster sheet for foreign Bf109s. Once I had all the decals
on I sprayed it with a flat coat and got out the white paint.
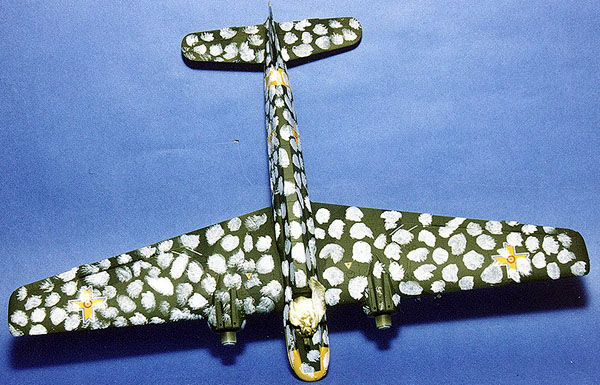
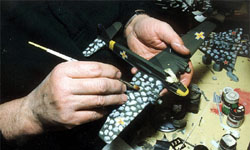 I
used a round brush that I borrowed from my wife's tole painting stash
and the white paint also came from her room, being Ceramcoat acrylic.
It took some practice, and plenty of Kokanee beer. Before I tried it on
the Henschel I grabbed one of my test planes and experimented. I highly
recommend practicing this method before trying it on the final model.
I thinned the white paint down so that it would go down somewhat translucent,
then I practiced twisting the brush. By doing a half turn right or left
or
I
used a round brush that I borrowed from my wife's tole painting stash
and the white paint also came from her room, being Ceramcoat acrylic.
It took some practice, and plenty of Kokanee beer. Before I tried it on
the Henschel I grabbed one of my test planes and experimented. I highly
recommend practicing this method before trying it on the final model.
I thinned the white paint down so that it would go down somewhat translucent,
then I practiced twisting the brush. By doing a half turn right or left
or  doing
a complete circle, I found that I could get different-looking spots that
closely matched the pictures I had. The paint went on thin and was very
pale in some spots, so I went over some again to bring out the white more.
This added to the pattern and when finished, my MiG-21 test plane really
looked odd. But the technique looked like it would work, so I started
on the Henschel. Working from one side to the other, I went at it, going
slow and steady, and little by little it got done. When it was all finished
I was amazed at how smooth the finish was. By keeping the paint thin,
I
doing
a complete circle, I found that I could get different-looking spots that
closely matched the pictures I had. The paint went on thin and was very
pale in some spots, so I went over some again to bring out the white more.
This added to the pattern and when finished, my MiG-21 test plane really
looked odd. But the technique looked like it would work, so I started
on the Henschel. Working from one side to the other, I went at it, going
slow and steady, and little by little it got done. When it was all finished
I was amazed at how smooth the finish was. By keeping the paint thin,
I 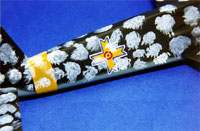 avoided
any build-up of paint. Also, the big key was to use a very nice sable
brush that was incredibly soft. If I tried this with anything less there
undoubtedly would have been some buildup.
avoided
any build-up of paint. Also, the big key was to use a very nice sable
brush that was incredibly soft. If I tried this with anything less there
undoubtedly would have been some buildup.
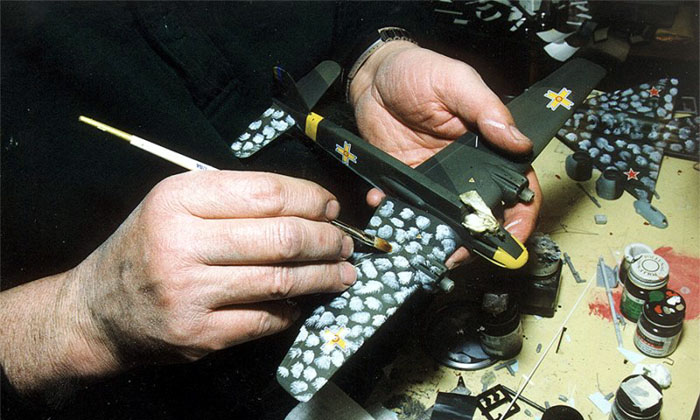

Once I was satisfied with the white spots, I sprayed another coat of
flat (I used Polly Scale flat, which gives a super smooth finish) and
started weathering. I used artist's oils for the weathering, with black,
burnt umber, and red paints. I took a very fine 000 brush and thinned
the paints with mineral spirits. I took the brush, loaded it with the
thinned 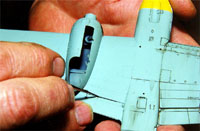 paint,
and touched a recessed panel line. The paint flows along the panel line.
After that is in there, I took a damp towel and ran it over the spot in
the direction of the airflow. This makes the dirty streaks and helps lighten
the stark contrast of the dark oil paint. I used the red paint around
the fuel points and landing gear, and a mix of black and burnt umber elsewhere,
working from one side to the other until I got to a point where everything
looked just dirty enough.
paint,
and touched a recessed panel line. The paint flows along the panel line.
After that is in there, I took a damp towel and ran it over the spot in
the direction of the airflow. This makes the dirty streaks and helps lighten
the stark contrast of the dark oil paint. I used the red paint around
the fuel points and landing gear, and a mix of black and burnt umber elsewhere,
working from one side to the other until I got to a point where everything
looked just dirty enough.


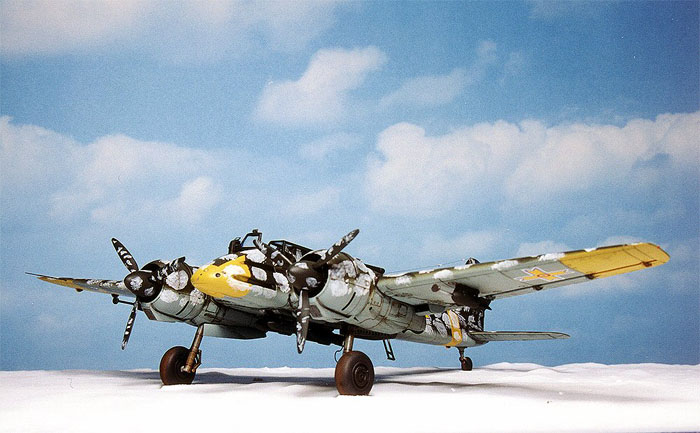
 Coming
down the home stretch now, I added the landing gear. The brake lines are
very prominent on this plane, so I added those from wire. I also added
Bare Metal Foil mirrors to the cockpit and affixed the propellers. While
the belly cannon looked neat, it needed something more, so I added bombs
to the outboard wing. I used the bombs out of the Monogram Ju 87 kit,
adding the plungers from plastic rod and a disc cut with a leather hole
punch and some plastic card. On goes the canopy, and it's finished.
Coming
down the home stretch now, I added the landing gear. The brake lines are
very prominent on this plane, so I added those from wire. I also added
Bare Metal Foil mirrors to the cockpit and affixed the propellers. While
the belly cannon looked neat, it needed something more, so I added bombs
to the outboard wing. I used the bombs out of the Monogram Ju 87 kit,
adding the plungers from plastic rod and a disc cut with a leather hole
punch and some plastic card. On goes the canopy, and it's finished.
 But
it wasn't finished. I was so excited to build a Henschel Hs 129 with the
cannon, and I really liked the Rumanian paint scheme, but in my enthusiasm
I failed to READ the references. After reading about the Rumanian Henschels,
I discovered that they were unfamiliar with both the operation of the
cannon and the ammunition, so they flew without the belly cannon. But
it looks so good on there! Oh, well, got to keep it accurate. So I ripped
the cannon off, sanded the belly smooth, and went for option number two:
the belly bomb rack.
But
it wasn't finished. I was so excited to build a Henschel Hs 129 with the
cannon, and I really liked the Rumanian paint scheme, but in my enthusiasm
I failed to READ the references. After reading about the Rumanian Henschels,
I discovered that they were unfamiliar with both the operation of the
cannon and the ammunition, so they flew without the belly cannon. But
it looks so good on there! Oh, well, got to keep it accurate. So I ripped
the cannon off, sanded the belly smooth, and went for option number two:
the belly bomb rack.
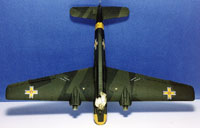
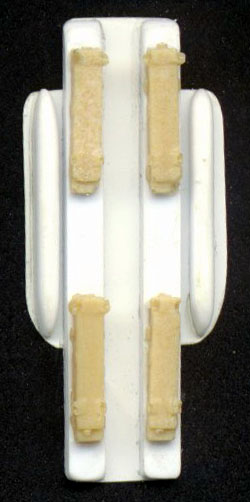
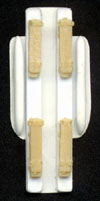 The
Rumanian Hs 129s had a bomb rack on the belly that held four bombs. The
racks themselves were the same as those on the wings, so I removed one
of the bombs off of the wing rack and poured some RTV material over the
kit part. I was going to make a box to hold it, but there wasn't much
RTV needed so I just let it sit on the wing. When it cured I pulled it
off and I had a perfect mold for the racks. I quickly made four resin
copies and then looked at how the whole assembly went together underneath
the fuselage. The four racks were all connected by a bracket, which most
likely connected to the fuselage at the same attachment points that the
belly cannon did. I made this bracket out of styrene stock, then attached
the resin bomb racks. I loaded it up with four bombs, and NOW the plane
was really finished! The lesson learned here? Always read your sources!
The
Rumanian Hs 129s had a bomb rack on the belly that held four bombs. The
racks themselves were the same as those on the wings, so I removed one
of the bombs off of the wing rack and poured some RTV material over the
kit part. I was going to make a box to hold it, but there wasn't much
RTV needed so I just let it sit on the wing. When it cured I pulled it
off and I had a perfect mold for the racks. I quickly made four resin
copies and then looked at how the whole assembly went together underneath
the fuselage. The four racks were all connected by a bracket, which most
likely connected to the fuselage at the same attachment points that the
belly cannon did. I made this bracket out of styrene stock, then attached
the resin bomb racks. I loaded it up with four bombs, and NOW the plane
was really finished! The lesson learned here? Always read your sources!
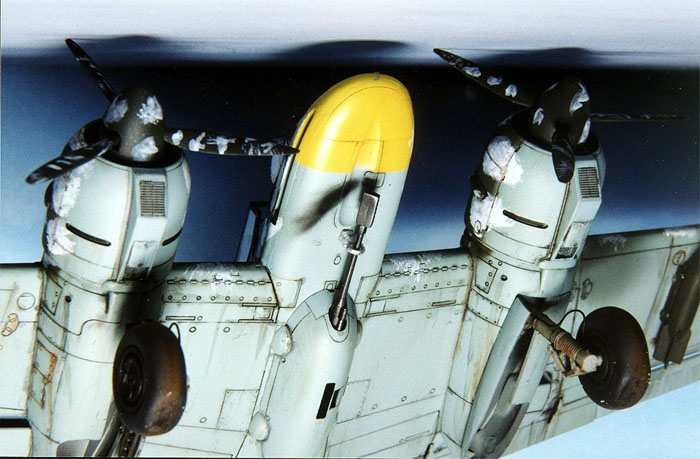
 With
it being January and plenty of snow on the ground, I thought I would photograph
this plane in its natural environment. Of course, when I shot the pictures,
there wasn't any snow on the ground, so I faked it. I used baking soda
for the snow in the pictures, and the backdrop is a HO train backdrop
printed by Faller. Check your train stores for one, as it makes for an
excellent backdrop.
With
it being January and plenty of snow on the ground, I thought I would photograph
this plane in its natural environment. Of course, when I shot the pictures,
there wasn't any snow on the ground, so I faked it. I used baking soda
for the snow in the pictures, and the backdrop is a HO train backdrop
printed by Faller. Check your train stores for one, as it makes for an
excellent backdrop.
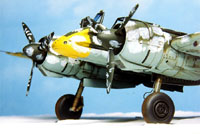
 Now
that this kit is done, I am very pleased at how it all went together.
No putty was needed anywhere and the model just fell together. It's been
a long time since I've built a model in such a short time and have it
turn out this good. It was so much fun, in fact, I'm thinking of getting
another one and building it up. I've got to use that nice belly gun on
something, after all
.
Now
that this kit is done, I am very pleased at how it all went together.
No putty was needed anywhere and the model just fell together. It's been
a long time since I've built a model in such a short time and have it
turn out this good. It was so much fun, in fact, I'm thinking of getting
another one and building it up. I've got to use that nice belly gun on
something, after all
.
Internet Modeler thanks HLJ for the review sample of this kit.


Previous: Contents

