
Building the VM 1/35TH Scale Aufklarungspanzer 140/1
By Richard Eaton
Introduction
I reviewed this interesting variant of the excellent Pz Kw 38(T) type tank back in the November issue of Internet Modeler. I recently completed an OOB build and thought I would share my thoughts.
The History
The Czech built TNHP-S tank built from 1938 onwards was one of the most modern vehicles of its time. Production of the vehicle continued under German aegis after the occupation onward. This extremely robust and reliable type formed a quarter of German tank strength in the 1940-41 period. After replacement by later German designs the excellent chassis was modified and equipped to form a variety of expedient vehicles such as the PanzerJager Marder III, Jagdpanzer Hertzer, and Panzerartillerie Grille. The Hertzer variant soldiered on with the Swiss army until the 70s! A functioning Swiss Hetzer is preserved to this day at the Texas Guard Museum at Camp Mabry here in Austin. Not bad for a 1938 design I'd say.
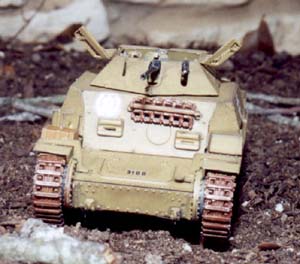
 A further Pz Kw 38(t) variant which came into troop service during 1943 was the Aufklarungspanzer (recon tank) 140/1. These came about initially as a field modification. A new superstructure was fitted to 50 38(t) chassis that were under repair. On that was mounted a 2 cm Haengelafette turret formally used on various armored cars and half tracks. These vehicles (70 produced) were intended as replacements for the four-wheeled armored car Sd Kfz 222 and Sd Kfz 250/9 half track. The open turret was fitted a 2 Cm KwK cannon and an MG 34 machine gun designed for both anti-aircraft and ground attack purposes. These recon tanks were equipped with a Fu 5 (2 meter) and Fu 12 (star type aerial) radios.
Building the Sd Kfz 140/1
This 1997 kit, from VM in Russia, is of the standard Sd Kfz 140/1. This is the first Pz Kw 38(T) type variant produced by VM and hopefully not the last. It is molded like the Italeri kit so that the mold may be used to produce other variants in the future.
 Step one assembles the hull components and interior detail. The hull sides and bottom have interior detail molded in There are six parts that make up the transmission. The entire assembly fits snugly onto the tank floor. I then assembled the lower hull, rear bulkhead and engine cover pieces with no problem. It is evident at this point that there will be quite a bit of builder modification to the kit parts. Instruction inserts have you cutting four major parts to allow the distinctive superstructure to fit the Italeri tank hull. Dimensions in mm's and approximate angles are given. I tried these modifications but later had to work the parts and dry fit extensively.

Step two completes the interior detail. I assembled the seat parts, controls, and the like. There are parts aplenty to supply exterior fixtures and equipment. I then added the flooring plates, fire extinguisher and various other details. I sprayed the interior Afrika Mustard and painted the details. I then applied a dark wash and, when dry, dry brushed heavily in white. I could not tell how visible the interior would be at this stage.
Steps four and five assemble the suspension and road wheels. This went by the numbers. Be sure the drive wheel turns freely or you will have a time getting the tracks to look right. I sprayed all parts Afrika Mustard and painted the road wheels.
 Things started to get interesting withstep six. I assembled the boxy multi-angled superstructure first. The fit was not that great and required filling and shaping. Use care not to damage the molded in riveting. I set that aside to dry and attached the muffler assembly. Directions have you cut off the exhaust pipe and replace it with two new longer angle pipes. Don't glue these quite yet because mounting the muffler requires quite a bit of dry fitting. I got it to look somewhat acceptable and glued it in place.

I assembled the individual link tracks and put them on the model. Getting a good fit around the drive wheel was challenging but overall the tracks look great. I modified the running boards and attached them.
Now time to add the superstructure. This required repeated rounds of test fitting, and then cutting of the lower hull. You really have to shoehorn this unusual structure onto the Italeri hull. I got a decent fit in the front and sides but the rear was a mess. I puttied it up big time and sanded. I did this again. On the third round, things began to look up. It still looked terrible but a coat of paint and I was happy.
 Steps seven and eight festooned the hull with boxes and assorted details. Most of the boxes were one piece parts that the instructions said to file and bend into place. Yeah right, this is heavy plastic not PE! I discarded most of them as the fit was poor and I did not feel like putting in the effort to make them presentable.

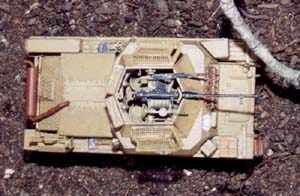
Steps nine and ten assembled the guns and their mount in the turret. I painted and detailed prior to assembly. The weapons are very nice and assembly went without a hitch. The gun mounts were detailed and the lower turret finished up nicely with a pair of gunner's seats. Then I noticed the dreaded knife symbol yet again. There were vague references of trimming parts of the gun mount and control assemblies. Not really knowing what to do, I proceeded.
Step 11 details the turret armor and affixes it to the base. Well, it does not fit very well. I wound up chopping the gun mounts and controls mercilessly before the thing settled down snugly. The sharp turret armor angle covers up my 'modification' nicely.
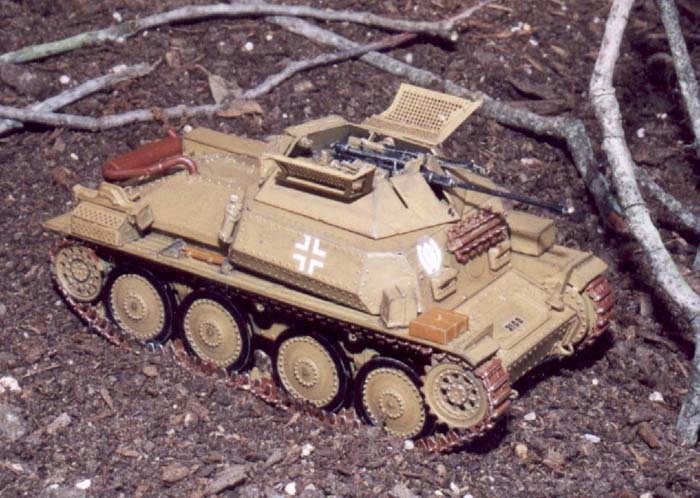
 In step 12 I assembled the two grenade shields. The kit PE screening was a really nice touch This provides six parts of netting material for these shields. Nice fits made CAing them into place a breeze. I painted them and then placed them in the open position on the turret. I then assembled the two turret ammo boxes and glued them in place. Just one more step now! I placed the turret into the hull and gave a twist. It did not fit. There was a substantial gap between the turret and base. Out came the cutters again!

Finishing
I finished the model in Testors Afrika Mustard. I then applied a mix of black and brown acrylic wash. I then sprayed the model with gloss coat to aid in dark washes and decals. I painted the road wheels rubber scale black. A fairly thick wash of Testors rust was applied on the tracks. Once dry I added a wash of a mix of acrylic scale black and brown to the entire tank. Then I washed the tracks again with scale black.
And now my favorite part of armor modeling, dry brushing! I used lightened Africa Mustard to highlight detail all over the tank. I followed that up with lightly dry brushing the treads and hull with Testors Steel. I finished up the weathering by applying ground pastel black with a brush to the gun muzzle, breach, and pretty much anywhere I felt like it.
Decals
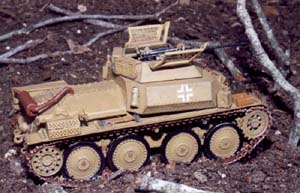 Decals for the kit include two types of crosses and three group markings. I chose the Nederland division because it looked cool. Once everything was dry, I gave the whole vehicle a few healthy puffs of Dullcote to finish things up.

Conclusion
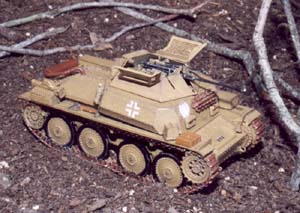
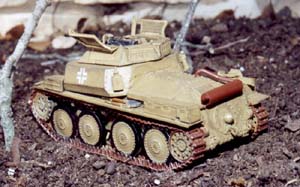
I took the completed model and set it in the dust dry soil of my garden for the completed shots. This kit builds up to a nice representation of this vehicle. I recommend it to the experienced armor builder. This is due to the amount of parts modification, dry fitting, and the individual track links. Overall I am pleased with the model and am glad to have such an interesting variant of one of my favorite tank families.
Source
-
F.M. von Senger und Ettrlin: German Tanks of World War II, Galahad Books, 1969.