
 CRA produced a number of all-resin models of lesser-known aircraft from WW2 and just before. Though of widely different subjects, all these kits have a few things in common. Nicely cast main pieces and finely scribed exterior detailing are common credits; rudimentary interiors and problematic engineering are common debits. The Loire is no exception. I have built a number of limited run resin kits of a all kinds of subjects, and I found this kit to be among the more challenging. Quite a bit of the challenge was my own fault, however. Here's why:
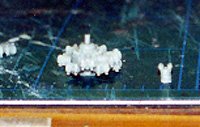 Just to be different, I started with the engine first. Using my razor saw, I carefully cut each cylinder off the carrier as close to the bottom as possible. All I needed was a few swipes of the sanding stick to clean up the bottoms. I placed each cylinder on the table and looked at it from several directions, sanding as necessary to get the bottoms level. The instructions are well drawn, but not clear; I'm fairly certain the two "bumps" on each cylinder should face to the rear (Assuming they represent the exhausts). I used tweezers and gel-type superglue to affix both rows. The cylinders then were painted Testors Model Master (TMM) Gunmetal and drybrushed with TMM Steel, while the crankcase was painted TMM Medium Grey. I thought about adding wiring details, then laid down until the thought had safely passed.
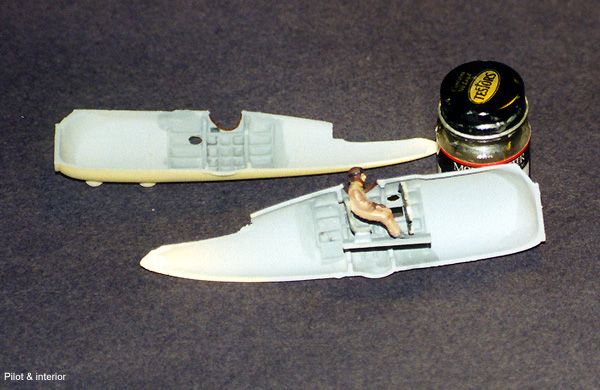 Engine done, I turned to the fuselage interior. Only a very basic representation of the cockpit is provided - instrument panel, seat, stick and lumps representing rudder pedals. Sidewall detailing is limited to rather large, soft stringers/longerons. One can't see very much when the fuselage halves are closed up, but that didn't stop me from adding a pilot figure to make darn sure one can't see anything in there. I grabbed the pilot from the Tamiya D.520, painted him up per that kit's directions, and plopped him in the Loire's seat. This required major surgery on the seat and the pilot to accomplish, I suspect because this kit's cockpit floor sits too low.
 The fuselage halves went together quite nicely. There are no locating pins or other alignment aids, but if you're careful, as I was, everything lines up neatly, with no steps, mismatched panel lines, and only a small seam. I fixed the seams on the fuselage with Mr Resin Surfacer, a Gunze product that's essentially a very thick lacquer. I also took the opportunity to fix some small surface blemishes on the wings and tail surfaces, and to clean up mold seams. The one-piece horizontal stabilizer, then the vertical fin, went on next. A little judicious sanding to get the mating surfaces level was all that was necessary to align the pieces. There were a few gaps that needed putty this time, but nothing major. I was on a roll...
 I ended up building a jig to keep everything in place and properly aligned while the glue set up. I first drew a "T" shape on a scrap of wood. I then drew alignment lines on the wood using dimensions carefully measured from the kit. The wings were lined up to the top of the T, and kept firmly in place with brads and tape. The fuselage was then test fit in its position so I could determine what extra supports I'd need to make it level. When I was sure I had it right, I applied 5 minute epoxy to the mating surface, carefully positioned everything, and let it dry overnight. The result: perfect alignment, strong join, and only a small amount of putty necessary to smooth everything out.
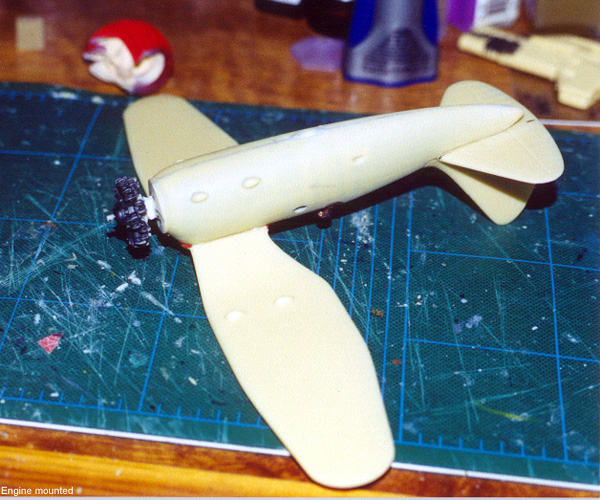 Flushed with that small victory, I turned my attention to the engine and cowl. Here again, the instructions are deceptively simple. The cowl needs to sit so that there is a small gap around the back edge, no more than 1/16". In hindsight, I should have thinned the trailing edges to help get that gap. The cowl should get most of its support from the engine cylinders, which means the engine needs to be placed far enough forward that the two cowl halves can fit together (and the propeller clear the front of the assembly!). I found myself carefully adding blocks of styrene behind the engine, testing the fit, and adding more until I was able to get the engine where it needed to be (actually, it's probably still too far back .. but it's too late to fix now). Once the engine was in place, the cowl halves were glued together. The seams here needed quite a bit of filler and sanding to smooth out, which led to me rescribing a few lost panel lines as well.
 The landing gear caused me the most worry, and not just because assembly looked to be difficult. I have built a number of resin models over the years. I've found that, over time, resin tends to deform under the influence of gravity. The undercarriage assembly has proven to be quite sturdy since I put together, but I don't want to see this model sitting bowlegged on the shelf in two years.. I thought about a number of alternatives, from scratchbuilding the main load bearing bits from styrene or wood, to inserting a wire in them for support. In the end, I decided to cut a hole in the fuselage and mount the model on a clear rod.
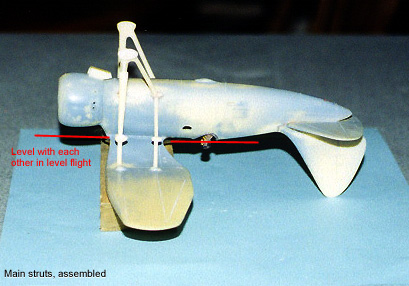 Honestly, for a limited run resin kit, I don't know how the parts could have been better designed to make this step less challenging. Tabs or slots would have helped though. Each main gear is made up of eight struts, plus the three piece wheel assemblies. The instructions are not at all clear on how all this should look, alas - though one can glean some placement info from the paint guide. Fortunately, between a large color profile in a book and the kind assistance of Tom Cleaver, who had already built this beast, I was able to figure it out. Basically, the main struts (part #6) should be vertical when the plane is sitting on the ground. This means they can backward just a bit when seen in level flight.
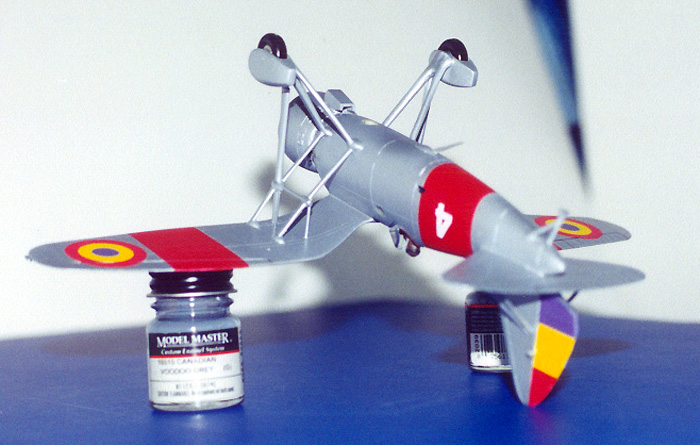 I placed the rear main struts (part #4) first, with the "long" section glued to the fuselage, on the top side of the "bump" provided. Everything else is aligned from these. Next came the main struts (part #6), which needed careful trimming to get to lean back (side view) but be perfectly vertical (front view). Quite a bit more trimming and test-fitting was needed to get the main gear supports (part #8) to fit with part #6 properly. Here's where tabs, slots, anything would have helped. As it was, I used my trusty Mk I calibrated eyeball to make sure everything was properly placed. When it's correct, the horizontal brace between parts #6 and #4 should be, well, horizontal (viewed from the side) and directly in line between the two (viewed from the front). I ended up with the plane sitting level, when viewed from the front (no mean feat!), but the starboard side landing gear is about 3/32" farther outboard than the port side - just enough that it's noticeable.
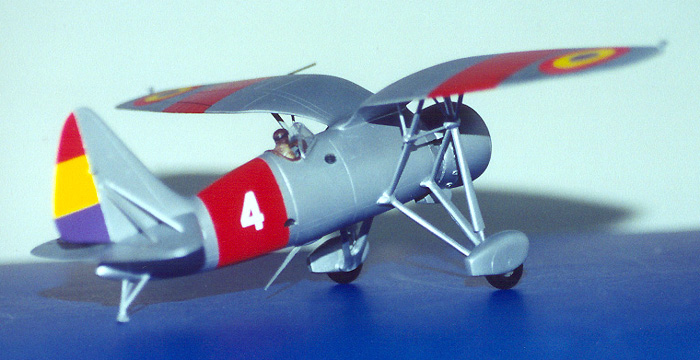 Compared to that, the rest of the struts on both tail and wings were almost anticlimactic. Interestingly, the tail has small inscribed circles indicating where the struts should be positioned. I didn't bother to cut the smaller strips from the resin wafer, instead using styrene rod. More test fitting, sanding, fitting, sanding and careful positioning with tweezers followed. This is not a job for a guy with shaky hands ... but nonetheless, I persevered. I replaced the tail skid strut with a brass rod, and I'm glad I did. It's far stronger than the resin, and I have not managed to break it yet.
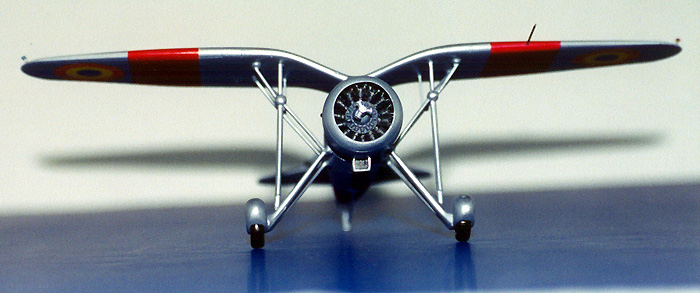 The final, and most time consuming, step was to try to blend in all those struts with putty, Mr Surfacer and lots of patience. It's very hard to maneuver amongst all those pieces, and this step took me most of a week to complete to my satisfaction. Then I had to do it all over again when the primer coat revealed all the flaws I'd missed.
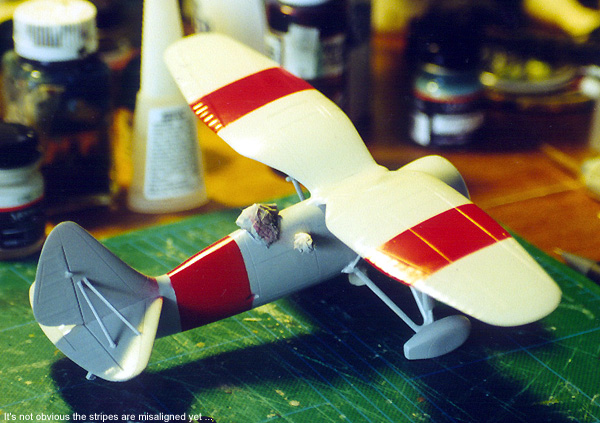 Before painting, I carefully washed the model down with diluted Simple Green, followed by a warm water wash. I masked off Mr. Pilot, the engine, and the windows on the fuselage with tissue paper, then primed the entire model with TMM Canadian Voodoo Grey. It's a glossy light grey that dries hard overnight, and I've found it to be a good base for metallic finishes. I had decided to do the Spanish Republican version of the plane, which was finished with an aluminum lacquer in real life. Next, I masked off the stripes and painted them with Gunze acrylic Red. Looking at the paint guide (which was actually quite well done) I figured that the stripes should be about 4 feet wide on the real plane, making them 1" wide on the model. I used a one inch wide strip of tape to lay out the stripes, then masked around it. I used a panel line in the center of the wing as a guide. Unfortunately, I forgot between wings that I was going to set the stripe a little outboard of that panel – so one stripe is further outboard than the other, a detail I completely missed until it came time to put the decals on!
 Once the red stripes were dry (overnight), I sprayed the rest of the model Floquil's Old Silver. Ouch. Silver paint is the absolute surest way to find surface flaws, and find them I did - all the bumps, scratches, and imperfections the grey primer coats had missed. This necessitated yet another round of sanding, filling and repainting.
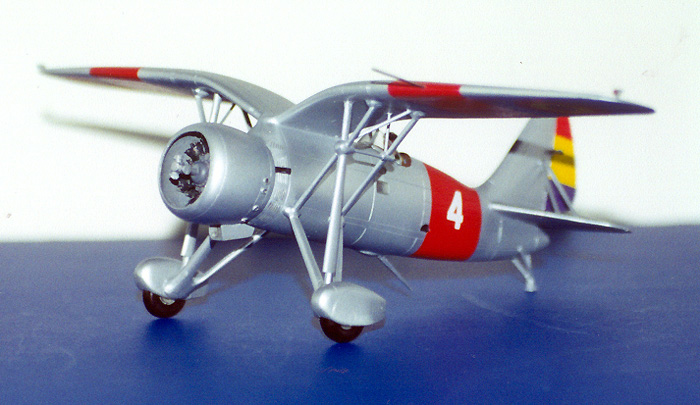
 Only the fiddly bits were left at this point. I painted the wheels Testors Rubber with TMM Aluminum hubs. I had to chop a good third of the tops off to get them to fit in the spats (alternatively, one could leave the spats off, as the aircraft were flown both ways). The ventral antenna, exhaust stubs and pitot tube were then affixed (the pitot being replaced by small diameter tubing). I then removed all the tissue masking and touched up areas where spray had crept in (mostly on poor Mr. Pilot's head). The last step was to cut the vacuformed canopy off its sheet, screw it up, then cut out the other one. This was sanded to shape, dipped in Future, frames painted and affixed with white glue. I left the props off - they appear too small, and I couldn't bear the thought of the sanding necessary to clean them up. Sometime down the road, I'll cut a clear disk from acetate to mimic spinning props. Finally, a wash of black hither and yon and - Voila!