


| Richard Marmo's SCALEWORLD |
Modelbuilding fosters opinions strong ones. Whether it's the type of solvent/glue/adhesive we choose, or acrylic versus enamel versus lacquer paint, or basic kits that require a lot of added detail and accurization just to get it up to accepted standards versus highly detailed box shaker kits that require nothing more than an ability to join the requisite parts, we all have our opinions. And for the most part, whatever that opinion may be, it is set in cement. I suspect you'll find the cement set hardest whenever you approach the question of scale.
Ask any modeler what his (or her) preferred scale is and you'll find answers that are all over the ahem scale. Their reasons are also equally varied. Some like the smaller scale for a perfectly logical reason room for the finished models. Others keep it small so that they don't have to bother with interior details. Still others are only interested in the exterior configuration and/or color schemes and markings.
At the opposite end of the ruler are the large scale devotees, 1/32 and larger. The obvious problem is finding a place to put'em when you're done. But if you like large amounts of interior detail and legible stenciling on the exterior, the larger scales can't be beat. They're also ideal if your eyes are not as co-operative as you'd like'em to be.
Some modelers build in any scale, the particular choice of kit being determined by subject and not size. They build with happy abandon, perfectly content to mix a variety of scales in their showcase.
Then there are the constant scale aficionados. Granted, constant scale has a perfectly logical rationale for its existence. If you want a collection that shows the correct relationship of each aircraft design to all the rest, this is the way to go. But which scale?
The one problem with constant scale is that somewhere down the line, some of the models in your collection will either be too small to see without the aid of a microscope or too large to display without building a trophy room the size of a two-car garage.
So what's the solution? I know you're going to hate to hear this, but it depends on the individual modeler. There are those who are so dedicated to a single scale that they will even refuse to buy a kit of a subject they desperately want (and it's the only kit of it that's ever been made) if it's not in their scale. No exceptions!!
Still others base their scale choice on the size of the original subject. For example, 1/48 works very well for a large percentage of all aircraft, regardless of time period with certain exceptions. Modern bombers, such as the B-36 and B-52, are impractical in that scale. Same goes for large transports, both military and civilian. Imagine a C-5 or that new, projected, 1,000-seat, double-deck airliner from Airbus in 1/48!
Because of the huge dimensions involved, 1/72 (or even 1/144) is ideal for the very large bombers and transports, with 1/144 becoming an accepted airliner constant scale. On the down side, building a fully detailed (and rigged) Sopwith Camel in 1/144 is essentially the modeler's version of engraving the King James Edition of the Bible on the head of a pin! But let's not forget the larger scales.
1/32 scale (or even 1/24) is about as good a compromise as you can find for biplanes and helicopters. They're large enough to do a lot of detailing, but not so big that you'll have that hard a time finding a place to display them. Move up to modern jet fighters and you're approaching the limits of practicality, but anything thru WW-II or Korea is not unreasonable.
So which scale is the perfect one for you? It's your choice.
Since we've been discussing scale, you're probably wondering what about the 1/48 scale survey. Did enough responses come in? Well, yes they did kinda, sorta, in a way. Numerically, the replies were rather puny, even after two months. Choices were literally all over the landscape, proving at least two things. First is that we want 1/48 scale kits of just about every aircraft ever built and, secondly, it's virtually impossible to get a consensus. When you consider the cost of producing a new injection kit, this ain't exactly the sort of results manufacturers want to see.
That said, the results are as follows:
AIRCRAFT WITH MULTIPLE VARIANTS
B-57/Canberra family 4
FJ-2/3/4 Fury family 2
E-2 Hawkeye 2
Lockheed Hudson 2
Curtiss P-40B/C 2
North American A-5 Vigilante 2
AIRCRAFT WITH NO VARIANTS
Vultee Vengence 2
SAAB J-21 2
And that, folks, is it. If you're wondering why, it's because not another subject got more than one vote. There were some very interesting subjects listed, many of them truly deserving of kit production. Same goes for conversions, accessories and decals. But when they only get one vote, no manufacturer is going to risk it.
 Those
of you whose passion lies with modern jets of other nations will be glad
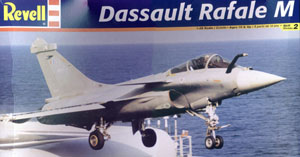
to see the appearance of a 1/48 Dassault Rafale M from REVELL.
Or reappearance, to be perfectly accurate, since this is a reissue.
Those
of you whose passion lies with modern jets of other nations will be glad
to see the appearance of a 1/48 Dassault Rafale M from REVELL.
Or reappearance, to be perfectly accurate, since this is a reissue.
Reissue or not, this is an excellent kit of the latest French carrier fighter design. Consisting of some 131 parts, all in gray styrene except for the clear sprue, everything is packed in a single bag except for the decals and instructions, which are tossed in loose. Open the main bag and you'll find a second bag within that contains both a gray and clear sprue, an approach that prevents scratches on the clear parts. The box is the usual clamshell design.
Cockpit interior is nicely done, including a multi-part ejection seat that can easily be enhanced. The main instrument panel is molded in clear, using paint and minute decals to replicate the details. Surface detail is lightly recessed, meaning that you will want to take it easy with the primer. Nose gear doors are molded in a closed configuration, but are easily separated if you build a Rafale with the gear down. And one other thing. The canards are molded integrally with a connecting rod. It's intended that you install them without glue so that they remain moveable.
Weapons load consists of two MICA and/or two MAGIC missles, along with three 2,000 liter external tanks. Instructions are strictly drawings only international style.
The decal sheet is loaded with all kinds of very small warning emblems/stencils that are common to both aircraft that can be produced from this kit. You're given a choice of creating either the #2 prototype or a production bird in service with the French Navy. Either way, your finished model will be overall flat gull gray with a flat white nose cone.
All in all, a very nice model of one of the latest French designs. Price? $16.75.
 Another
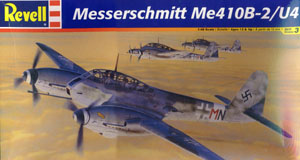
repop from REVELL is the 1/48 Messerschmitt Me-410B-2/U4. Originally produced
as part of the ProModeler line, you remember it as a Me-410B-1. So what's
the difference between the two? Alternate chin moldings to give you a
choice of either 4 MG 151 20mm cannon or a single 50mm BK5 cannon. The
decals allow a choice of three different aircraft and the sheet does include
swastikas.
Another
repop from REVELL is the 1/48 Messerschmitt Me-410B-2/U4. Originally produced
as part of the ProModeler line, you remember it as a Me-410B-1. So what's
the difference between the two? Alternate chin moldings to give you a
choice of either 4 MG 151 20mm cannon or a single 50mm BK5 cannon. The
decals allow a choice of three different aircraft and the sheet does include
swastikas.
If you're familiar with the original kit, you will know what to expect from this one. A brief recap is in order for those who have yet to make the kit's acquaintance.
Parts are molded in medium gray styrene and are contained in three bags, including a separate bag for the clear. All the moldings are crisp and quality is excellent with a small amount of flash visible, mainly on the smaller parts. As with the Rafale, the kit comes in a clamshell box.
Detail is excellent, most of it being recessed but raised where appropriate. Cockpit detail will keep you busy for awhile, the end result giving an excellent representation of just how crowded the office was. Weighted tires help create a 'heavy' appearance for the finished model. MSRP is a most reasonable $13.50.
If you subscribe to the notion that the perfect military weapon has tracks instead of wings, take a look at a couple of new armor releases from ITALERI. There's one American and one German.
 First
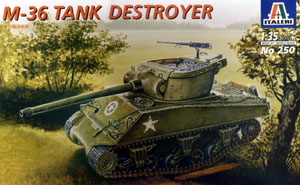
up is a 1/35 kit of the M-36 Tank Destroyer. Yet another variation on
the venerable M-4 Sherman, this one is hard to ignore. If you're thinking
that ITALERI did an M-36 some years ago, you'd be right. The tipoff lies
in it's being listed as a limited edition, another way of saying reissue.
Repop or not, the kit's most welcome.
First
up is a 1/35 kit of the M-36 Tank Destroyer. Yet another variation on
the venerable M-4 Sherman, this one is hard to ignore. If you're thinking
that ITALERI did an M-36 some years ago, you'd be right. The tipoff lies
in it's being listed as a limited edition, another way of saying reissue.
Repop or not, the kit's most welcome.
ITALERI has produced numerous kits based on the Sherman (the Priest, for example) and that history pretty well tells you what to expect. The kit, which sells for $27.00, comes packed in a conventional top over bottom box.
There are three sprues of brown parts with none of them being bagged. Moldings are crisp with little if any flash. Tracks are the familiar vinyl 'open rubber band' style that you have to connect at the ends and weld with heat. While they produce good results with a little effort, purists will probably opt for an aftermarket set of individual resin track links. A small decal sheet and the usual international style (drawings only) ITALERI instructions complete the package.
Since the M-36 was an open turret design, you'd expect to find a detailed turret interior and you do. Granted, there's room for additional detailing, but you can produce a very nice vehicle just straight from the box. If you want to take your M-36 to a higher level, plan on loading up the hull with an assortment of storage boxes, tarps, sandbags, jerry cans and maybe a figure or three. A little research on markings wouldn't hurt either, since the decals only allow you to create a very plain M-36 that operated in France during 1944.
 The
German release is also a repop, though it's harder to tell since it lacks
the limited edition banner. Produced in the familiar 1/35 scale, the subject
in question is the Panzer IV Ausf. H, also priced at $27.00.
The
German release is also a repop, though it's harder to tell since it lacks
the limited edition banner. Produced in the familiar 1/35 scale, the subject
in question is the Panzer IV Ausf. H, also priced at $27.00.
This is an update of an earlier kit. Packed in a top over bottom box, you get four sprues of parts that are molded in a peculiar yellowish brown color. But no matter, since you're going to paint it anyway. Anyway, the parts are crisp and cleanly molded with no obvious flash. Again, nothing is bagged. Some of the parts, such as individual j-hooks, are so small that you'll need a Opti-Visor and some quality tweezers to find and handle them. Also, extreme caution will be needed to get'em off the sprue with breaking them.
The spaced armor on the hull and turret are built up from individual pieces and mounted on some very delicate brackets. This approach sure makes representing your Panzer IV with sections of the armor missing a lot easier.
As with the M-36, you get 'open rubber band' style tracks. Unlike the M-36, you also get three nicely detailed figures. They're all posed in standing position, one in a greatcoat, another in officer's dress and the third as a soldier with steel helmet.
Decals provide markings for three vehicles, each in a significantly different color scheme. The instructions provide three-views for one in overall sand, a second in sand with reddish brown stripes and a third in sand with brown and green mottling.
Instructions themselves are the familiar drawings-only international style. Considering the world-wide marketing of the kit, I can understand why. Trouble is, this approach can also be confusing for the less experienced, especially as the kit becomes more complex. Bottom line? Take your time and test fit.
Again, check your references, add some clutter, wood boxes, a tow chain and two or three Wehrmacht soldiers hitching a ride and you'll have an excellent addition to your armor collection.
 Fantasy
and horror figure enthusiasts will love one of the latest from POLAR
LIGHTS, that being a 1/8 scale kit of The Phantom Of The Opera. The
role of The Phantom Of The Opera was immortalized by Lon Chaney in a 1925
movie of the same name.
Fantasy
and horror figure enthusiasts will love one of the latest from POLAR
LIGHTS, that being a 1/8 scale kit of The Phantom Of The Opera. The
role of The Phantom Of The Opera was immortalized by Lon Chaney in a 1925
movie of the same name.
Because of Polar Light's history of repopping Aurora kits, it's very easy to assume that this kit is exactly that a repop of an Aurora effort. Don't make that mistake. This is an original kit, produced in the Orient and based on an original sculpture by Pat Delaney. MSRP is given as $25.99, most reasonable when you consider what many figure kits are selling for these days.
The kit itself is molded in crème colored styrene with all parts being cleanly molded. There is a general dearth of flash. Sprues for the smaller parts are trapped in two bags, while the larger parts and instructions are not. Everything is tightly packed in a sturdy top over bottom box. Boxtop illustration and the instructions continue the Aurora retro appearance that POLAR LIGHTS has become known for.
You'll find a total of 40 parts, including an organ sitting on a stone base with the Phantom standing in front of the organ. He's posed with his arms thrown up, body recoiling backward and an expression of shock or horror on his face. The partial face mask that the Phantom normally wore can be seen lying on the base. On top of the organ is a calligraphy tray, a quill pen in its holder and a five-arm candelabra. A neat touch is a piece of sheet music printed on the instructions that can be cut out an attached to the music rest.
Assembly is quite straightforward and should pose no problem for anyone. Painting, on the other hand, will separate the box shakers from the model builders. While the instructions do give you some fairly detailed suggestions, consider these only a starting point. While a beginner can produce a very creditable model by adhering strictly to the instructions, the experienced and especially the advanced figure painter can turn this kit into an absolute knockout.
 The
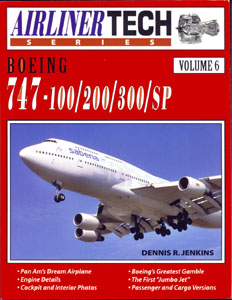
latest addition to Specialty Press' Airliner Tech line is Volume 6, Boeing
747-100/200/300/SP by Dennis R. Jenkins. Price is their usual $16.95 and
it can be ordered from Specialty Press, 11605 Kost Dam Road, North Branch,
MN 55056 (tel. 800-895-4585). Be sure to add $4.50 per order for shipping
and handling.
The
latest addition to Specialty Press' Airliner Tech line is Volume 6, Boeing
747-100/200/300/SP by Dennis R. Jenkins. Price is their usual $16.95 and
it can be ordered from Specialty Press, 11605 Kost Dam Road, North Branch,
MN 55056 (tel. 800-895-4585). Be sure to add $4.50 per order for shipping
and handling.
As you've come to expect in both the Airliner and Warbird Tech series, the standard format is 100 pages, 8 ½ x 11 inch vertical format, semi-stiff covers, approximately 160 b&w photos and illustrations and four pages of color photos.
Dennis Jenkins does his usual excellent job. From the history of the aircraft's genesis (where we learn we would be flying in airliner versions of the C-5 if one phone call had been returned) thru the five distinct versions that have been designed, the aircraft is thoroughly covered.
You'll find photos of the 747s used to ferry the Space Shuttle, along with a good 3-view. There's artist's concepts of the 747 in proposed cargo and tanker configurations for the Air Force, 747 command post photos, loads of technical illustrations and on an on.
Then there's the odd-looking (compared to a standard 747) 747SP. This little puppy had a fuselage that was 48 feet shorter than a standard 747. Only 45 were built and the full story of its development is related here, including the various 3-engine proposals. One would have laid the engines out like a 727 and yet another envisioned mounting two engines under one wing and one engine under the other!
Color photos include some truly unusual schemes. For example, the 747-312 of Ansett Australia Airlines that was painted in a special scheme to celebrate the 2000 Olympics. To say that it would be a challenge would be an understatement. And the truly masochistic might want to tackle a 747-312 painted in the markings of South African Airways. If you manage to replicate that scheme, you stand a 50-50 chance of winding up permanently cross-eyed!!
Considering that airliner references are about as scarce as hen's teeth, this entire Airliner Tech Series belongs on your bookshelf. And you can't beat the price.
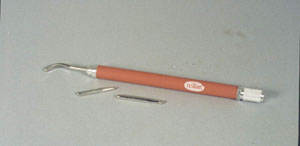 If
you use chrome foil to replicate various levels of bare metal finish,
an essential tool is something you can use to rub it down. Knowing this,
MODEL MASTER offers a burnishing tool. What is a burnishing tool, you
ask? Exactly what it says. You get a handle with interchangeable tips.
The tip are of various shapes that allow you to rub down
or burnish
the
foil so that it will adhere tightly over the underlying surface, allowing
the detail to show thru.
If
you use chrome foil to replicate various levels of bare metal finish,
an essential tool is something you can use to rub it down. Knowing this,
MODEL MASTER offers a burnishing tool. What is a burnishing tool, you
ask? Exactly what it says. You get a handle with interchangeable tips.
The tip are of various shapes that allow you to rub down
or burnish
the
foil so that it will adhere tightly over the underlying surface, allowing
the detail to show thru.
In this case, you get a curved spoon and two ball tips, one small and the other large. Price is $8.99. Depending on the type of foil work you're doing, this little critter could save you a lot of time and misery.
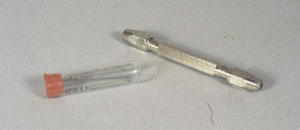 We've
all run into situations where our trusty Dremel (whether the corded version
or the cordless Mini-Mite) can't do the job. Usually this involves drilling
a hole in an area where your Dremel won't fit
or the job at hand is so
touchy that it needs to be done by hand. So what's the answer? Obviously,
a pin vise and your hand. With this combination, you can manually (Gasp!)
drill the requisite hole.
We've
all run into situations where our trusty Dremel (whether the corded version
or the cordless Mini-Mite) can't do the job. Usually this involves drilling
a hole in an area where your Dremel won't fit
or the job at hand is so
touchy that it needs to be done by hand. So what's the answer? Obviously,
a pin vise and your hand. With this combination, you can manually (Gasp!)
drill the requisite hole.
Granted, pin vises are made by several manufacturers, but the one offered by Model Master has a lot to recommend it. A pin vise is a pin vise and Model Master's does what everyone else's does. Double ended, with reversible mandrels at each end, it'll handle any drill bit from a #80 up to 1/8 inch. What makes this one different is the fact that it comes packaged with six drill bits that range from .025 to .038 in diameter. Granted, that's not a full range of bits from #60 to #80, but it just might keep you from buying a full set of drill bits at the same time. $12.95 and worth every penny.
One final note. The IPMS/USA National Convention is July 19-22, 2000 in Dallas, Texas. I hope to have an initial report on it in the August Scaleworld.
See ya'.


Previous: Contents

