


 Building
the Artur Albatros D.II
Building
the Artur Albatros D.II

by Steve Perry
Introduction
By the Spring of 1916 the Fokker monoplanes, once the scourge of the Western Front were being outclassed by the British DH-2 and the French Nie.11. This was to change with the introduction of the next generation of German fighters. These included the Albatros D.I/II, Halberstadt D.II and the Fokker D.I/II. The Albatros was the best of these German biplane scouts developed to maintain air superiority over the front.
The D.II was the second generation of this fighter which incorporated several improvements learned from combat operations in the D.I. The wing was lowered to give the pilot better upward visibility. This was done by splaying the cabanes outward. The outward splayed cabanes also increased the pilot's forward visibility while aiming to fire his twin Spandaus.
At the same time that Germany was re-equipping with the Albatros, they were also reorganising the unit structure of their airforce into Jagdstaffels or hunting squadrons. Jagdstaffel 2 was organized in August of 1916 at Bertincourt by Hptm. Oswald Boelcke. Jasta 2 was the first unit to achieve great success with the D.II. Boelcke hand picked his pilots and trained them in his tactics. These are taught – essentially unchanged today –to combat pilots the world over and are known as Dicta Boelcke.
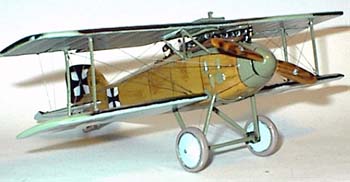
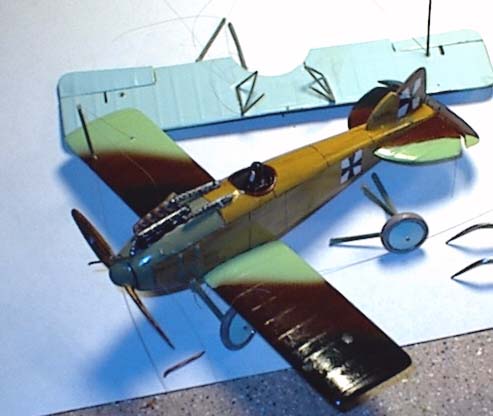
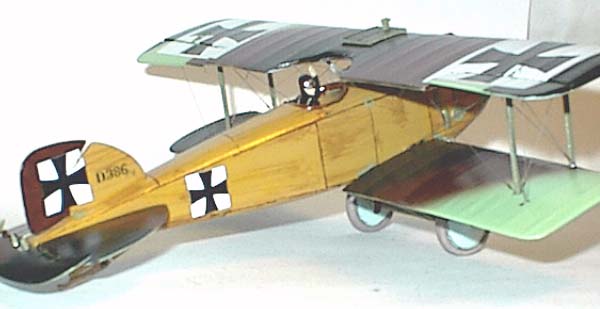
On October 26, 1916, while both pursuing the same Englishman, Lt. Bohme's landing gear clipped Boelcke's upper wing tip. Boelcke was unable to recover and was killed in the crash. I decided to model this aircraft, 386/16 .
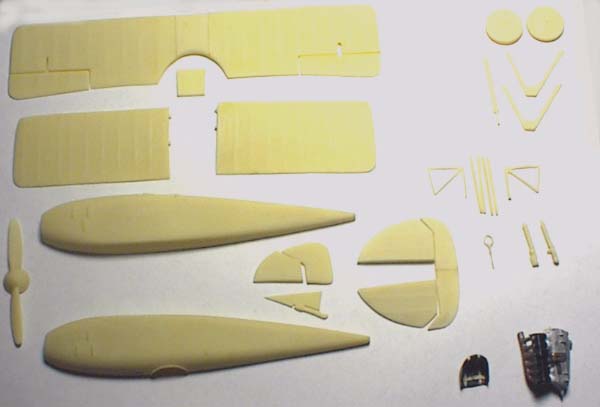
Kit Contents
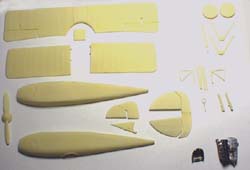
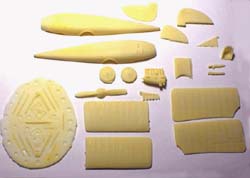 The
kit I received consisted of 36 resin parts and three xeroxed 'reference'
sheets and no decals. The small parts came in resin 'wafers'. Included
from IM was a sheet of decals, a piece of extruded plastic strut material
and a packet of Eduard WWI Instruments.
The
kit I received consisted of 36 resin parts and three xeroxed 'reference'
sheets and no decals. The small parts came in resin 'wafers'. Included
from IM was a sheet of decals, a piece of extruded plastic strut material
and a packet of Eduard WWI Instruments.
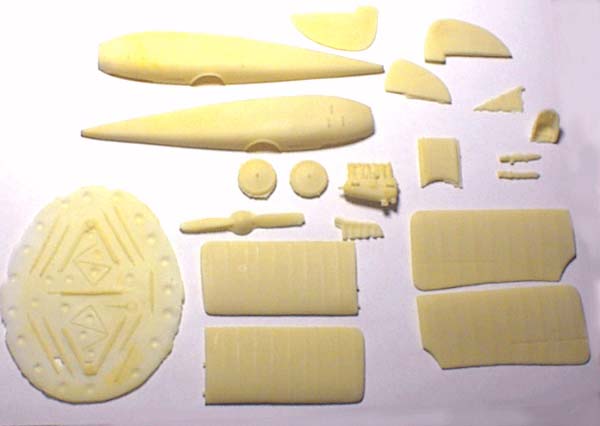
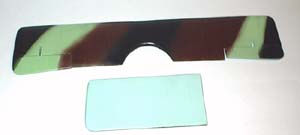
Parts Cleanup
No surprises here, the parts need cleanup. I prefer to say that the parts need to be 'Developed'. Just like a photograph's latent image, there is a latent shape in the resin just waiting to be developed. Plan to spend an evening cleaning up the parts and separating the control surfaces. Just like a vac kit, this sort of parts prep work is good for the soul and helps build strong character 12 ways..... so quitcherbitchin' and go make some resin dust.
I used the trusty X-acto with a sharp #11 blade for scraping, drilling out, and cutting. A jeweler's saw, panel line scriber, Flex-a-File, scissors and various sanding sticks and files rounded out the weapons load.
I used small scissors to cut the small parts out of their mold wafers. Scrape or slice the mold lines off the parts and smooth them up with files or sanding sticks. The small parts are a lot tougher than they look and are somewhat flexible. Easier to work with than injection parts the same size.
With a scriber and jeweler's saw I separated the control surfaces and dressed the edges with a sanding stick. The flying surfaces are a bit thick and need sanding. I did not go overboard here, mainly working to thin the trailing edges and reduce the rib station detail.
After assembling the top wing and the elevator, I washed all the parts in warm soapy water. The parts were several shades lighter after washing indicating how much oil had been removed from the surfaces.
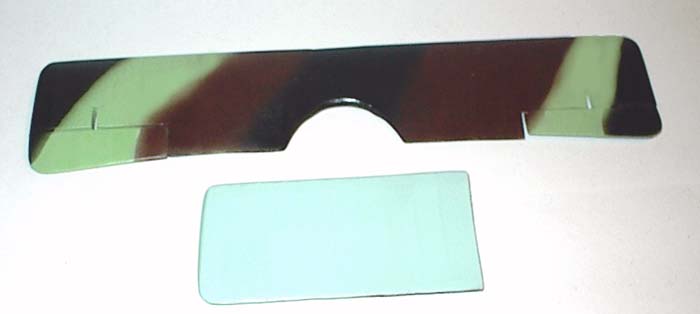
Parts all cleaned up and ready for assembly.
 Only
a very few bubbles forming pin holes in the resin pieces. These can be
fixed with a drop of CA or even a bit of rod dipped in CA and stuck in
the hole, then trimmed & sanded. Hard part is taking the time to find
them all. Fixing them is easy now, so give all the parts a serious squizzy
and fix what needs it.
Only
a very few bubbles forming pin holes in the resin pieces. These can be
fixed with a drop of CA or even a bit of rod dipped in CA and stuck in
the hole, then trimmed & sanded. Hard part is taking the time to find
them all. Fixing them is easy now, so give all the parts a serious squizzy
and fix what needs it.
Fuselage Construction
The fuselage is the right basic size and shape, but basic is the key word here, While you have a choice of engines, the Mercedes D.III and an Austro -Dalmer, the interior is bare except for a seat with molded on belts and a control stick. Here you can go two ways, You can super detail the interior or you can camouflage it. I put in a pilot to camouflage mine due primarily to time constraints on finishing this article.
The super detailer will surely want to grind out the cockpit walls to an acceptable thickness, add internal structure and controls. A Tom's Modelworks German Interiors set and a pair of somebody's PE Spandaus are a good starting point. The Eduard WWI Instruments PE set is another excellent source of details.
 Externally
you will have to represent the wing root fairings, iInspection ports,
cowl latches and other metal fittings visible on the surface.
Externally
you will have to represent the wing root fairings, iInspection ports,
cowl latches and other metal fittings visible on the surface.

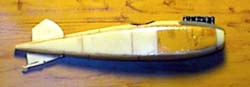
The inherent warp in the fuselage halves that made them curve away from each other was fixed by placing the parts flat side down on a piece of hard flat composite material (fake marble) under a 100 watt bulb no closer than 18" . That warp relaxed and those pieces flattened out and fit together well .
So after cleaning up and painting the engine and painting the interior walls a base coat of wood, I CAed the fuselage halves together. The seam was not bad and sanded down well. Here is when I took a moment to sand that little chin bump into the lower nose just where the spinner meets the cowl.
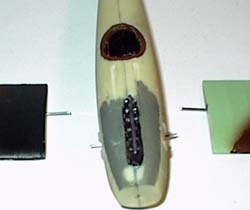
Mounting the lower wing
 I
chose to use a combination of methods to mount the lower wing panels to
the fuselage. The front attachment point is a brass tube which carries
through the fuselage into which fit wire pins set into the wing root,
the rear attachment point is a wire pin set into the wing root and inserted
into a hole drilled directly into the resin fuselage wall.
I
chose to use a combination of methods to mount the lower wing panels to
the fuselage. The front attachment point is a brass tube which carries
through the fuselage into which fit wire pins set into the wing root,
the rear attachment point is a wire pin set into the wing root and inserted
into a hole drilled directly into the resin fuselage wall.
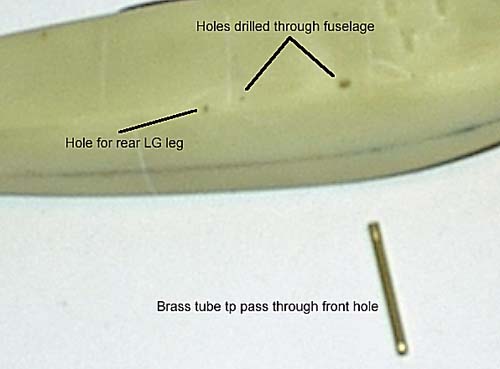
Drill out the holes at the marked locations. Use a small pilot hole and then re-drill to the correct diameter. In the front and larger hole, insert a length of brass tube and cut and file to exact length. Remove any brass burrs on the inside of the ends of the tubing with the point of a #11 blade.. Cement the tubing into the hole with a few drops of CA applied through the open cockpit hole.
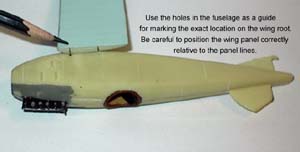 The
next step is to mark the locations of the holes for the wire pins in the
wing roots. Be sure to do exactly as I did in the photo and position the
wing correctly fore and aft relative to the panel lines. Do not however
do as I did for the photo and position the wrong wing upside down. I had
already glued both panels on by the time I discovered the photo error.
The
next step is to mark the locations of the holes for the wire pins in the
wing roots. Be sure to do exactly as I did in the photo and position the
wing correctly fore and aft relative to the panel lines. Do not however
do as I did for the photo and position the wrong wing upside down. I had
already glued both panels on by the time I discovered the photo error.

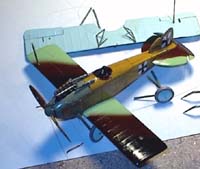
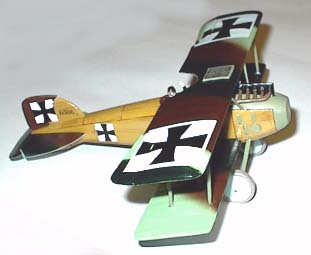
Painting
 I
used artist's acrylics thinned with Future to paint this model. The wing
and tail surfaces were sprayed from colors I mixed. Thin them to the consistency
of whole milk to airbrush. It takes several light coats to cover. The
fuselage was covered in individual panels of homemade ply decal material.
I sprayed a base coat of wood color I mixed from Acrylics & Future. When
this was well dry, I dry brushed a darker brown to simulate the tonal
variations in plywood. This was covered with a coat of Micro Scale clear
decal film. I cut the panels so the 'grain' did not match up across adjoining
pieces.
I
used artist's acrylics thinned with Future to paint this model. The wing
and tail surfaces were sprayed from colors I mixed. Thin them to the consistency
of whole milk to airbrush. It takes several light coats to cover. The
fuselage was covered in individual panels of homemade ply decal material.
I sprayed a base coat of wood color I mixed from Acrylics & Future. When
this was well dry, I dry brushed a darker brown to simulate the tonal
variations in plywood. This was covered with a coat of Micro Scale clear
decal film. I cut the panels so the 'grain' did not match up across adjoining
pieces.
 I
am told that the decals (Boelcke's 386/16) were done on an Alps. I gave
them a coat of air brushed Clear decal film and trimmed them close. They
were excellent. I applied them to a coat of clear future sprayed over
the paint and ply decals.
I
am told that the decals (Boelcke's 386/16) were done on an Alps. I gave
them a coat of air brushed Clear decal film and trimmed them close. They
were excellent. I applied them to a coat of clear future sprayed over
the paint and ply decals.

Rigging and Test Flying
I rig with heat stretched sprue pre-painted with Testors Metalizer steel. I was seven wires short of completion when the model slipped from my fingers and, without any attempt to recover by the pilot inside, augured straight in to the floor.
 The
resultant debris field about my feet was a sickening sight. After uttering
the requisite incantations, invocations and blood curses, I picked the
pitiful mess up and began damage assessment
The
resultant debris field about my feet was a sickening sight. After uttering
the requisite incantations, invocations and blood curses, I picked the
pitiful mess up and began damage assessment
Fortunately only the glue joints had popped and no resin parts were broken. This was due to the coat of Future that was sprayed on before assembly. The Future to resin bond was the weak link and gave without breaking the parts.
I was able to piece it back together. There was some unevenness in the landing gear that had to be dealt with before it would sit level again.
My best advice on test flying the Artur D.II is DON'T. The glide angle really stinks.
Conclusion:
 This
model is one for the detailer. The basic engine and bare interior are
a surefire way to knock most any AMS sufferer out of remission and into
a full blown relapse. The true perfectionist will sand down the wings
and tail surfaces and replace the surface detail The model builds quickly
and there are no major fit problems. If you are not into detailing cockpits
or engines, this model will suit you and a fine example can be made in
the markings of many famous aces who flew the D.II during their careers.
If you really do love to superdetail engines and interiors, then this
is the D.II kit for you. You literally have a blank slate and you and
your ability are the only limiting factors..
This
model is one for the detailer. The basic engine and bare interior are
a surefire way to knock most any AMS sufferer out of remission and into
a full blown relapse. The true perfectionist will sand down the wings
and tail surfaces and replace the surface detail The model builds quickly
and there are no major fit problems. If you are not into detailing cockpits
or engines, this model will suit you and a fine example can be made in
the markings of many famous aces who flew the D.II during their careers.
If you really do love to superdetail engines and interiors, then this
is the D.II kit for you. You literally have a blank slate and you and
your ability are the only limiting factors..
 Unfortunately.
if you prefer nicely detailed kits that build up into contest quality
models right out of the box, then you will be disappointed. There are
very few 'Bad' kits, however there are many kits which are unsuited to
certain modeler's styles. Knowing what kind of kit suits your style or
being flexible enough to adapt your style to various kinds of kits are
keys to enjoying the time you spend on this hobby. I found building the
Artur Albatros D.II kit to be an enjoyable project. I recommend this kit
to anyone who enjoys putting in some extra work to turn a basic kit into
a fine scale model.
Unfortunately.
if you prefer nicely detailed kits that build up into contest quality
models right out of the box, then you will be disappointed. There are
very few 'Bad' kits, however there are many kits which are unsuited to
certain modeler's styles. Knowing what kind of kit suits your style or
being flexible enough to adapt your style to various kinds of kits are
keys to enjoying the time you spend on this hobby. I found building the
Artur Albatros D.II kit to be an enjoyable project. I recommend this kit
to anyone who enjoys putting in some extra work to turn a basic kit into
a fine scale model.
Thanks to Lubos Vinar of VAMP mail order for supplying the kit and Eduard instruments.


Previous: Contents

