


 Copper
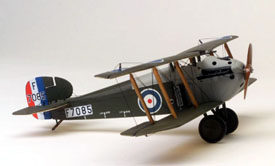
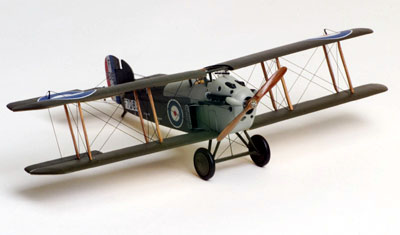
State's 1/48 Sopwith Dolphin
Copper
State's 1/48 Sopwith Dolphin

By Merrill
Anderson
Photos by Joel Butkowski
History
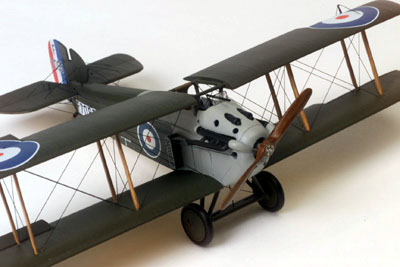
The Sopwith 5F.1 Dolphin is considered by some to have been one of the best fighters of the war, and is almost universally agreed to be the most underrated. The ugliest of Sopwith's wartime designs, and one of the very few powered by an inline engine, the Dolphin was untypical in several ways.
Designed in 1917, the Dolphin was in part, an attempt to address a common problem in earlier designs. In most biplanes, the pilot's view 'up and forward' is poor, and as that is where the pilot needs to 'see' in the steep turns necessary in combat, this is a serious flaw. Several designers tried to overcome this problem, but the solutions were not well accepted. Two well-known attempts were, the Bristol M1-C monoplane, and the de Havilland DH 5. They were good designs, but their unconventional nature doomed them to limited acceptance, and near obscurity. Sadly, this "curse" seems to have continued for the Dolphin.
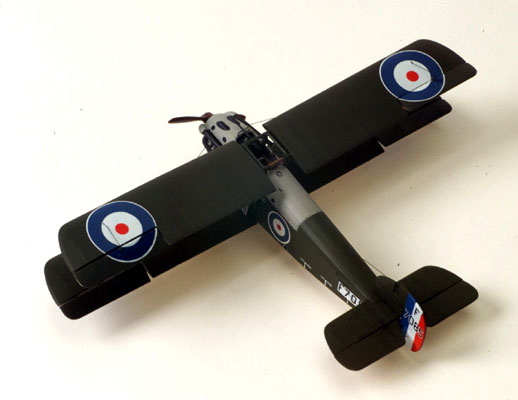
The key design feature of the Dolphin was the open center section of
the upper wing, with the pilot's head in the center of this opening, resulting
in a totally unobstructed 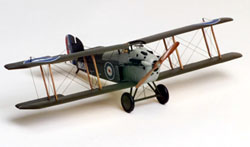 view
of the entire upper hemisphere. To accomplish this, the upper wing had
to be moved back, resulting in "negative stagger" with the leading
edge of the upper planes behind those of the lower wing, and the interplane
struts sloping toward the tail. That is the reverse of almost all the
aircraft of that era, and labeled the Dolphin 'unconventional' from the
start.
view
of the entire upper hemisphere. To accomplish this, the upper wing had
to be moved back, resulting in "negative stagger" with the leading
edge of the upper planes behind those of the lower wing, and the interplane
struts sloping toward the tail. That is the reverse of almost all the
aircraft of that era, and labeled the Dolphin 'unconventional' from the
start.
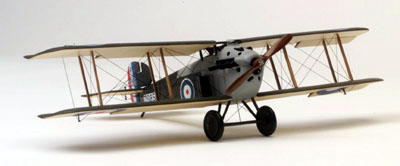
The Dolphin prototype first flew in May of 1917, achieved a speed of 146 mph in level flight, and outclimbed a Camel that was flying as a comparison. The findings of the official tests in May and June resulted in several changes to the design, the most obvious being the switch from a single large frontal radiator to two smaller side radiators, another 'unconventional' feature, as side radiators had disappeared from aircraft in late 1916. At about the same time, a specification appeared for a fighter mounting four guns, which Sopwith modified the Dolphin to meet.
The Dolphin, as issued, had two synchronized Vickers guns in the nose, and two Lewis guns mounted on the front bar of the cabane frame, tilted upward, at about 30 degrees to clear the propeller. In service, the Lewis guns were removed, or only one was left, as a "last resort" weapon, as aiming those guns was considered impossible. One unit, 87 Squadron, mounted the Lewis guns on the lower wing, outboard of the propeller arc, presaging the wing-mounted guns of later years.
The Dolphin was well received by the pilots who flew it, and began equipping
squadrons in December 1917. But problems with the geared 200-hp Hispano
Suiza engine, (the same problems that plagued the early SE 5 and the SPAD
XIII, i.e., easily broken reduction gears) resulted in slow deployment,
and some official distrust 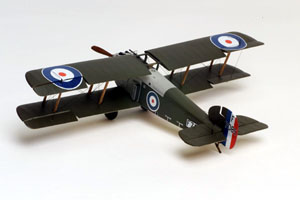 of
the design. Development was continued, however, with proposals and work
ups of a Dolphin II, powered by the still developmental Hispano 300 hp,
and the Dolphin III, a Dolphin I with a de geared 200 hp Hispano. Although
over 1,700 Dolphins were built, only five squadrons were equipped and
operated at the front, and despite it's excellent high altitude performance,
the Dolphin was used primarily for ground attack.
of
the design. Development was continued, however, with proposals and work
ups of a Dolphin II, powered by the still developmental Hispano 300 hp,
and the Dolphin III, a Dolphin I with a de geared 200 hp Hispano. Although
over 1,700 Dolphins were built, only five squadrons were equipped and
operated at the front, and despite it's excellent high altitude performance,
the Dolphin was used primarily for ground attack.

Paradoxically, in 1918, the Dolphin II, equipped with the 300 hp Hispano, was considered one of the aircraft of the future, and was to have been manufactured by both France and the U.S. The end of the war, however, cancelled those plans, and finished off the Dolphin, with the design being withdrawn from service, (in 1921) and the unissued stocks (over 650 planes) sold for scrap.
The Kit
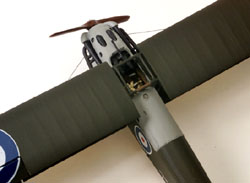
The Copper State Dolphin is a true "multi media" kit, with
resin fuselage, wings, stabilizer and rudder; white metal engine, gas
tank, props (a choice of two styles), front cowlings, exhausts, guns,
dash panel and all struts; and a large fret of photoetched details, (with
a second fret for cockpit instruments). The resin parts are quite good,
with virtually no surface bubbles, perfectly in register (almost no parting
 seams)
and no casting sprues. Exterior detail is subtle and smooth, and interior
detail on the fuselage halves is good. The white metal parts were a disappointment,
with several parts badly out of register, including all the struts and
the exhausts. The front upper cowling was a bit on the thick side, and
needed a lot of thinning, and none of the cowl access holes were cast
in. The guns, and the white metal seat seemed undersized, and the guns
were badly out of round, so I replaced the seat with a kitbashed photoetched
item, and the guns with Aeroclub items. The kit exhausts were beyond
saving and were replaced with scratchbuilt ones. The white metal tailskid
was too weak for the weight of the kit, and was replaced with brass. The
nickel photoetched fret looked beautiful, but the stuff is stiff and brittle,
so anneal anything you have to bend, even those parts (like the windscreen
frame) that have fold creases. One piece, conspicuous by it's absence,
was a prop boss (Eric offers a prop boss set separately). The fuselage
has scribed lines for the fuselage-mounted parts, but they are not the
same shape and size as the parts, and have to be puttied and sanded before
the parts go on.
seams)
and no casting sprues. Exterior detail is subtle and smooth, and interior
detail on the fuselage halves is good. The white metal parts were a disappointment,
with several parts badly out of register, including all the struts and
the exhausts. The front upper cowling was a bit on the thick side, and
needed a lot of thinning, and none of the cowl access holes were cast
in. The guns, and the white metal seat seemed undersized, and the guns
were badly out of round, so I replaced the seat with a kitbashed photoetched
item, and the guns with Aeroclub items. The kit exhausts were beyond
saving and were replaced with scratchbuilt ones. The white metal tailskid
was too weak for the weight of the kit, and was replaced with brass. The
nickel photoetched fret looked beautiful, but the stuff is stiff and brittle,
so anneal anything you have to bend, even those parts (like the windscreen
frame) that have fold creases. One piece, conspicuous by it's absence,
was a prop boss (Eric offers a prop boss set separately). The fuselage
has scribed lines for the fuselage-mounted parts, but they are not the
same shape and size as the parts, and have to be puttied and sanded before
the parts go on.
Assembly
Only part of the interior detail is provided: the dash, seat, and sidewalls,
a round, 'late' type photoetched joystick handle, and a curious early
type rudder bar (the Dolphin used round steel tubing, with leather straps).
The footboards and rudder bar (scratchbuilt) need to be set fairly high
off the floor, because the seating position is high to take advantage
of the view. The rudder bar is fairly close to the stick; I had to relocate
mine, because the back of the engine crankcase fouled it. The entire metal
cabane setup is useless, too weak, and on my example the upper cabane
framework was not fully cast. I replaced the cabane frame with brass wire
to support the upper planes; aligning the wings, cabane  struts
and fuselage was hard, fussy, and frustrating, and took several attempts.
The kit cabane struts were too short, and had to be replaced with Contrail
strut material. Another problem was that there were no locators, (holes,
dimples or whatever), for the interplane struts; scale plans; a fine ruler
and a good set of dividers are needed.
struts
and fuselage was hard, fussy, and frustrating, and took several attempts.
The kit cabane struts were too short, and had to be replaced with Contrail
strut material. Another problem was that there were no locators, (holes,
dimples or whatever), for the interplane struts; scale plans; a fine ruler
and a good set of dividers are needed.
I had a very bad time getting the white metal engine, cowling parts, and fuselage to align. Several dry fits, and some modification and 'tweaking' of the parts were required.
The one area of the Resin that sucked were the fuselage access holes, they were ragged and outsized, and had to be built up with A plus B putty, before they would match the provided PE trim rings. No 'interior' detail (filler caps, etc.) was provided, so I scrounged parts from generic photo etched sheets. The cockpit upper sidewalls on the Dolphin were sheet metal, so a photoetched piece is provided, but it's totally wrong. The provided piece is too long, too low, and flat on the bottom when it should have a slight curve to match up with the fuselage. The top of the piece should make a line that mates up with the cowling, and have cutouts to admit the cabane struts. I made my own section, using the Windsock plans as a guide, out of .005 brass sheet, after checking the fit with a file card prototype. To finish it off, I made a "rolled edge" by gluing a bit of .008 brass wires to the top edge. A note, my pieces are about 1/32 too high; the top curve is steeper than it looks on the plans, as the panel curves inward slightly to mate with the fuselage and cowling, so perspective drawing gets me again!
 I
rig my aircraft with .006 four-pound test fishing line (for 1/48 scale)
and drill holes completely through the wings and etc, and pull the line
taught (not tight) through the upper surface of the upper planes and the
lower surface of the lower planes. I then secure the lines with tape,
apply super glue to the holes (on the 'exterior surfaces') and let them
sit for at least an hour to cure. One drawback to fishing line is that
it has to be painted, but that's not as bad as it sounds.
I
rig my aircraft with .006 four-pound test fishing line (for 1/48 scale)
and drill holes completely through the wings and etc, and pull the line
taught (not tight) through the upper surface of the upper planes and the
lower surface of the lower planes. I then secure the lines with tape,
apply super glue to the holes (on the 'exterior surfaces') and let them
sit for at least an hour to cure. One drawback to fishing line is that
it has to be painted, but that's not as bad as it sounds.

Painting was with Floquil Polly Scale railroad colors, 'Empire Green' is a fair match for PC 10's green shades, and there are a fair number of grays (for battleship gray) to choose from. The 'unbleached linen' color I used on this kit was "D&RGW Bldg. Cream " which looks slightly pinkish when sprayed, but dries to a nice natural looking buff. After a coat of Future, I applied the kit decals, with the exception of the Roundels, whose blue was way too light in shade. For the Roundels, I used a spare set from Aero Master's Camel sheet, which were the right size. For the rudder flash, I cut a strip of blue decal film to cover the same too light blue on the kit decal. Topping it all off, I sprayed with my own mixture of semi gloss; it's really mostly Polly Scale flat, but I add a little satin to it to produce a very slight sheen, which I think looks right. I also brush straight satin onto the interplane struts, which were clear varnished on the original, it looks right, and it brings out my woodgraining effect.
Conclusions
This kit is not for the inexperienced, or the faint of heart. It will, with effort and patience, make a very good representation of the original, and is of a subject not previously available in 1/48. With the Blue Max kit coming out late this year, those who can wait for a model of the Dolphin perhaps should, but Mr. Gannon's kits have their problems too; for the experienced biplane modeler who has to have a kit of the Dolphin, the Copper State kit does have many good points.


Previous: Contents

