


 Aoshima
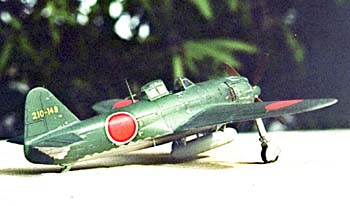
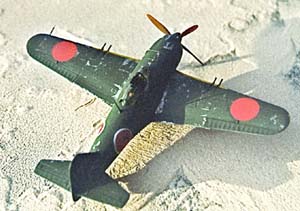
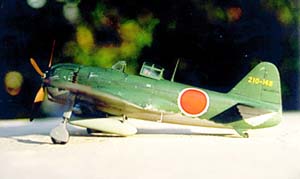
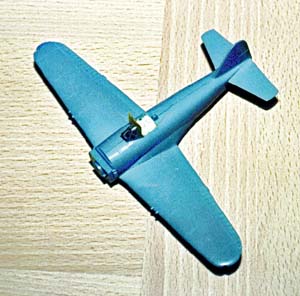
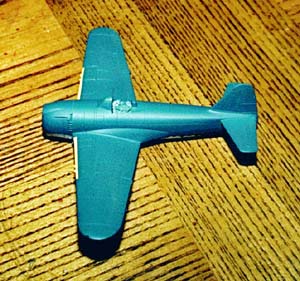
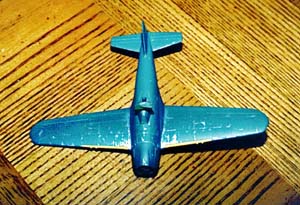
1/72 N1K1-J George
Aoshima
1/72 N1K1-J George
By Chris Bucholtz
Introduction
The Marine Corsairs were strung out in a loose set of two four-ship formations, the rear planes struggling to catch up to the lead element. They had been scrambled from the ready carrier to protect the fleet off Okinawa from yet another massive kamikaze attack after a huge radar contact had been picked up by a picket destroyer.
The lead Corsair spotted the Japanese planes, above and slightly to the right of where he'd expected to see them based on the heading provided by the fighter director aboard the picket destroyer. There were 30 planes, flying in an irregular gaggle. "Come on, let's rip 'em up," he said tersely. Eight R-2800s were fire-walled as the Corsairs raced up at the unwavering and unwitting kamikaze formation. The first Corsair calmly angled toward the lead element of the formation, picked out a slow-moving D3Y 'Val', took careful aim and spattered it with 20mm cannon fire from below. The plane erupted into a fireball; the engine wrenched from the wreckage, the tail buckled upwards, then the right wing folded over the tangled metal where the cockpit had been. As the Corsair flashed past its victim, the Val's 500-kg bomb detonated, rocking the Corsair and forcing the pilot to battle for control momentarily.
 Having
sliced through the formation, the Corsair pilot banked to the right and
looked down on the enemy formation, which had begun to scatter. It was
too late for three other Japanese aircraft; two were burning and streaking
the sky with greasy black plumes of smoke, while a third had been reduced
to debris after a catastrophic explosion, which left an angry black blossom
in the sky. The Marine pilot was momentarily transfixed by the oddly beautiful
sight of the destroyed plane's parts spinning and twirling toward the
ocean, glinting in the morning sun.
Having
sliced through the formation, the Corsair pilot banked to the right and
looked down on the enemy formation, which had begun to scatter. It was
too late for three other Japanese aircraft; two were burning and streaking
the sky with greasy black plumes of smoke, while a third had been reduced
to debris after a catastrophic explosion, which left an angry black blossom
in the sky. The Marine pilot was momentarily transfixed by the oddly beautiful
sight of the destroyed plane's parts spinning and twirling toward the
ocean, glinting in the morning sun.
His mind snapped back to the task at hand as he saw tracers coming up over his cowling; suddenly, from below his nose, a Japanese fighter screamed past and over him even before he could fire his guns, using roughly the same approach that the Marine pilot had used to destroy the Val. The Japanese fighter's wingman squeezed off some rounds at the Corsair as well before flashing past. These were no suicide planes, the Marine realized - these were escort fighters!
 He
threw the stick to the left and tried to spot the Japanese fighters. The
two had attached themselves to a pair of Corsairs, who were forced to
break off their attacks on the kamikaze aircraft. One followed a Corsair
as it dove to safety, and the Marine thought this a foolish move. The
Corsair could outpace all comers in a dive, and the move put the Japanese
fighter below and in front of him. He quickly closed on the Japanese plane,
picked up a lead and fired. At extreme range, a shell smashed into the
wing root and two more banged into the fuselage behind the Japanese pilot,
who quickly sideslipped his plane, causing the Corsair to overshoot. In
every other action, the Marine had seen hits like this ignite the fragile
Japanese aircraft or cripple their pilots. It dawned on him that this
was not a Zero or a J2M 'Jack.' This was an N1K1-J 'George,' a mid-winged
fighter - and it was still in the fight!
He
threw the stick to the left and tried to spot the Japanese fighters. The
two had attached themselves to a pair of Corsairs, who were forced to
break off their attacks on the kamikaze aircraft. One followed a Corsair
as it dove to safety, and the Marine thought this a foolish move. The
Corsair could outpace all comers in a dive, and the move put the Japanese
fighter below and in front of him. He quickly closed on the Japanese plane,
picked up a lead and fired. At extreme range, a shell smashed into the
wing root and two more banged into the fuselage behind the Japanese pilot,
who quickly sideslipped his plane, causing the Corsair to overshoot. In
every other action, the Marine had seen hits like this ignite the fragile
Japanese aircraft or cripple their pilots. It dawned on him that this
was not a Zero or a J2M 'Jack.' This was an N1K1-J 'George,' a mid-winged
fighter - and it was still in the fight!
 The
Japanese pilot righted the 'George' and tried to turn into the Corsair,
which scissored in front of him, providing only a fleeting shot. The N1K1-J
was still on the Corsair's tail, however, in a spiraling, descending turn
to the right. At the end of each complete turn, the Corsair pilot could
see more of the 'George' over his shoulder - first the tip of the fin,
then the top of the canopy, then the spinner and cowling. In the next
turn, the 'George' would have a lead. 'This is not going to work"
the Marine thought. He leveled the wings of his F4U and jerked the stick
back, surprising the Japanese pilot, who tightened his own turn and tried
to dive away. This only gave the Corsair the advantage; the Marine kicked
the rudder to the left and dropped he left wing, forcing the Corsair into
a shuddering turn. The 'George' was all but gift-wrapped for the Marine,
its pilot too focused on escape to look behind him. The Corsair's guns
roared; the tracers zipped over the right wing for a long instant. Then
'George's' wing was punctured by a series of ugly bursts that carried
up and over the fuselage. The ammunition trays in the N1K1-J's right wing
exploded, snapping the outer wing off and sending it spinning into space.
Only when shells splintered and split the horizontal rudder into a blur
of wooden shards did the plane shudder and suddenly spin out of control,
slapping into the ocean left wing first and exploding in a white froth.
The engine and propeller ripped from the motor mount and skipped across
the sea's surface twice before mushing to a stop a quarter mile away.
Only then did the Marine realize how low the fight had taken him. "That
was a tough plane,î he thought to himself. "Thank God that pilot
made so many mistakes."
The
Japanese pilot righted the 'George' and tried to turn into the Corsair,
which scissored in front of him, providing only a fleeting shot. The N1K1-J
was still on the Corsair's tail, however, in a spiraling, descending turn
to the right. At the end of each complete turn, the Corsair pilot could
see more of the 'George' over his shoulder - first the tip of the fin,
then the top of the canopy, then the spinner and cowling. In the next
turn, the 'George' would have a lead. 'This is not going to work"
the Marine thought. He leveled the wings of his F4U and jerked the stick
back, surprising the Japanese pilot, who tightened his own turn and tried
to dive away. This only gave the Corsair the advantage; the Marine kicked
the rudder to the left and dropped he left wing, forcing the Corsair into
a shuddering turn. The 'George' was all but gift-wrapped for the Marine,
its pilot too focused on escape to look behind him. The Corsair's guns
roared; the tracers zipped over the right wing for a long instant. Then
'George's' wing was punctured by a series of ugly bursts that carried
up and over the fuselage. The ammunition trays in the N1K1-J's right wing
exploded, snapping the outer wing off and sending it spinning into space.
Only when shells splintered and split the horizontal rudder into a blur
of wooden shards did the plane shudder and suddenly spin out of control,
slapping into the ocean left wing first and exploding in a white froth.
The engine and propeller ripped from the motor mount and skipped across
the sea's surface twice before mushing to a stop a quarter mile away.
Only then did the Marine realize how low the fight had taken him. "That
was a tough plane,î he thought to himself. "Thank God that pilot
made so many mistakes."
 Armor
to protect the pilot, self-sealing fuel tanks, rugged construction, and
a hard-hitting armament of 20mm cannon and 12.7mm machine guns. These
are attributes one doesn't immediately associate with Japanese aircraft
of World War II, but they do apply to the Kawanishi N1K1-J Shiden - and
they're the attributes that made the aircraft such an unwelcome surprise
to American pilots, who first engaged them over the Philippines in September,
1944.
Armor
to protect the pilot, self-sealing fuel tanks, rugged construction, and
a hard-hitting armament of 20mm cannon and 12.7mm machine guns. These
are attributes one doesn't immediately associate with Japanese aircraft
of World War II, but they do apply to the Kawanishi N1K1-J Shiden - and
they're the attributes that made the aircraft such an unwelcome surprise
to American pilots, who first engaged them over the Philippines in September,
1944.
The Shiden's evolution is an interesting one. The plane originated from a 1940 requirement for a floatplane fighter, a concept still in vogue in the days before the ascendancy of the aircraft carrier. The N1K1 Kyofu (Mighty Wind) was a stoutly-built floatplane, with a respectable engine and reasonably good armament. Initially, the plane mounted two two-blade contra-rotating propellers to offset a tendency to swing to the left on takeoff, but this proved too complex and was abandoned in favor of a standard three-bladed prop and a bootful of rudder from the pilot.
 Despite
this, Japanese Navy officials recognized the design's potential and ordered
Kawanishi to develop a land- and carrier-based version, to be powered
by the Homare Type 11 1900-horsepower engine. The plane incorporated many
of the hard lessons learned at the cost of the cream of Japan's fighter
corps: self-sealing tanks, armor and firepower were the only way to survive
against the American Hellcat and Corsair. The plane brought with it the
rugged construction of a floatplane, and it seemed like a natural winner.
Despite
this, Japanese Navy officials recognized the design's potential and ordered
Kawanishi to develop a land- and carrier-based version, to be powered
by the Homare Type 11 1900-horsepower engine. The plane incorporated many
of the hard lessons learned at the cost of the cream of Japan's fighter
corps: self-sealing tanks, armor and firepower were the only way to survive
against the American Hellcat and Corsair. The plane brought with it the
rugged construction of a floatplane, and it seemed like a natural winner.
Unfortunately, getting the plane into service was a trial in itself. Adapting the mid-wing floatplane into a land based fighter required a set of long, complicated main landing gear, and collapses of the gear were to plague the N1K1-J through its entire career. The Homare engine required refinement and development, and there were stability issues to address before the N1K1-2 could make the jump to land.
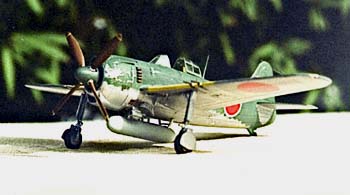
Not all of these problems had been ironed out when the first units of N1K1-Js were sent to the Philippines to try to hold back the rising Allied tide. Had the Japanese Navy had a cadre of well-trained pilots at their controls, the N1K1-Js – known as the 'George' to the Allies - might have made a significant impact on the invading aircraft. As it was, even with inexperienced pilots, the 'George' was formidable; it was the first Japanese plane many pilots had faced that didn't immediately burst into flames after being hit.
 The
units in the Philippines were swept aside, but more N1K1-Js were employed
in the defense of the home islands, where they were tasked with intercepting
low-level marauders: Hellcats, Corsairs, Avengers and Helldivers of the
U.S. carrier fleet, followed soon by Mustangs, Thunderbolts, and Invaders
flying from Okinawa. The B-29s were left to other aircraft; the N1K1-J's
performance fell off as altitude increased.
The
units in the Philippines were swept aside, but more N1K1-Js were employed
in the defense of the home islands, where they were tasked with intercepting
low-level marauders: Hellcats, Corsairs, Avengers and Helldivers of the
U.S. carrier fleet, followed soon by Mustangs, Thunderbolts, and Invaders
flying from Okinawa. The B-29s were left to other aircraft; the N1K1-J's
performance fell off as altitude increased.
The N1K1-J was followed in early 1945 by the N1K2-J Shiden-kai, an entirely redesigned version with a low wing, shorter landing gear and a refined tail section, and this aircraft was an even more formidable foe. The Shiden and Shiden-kai fought until the end of the war; they were not used as kamikaze aircraft, but were considered too valuable as escorts for other aircraft. Some N1K1-Js were modified to serve as dive-bombers to oppose the Allied invasion, but these were never put into use.
Building the Kit
Aoshima's N1K1-J, when it was released three years ago, came as a great surprise. Aoshima 1:72 aircraft have left behind an unenviable heritage. Their Avenger, Dauntless, Tigercat, and Helldiver are among the least accurate and most poorly detailed models I've ever seen, and their series of underscale, over-featured Japanese aircraft represent the low point of Japanese kit design and manufacture. The only reasonable looking build-up of one of these kits I've ever seen was a P-63 Kingcobra unlimited air racer modified more heavily in real life than Aoshima accidentally modified the plane in making their kit! However, the 'new' fighter series, including the N1K1-J family - and the N1K2-J and Ta 152 families that followed it onto the market - are as far removed from these kits as you could get. The kits feature accurate outlines, fine recessed panel line detail, and good fit, a shocking change from the company's earlier efforts.
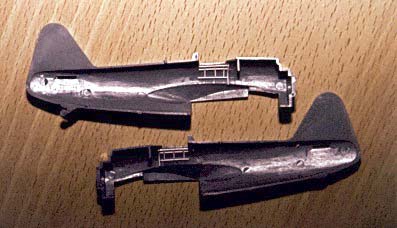
 The
kit includes a good engine, respectable interior detail, and boxed wheel
wells; the landing gear struts and strut doors are molded as single pieces,
but look great. A one-piece cowling covers the engine and joins smartly
to the fuselage, and the fit of the wing checked out as better than acceptable.
The
kit includes a good engine, respectable interior detail, and boxed wheel
wells; the landing gear struts and strut doors are molded as single pieces,
but look great. A one-piece cowling covers the engine and joins smartly
to the fuselage, and the fit of the wing checked out as better than acceptable.
Although I'm an enthusiastic student of the Pacific War, I had just one Japanese aircraft in my collection, a MXY8 Ohka I built for a club contest. A little prodding from our editor motivated me to dig out this kit, along with an older MPM kit of the same subject and the Famous Aircraft of the World volume on the Kyofu, Shiden and Shiden-kai. I also picked up the Eduard brass set for the N1K1, which borrows heavily from the detail in the MPM kit.
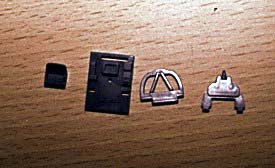 The
cockpit parts of the kit are good starting points, with a stepped control
panel, floor, seat, control column and rear bulkhead. The seat is oversized,
so I discarded it and folded together the Eduard seat, only to discover
that it was absurdly undersized; with a seat this small, there would be
no need for seat belts - once your backside was jammed into this, you
were never going anywhere! I pitched the Eduard seat and found a suitable-shaped
seat in resin from the otherwise horrific Pavla set for the P-39.
The
cockpit parts of the kit are good starting points, with a stepped control
panel, floor, seat, control column and rear bulkhead. The seat is oversized,
so I discarded it and folded together the Eduard seat, only to discover
that it was absurdly undersized; with a seat this small, there would be
no need for seat belts - once your backside was jammed into this, you
were never going anywhere! I pitched the Eduard seat and found a suitable-shaped
seat in resin from the otherwise horrific Pavla set for the P-39.
 The
Eduard set provides upper surfaces for the wheel wells. To add them, I
used a Dremel tool to thin down the kit wheel well tops, then cut them
out with an X-Acto knife. The brass was a perfect fit and added detail
to the already-good wheel wells; three U-braces per well further enhanced
the look. These braces' ends projected above the wing surface, so when
the superglue was dry I filed them flush with the wing.
The
Eduard set provides upper surfaces for the wheel wells. To add them, I
used a Dremel tool to thin down the kit wheel well tops, then cut them
out with an X-Acto knife. The brass was a perfect fit and added detail
to the already-good wheel wells; three U-braces per well further enhanced
the look. These braces' ends projected above the wing surface, so when
the superglue was dry I filed them flush with the wing.
 Styrene
strip was used to add detail to the sides of the fuselage. Eduard provides
brass kickplates and a four-piece rudder bar, which I added to the floor
section. At this point, I was worried about breaking off parts, so I glued
them into place on the one-piece lower wing section. I airbrushed my cockpit
parts with RAF interior green, tinted slightly with blue.
Styrene
strip was used to add detail to the sides of the fuselage. Eduard provides
brass kickplates and a four-piece rudder bar, which I added to the floor
section. At this point, I was worried about breaking off parts, so I glued
them into place on the one-piece lower wing section. I airbrushed my cockpit
parts with RAF interior green, tinted slightly with blue.
As I took inventory of Eduard's parts, I noticed that there were many facets of the brass set that didn't jive with the photos of an N1K1 interior in the FAOW book. Furthermore, the directions in the Eduard set were incomprehensible, even by the standard of Eduard's own early products. I started picking and choosing parts to match the photos, and added a few boxes from the scrap box. The Eduard instrument panel was airbrushed with two shades of dark gray, and once it was added to the instrument panel, it looked quite nice.
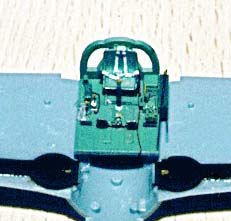 I
added various bits of resin and brass to improve the interior, including
parts from Reheat, Cooper Details, Hawkeye and, of course, Eduard. This
busied-up the interior to match the photos. These were painted to match
the photos. The cockpit of the 'George' has numerous levers with colored
knobs; these were replicated with dabs of white glue, which were painted
the appropriate color once dry.
I
added various bits of resin and brass to improve the interior, including
parts from Reheat, Cooper Details, Hawkeye and, of course, Eduard. This
busied-up the interior to match the photos. These were painted to match
the photos. The cockpit of the 'George' has numerous levers with colored
knobs; these were replicated with dabs of white glue, which were painted
the appropriate color once dry.
The kit control column was added to the floor, and the cockpit assembly was anchored to the lower wing, which has raised locating tabs to accommodate it. This allowed me to add small details, like additional levers and knobs, without having to handle the cockpit parts. The wing served as a handle, and I could add bits to the cockpit sidewalls and test fit the fuselage and wing to check alignment and placement. All in all, it was a very civilized way to finish up a cockpit!
 When
I was satisfied with the interior, I superglued the two halves of the
fuselage together. The fit was spectacular and left only a mild ridge
to be cleaned up on the lower fuselage. I used a Dremel tool to remove
the tops of the wheel wells and replaced them with the much more detailed
Eduard wheel well roofs; any gaps left were filled by a little white glue,
which boxed them in nicely. The fuselage was dropped onto the lower wing,
which fit extremely snugly – too snugly, I discovered later. The
top wings went on next, and these left some gaps at the root. Sanding
these was complicated by the root shape; essentially, the wing, root and
fuselage formed three distinct planes, which came to a point about an
inch from the leading edge on the model.
When
I was satisfied with the interior, I superglued the two halves of the
fuselage together. The fit was spectacular and left only a mild ridge
to be cleaned up on the lower fuselage. I used a Dremel tool to remove
the tops of the wheel wells and replaced them with the much more detailed
Eduard wheel well roofs; any gaps left were filled by a little white glue,
which boxed them in nicely. The fuselage was dropped onto the lower wing,
which fit extremely snugly – too snugly, I discovered later. The
top wings went on next, and these left some gaps at the root. Sanding
these was complicated by the root shape; essentially, the wing, root and
fuselage formed three distinct planes, which came to a point about an
inch from the leading edge on the model.
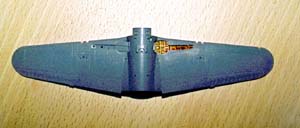
After considerable effort, the roots were blended in and the panel lines that had been lost were restored. Next came the tailplanes; the Aoshima kit includes both the standard rounded horizontal tail and the squared-off tail of the N1K1-Jb. These squared stabilizers fit spectacularly, requiring only a bit of filler. Only then, when I was able to compare the wing's alignment to the tail's alignment, did I notice that the left wing was slightly higher than the right! I tried to gently coax the wing down when I heard a loud SNAP! The upper wing snapped off at the root, wrecking all of my work to blend it in! When I pushed it back into place, the wing took on the right dihedral. Apparently, this kit won't allow you to build a bad model from it!
After
blending, sanding and scribing the wing back to an appropriate standard,
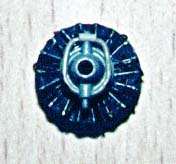
I started on the engine. The kit engine is nice enough, but the addition
of Eduard's pushrods, a bit of tubing for the oil system on the crankcase
cover, and ignition wires to each of the cylinders helped it out immensely.
I painted the inside of the cowling and the firewall in RAF interior green
and added the engine and cowling to the fuselage.
I added a gunsight made from resin and styrene bits and a ring and
bead from the Eduard set to the top of the instrument panel and glued
the windscreen in place. This was masked with Parafilm M, as were the
rear canopy and sliding section. Then, the entire model was airbrushed
with Testors Model Master non-buffing aluminum. This would provide the
lower surface color - by the time the -JB version came around, the Japanese
had abandoned painting the undersides of their airplanes - and give me
a basis to weather the plane later. Next, I masked off the ID panels and
painted them with AeroMaster Japanese ID yellow. These were masked off,
and I 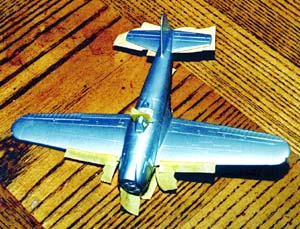 made
additional scalloped masks from Tamiya masking tape to delineate the border
between upper and surface colors. With these in place, I gave the uppersides
a coat of AeroMaster IJN Green. As soon as this was dry to the touch,
I attacked it with a sharp X-Acto knife, chipping and scratching the paint.
Japanese paint was notorious for its poor adhesion, so I chipped it liberally,
especially around the cowling, ammunition bay doors, wing roots and leading
edges of the wings and tail. Then, I painted the fabric surfaces of the
ailerons and elevators with IJN gray; these parts were still painted.
With this done, I sprayed the model with a 50-50 mixture of Varathane
and water; this provided me with a smooth surface for decaling and was
dry in just a few minutes, too!
made
additional scalloped masks from Tamiya masking tape to delineate the border
between upper and surface colors. With these in place, I gave the uppersides
a coat of AeroMaster IJN Green. As soon as this was dry to the touch,
I attacked it with a sharp X-Acto knife, chipping and scratching the paint.
Japanese paint was notorious for its poor adhesion, so I chipped it liberally,
especially around the cowling, ammunition bay doors, wing roots and leading
edges of the wings and tail. Then, I painted the fabric surfaces of the
ailerons and elevators with IJN gray; these parts were still painted.
With this done, I sprayed the model with a 50-50 mixture of Varathane
and water; this provided me with a smooth surface for decaling and was
dry in just a few minutes, too!
 All
was going well until now. Lacking any Japanese decals, I selected the
kit's markings. They all went on well, until I hit them with SuperSol;
at that point, the hinomarus wrinkled up something awful. For once, I
obeyed the SuperSol instruction and didn't touch the decals, trusting
in God, country and modern chemistry to flatten out my decals. When they
dried, they did not smooth out, so I removed them with tape. This, in
turn, pulled up my Varathane gloss coat and left horrific circular blobs
on the lower wings in the natural metal. Worse yet, a patch of green lifted
off on the fuselage spine, a completely unrealistic location for such
weathering. To say I was displeased would be a dramatic understatement.
All
was going well until now. Lacking any Japanese decals, I selected the
kit's markings. They all went on well, until I hit them with SuperSol;
at that point, the hinomarus wrinkled up something awful. For once, I
obeyed the SuperSol instruction and didn't touch the decals, trusting
in God, country and modern chemistry to flatten out my decals. When they
dried, they did not smooth out, so I removed them with tape. This, in
turn, pulled up my Varathane gloss coat and left horrific circular blobs
on the lower wings in the natural metal. Worse yet, a patch of green lifted
off on the fuselage spine, a completely unrealistic location for such
weathering. To say I was displeased would be a dramatic understatement.
This required me to apply some new paint over the flawed areas. I used an index card with a hole cut in as a 'moveable mask' this allowed me to re-paint the offending areas without marring the rest of the model. Once this was dry, I shot another coat of Varathane over the model and added new Hinomarus - these from an AeroMaster set, which behaved much better. A wash of thinned dark gray watercolor paint was run through the panel lines and was sealed with another coat of Varathane.
 The
landing gear was next. I sanded mold lines on the struts and painted them
aluminum, then added a bit of blackened copper wire as a brake line. The
kit wheels and tires were cleaned up, and the hubs were painted silver.
Photoetched wheel covers came next. I added the wheel covers and brass
actuators to the fuselage, then popped the landing gear into place.
The
landing gear was next. I sanded mold lines on the struts and painted them
aluminum, then added a bit of blackened copper wire as a brake line. The
kit wheels and tires were cleaned up, and the hubs were painted silver.
Photoetched wheel covers came next. I added the wheel covers and brass
actuators to the fuselage, then popped the landing gear into place.
The drop tank was assembled, sanded and painted IJN gray. Its supports were painted silver. This fit into place without any troubles.
The propeller posed a challenge. The prop governor on the real item
projected from large cutouts in the spinner, but the kit had just small
cuffs on its prop. I enlarged the spinner cutouts with a round file and
then added the backplate, allowing me to paint the spinner without needing
to mask the propellers.  I
then cut small lengths of metal tubing to length to form the governor
assembly. A small bit of the tubing projected from the spinner, allowing
me to slip it in later. The propeller was snipped from the hub, and the
cuffs acted as perfect stoppers in the tubing. The blades were painted,
the prop was assembled, and I was able to move toward final assembly.
I
then cut small lengths of metal tubing to length to form the governor
assembly. A small bit of the tubing projected from the spinner, allowing
me to slip it in later. The propeller was snipped from the hub, and the
cuffs acted as perfect stoppers in the tubing. The blades were painted,
the prop was assembled, and I was able to move toward final assembly.
The kit's cannon barrels were grossly oversized. I nicked the barrels from an Airfix Mosquito and drilled them out, then glued them into the wings. The pitot tube was next; the inner rod of the tube was superglued into a pre-drilled hole, and the outer tube was slipped over this and attached to the wing. This assembly has much more strength and durability to it than it would if the entire rod/tube assembly was glued to the wing leading edge.
I brush-painted the exhaust stacks with Testors Model Master burnt sienna, and ran a dark gray wash over the model to pop out the panel detail. Next, I shot the model with a thinned coat of Testors dullcote. When this was dry, I added the rear canopy and sliding section, the radio mast and the drop tank assembly. Early on, I had cut out the wing formation lights; now, I added painted bits of red and green wire into pre-drilled holes in these notches and added small drops of 5-minute epoxy to form light covers. One of my favorite touches are the landing gear indicator pins; I drilled holes in the wings and inserted very fine copper wire, painted red, to capture this small and frequently overlooked detail. A few fibers from a pair of smoke-colored panty hose were run from the tail to the radio mast. Finally, I brushed on a light amount of black and dark gray pastel to the cannons, machine gun troughs and exhaust areas.
Conclusion
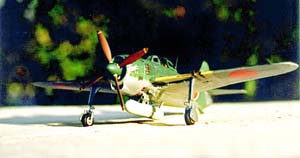
The final product is a sharp-looking fighter, and it could have been finished easier and more quickly had I not had the wing and decal mishaps! Aoshima's mid-wing 'George' is a first-rate kit befitting one of Japan's finest fighters.


Previous: Contents

