


 Academy
1/48 Seversky P-35A Fighter
Academy
1/48 Seversky P-35A Fighter
By Kelly Jamison
Background
The Seversky P-35A can draw its ancestry directly from the SEV-1XP and the Hawk 75. These aircraft had many technical problems that led to the development of the P-35 through trial and error. Many different combinations of fuselages, engines and wings went into the final production. Many of de Seversky's designs were developed for the world of aircraft racing, including a model dubbed 'The Dolittle Special.' Because of the struggling economy of 'The Thirties', Seversky started to look for clients to export his fighter to. Unknown to Seversky his company sold 20 fighters to a company called Aircraft Trading that had dealings with one Mr. Yamamoto! Seversky was notified that the aircraft were going to go to Siam. Nothing was ever said about Japan during these dealings until the War Department heard about the deal. By this time the planes were packed on the Hokkai Maru in Los Angeles Harbor and the aircraft were on their way to 'Siam.' The Imperial Japanese Navy gave the planes the designation of A8V1 Type S aircraft and planned to use them to escort their Nell bombers over China. This aircraft became the only American airplane to operationally serve with Japan during the long war to come. Under the designation of EP1-106, the P-35A went on to serve in the Swedish Air Force also.
The Kit
 The
instructions direct you to start in the 'office' area first so I will
do the same. It is quite Spartan and can use some fixing up. There is
a lot of room for improvement in this area. I recommend the Eduard's ed48087
Detail Set you can get for around $15.00. I airbrushed silver on all interior
surfaces. I have tried to find good photos of P-35 interiors only to come
up short every time. Then I struck gold in an unlikely place. Warren M.
Bodie's book titled Republic's P-47 THUNDERBOLT From Seversky to Victory.
It covers the start of Seversky in his early racing days and follows the
progression of design to the XP-72. This book is a must for any modeler
who is interested in the Jug line of aircraft. It shows a perfect interior
shot of the fuselage station and great cockpit shots along with wonderful
cutaway drawings and colors profiles. If you want something just a little
smaller and something that will not take as big a bite out of your wallet,
try out Squadron's P-35 Mini in Action book #1. It will give you most
of the information that you need for this project.
The
instructions direct you to start in the 'office' area first so I will
do the same. It is quite Spartan and can use some fixing up. There is
a lot of room for improvement in this area. I recommend the Eduard's ed48087
Detail Set you can get for around $15.00. I airbrushed silver on all interior
surfaces. I have tried to find good photos of P-35 interiors only to come
up short every time. Then I struck gold in an unlikely place. Warren M.
Bodie's book titled Republic's P-47 THUNDERBOLT From Seversky to Victory.
It covers the start of Seversky in his early racing days and follows the
progression of design to the XP-72. This book is a must for any modeler
who is interested in the Jug line of aircraft. It shows a perfect interior
shot of the fuselage station and great cockpit shots along with wonderful
cutaway drawings and colors profiles. If you want something just a little
smaller and something that will not take as big a bite out of your wallet,
try out Squadron's P-35 Mini in Action book #1. It will give you most
of the information that you need for this project.

Popular consensus is that the pre-war P-35s were all silver on the inside with instrument panels painted in a flat black. I used Testors Acryl Silver for interior surfaces and Acryl Aircraft Interior Black on all sundry items and instrument panels. The aft bulkhead was glued to the floor assembly and the seat glued to the bulkhead after painting the seat cushion backrest FS 34087 Olive Drab. An old set of strap decals was applied to the seat. The aft bulkhead that the seat is attached to needs to be tilted back, according to the instructions, 100 degrees. So get out your protractor or just match the angle to the drawing on the instructions. A light wash of watered down black brings out the detail. Since the aircraft will be displayed with the canopy closed, I decided not superdetail the interior. I painted the inside of the firewall and other areas that need to remain unseen, flat black.
It is time to glue a small plate into the tail of the fuselage that the tail wheel will be attach to. Voice of experience 'Do Not Forget This Piece.' That is all I have to say about that. If you want to have your plane flying, the tail wheel doors are molded closed and you can bypass putting this plate the tail wheel attaches to in and just glue the doors in place before painting. There are these two little pieces labeled C29 and C30. They brace against the tail wheel doors. There is a diagram on the instructions that let you know the placement of these two parts. I don't know what purpose they serve and I can not find them in any picture of a P-35 so I left them out.
I dry fitted the cockpit to the fuselage halves and was pleased with the fit. The instrument panel glues directly onto the right fuselage half along with a small cluster of gauges. Take your time and make sure that the panel is level when you put the two fuselage halves together. There is a throttle quadrant that glues up to the left fuselage half. They are clearly marked on the instructions and there are no hidden problems with these components. The fuselage halves align up very nicely and took just a little Ambroid Pro Weld along the seams to bind the two pieces together. I placed that section aside and started on the wing halves.
The wing is a three-piece affair with a single underwing. The pieces are well molded and did not cause any problems as far as alignment or gluing together. I painted the center of the bottom wing silver for the landing gear bays. I painted the wing root area that can be seen inside of the cockpit, flat black. It really helps the office area look like it is 'floating' inside the fuselage. There are these strange protrusions right below where the gun barrels come out of the wing. They are quite normal and need to be glued into place at this time. The two exhaust stacks that are glued to the bottom of the fuselage right behind the bottom of the engine cowl are undersized and need to be replaced with some brass tubing and putty built to the right shape to replicate the farings that go around the stacks. I am sticking with the ones from the kit to stay with the box stock theme. There are no locating pins or any other reference and the web pictures to let you know exactly where to glue them. I used my references for their locations.
 Assembly
up to this point is extremely quick and without any major problems if
you build out of the box. I slowed down during the assembly of the wing
to the fuselage to get the dihedral correct and work on the wing root
area. I do not plan to use any filler in this area and wanted to make
sure alignment is perfect for on the silver paint job later down the road.
Where the bottom of the wing meets the bottom of the fuselage there is
a small gap so I used Flash Thick CA+ Gap Filling Superglue was used to
get this area filled. If you use an accelerator and then sand after a
few minutes of drying time, the CA glue does an excellent job filling
up the seams in this area. Flashtac Cyanoacrylate Accelerator is my weapon
of choice. I used Flash Super Thin CA to glue the wing roots to the fuselage.
The tail planes needed just a little trimming to fit properly. There were
scratches on these surfaces that I did not notice until the silver paint
went down. So, make sure and polish out these areas as well.
Assembly
up to this point is extremely quick and without any major problems if
you build out of the box. I slowed down during the assembly of the wing
to the fuselage to get the dihedral correct and work on the wing root
area. I do not plan to use any filler in this area and wanted to make
sure alignment is perfect for on the silver paint job later down the road.
Where the bottom of the wing meets the bottom of the fuselage there is
a small gap so I used Flash Thick CA+ Gap Filling Superglue was used to
get this area filled. If you use an accelerator and then sand after a
few minutes of drying time, the CA glue does an excellent job filling
up the seams in this area. Flashtac Cyanoacrylate Accelerator is my weapon
of choice. I used Flash Super Thin CA to glue the wing roots to the fuselage.
The tail planes needed just a little trimming to fit properly. There were
scratches on these surfaces that I did not notice until the silver paint
went down. So, make sure and polish out these areas as well.
A small scoop is attached to the top of the fuselage that helps hide that upper seam going back to the canopy. I started to sand any trouble spots and blemishes on the wings and fuselage in preparation of the SNJ Silver. The key to using this paint is in the prep. Every little nick, bump, indention, scratch shows up 10 fold. Once you polish the model from top to bottom, go back and do it again. Any shortcut you take will come back and haunt you. Take care of the blemishes now and it will pay off in the end.
I glued the headrest onto the top of the fuselage to help keep any painted surface off the desk when the plane is upside down. It glues into a small tab protruding off the fuselage to help alignment. On the nosepiece there are two machine gun covers that cover the barrels up to the edge of the cowl. These are two tear drop shape pieces of plastic and are poorly molded. I have seen pictures of P-35s without the smooth fairing around the barrels in the front and just have the two barrels coming out of the cowling. You might want to replace these two lumps with some brass tubing or cut off the old plastic machine gun barrels and drill out new holes for some barrels.
 I
broke out the airbrush and the SNJ Silver Spray. Make sure to mix it up
and keep it stirred during your entire airbrush session. It sprayed on
very smoothly in a dull aluminum. Follow the instructions and be patient.
I sprayed three coats waiting 15 minutes for drying between each coat.
Then for good measure I allowed the plane to dry overnight. The next morning
I grabbed the polishing cloth that came in the starter kit and the polishing
powder. Dabbing a small amount of the powder, I started hand polishing
the fuselage. The dull aluminum quickly turned to a smooth metal look.
I love this product. The wings were next being careful not to polish out
the flight controls. I left them a dull aluminum color. You can spend
more time on certain panels giving them a more polished look or leave
them as sprayed. The model was easy to handle and did not need a sealer
to keep fingerprints off the 'metalized' surface.
I
broke out the airbrush and the SNJ Silver Spray. Make sure to mix it up
and keep it stirred during your entire airbrush session. It sprayed on
very smoothly in a dull aluminum. Follow the instructions and be patient.
I sprayed three coats waiting 15 minutes for drying between each coat.
Then for good measure I allowed the plane to dry overnight. The next morning
I grabbed the polishing cloth that came in the starter kit and the polishing
powder. Dabbing a small amount of the powder, I started hand polishing
the fuselage. The dull aluminum quickly turned to a smooth metal look.
I love this product. The wings were next being careful not to polish out
the flight controls. I left them a dull aluminum color. You can spend
more time on certain panels giving them a more polished look or leave
them as sprayed. The model was easy to handle and did not need a sealer
to keep fingerprints off the 'metalized' surface.
My next test of SNJ was to tape up the aft section of the engine cowl in preparation of painting on the white band the nose. Tamiya Low Adhesive tape is an excellent product for taping on SNJ surfaces. It taped up with no problems but special attention had to be spent on getting around the contours of the machine gun blisters. I used Badger Flex Gloss White for the nose and let it dry fully before pulling off the tape. The tape came off with no problems at all. The silver surface was flawless. I wish I could say the same thing for Testors Metalizer paints. SNJ, I am sold.
The wheels are a one piece deal with the centers being painted chrome silver and the tires painted flat black. My sample had large scratches that had to be filled on the smooth outer part of the wheel. The landing gear glues into some holes in the bottom of the wing and line up with no problem. There are small rods that extend from the gear to the inside of the landing gear wells. If you glue them to the sides of the landing gear like the instructions say, you will not have enough room to put the gear covers on. I had to thin out the inside of the gear covers to get them to even sit right. You can see what they are used for when you remember that the gear went straight back and half of the wheel stayed exposed. I fought with those wheel covers for some time. There are two small aft fairings for the landing gear that glue directly to the bottom of the wing. There are no location pins so be careful. You might want to glue these down before painting the wings and fuselage.
I
did not like the kit machine gun barrels at all and decided to break with
my box stock theme. The ones that came with the kit looked way too small
and were warped. I used brass tubing to replace the kit ones. This was
my only deviation from my original plan. If you look close in the pictures
of the real thing, you will see the barrels do not come out at the center
of the curve on the leading edge of the wing, They come out on the upper
part of the wing. The kit does not depict this and I did not notice it
when I was drilling the holes for the new barrels. There is a rather long
air scoop that runs along the bottom of the engine cowling and is centered
on a small pin on the bottom of the wing. I had to test fit this piece
many times, trimming away small amounts to get it to fit right. The pitot
tube was painted chrome silver and fit nicely into the wing. I used Rub
N' Buff on the front side of the propeller blades and painted the back
side part way down flat black according to the directions. The center
hub is painted chrome silver. On the exported versions of this aircraft
there is a small spinner that goes over the hub. Leave this off for the
American version.
I used Bare Metal Foil to mask off the canopy then used Rub N' Buff to paint the frame work. Be careful taking off the foil if you use this method. It is easy to scratch up the glass. The aft canopy fit poorly to the top of the fuselage. If I had to do this kit again I would mask off the canopy then glue it to the fuselage working the seam smooth before painting the plane silver. This is where I ran into another problem. The Plexiglas passenger door on the right side of the aircraft is another thing that I would have glued in when I had the fuselage halves apart. It was so difficult to get in that I had to remove the seat from the cockpit and put my pinkie finger into the fuselage to help get the window in place. I used Krystal Klear white glue to keep it in place and superglued the seat back in when I was finished.
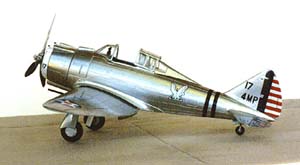
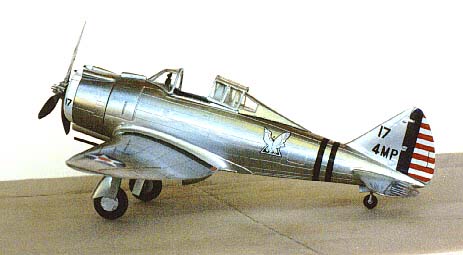
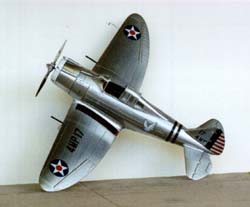
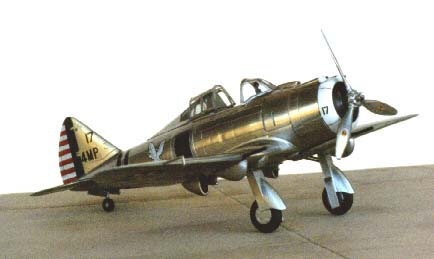
I used the kit decals for a USAAF P-35A flown by Lt. Boyd D. Wagner of the 17th Pursuit Squadron and Americas first Ace of WWII. The instructions do not show the white band on the forward part of the engine cowling but my research and the box art both show the white band. I trimmed up the decals removing any carrier film that might dull the silver paint. This helped the decals look painted on but was very tedious.
The bare metal makes this plane a real eye catcher but did pose some problems in construction. Making sure you have a blemish free surface before painting and you have glued on all farings, covers and frames prior to painting will help the look of the model tremendously. There are no real 'Gatcha' problems with this kit but I am a little disappointed in the fact that there are less decal options in this kit than in the HobbyCraft version of the same kit while the cost of this kit is about ten dollars more. Keep your eyes out for the HobbyCraft offering on the sale rack and save yourself some money to spend on a good photoetched set and some True Detail wheels.
Here are some items that will greatly enhance the look of your P-35:
Republic's P-47 THUNDERBOLT - From Seversky to Victory by Warren M. Bodie
SQ1601 Seversky P-35 Mini In Action @ $4.50 USD
Eduard ED48098 P-35 Flaps
Reheat Models REH076 Seversky P-35 Detail Set
AeroMaster Products AMD48055 USAAF 1938-42
SQT9544 Seversky P-35 Canopy Set
http://www.hotel.wineasy.se/ipms/stuff_eng_detail_p35.htm
True Details Accessories 1/48 TD48020 P-40/P-35/P-36 Wheel Set
1/48 FA0132 Canopies: USAAF WWII by Falcon Industries @ $15.00 USD
My sincere thanks to MRC for this review sample!


Previous: Contents

