


 Alan
1/35 Marder II
Alan
1/35 Marder II

by Richard Eaton
Introduction
One of my favorite small WWII 1/35 scale armor subjects is the German Marder line of Tank Destroyers. I am slowly making all five versions of the Marder. I reviewed this kit in the January issue of Internet Modeler. Recently I got a chance to build it in between other projects.
Building the Marder II D
This new kit from Alan in Russia is of the standard Sd.Kfz 132 Marder II. A first impression of the kit is that it is comparable to Italeri in the detail and quality of its molding. Building the kit confirmed my first impressions.
 The
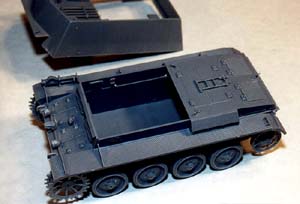
torsion bar suspension included separate basic parts that I glued to the
hull. Use some caution to get a good alignment before adding the road
wheels. The front drive sprocket halves do not want to line up well so
spend some extra time getting things straight. This alignment is critical
to later fitting the excellent individual track links onto the kit. I
assembled the road, rear, and drive wheels and dry fit for alignment.
Be sure you use the right parts for the rear wheel as there are two different
sets provided. Once aligned, I glued all wheels in place except the drive
wheel. I wanted that to turn when it came time to add tracks.
The
torsion bar suspension included separate basic parts that I glued to the
hull. Use some caution to get a good alignment before adding the road
wheels. The front drive sprocket halves do not want to line up well so
spend some extra time getting things straight. This alignment is critical
to later fitting the excellent individual track links onto the kit. I
assembled the road, rear, and drive wheels and dry fit for alignment.
Be sure you use the right parts for the rear wheel as there are two different
sets provided. Once aligned, I glued all wheels in place except the drive
wheel. I wanted that to turn when it came time to add tracks.

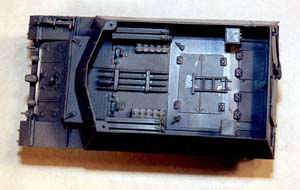
I then attacked the tank deck. The kit provides for all hatches to be posed in either open or shut positions. Since there was no interior detail I assembled them shut.
I like to assemble models in sections so that there is ample time to dry fit and add detail that would be difficult in later steps. Once comfortable with the fit of things, I then glued the deck to the lower hull and added all the detailed parts. At the rear, I covered the muffler with the included PE screen bent to shape.
 A
low armored shield surrounds the fighting compartment on all sides. Molded
with this is a good amount of the top deck. This portion of the tank's
deck had to mate with the rest of the deck on the hull. Dry fitting this
the deck matched up very nicely! The only problem is getting the shield
to line up with the rest of the deck. The kit includes ammunition storage
boxes that protrude through this portion of the tank deck at an angle
and lay on top of the deck. I added those next rather than glue the deck
and shield to the lower hull as called for in the instructions. I then
added the driver's hatches and various other bits. I then glued the shield
and deck to the lower hull. Extra care and a lot of tape is required to
get the shield lower edges to sit snugly onto the deck and hull. Tiny
tie downs ring the shield top.
A
low armored shield surrounds the fighting compartment on all sides. Molded
with this is a good amount of the top deck. This portion of the tank's
deck had to mate with the rest of the deck on the hull. Dry fitting this
the deck matched up very nicely! The only problem is getting the shield
to line up with the rest of the deck. The kit includes ammunition storage
boxes that protrude through this portion of the tank deck at an angle
and lay on top of the deck. I added those next rather than glue the deck
and shield to the lower hull as called for in the instructions. I then
added the driver's hatches and various other bits. I then glued the shield
and deck to the lower hull. Extra care and a lot of tape is required to
get the shield lower edges to sit snugly onto the deck and hull. Tiny
tie downs ring the shield top.

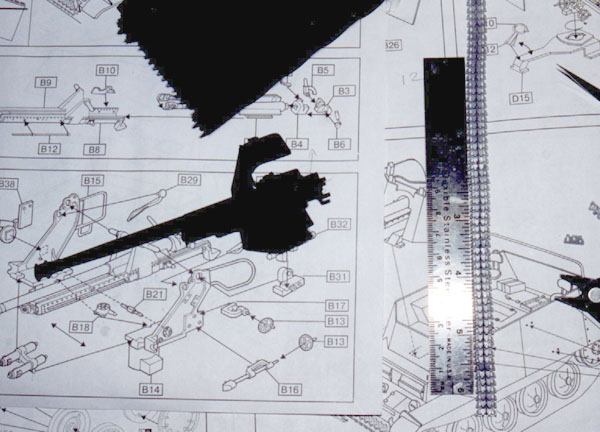
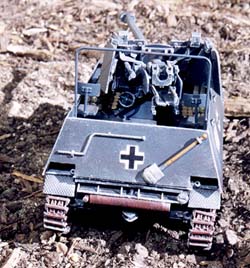
 The
7.62 cm gun is executed nicely with 25 parts. I followed the kit instructions
to the letter here. It assembles much like a Pak 40 75mm starting with
the barrel and breach assembly. Three different operating handles go on
the very nicely molded breach. I then assembled the gun mounting rail.
The rear of this assembly is tricky to align and needs quite a bit of
cleanup. I carefully sanded, dry fit, and mated the two barrel halves.
The
7.62 cm gun is executed nicely with 25 parts. I followed the kit instructions
to the letter here. It assembles much like a Pak 40 75mm starting with
the barrel and breach assembly. Three different operating handles go on
the very nicely molded breach. I then assembled the gun mounting rail.
The rear of this assembly is tricky to align and needs quite a bit of
cleanup. I carefully sanded, dry fit, and mated the two barrel halves.

Once dry, I sanded the barrel to eliminate the seams and cleaned up the muzzle brake. I next assembled the gun mount and recoil system. There are numerous sighting and control hardware pieces that give this assembly a great bit of detail. The mount is designed so that gun elevation and traverse are possible.
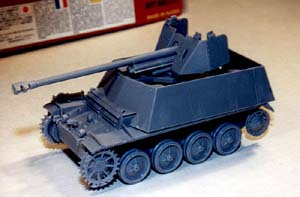 I
then assembled the shield and associated hardware. Four nicely detailed
periscopes line the top of the shield. These required a bit of cleanup.
A sliding bit of armor protects the area over the barrel. Use care here
to preserve the elevation of the main gun. I dry fitted the completed
shield assembly to the main gun several times due to its tricky and critical
alignment. Once I was happy, out came the glue. The gun and shield assembly
twist locks into the one piece lower gun mount. I then glued the gun mount
in place on the tank deck taking care to align things.
I
then assembled the shield and associated hardware. Four nicely detailed
periscopes line the top of the shield. These required a bit of cleanup.
A sliding bit of armor protects the area over the barrel. Use care here
to preserve the elevation of the main gun. I dry fitted the completed
shield assembly to the main gun several times due to its tricky and critical
alignment. Once I was happy, out came the glue. The gun and shield assembly
twist locks into the one piece lower gun mount. I then glued the gun mount
in place on the tank deck taking care to align things.
 There
are four small trees of individual track links. The track links are the
first individual moldings I have seen in a kit for this vehicle type and
are superb. Interconnecting moldings seem fine and a dry fit of several
links proved that it should be no problem linking them together. I carefully
cut out and built the tracks in sections. I like to glue the tracks together
using a straight edge for alignment. I then let them set up for 20 minutes
or so before placing them on the tank. The drive sprocket is most critical
area to build so I started there. Using liquid glue as a 'lubricant' I
work the treads into the sprockets around the drive wheel. I then connected
the remaining treads gluing as I went to achieve that classic tread droop
associated with German torsion bar tanks. I assembled he tracks in two
sessions over two days.
There
are four small trees of individual track links. The track links are the
first individual moldings I have seen in a kit for this vehicle type and
are superb. Interconnecting moldings seem fine and a dry fit of several
links proved that it should be no problem linking them together. I carefully
cut out and built the tracks in sections. I like to glue the tracks together
using a straight edge for alignment. I then let them set up for 20 minutes
or so before placing them on the tank. The drive sprocket is most critical
area to build so I started there. Using liquid glue as a 'lubricant' I
work the treads into the sprockets around the drive wheel. I then connected
the remaining treads gluing as I went to achieve that classic tread droop
associated with German torsion bar tanks. I assembled he tracks in two
sessions over two days.
Painting and Weathering
 I
sprayed the entire tank with Testors Panzer Gray. I then sprayed the model
with gloss coat to aid in dark washes and decals. I painted the road wheel
rubber scale black. A fairly thick wash of Testors rust was applied on
the tracks. Once dry I added a wash of a mix of acrylic scale black and
brown to
I
sprayed the entire tank with Testors Panzer Gray. I then sprayed the model
with gloss coat to aid in dark washes and decals. I painted the road wheel
rubber scale black. A fairly thick wash of Testors rust was applied on
the tracks. Once dry I added a wash of a mix of acrylic scale black and
brown to 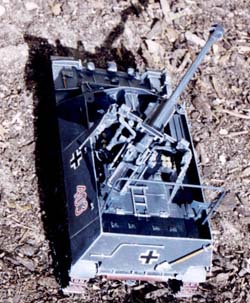 the
entire tank. Then I washed the tracks again with scale black.
the
entire tank. Then I washed the tracks again with scale black.


And now my favorite part of armor modeling, dry brushing! I used Testors light gray to highlight detail all over the tank and treads. I followed that up with Testors Steel painting the recoil rails of the main gun and then lightly dry brushing the treads and hull. I finished up the weathering by applying ground pastel black with a brush to the gun muzzle, breach, and pretty much any where else I felt like it.
Decals
 Kit
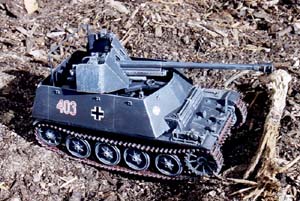
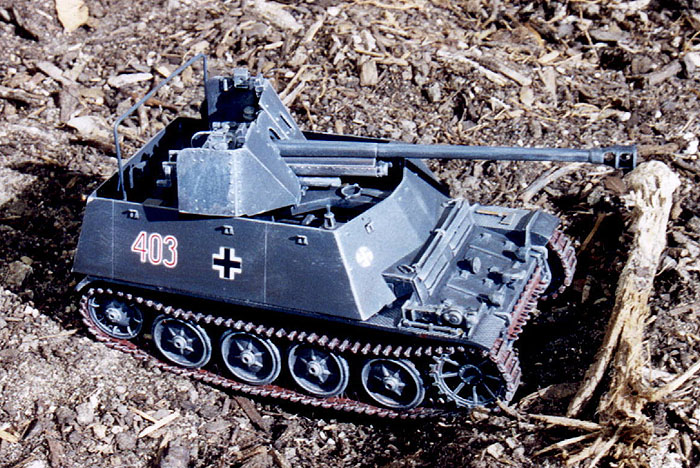
decals allowed for three different unit markings. I chose the SS Panzer
Division "Viking" markings because I thought the red lettering and black
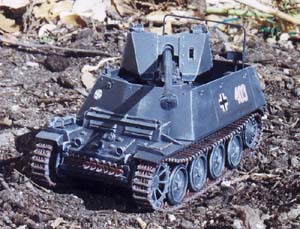
and white crosses looked nice on all that gray.
Kit
decals allowed for three different unit markings. I chose the SS Panzer
Division "Viking" markings because I thought the red lettering and black
and white crosses looked nice on all that gray.

I applied the kit decals with good results over the gloss coat. They looked pretty good until I sprayed dull coat over the model. Then the decal silvering. Oh well, next time I'll use Future!
Conclusion
I took the completed model and set it in the dust dry soil of my garden for the completed shots. This kit builds up fairly easily to a nice representation of this vehicle. I recommend it to the average level armor builder due to the amount of dry fitting required and the individual track links. If you are into the Marder variants, as I am, I am sure that you will like this early model beauty. I can pose this beast right along with the rest of my Marders! Hum, could they possibly be a "collection" entry in the model show next summer? Maybe so now!
Source
F.M. von Senger und Ettrlin: German Tanks of World War II, Galahad Books, 1969.


Previous: Contents

