


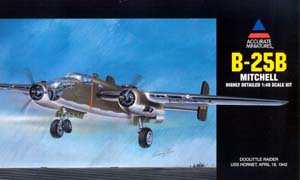
 Accurate
Miniatures 1/48 North American B-25B Mitchell
Accurate
Miniatures 1/48 North American B-25B Mitchell
By Michael Benolkin
Background
The B-25 series started life as a drawing board concept at North American Aviation, designated NA-40. Developed as a light bomber for the 'peacetime' Army Air Corps, the NA-40 was a twin-engine, twin-tailed aircraft that was competing for limited funding. The NA-40 was adopted, with some changes, as the B-25. The B-25 and B-25A were both procured in small numbers and used for training, as these aircraft were not configured with self-sealing fuel tanks and other combat necessities. The B-25B would be the first version that was combat-ready, and the RAF dubbed the aircraft as Mitchell Mk.I.
The aircraft was named in honor of General Billy Mitchell, whose maverick style tended to get him into political trouble, but his message was belatedly understood loud and clear. Airpower was a force to be reckoned with, and aircraft can be used to sink even the most powerful battleships. Mitchell foresaw the future of aviation, and like many outspoken visionaries, he was court-martialed and stripped of his military career. Japanese planners also recognized the truth in Mitchell's vision and proved him correct on December 7, 1941. The B-25 was going to war.
The Tokyo Raid
 Major
James Doolittle proposed a daring strike against the seemingly invincible
Japanese. He would take a squadron of light bombers aboard an aircraft
carrier and launch a raid against the Japanese homeland. In 1942, the
US was still reeling from the surprise attack against Pearl Harbor as
well as from subsequent defeats throughout the Pacific. Morale at home
was suffering. Such a raid may not cause a devastating strategic blow
against Japan, but it would let the Japanese know that they were not invincible
and it would serve as a major morale-booster at home.
Major
James Doolittle proposed a daring strike against the seemingly invincible
Japanese. He would take a squadron of light bombers aboard an aircraft
carrier and launch a raid against the Japanese homeland. In 1942, the
US was still reeling from the surprise attack against Pearl Harbor as
well as from subsequent defeats throughout the Pacific. Morale at home
was suffering. Such a raid may not cause a devastating strategic blow
against Japan, but it would let the Japanese know that they were not invincible
and it would serve as a major morale-booster at home.
Of course, you've probably seen the great movie, '30 Seconds Over Tokyo' and read a few articles about Doolittle's raid. What you may not have read is just how dangerous it really was. Doolittle considered a number of aircraft for the mission. One runner-up was the Martin B-26, which had the range and payload, but its greater wingspan would be more of a factor on the narrow confines of a carrier deck, and its takeoff requirements were too high (airspeed/takeoff roll) to be feasible. Remember, while the last aircraft to depart the Hornet had the whole deck to take off from, Doolittle's aircraft was at the front of the pack, almost mid-way on the deck - he had only half the deck to take off from!
 Another
factor; pilots are taught a number of techniques to get the aircraft off
the ground. You have your standard takeoff roll, you have your short field
takeoff profile, and you have your soft field profile. The deck of the
Hornet was too short for even the short field take-off, which simply involves
a normal acceleration down the runway and a brisk initial climbout at
a safe speed to clear an obstacle at the end of the runway. The soft field
(taking off from soft dirt/grass) involves lofting the aircraft into the
air at the shortest possible distance, since the grass/dirt is a major
drag against your wheels and impedes takeoff acceleration. It is fairly
easy to coax the aircraft into the air at minimal airspeed, but you are
usually too slow to control the aircraft safely. This technique also assumes
that you don't have to climb immediately, as you'll need to remain in
ground effect while you accelerate to the aircraft's actual safe flying
speed. The Doolittle Raiders had no obstacles to climb over on takeoff,
but the 'ground effect' ended at the end of the carrier deck, so they
had little margin for error in getting these fully-loaded B-25s into the
air.
Another
factor; pilots are taught a number of techniques to get the aircraft off
the ground. You have your standard takeoff roll, you have your short field
takeoff profile, and you have your soft field profile. The deck of the
Hornet was too short for even the short field take-off, which simply involves
a normal acceleration down the runway and a brisk initial climbout at
a safe speed to clear an obstacle at the end of the runway. The soft field
(taking off from soft dirt/grass) involves lofting the aircraft into the
air at the shortest possible distance, since the grass/dirt is a major
drag against your wheels and impedes takeoff acceleration. It is fairly
easy to coax the aircraft into the air at minimal airspeed, but you are
usually too slow to control the aircraft safely. This technique also assumes
that you don't have to climb immediately, as you'll need to remain in
ground effect while you accelerate to the aircraft's actual safe flying
speed. The Doolittle Raiders had no obstacles to climb over on takeoff,
but the 'ground effect' ended at the end of the carrier deck, so they
had little margin for error in getting these fully-loaded B-25s into the
air.

The USS Hornet was selected as the carrier to get Doolittle within striking range of Japan. The Hornet was also in significant danger up until the B-25s were off the deck - her entire air wing was trapped below decks while the B-25s were on the deck. Had the Hornet encountered Japanese air opposition, there was no way to get her fighters into the air for protection – Enterprise was along to provide needed air cover. That was why Admiral Halsey insisted on launching the B-25s when they were spotted by the patrol craft, he had assumed that the Japanese would respond immediately to their presence so close to the Japanese homeland. Once the B-25s were gone, he could get his fighters on deck and get the Hornet out of Dodge!
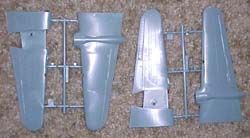
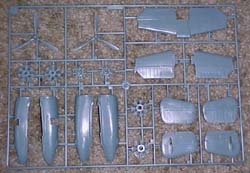
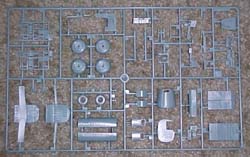
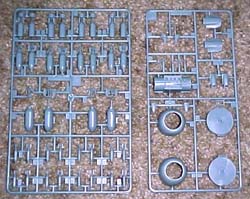
The Kit
 |
 |
 |
 |
 |
 |
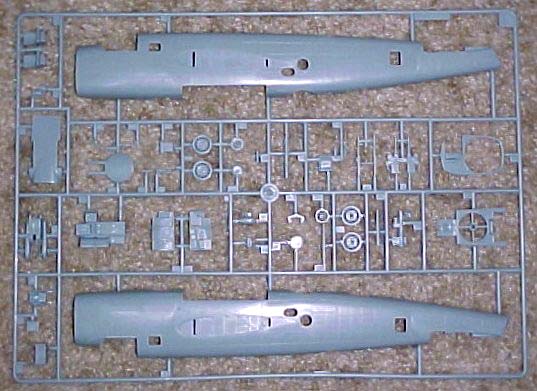
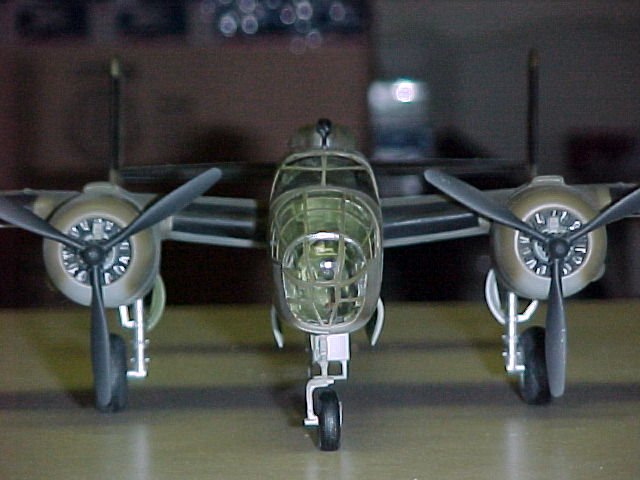
Molded in light grey and clear plastic, this kit represents the first combat-capable version, the B-25B. The instructions show how to build up the standard B-25B, and in the footnotes explain what parts of the kit to add/leave off to represent the Doolittle version. This is the first B-25 kit in 1/48 with fully scribed panel lines. The detail work is nicely done indeed. There are a number of ejector pin marks throughout the kit, but you'll find that none of them are visible once the aircraft is assembled. This kit also has a bit of flash on many of the parts, and on my example there is also flash on the ejector pin marks. You'll need to ensure that all of the flash is removed prior to installing each part to ensure a good fit.
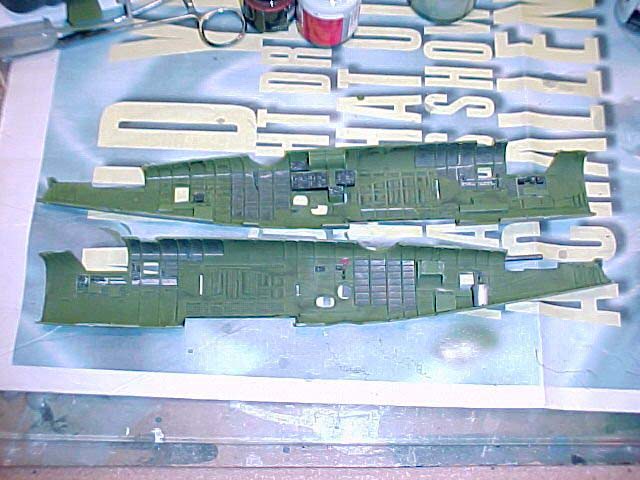
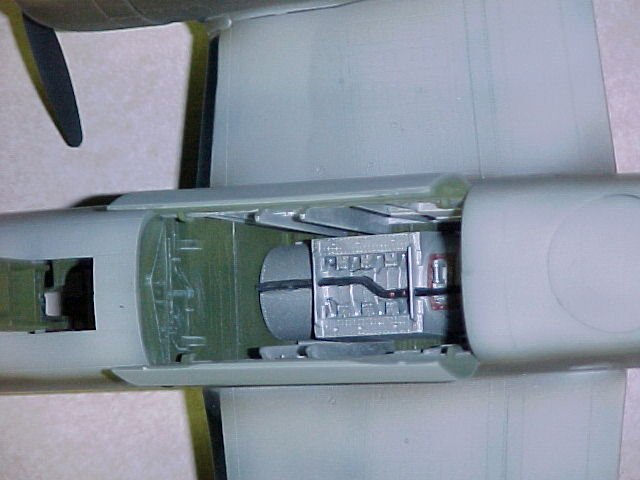
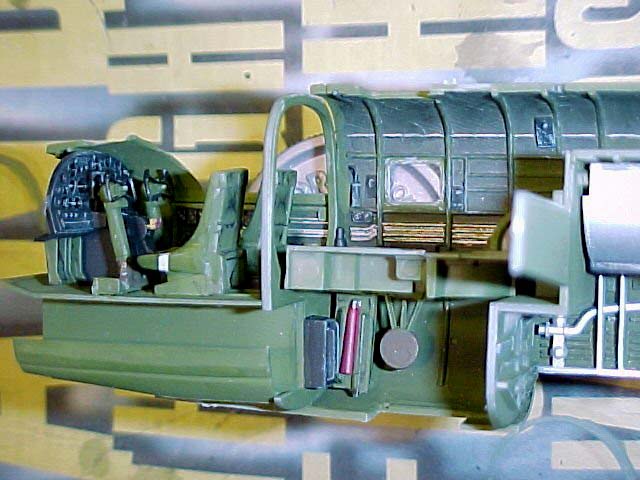
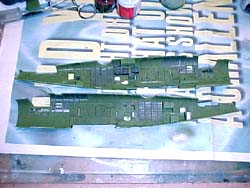 The
detailing inside and out is quite extensive. The cockpit alone is a nice
piece of artwork, including all of the compulsory details: dual control
yokes, throttle quadrant, crew seats with decal-based seatbelts; detailed
bulkheads, and the signature transparent instrument panel. The interior
fuselage halves even represent the soundproof pads that were fitted between
the ribs and stringers. In fact, as you can see with some of the interior
photos, the detailing includes a full interior, with radio operator's
station, top and bottom turrets with nice detailing, dummy tail 'stinger'
for the Doolittle version, and nicely laid out bombardier's station in
the nose. Unfortunately, with the exception of the bombardier's station,
very little of this great detail is visible once the aircraft is assembled.
Let's get started.
The
detailing inside and out is quite extensive. The cockpit alone is a nice
piece of artwork, including all of the compulsory details: dual control
yokes, throttle quadrant, crew seats with decal-based seatbelts; detailed
bulkheads, and the signature transparent instrument panel. The interior
fuselage halves even represent the soundproof pads that were fitted between
the ribs and stringers. In fact, as you can see with some of the interior
photos, the detailing includes a full interior, with radio operator's
station, top and bottom turrets with nice detailing, dummy tail 'stinger'
for the Doolittle version, and nicely laid out bombardier's station in
the nose. Unfortunately, with the exception of the bombardier's station,
very little of this great detail is visible once the aircraft is assembled.
Let's get started.
 First
off, I pre-painted every interior part with Testors Interior Green. I
also pre-painted the bomb-bay framework, fuel cell, gear struts and wheel
hubs flat aluminum. Next, I painted the soundproof pads in the interior
(the quilt-like detailing) a darker green. I finally finished off the
paint binge with flat black on the wheels and propellers.
First
off, I pre-painted every interior part with Testors Interior Green. I
also pre-painted the bomb-bay framework, fuel cell, gear struts and wheel
hubs flat aluminum. Next, I painted the soundproof pads in the interior
(the quilt-like detailing) a darker green. I finally finished off the
paint binge with flat black on the wheels and propellers.
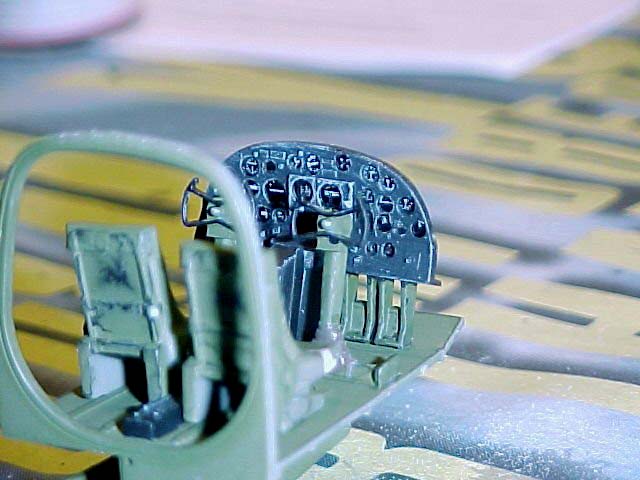
In step one, the instrument faces are masked with liquid mask before spraying the instrument panel flat black. I dry-brushed light grey across the instrument panel to highlight the nice detailing. After removing the liquid mask from the instrument faces using a toothpick, I added the decal to the back of the instrument panel to provide the instrument details. As you can see in the photo, the process works well. What is interesting is that the kit also provides the crawlway from the nose to the crew compartment aft of the cockpit.
When assembling this section (and all parts of this kit), ensure that there are no sprue tree stubs or flash on any of the edges. When the interior is installed between the fuselage halves, the fit tolerances are very close, like the Tamiya 1/48 Mosquito. One rough edge will make assembly difficult in later steps.
 The
assembly of Step 2 is very similar to that of the interior/bomb-bay/fuel
cell of the Tamiya Mosquito. Unlike the Mosquito, the joins of the bulkheads
to the bomb-bay ceiling is not as mechanically solid, so carefully glue
the parts together as described in Step 2 with the following exceptions:
do not install the fuel cell until the rest of the assembly is dry/set.
When you get the bulkheads with the wing spars glued to the bomb-bay roof,
set the assembly into one of the fuselage halves to dry. With the mainspars
aligned with the holes in the fuselage and the bulkheads aligned with
the interior detailing, this will help minimize fit problems later. Be
careful that there is no excess cement that will adhere the interior assembly
into the fuselage. Once the assembly is dry, remove it from the fuselage
and install the fuel cell (if you're doing the Doolittle version).
The
assembly of Step 2 is very similar to that of the interior/bomb-bay/fuel
cell of the Tamiya Mosquito. Unlike the Mosquito, the joins of the bulkheads
to the bomb-bay ceiling is not as mechanically solid, so carefully glue
the parts together as described in Step 2 with the following exceptions:
do not install the fuel cell until the rest of the assembly is dry/set.
When you get the bulkheads with the wing spars glued to the bomb-bay roof,
set the assembly into one of the fuselage halves to dry. With the mainspars
aligned with the holes in the fuselage and the bulkheads aligned with
the interior detailing, this will help minimize fit problems later. Be
careful that there is no excess cement that will adhere the interior assembly
into the fuselage. Once the assembly is dry, remove it from the fuselage
and install the fuel cell (if you're doing the Doolittle version).
 In
Steps 3 and 4, you are building the top and bottom turrets. The Doolittle
version flew with the bottom turret removed to save weight, so you'll
only install the lower turret mount (part J198) in the fuselage for the
Doolittle version. The installation of the 50 cal machine guns in the
top turret was a bit troublesome, as there was no positive mount to retain
the guns. I was able to use the J208 part as the instructions indicate
for this purpose, but the result was not effective. I would probably use
some plastic strips from my trusty Evergreen stash to modify the mount
in the next B-25. The detailing here is quite nice, however there won't
be too much visible when the aircraft is fully assembled.
In
Steps 3 and 4, you are building the top and bottom turrets. The Doolittle
version flew with the bottom turret removed to save weight, so you'll
only install the lower turret mount (part J198) in the fuselage for the
Doolittle version. The installation of the 50 cal machine guns in the
top turret was a bit troublesome, as there was no positive mount to retain
the guns. I was able to use the J208 part as the instructions indicate
for this purpose, but the result was not effective. I would probably use
some plastic strips from my trusty Evergreen stash to modify the mount
in the next B-25. The detailing here is quite nice, however there won't
be too much visible when the aircraft is fully assembled.
 Assembly
of the details in the fuselage halves is fairly straightforward in steps
5 and 6, though do NOT glue any piece into place without dryfitting that
part with the interior set into place first. This extra step will also
ensure a smoother assembly process later. There are a few parts in the
interior that could get in the way of the interior and cause you an opportunity
to dust-off your more colorful metaphors. One note here, the side windows
are installed in this step. The fit of these windows is so good, that
all you'll need to do is dry-fit the window in place, and apply something
like Tenax 7 on a fine brush to the corners of each window. The fit is
so good that the Tenax will flow nicely.
Assembly
of the details in the fuselage halves is fairly straightforward in steps
5 and 6, though do NOT glue any piece into place without dryfitting that
part with the interior set into place first. This extra step will also
ensure a smoother assembly process later. There are a few parts in the
interior that could get in the way of the interior and cause you an opportunity
to dust-off your more colorful metaphors. One note here, the side windows
are installed in this step. The fit of these windows is so good, that
all you'll need to do is dry-fit the window in place, and apply something
like Tenax 7 on a fine brush to the corners of each window. The fit is
so good that the Tenax will flow nicely.
In Step 7, the kit calls for assembly of the nose section. I did so and ran into trouble a little later. Hold off on Step 7 until later.
 Step
8 merely installs the nosewheel strut. I thought seriously about waiting
on this step until later, but there is no way to install this nosewheel
once the fuselage halves are joined. The nosegear mount is mechanically
solid once glued into place, and even though I forgot about the strut
several times, it withstood the occasional 'bounce'.
Step
8 merely installs the nosewheel strut. I thought seriously about waiting
on this step until later, but there is no way to install this nosewheel
once the fuselage halves are joined. The nosegear mount is mechanically
solid once glued into place, and even though I forgot about the strut
several times, it withstood the occasional 'bounce'.

 Steps
9 and 10 are the moments of truth. The interior sections are installed
in the right fuselage half in Step 9. If your dryfitting was done as suggested,
this should be a non-event. Be sure to install the lower turret mount
even if you are not installing the lower turret, as this part is also
the mount for the upper turret as well. In Step 10, you'll glue the fuselage
halves together. In my example, the fit was good, but there were enough
minor seamlines visible that I ran a small bead of gap-filling cyano on
all of the seams to get a smooth join. When the sanding and polishing
was done (being careful not to scratch the top turret), I installed the
nose weights. It is amazing how much weight Accurate Miniatures is able
to cram into this small space. Install the weights and bulkhead K21 as
instructed. If all goes well, the bulkhead should be flush with the open
nose.
Steps
9 and 10 are the moments of truth. The interior sections are installed
in the right fuselage half in Step 9. If your dryfitting was done as suggested,
this should be a non-event. Be sure to install the lower turret mount
even if you are not installing the lower turret, as this part is also
the mount for the upper turret as well. In Step 10, you'll glue the fuselage
halves together. In my example, the fit was good, but there were enough
minor seamlines visible that I ran a small bead of gap-filling cyano on
all of the seams to get a smooth join. When the sanding and polishing
was done (being careful not to scratch the top turret), I installed the
nose weights. It is amazing how much weight Accurate Miniatures is able
to cram into this small space. Install the weights and bulkhead K21 as
instructed. If all goes well, the bulkhead should be flush with the open
nose.
 In
my example, that K21 bulkhead protruded a fraction of an inch. Since I
had already assembled the nose per Step 7, I had a problem. A little Dremel
work solved the problem for my first B-25, but here is what I am going
to do for the next: with the assembled fuselage in Step 10, install part
K19 (lower nose) to the fuselage. Fill any gaps in the join. Next, install
the nose interior bulkheads are indicated. The instructions assume that
the bulkhead K21 is flush with the nose, and the interior parts J219,
J220 and K20 butt against the bulkhead K21. By installing these parts
later, it doesn't matter how flush part K21 really is. Press on with Step
7 as per the instructions.
In
my example, that K21 bulkhead protruded a fraction of an inch. Since I
had already assembled the nose per Step 7, I had a problem. A little Dremel
work solved the problem for my first B-25, but here is what I am going
to do for the next: with the assembled fuselage in Step 10, install part
K19 (lower nose) to the fuselage. Fill any gaps in the join. Next, install
the nose interior bulkheads are indicated. The instructions assume that
the bulkhead K21 is flush with the nose, and the interior parts J219,
J220 and K20 butt against the bulkhead K21. By installing these parts
later, it doesn't matter how flush part K21 really is. Press on with Step
7 as per the instructions.

With Step 11, we've already installed the nose, so we're just adding the rest of the forward fuselage details.
 In
Step 12 the joint of J94 and L17 to the rear of the fuselage leaves some
minor gaps, but the gap-filling cyano will make short work of them. Whatever
you do, do NOT glue the vertical stabilizers until after you've painted
the aircraft. This will significantly simplify the masking of the tail,
especially if you are doing the Doolittle Raider version, which retained
the de-icing boots. Once you have the painting complete, press on with
installing the vertical stabs.
In
Step 12 the joint of J94 and L17 to the rear of the fuselage leaves some
minor gaps, but the gap-filling cyano will make short work of them. Whatever
you do, do NOT glue the vertical stabilizers until after you've painted
the aircraft. This will significantly simplify the masking of the tail,
especially if you are doing the Doolittle Raider version, which retained
the de-icing boots. Once you have the painting complete, press on with
installing the vertical stabs.

The wings go together smoothly in Step 13. The rear joint of the nacelle
fairings and the rear of the wings also has some minor gaps, but once
again, the gap-filling cyano took care of the problem. The landing light
bays in the leading edges of the wing actually have a depression representing
the bulb. Do use a drop of silver or something to 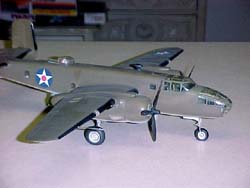 represent
a light lens here before installing the clear landing light covers.
represent
a light lens here before installing the clear landing light covers.
Step 14 was another minor challenge. Parts A14/A64 represent the carburetor intake fairings for the B-25B and are installed on the wings. To these and to the firewalls, parts A88 (the intake and cowl flaps) are installed. The fit of A88 is a little odd, so take a little extra time to dry fit, sand/file/fidget before gluing these into place. The join of the carburetor intake scoop to the fairing still required a touch of gap-filler on my example.
Assembled the two engines per the instructions, but be sure to dry fit the engines and the cowlings together to the wing assemblies. The cowlings A75 tended to want to fit low when joined to A88. Again, some careful filing/fidgeting will help here.
 With
Step 15, the main assemblies of the aircraft are now altogether, with
the exception of the vertical stabilizers that I left off. The wings drop
snugly into the recesses on the fuselage sides and leave no gaps. This
is where I stopped assembly to paint the aircraft.
With
Step 15, the main assemblies of the aircraft are now altogether, with
the exception of the vertical stabilizers that I left off. The wings drop
snugly into the recesses on the fuselage sides and leave no gaps. This
is where I stopped assembly to paint the aircraft.
This kit comes with vinyl canopy masks. I installed them on the cockpit cover and nose transparencies without a problem. The masks for the top and side windows are about 20% too big for the windows. I used liquid mask to cover the side windows, top turret and aft transparency. The masks do not cover the top or bottom turret, nor the aft transparency, so do ensure that you have some liquid mask handy. (NOTE Accurate Miniatures acknowledged the oversized masks and said that they will be corrected in future kits. You can still use these masks anyway - cut each one of the oversized masks into quarters and put them into place. There will be some overlapping in the center, but the side windows will be covered.)
 I
started the painting process by spraying a thin line of flat black along
the major panel lines. This will be partly visible from under the camouflage
and provide a little more depth to the paint scheme. Next I sprayed the
underside of the aircraft a Testors Camouflage Grey. Don't forget to paint
the bomb-bay doors and the gear doors now, as well as fairing J152 that
covers the missing bottom turret. When that had dried, I masked the appropriate
spots and painted the topside Olive Drab. When the paint had dried, I
buffed the paint with an old T-shirt to smooth the roughness of the flat
paint. Over the smooth surface I shot a coat of Future floor wax.
I
started the painting process by spraying a thin line of flat black along
the major panel lines. This will be partly visible from under the camouflage
and provide a little more depth to the paint scheme. Next I sprayed the
underside of the aircraft a Testors Camouflage Grey. Don't forget to paint
the bomb-bay doors and the gear doors now, as well as fairing J152 that
covers the missing bottom turret. When that had dried, I masked the appropriate
spots and painted the topside Olive Drab. When the paint had dried, I
buffed the paint with an old T-shirt to smooth the roughness of the flat
paint. Over the smooth surface I shot a coat of Future floor wax.

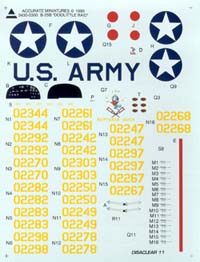
The decals were absolutely trouble-free. I did not have to use any sort of decal setting solution. These markings settled onto the paint with no silvering or any other problems. I selected the markings for aircraft 15, 'TNT' for this project. Once all of the decals were dry, I sprayed another coat of Future that was mixed with Tamiya Flat Base (acrylic) which put on a nice matte finish.
Steps 16 though 19 are merely adding landing gear and all of the other fine details to the finished product. The part J152 bottom turret fairing needed a little adjusting to fit into place. Once you finish up any touching up of the paint, you are done!
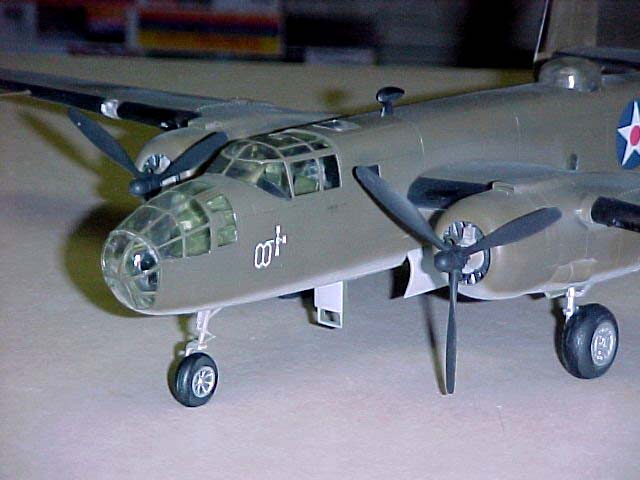
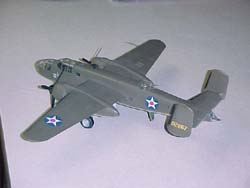
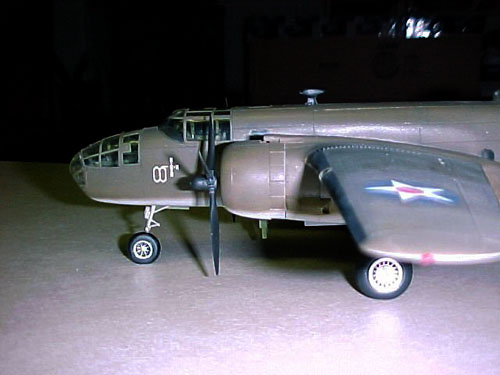
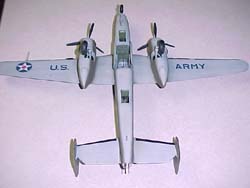
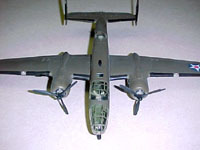
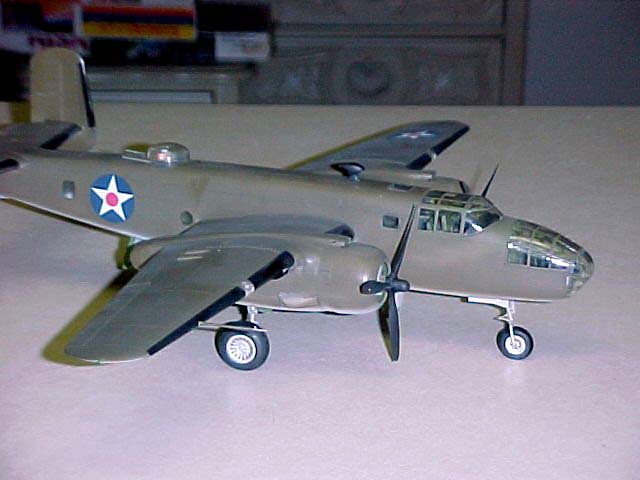
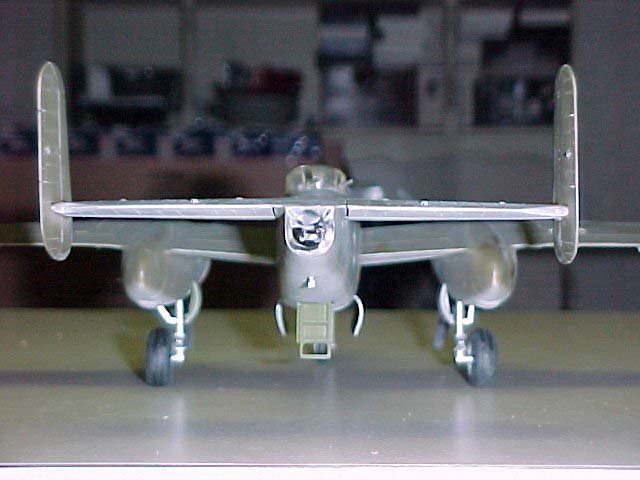
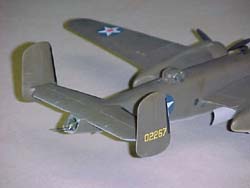
Conclusions
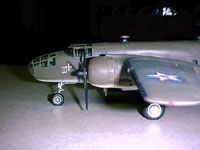
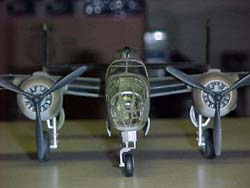 There
are a few fit problems with this kit, but nothing major (now that I've
overcome the nose fit issue). As you can see in the photos, the finished
product is quite nice. It is unfortunate that most of the beautiful detailing
on the interior of the aircraft is not visible. It would be interested
if Accurate would consider a limited edition release with the fuselage
sides molded in clear plastic to allow for the display of the interior.
There
are a few fit problems with this kit, but nothing major (now that I've
overcome the nose fit issue). As you can see in the photos, the finished
product is quite nice. It is unfortunate that most of the beautiful detailing
on the interior of the aircraft is not visible. It would be interested
if Accurate would consider a limited edition release with the fuselage
sides molded in clear plastic to allow for the display of the interior.
Overall, I enjoyed the kit. In fact, now that I know where the 'bugs' are in assembly, I have already purchased another B-25B so that I can build another! You might have already heard that the B-25B kits are sold out. This is true from the manufacturers' point of view - Accurate has none left. Don't panic, however, there are still kits on store shelves, but don't wait too long either. If you do miss out on buying one of these great kits, never fear. Accurate intends to re-release the B-25B once the B-25C/D and B-25G kits have been released. Whatever you do, don't let anyone fool you into believing this kit is already a 'rare collectors item'.
I am definitely looking forward to seeing the next two B-25 releases. For what it is worth, I asked Accurate if they intend to do any other versions of the B-25 (like a B-25J!). The answer is no - they are filling a void in B-25 variants in 1/48 and there is already a B-25J on the market (the Monogram and Pro Modeler kits).
My sincere thanks to Accurate Miniatures for this review sample.


Previous: Contents

