


 How
to paint model figures:
How
to paint model figures:
a How-to Primer
by Gaston Graf
Introduction
Many talented modelers who build fantastic models of vehicles, aircraft and ships of every description often believe they are unable to build model figures also. When I talk to such people I often hear similar statements, giving me the impression some people are terrorized by the thought that to build and paint a figure is difficult because such a model is representing a living person. It is the same effect I noticed already with people who draw or paint. Some do wonderful jobs when it comes to painting landscapes, or other objects, but lose self-confidence when they are asked to paint a portrait. Not because of a lack of skill, but because they fear failure in giving the portrait a living expression.
But there is nothing to fear with figure painting because it is the same as with other models: Careful research, as well as the ability to analyze and observe, combined with patience are the set of mental keys to success. A calm hand, and a good eye for colors are the physical keys you need to build a perfect model figure.
In fact, successful modeling is more mental work than physical work. Carefully analyze real life photographs to find details – and in case of figures – to study body positions.
-
Make sure your figure is in a natural position that a real person can hold or your figure will look like a toy soldier, despite all good paint work.
-
Have hands which are supposed to grip something actually grip it. Examine photographs of real persons carrying things or wearing equipment and make sure that your model figure carries it the same way.
-
Take physical facts such as weight of equipment into consideration when adding it to your figure.
-
One of the most delicate positions of a figure is the seated position. Make sure seated figures are sitting solidly and give an impression of weight to the viewer of your scene.
-
When building dioramas or vignettes check the positions and arrangement of your figures again and again to see how they fit into the scene. To temporarily assemble figures for position check, use a little drop of contact glue. You can easily disassemble the parts then for repositioning and/or painting.
-
There are many, many things to think about. Always remember to think first, then build, no matter how much time you'll need for thinking! And never lose patience until your work will be finished.
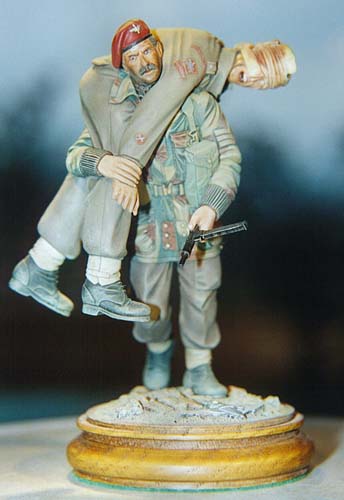
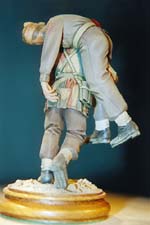
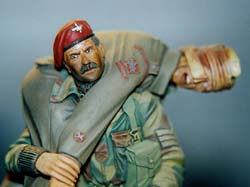
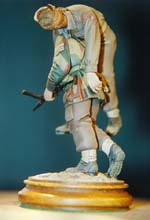
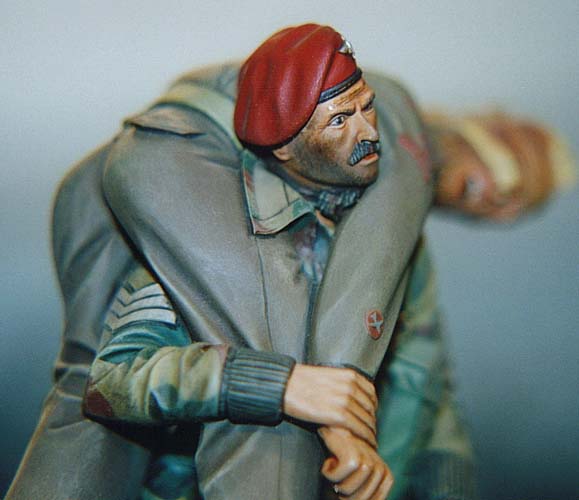
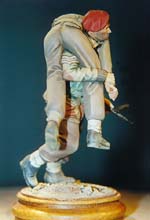
An Example - VLE British Paratrooper
 Verlinden
Productions is known for their first class detail kits, accessories and
the big scale figures they manufacture. Some years ago they released a
British Paratrooper carrying his wounded comrade over his shoulders. Opening
the box is a pleasure because all parts are perfectly cast in resin, but
assembling the model requires a lot of patience because some of the parts
do not perfectly fit and body putty is needed to fill the gaps between
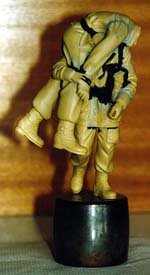
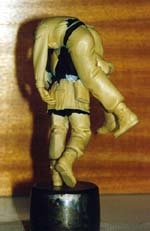
arms and legs. I also used a grinding tool to hollow the upper body where
it meets the legs to simulate the Denison smock hanging naturally over
the legs. This operation took a lot of time but was worth doing. If you
look at the picture you can see black and gray areas on the assembled
body.
Verlinden
Productions is known for their first class detail kits, accessories and
the big scale figures they manufacture. Some years ago they released a
British Paratrooper carrying his wounded comrade over his shoulders. Opening
the box is a pleasure because all parts are perfectly cast in resin, but
assembling the model requires a lot of patience because some of the parts
do not perfectly fit and body putty is needed to fill the gaps between
arms and legs. I also used a grinding tool to hollow the upper body where
it meets the legs to simulate the Denison smock hanging naturally over
the legs. This operation took a lot of time but was worth doing. If you
look at the picture you can see black and gray areas on the assembled
body.


This was the area where body putty got applied. After sanding I smoothed the places with steel wool before I applied a coat of flat black Revell paint to check if there are traces remaining from grinding and sanding. I assembled the model using Cyanoacrylate glue only. The parts must perfectly fit before glue will be applied because there isn't much time left to correct the position of a part until the glue sets.
-
Tip: Use Cyanoacrylate glue gel because the gel does not set as quickly as the liquid glue does, leaving you at least a little chance to correct the position.
During assembly of the parts I left the heads and the Sten submachine gun alone because I painted those parts separately. After assembly, the body got fixed on a steel roll from a big old roller bearing using a drop or two of Cyanoacrylate glue. The purpose of the heavy roller bearing is to have a firm grip when painting the model later. Also the weight of this temporary base avoids the partially painted body from toppling over by a careless move on your tabletop, ruining the still wet oil paint. But as not everybody collects old rolls from roller bearings you may alternatively use a block of wood or anything else that offers a solid base for the part and a firm grip for your hand while you paint it.
 The
heads had a hole drilled in their lower end (neck) to stick the parts
on toothpicks for holding them while painting. To store the heads while
I did not work on them and to allow them to dry later I drilled some holes
in a block of wood to hold the toothpicks with the parts. A toothpick
was also used to hold the Sten while painting it.
The
heads had a hole drilled in their lower end (neck) to stick the parts
on toothpicks for holding them while painting. To store the heads while
I did not work on them and to allow them to dry later I drilled some holes
in a block of wood to hold the toothpicks with the parts. A toothpick
was also used to hold the Sten while painting it.
An alternative to a block of wood with holes, a fistful of plasticine serves equally well to hold toothpicks with small parts. Make a ball from the plasticine and press it into a plastic container of your choice (i.e. clean empty jam pot etc.). The container will prevent the plasticine base from catching dirt.
Preparing to paint
Before painting can start, all parts should be washed in lukewarm water and a bit of detergent must be added to clean the parts from all dust and remove grease from eventual finger prints. The kit manufacturers spray their moulds with silicone based parting agents to prevent the parts from sticking. It is the residues of such parting agents which give the parts a waxy shine. If you now try to paint such a waxy part you will notice that paint does not stick well to your model, especially when using water-based paints. While Enamels may dissolve the parting agent residues, water is not that aggressive and water-based paints will peel off from the waxy surface. For washing model parts, an old shaving brush serves well. Until the parts are dry, they must be stored in a dust free place. I use an old metal bread box for this purpose which is especially handy to hold medium size figures or aircraft parts.
To accelerate drying of resin parts you can use a hairdryer which will blow away remaining water drops and heat up the surface of the parts slightly, which will dry sooner in that way. Be careful not to come to close to the parts which may soften in the hot air stream.
A word about the paint
It is a matter of personal choice what paint you select for figure painting. I suggest you try the different paints and settle on the ones you like best. I personally prefer a mix of different paints because all paints have their advantages and disadvantages.
The paints and special tools I use for painting model figures are:
-
 Acryl
White serving as the primer - another positive effect of using Acryls
for the first coat of paint is that Acryls soak a certain amount of
oil from the oil paint later.
Acryl
White serving as the primer - another positive effect of using Acryls
for the first coat of paint is that Acryls soak a certain amount of
oil from the oil paint later. -
Enamel paints from Revell and Humbrol to prepaint all parts in their respective colors. I use those two brands because they are available in my region but you might prefer other brands. No matter what brand you buy, buy only first quality paints!
-
Artist Oils for the finish - Choose a high quality brand such as Rembrandt or Lefranc-Bourgois. This will avoid you trouble with the paints later. It is simply a pleasure to work with high quality products. All you need is a set of 7-8 different colors such as: Titanium White, Ivory Black, Genuine Red, Burnt Sienna, Cadmium Yellow Light, Ultramarine Light (Blue), Gold Ochre, Garnet Red (I used this color as the base color for the paratroopers beret only) All other colors were mixed using this basic set of colors.
-
Matt enamel varnish to seal and finish the glossy oil surface after drying. The matt varnish was applied using an airbrush.
-
Some drops of gloss varnish to add some extra details such as sweat pearls on the forehead of the paratrooper carrying his comrade or to bring life into the eyes of the figures by adding a semi-gloss finish to it. Also the black leather rim around the beret of the paratrooper received a thin coat of a mix of gloss and matt varnish to give it a natural finish.
-
Metallic paints for the metal parts.

To mix my paint I use a white china plate for Oils and Acrylics and for small quantities of Enamels I use the crown cups of beer or Coke bottles. I rarely use Enamels straight from the pot. Disposable plastic film canisters to mix larger quantities of Enamels if needed. Such canisters may also be used for airbrushes if you fit the siphon top of the airbrush to it.
A word about metallic paints.
The golden rules in working with metallics are to NEVER STIR the paint, and NEVER use it straight from the pot. I use a toothpick or old pencil instead to remove a certain quantity of pigment from the bottom of the pot, then put it into a crown cup and add some thinner to dilute it. The reason for this is simply to keep control over the paint. If you stir metal paints and use it straight from the pot, chances are good that the liquid paint will run across the uniform if you try to paint only a button by application of a drop of paint. Use a separate pot of thinner for metallics only. This will spare you the glitter effect, the result of transferring single particles of metallics from the pot containing your cleaning thinner to your model when using the other paints after previously washing a metallic paint pencil in the same thinner pot. Some people use even a different set of brushes for metallics only.
A word about brushes.
Like I make use of only first class paints, I use only first class brushes also. Forget about the brushes which come with ready to build kits where paint, brush and cement are included. It pays to invest your money in a set of first quality red sable artist brushes. To paint figures I am using only the round ones. Flat brushes are used to paint broad areas such as tanks or other military vehicles in case you don't use an airbrush for that purpose. Also I use mostly flat brushes for dry brushing.
To know what brush will be the right one for you, look at the tip of the brush. I use a set of 4 brushes for big scale figure painting. A medium size round brush #10 for bigger surfaces such as the body, a #4 brush for smaller surfaces such as faces and hands, a # 1 for outlining and shading and a #0 brush with extra short hair for detailing. I avoid the super tiny brushes such as #000 or less because a brush needs to hold a certain amount of paint to get the paint flowing.
The brushes I use for oil paints I clean in turpentine first, then wash them in warm soapy water. Store it with the hairs pointing upright in an old cup or glass. When painting enamels I clean the brushes using synthetic thinner, then wash them in warm soapy water too after ending my painting session. Form the tip of the brushes with your fingers to keep it sharp after cleaning and while the hairs are still wet.
-
Remember: The most important thing on a brush is its TIP, not its size!
Applying the primer.
 After
all parts dried, they are painted using white Acryl paint. This gave them
a uniform look to allow the final colors cover the surface equally. At
the same time it allowed a final check for eventual scratches or dust
particles remaining on the surface.
After
all parts dried, they are painted using white Acryl paint. This gave them
a uniform look to allow the final colors cover the surface equally. At
the same time it allowed a final check for eventual scratches or dust
particles remaining on the surface.

Because Acryl paints come in tubes they must be diluted with water before usage. The important thing is the consistency of the paint before applying it. If you add too much water, the paint won't cover the surface at all and run where it shouldn't. But if you add less water, the paint will be too thick, hiding fine details under heavy brush marks forever. My experience is that the consistency of the paint is best when it's flowing from the brush like ink flows from a fountain pen. Acryls won't cover the surface in a single layer so you'll need to apply more and more layers until a uniform look is achieved. Alternatively you can use an airbrush to apply the primer which will save you a lot of time.
Drying is time consuming so again I use hot air to accelerate the process. I place the model in the hot air oven in the kitchen at 50°C (or 122°F). Later, when applying the artist oil paints, I am using this procedure to accelerate drying between the different steps of painting.
-
Caution: DO NOT PLACE YOUR MODEL IN THE MICROWAVE FOR DRYING !
The base colors.
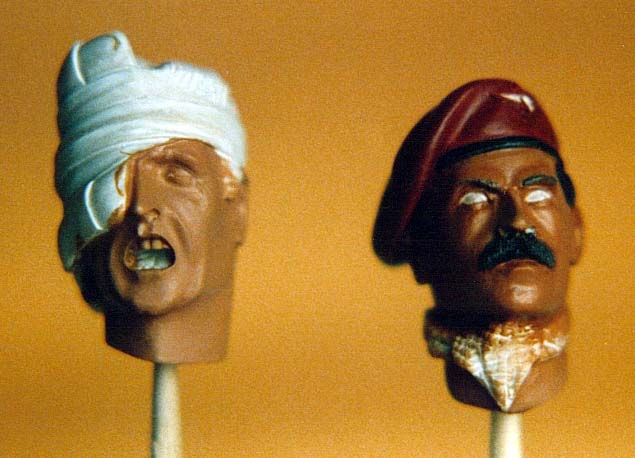
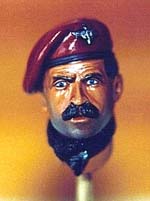
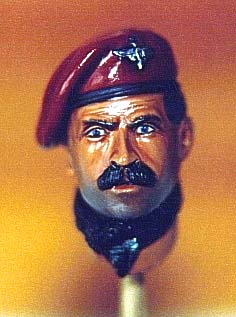
After the white primer dried, the base colors can be applied. I use matt Humbrol and Revell enamel paints for that. Even the camouflage patches on the uniform got prepainted in that way and the heads received a few thin layers of self mixed flesh paint. To mix the flesh color I use the following matt Revell paints: Sand, Red-Brown, White and Red. Mixing Sand with Red-Brown already brings you very close to the color of the Caucasian skin. Adding a bit of Red is like adding blood to the skin and using White or Red-Brown again is lightening or darkening the skin color. Do not make the mistake to mix Red with White only, unless you want to paint a Barbie Doll! On the picture you can see the prepainted heads on the toothpicks. Notice that no skin color got applied for hairs and eyes.
 The
uniform colors I mixed according to the color drawings provided in the
book 'British Paratroopers in Action', Combat Troops Number 9,
Squadron/Signal Publications ISBN 0-89747-233-0. You need to play around
with the colors and compare them to the colors on the drawings to find
the correct mixture. That little book was the only reference I had at
that time but even more helpful would be to have color photographs of
real uniforms. So don't forget your photo camera the next time you visit
a museum where uniforms are on display.
The
uniform colors I mixed according to the color drawings provided in the
book 'British Paratroopers in Action', Combat Troops Number 9,
Squadron/Signal Publications ISBN 0-89747-233-0. You need to play around
with the colors and compare them to the colors on the drawings to find
the correct mixture. That little book was the only reference I had at
that time but even more helpful would be to have color photographs of
real uniforms. So don't forget your photo camera the next time you visit
a museum where uniforms are on display.

Artist Oils - Painting lights and shadows.
After all parts of the model got prepainted with the Enamels I switched over to the Artist Oils. To dilute artist oils I am using nothing but genuine turpentine. First I press a bit of every color I want to use on an old China plate, serving me as a palette. Leave enough space between the colors because each colors spot will grow much larger when diluting the thick paint. Arrange the colors you eventually want to mix so the mixing can happen at the outer border of each colors spot. Example: Place White next to Black so you can easily mix Gray between those two spots. Then place Burnt Sienna next to Black, Ochre next to Burnt Sienna, Red and Yellow next to Ochre and you will have the perfect arrangement to mix your skin color shades. Make sure to leave enough space to mix the base skin color of your figure. If you need additional place to mix other colors such as for the uniform, create another arrangement of color spots of those colors you want to mix.
Add a drop of turpentine to dilute all colors a bit. To do this I use a pipette which allows me easily to add single drops of clean thinner to the paint but alternatively you may also use a brush. There are many figure modelers who start with painting the face while other prefer to start with painting the body so I leave it to your choice how you want to start with your work. I personally prefer starting with the heads (the face) because the finished face gives my figure a character. To me it brings life to the still unfinished body in some way and at the same time it gives me the inspiration I need to finish my model.
To mix your skin color base shade take a brush load full of Gold Ochre and add a small amount of Burnt Sienna into it, then dip your brush's tip into the Red and add a tiny little bit of Red to it. Mix this thoroughly. Eventually compare the mixed color to your own skin by holding the brush with the paint close to the back of your hand, or in case you are of a different human race then the one your model figure is representing, compare your color to a color photo. How does the color look? Is it too brownish? You maybe add too much of the Burnt Sienna. Or is it too yellowish? Perhaps you added too much of the Gold Ochre? In case it looks too pinkish you certainly added too much Red. Play around with the colors until you find the right tone. Use White to lighten it up and Burnt Sienna to darken it. Do NOT use pure Black to darken it because it will turn your flesh paint into an ugly pinkish gray!
Now apply this base color to the face and the hands of your model. You will notice that the Oils do not cover the surface well, but this does not matter because you prepainted your model with Enamels first. Let the head of your model dry a few hours or place it into the hot air oven at 50°C (122°F) for 15-20min or so. Remember: Do not place it into the Microwave! After the first layer set (not completely dried) you can add the shadows and lights to the face. You will need the following tones to paint your figure's face:
The base color - the one you just applied.
-
Dark shadow color - the color mix for the dark shades consists of Burnt Sienna and Black, with a little bit of your base color.
-
Medium shadow color - I use pure Burnt Sienna for this.
-
Light shadow color - add a little bit of Burnt Sienna to the edge of the spot where you mixed your base color and mix both colors to a brownish skin tone.
-
Light color - add a little bit of White and Ochre to the edge of your base color. Add the colors to an edge where you did not add other colors yet.
-
Highlight color - take a bit of White and add a bit of your base color to it.
 After
applying the base color of the face, paint all dark shadows using the
color mix mentioned under point 2. The deepest and darkest shadows of
a face are between the eyes, under the brows, and on either side of the
nose. Let it set, then blend it in. Blending means dissolving the edges
of the dark lines you painted in your dark shadows color. To blend colors,
clean your brush in turpentine, then wipe it dry on a paper napkin. Dip
it in turpentine again, but paint a stroke or two over the paper napkin
to remove exceeding liquid. Do not wipe it dry because the brush must
stay slightly wet. Carefully move your brush over the previously painted
shadows in a movement of about 90° to the line to blend. You will see
that its edges will be softened because the paint of the dark shadow will
mix with the paint of the base color. Repeat the same procedure for the
light shadows, and later for the lights and highlights. To determine where
to apply shadow or light color, have a look in your mirror and carefully
examine your own face. Do you see where your skin appears to be darker
(under your chin, around your eyes and nose)? And where it is lighter
(forehead, tip of nose and chin)?. That's where to apply those color shades.
After
applying the base color of the face, paint all dark shadows using the
color mix mentioned under point 2. The deepest and darkest shadows of
a face are between the eyes, under the brows, and on either side of the
nose. Let it set, then blend it in. Blending means dissolving the edges
of the dark lines you painted in your dark shadows color. To blend colors,
clean your brush in turpentine, then wipe it dry on a paper napkin. Dip
it in turpentine again, but paint a stroke or two over the paper napkin
to remove exceeding liquid. Do not wipe it dry because the brush must
stay slightly wet. Carefully move your brush over the previously painted
shadows in a movement of about 90° to the line to blend. You will see
that its edges will be softened because the paint of the dark shadow will
mix with the paint of the base color. Repeat the same procedure for the
light shadows, and later for the lights and highlights. To determine where
to apply shadow or light color, have a look in your mirror and carefully
examine your own face. Do you see where your skin appears to be darker
(under your chin, around your eyes and nose)? And where it is lighter
(forehead, tip of nose and chin)?. That's where to apply those color shades.
After completing shadows and lights you should add what old Master Paine called a '5 o'clock shadow' - a shadow which usually appears on every man's face where his beard grows. Add a tiny little bit of Black to your base color to get a grayish shade. This is how it should look like:
Painting the eyes.
The eyes are the most important part of a figure because it is decided by the natural look of the eyes whether a figure looks like a detailed model of a real human or if rather it looks like a toy soldier. First you should paint the eyes with a dark gray mixture of base color with black. Then paint the eyeballs in a very light gray, almost white color, but do not apply pure white paint. Now outline the eye using a tiny 'O' size brush with short hair. The outline color must be very dark like pure Burnt Sienna. Dilute that paint enough so it will flow freely from your brush. To know when consistency is right I use a piece of sheet plastic where I test paint a few lines before I will apply the paint on the model.
Outlining is one of the most delicate steps in painting a model. Be careful to draw very thin lines. But if your lines occasionally become too thick don't worry. You can always remove exceeding paint by cleaning your brush in the turpentine, then removing the paint with the clean but wet brush. This is the advantage of painting figures with Oils! You can easily blend colors and correct painting errors which you cannot do when painting with Enamels or Acryls due to the short drying times. On models you paint with oils you still can correct errors the day after if you like, with no need to worry about the paint being too dry.
 Next
step is to paint the pupils. Depending on the human you want to reproduce
with your model what color the pupil will have. For North and Middle-Europeans
and/or white North-Americans I use a blue-gray color but people from the
Southern-European countries as well South-American or African countries
usually have dark brown eyes so you should take this into consideration
when doing models of such people. Mix your color and dilute it but do
not dilute it as much as the outlining color. The consistency of salad
oil should be right for it.
Next
step is to paint the pupils. Depending on the human you want to reproduce
with your model what color the pupil will have. For North and Middle-Europeans
and/or white North-Americans I use a blue-gray color but people from the
Southern-European countries as well South-American or African countries
usually have dark brown eyes so you should take this into consideration
when doing models of such people. Mix your color and dilute it but do
not dilute it as much as the outlining color. The consistency of salad
oil should be right for it.
Use a round shaped brush of size 1 or even 2, allowing you to paint a round dot of the size of the pupil you need. For figures smaller than 120mm you should be using a smaller brush indeed. Now try to paint a round dot on a piece of plastic sheet. When you are satisfied with your result go ahead and paint the pupil of your figure. Take good care of the direction of view of your model! By all means you must avoid to have one eye looking into one direction and one into the other unless you really intend to paint a caricature of somebody.
After painting the pupil you must add a little black dot in its middle to bring life into the eyes of your model. The black dot reflects the opening of the pupil. Notice that pupils are closing when a person is out in the bright daylight so the black dot shouldn't be too big if you plan to add your model to an outdoor diorama scene, but pupils open the darker it grows. You can take this extra detail into consideration depending on the enviroment you want to create for your figure but the smaller the scale of your figure is, the less important this becomes.
As a final touch of the eyes I add some lights to it as one of the very latest steps in finishing the model. After application of the matt varnish, which will be done after the model was finished and the Oil paint THOROUGHLY DRYED, I add a slight touch of gloss varnish to the eyes to have light reflecting in it.
Detailing and finishing the face.
 After
finishing the eyes, I usually paint the hair, eyebrows and mustache or
beard. Don't make the mistake and try to paint every single hair but paint
hair as a MASS. In case of black hair this is very easy. Paint it Black,
then after drying, mix a tiny little bit of White to the black and carefully
dry brush the hair. Dry brushing is a painting technique I did not talk
about yet because I rarely use it for painting figures. To dry brush,
dip your brush in thick paint, then wipe it clean on a paper napkin until
you get the impression no paint is left on it anymore. Now brush over
the area you want to highlight in quick following strokes. You will notice
that the clear paint will settle only on the raised details, bringing
it out more clearly by highlighting it with the lighter shade of paint
you mixed. You may dry brush in one or more steps, adding more white to
your base color for every step of dry brushing you want to do. But be
careful - do not overdo it! The right moment to stop your dry brushing
has come when you believe you should add 'just a little bit more'. In
case of black hair you must be very careful with highlighting, or it may
soon turn to gray.
After
finishing the eyes, I usually paint the hair, eyebrows and mustache or
beard. Don't make the mistake and try to paint every single hair but paint
hair as a MASS. In case of black hair this is very easy. Paint it Black,
then after drying, mix a tiny little bit of White to the black and carefully
dry brush the hair. Dry brushing is a painting technique I did not talk
about yet because I rarely use it for painting figures. To dry brush,
dip your brush in thick paint, then wipe it clean on a paper napkin until
you get the impression no paint is left on it anymore. Now brush over
the area you want to highlight in quick following strokes. You will notice
that the clear paint will settle only on the raised details, bringing
it out more clearly by highlighting it with the lighter shade of paint
you mixed. You may dry brush in one or more steps, adding more white to
your base color for every step of dry brushing you want to do. But be
careful - do not overdo it! The right moment to stop your dry brushing
has come when you believe you should add 'just a little bit more'. In
case of black hair you must be very careful with highlighting, or it may
soon turn to gray.

One of the last steps to paint the face is to paint the lips. Mix some Red with your base skin color and use this pinkish color to paint the lips of your model. Then use much diluted Burnt Sienna to paint the dark line between the lips and blend it in. Now add a little bit of White to your lip color to mix the light color. Paint the light on top of the under lip only, then blend it in.
Again take some base skin color and add a little bit of Red to it. Apply this mix on the cheeks of your models face and blend it in. You will notice that this effect will really bring the face to life as if blood circulation was added in some magic way. Do not overdo it or your model will look like a doll.
As a final touch you can add some tiny wrinkles to your face. Again have a look in the mirror to determine where to add wrinkles. Usually you can add some to the forehead as well as under the eyes of the models face in case you are doing a big scale model figure. Adding wrinkles to smaller scale models is unnecessary.
The hands.
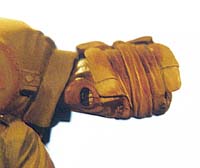
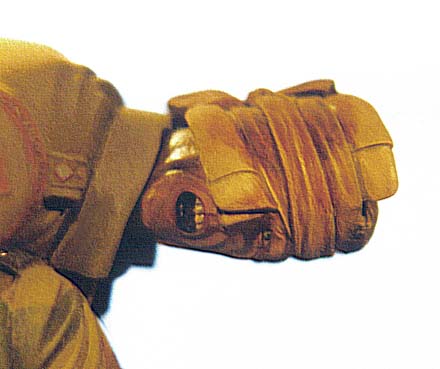
 The
hands are painted in the same way as the face. Additionally you must paint
the fingernails in a lighter color than the rest of the hands and outline
the fingernails using much diluted Burnt Sienna. Notice that the palms
are often lighter and more pinkish than the back of a hand, especially
when painting models reflecting African people. Tiny wrinkles may also
be added to the hands, on top of the knuckles and fingers. On large scale
figures you may also want to add veins under the skin on the back of the
hands. This you can do by adding a tiny little bit of Black and Blue to
your base skin color. Paint the veins and let the hands dry before you
paint over the area using much diluted base skin color to tone down the
veins and blend it into the hands surface. Depending on the environment
you want to place your figure in you may additionally add dirt to the
hands, especially under the finger nails. How much detail you can add
depends largely on the scale of your figure. The bigger the scale, the
more details you can add.
The
hands are painted in the same way as the face. Additionally you must paint
the fingernails in a lighter color than the rest of the hands and outline
the fingernails using much diluted Burnt Sienna. Notice that the palms
are often lighter and more pinkish than the back of a hand, especially
when painting models reflecting African people. Tiny wrinkles may also
be added to the hands, on top of the knuckles and fingers. On large scale
figures you may also want to add veins under the skin on the back of the
hands. This you can do by adding a tiny little bit of Black and Blue to
your base skin color. Paint the veins and let the hands dry before you
paint over the area using much diluted base skin color to tone down the
veins and blend it into the hands surface. Depending on the environment
you want to place your figure in you may additionally add dirt to the
hands, especially under the finger nails. How much detail you can add
depends largely on the scale of your figure. The bigger the scale, the
more details you can add.
The headgear.
The last part on a figures head I paint is the headgear. In the case of my Paratrooper it was his beret. I prepainted it using a mix of Revell Red Brown, pure Red and a little bit of Black. After drying I applied a mix of Garnet Red and Genuine Red. To mix the shadow color I used a tiny little bit of Black and to mix the light color I added a tiny little bit of White.
You certainly noticed that I used the word TINY quite often. This is intended, to bring your attention to the fact that a little bit more will be a little bit to much. Be careful with mixing pure White with Red or other reddish colors because it will turn pink, causing an ugly effect which will be looking far from good.
Before painting the Paratroopers badge on the beret I outlined it using diluted Black. Then I painted it using Humbrol Polished Aluminium. After this paint dried I polished it using a Q-Tip. Then I added the shadows using much diluted Black paint. In fact the diluted Black resembled more tainted thinner than diluted paint. To highlight the badge I added a little bit of White enamel paint to Revell Silver 90 and carefully drybrushed the edges.
You MUST be careful to avoid metal particles sticking to the Red beret. The last part of the beret to paint was its black rim. I did not add any lights and shadows to it but painted it only black. Later, after application of the matt varnish, I over painted the rim with a semi-gloss mix of matt and glossy varnishes.
The body
 I
previously mentioned that I applied an overall white primer, then prepainted
the body with the uniform colors using Enamels. The reason why I did that
simply is that pure oils do not cover well enough to eliminate the white
base color completely. After the enamels dried I started with the oils.
Colors were mixed after the color drawings in the book mentioned above.
Please notice that colors do not necessarily match the original colors
perfectly because of the same cloth many shades exist, especially when
it comes to dresses worn in the field. Washed uniforms loose a lot of
color by the time and only brand-new uniforms show their original color.
You may even vary your base color by lightening or darkening it. The lighter
the color, the more the uniform piece looks washed. I never paint shirt
and pants using the same base color even if both pieces was made of the
same cloth. Also uniforms worn in the field usually get dirty and dusty.
I
previously mentioned that I applied an overall white primer, then prepainted
the body with the uniform colors using Enamels. The reason why I did that
simply is that pure oils do not cover well enough to eliminate the white
base color completely. After the enamels dried I started with the oils.
Colors were mixed after the color drawings in the book mentioned above.
Please notice that colors do not necessarily match the original colors
perfectly because of the same cloth many shades exist, especially when
it comes to dresses worn in the field. Washed uniforms loose a lot of
color by the time and only brand-new uniforms show their original color.
You may even vary your base color by lightening or darkening it. The lighter
the color, the more the uniform piece looks washed. I never paint shirt
and pants using the same base color even if both pieces was made of the
same cloth. Also uniforms worn in the field usually get dirty and dusty.

The trick to doing a good paint job on a figure is the capability to determine where to lay the different color shades! If you look at your unpainted model you might ask why bothering about shadows and lights because the natural light casts already shadows on the model. The reason is easy to explain: If you paint your - say 1/16th scale - figure without adding lights and shadows it will still look unrealistically flat, compared to a 1/1 scale model of a person or a real person. This is because the light cannot be scaled down - it always stays at 1/1 scale. So you'll have to intensify lights and shadows on your model to bring out its proportions in a realistic way. You'll have to darken the shadows and lighten the lights on your model to make it look realistic.
I suggest beginners to do some experiments with a white painted figure and a halogen spotlight. Place the spotlight at a certain distance right above the head of your figure. Do you see where the model appears to be darker? Where it is shining brighter? It is there where you will have to lay the color shades. Now change the distance and/or the angle between the spotlight and the figure. Notice how the sharpness of the shadows change. These little experiments show you the influence of light on a scale model and hopefully helps you to determine where to apply the colors to paint a perfectly looking model figure.
The base
After I finished the body I placed it into the oven for drying while I painted the base. Although the base is looking like being made out wood it isn't! It's painted resin! I first painted it matt Sand Brown. Then I applied a wash of Burnt Sienna to it and wiped excessive paint off using a paper napkin. I repeat the procedure until the socle looked fine to me. Then I let it dry and waxed it using furniture wax. This gave it a realistic look of real wood. I then painted the center of the base using enamels. First I mixed a dirty looking brownish color and painted the center area with it. After it dried I applied a wash of even darker, almost black, color. I let the wash dry thoroughly before I dry brushed the area to bring out the details. To drybrush it I mixed several shades of dark green, earth brown and sand. After that I painted the debris – bricks, and stones separately, using a dark red brown for the bricks and a dark gray for the stones. I carefully dry brushed the debris separately to bring out details.
As mentioned before, the paratrooper's badge was painted in Humbrol Polished Aluminium, then carefully polished using a Q-tip before applying a wash of heavily diluted Black paint. After drying it got dry brushed using Revell Silver 90. You must be very careful when dry brushing a metal part in a non-metal environnement to avoid metal particles stick to the non-metal parts.
The Sten submachine gun got painted using enamels only. First I painted it using Matt Black, then dry brushed it using Gun Metal. For a final touch I carefully dry brushed it using Silver.
The metal parts of the uniform such as buttons and belts got painted using a mix of Gold with a little bit of White. After the metal paint dried I let flow a little drop of much diluted Black paint around it for shading. To fix your model on the base do not just glue it into place, but use pins to fix it! I use small nails for 120mm figures. I cut off the heads of the nails, then drill holes of the size of the nails into both, the figure and the base. Make sure the holes in your model's feet correspond with the holes in the base!
To do so is very easy: First drill holes into the heels of the figure and insert the nails using Cyanoacrylate glue. Then put the figure at the place where you want to fix it on its base. Now put a tiny little drop of white paint at the end of the nail where it meets the base. Put the figure aside and you can drill the holes to hold it in place! Needless to say that I glue the figure in place using Cyanoacrylate glue again. After the body was in place I added the heads and the Sten submachine gun to it.
The Finish
I applied dirt to the shoes of the figures to make it part of its environement. In this case it is only a base and no large diorama, but even on such a small area it is important to make the model look as if it belongs to this little piece of its own world. I mixed a dirt shade of sand brown, black and red brown enamels which I carefully dry brushed onto the feet of the model. Also I applied some traces of dirt to the uniforms. Then I set the figure aside and let it dry thoroughly. I DID NOT put it into the oven again for the reason of the thin parts of the Sten gun which I feared would bend if they will be exposed to heat.
After several weeks of drying I applied matt varnish all over the model for protection as well as for the final finish because the oils dried up too glossy.
Conclusion
Well, that's it! I hope this little article will help the readers of the Internet Modeler to realize perfectly looking model figures. The Verlinden Paratrooper was only the second 120mm figure that I ever built. My first figure was the B17 crewmember, also from Verlinden. I want to personally thank Mr. Sheperd Paine for the wonderful books he wrote about modeling. His "How to build Dioramas" became my personal bible of modeling. If you see parallels between my article and his books, this is not because I have copied from him but it is only because he, the master, is right with his lessons. "How to build Dioramas" was recently released again in an updated edition. I strongly recommend you read his books for even more detailed information about the wonderful art of figure modeling than a simple article can cover.
Funny thing is this: I believed the dry-it-in-the-oven-trick was an invention of mine until I read Sheperd Paine's book "Building and Painting Scale Figures", where he explained absolutely the same thing. He also explains his light box where he uses the heat of a bulb in a box to dry his models... But read for yourself!


Previous: Contents

