


 Italeri
1/35 Sd.Kfz 234/3 8 Rad. Armoured Car
Italeri
1/35 Sd.Kfz 234/3 8 Rad. Armoured Car
By Kevin Brenton
History
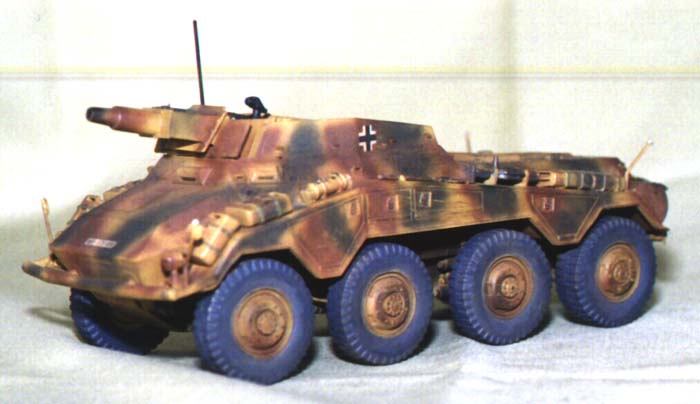
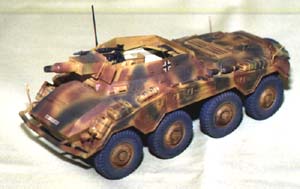
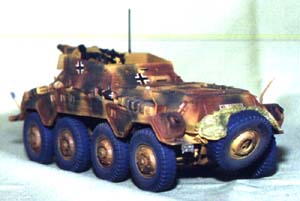
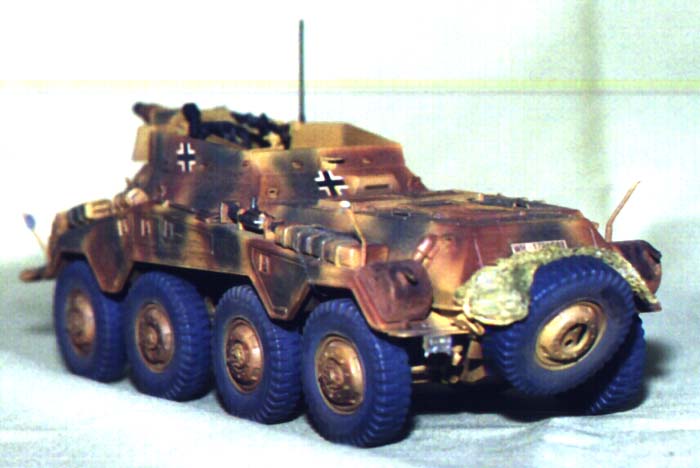
The 234/3 is the forerunner of the Puma armoured car. This version was fitted with a 75mm L/24 gun (similar to the Stummel). The vehicle had a crew of four, with driver positions for forward and reverse steering. It featured drive to all eight wheels and was well suited to cross country reconnaissance purposes. The vehicle was originally intended for use in North Africa, but was only used in France and Russia.
The Kit
The contents of the box consists of three sprues, molded in a tan coloured plastic, with approximately one hundred and forty parts . The box art is quite good and is a good guide as to what the model would look like when built. The instructions are quite clear and easy to follow , with paint schemes for two vehicles. Model Master paint numbers are featured in the painting instructions.
Construction
Construction starts with the lower main chassis, which is molded in one piece (this makes it easier because it would be quite complicated if you had to assemble all the panels). Added to this are the eight drive axles with suspension arms, spring mounts, and suspension travel limit brackets. I might add that it would be possible to set up the suspension to accommodate uneven ground for a diorama, and have the wheels turned as well, with a bit of messing about .
Next, comes the steering arms and springs, as well as the wheels. I left the wheels off for ease of painting and fitted them after I had weathered the underside of the vehicle.
The interior is next, adding the steering wheels, two driver's seats, gear levers, and other necessary items. I added some minor extra detail here: some wiring on the fire wall, a couple of gas mask containers, water bottles, and some pipe work from solder wire. I also painted the interior; the floor in red oxide, and the side walls in interior buff. You could really go to town on the interior, as this vehicle has an open top. You could add ammo racks and lots of good stuff. I am unsure if there are any after market P.E. sets for this kit. I had no references for the interior of this vehicle, but I did find a couple of pictures on the internet after I had completed the model.
The top body section is next, along with the side panels, tow hooks, and vision ports. I found no problems with fit here. It went together very nicely.
The mudgards and tool box interiors need to be assembled next, and then the guards onto the main body. With such long joints I would have expected some problems with fit and alignment but they went together nicely. Tools, jerry cans, and spare wheel carrier can be added, as well as the exhaust mufflers.
 Next
comes the gun and upper armour plating. Once again it all fell into place.
The gun is well detailed, with sighting equipment, and trunnion blocks,
allowing movement of the gun if required.
Next
comes the gun and upper armour plating. Once again it all fell into place.
The gun is well detailed, with sighting equipment, and trunnion blocks,
allowing movement of the gun if required.

A nice MG34 machine gun sits beside the gun on its own detailed mount. I added a camouflage net, which I made from medical gauze soaked in thinned white glue and painted with Tamiya acrylics. I tucked this down behind, and over, the spare wheel. I also used a sub machine gun from the kit and added a sling from a slither of foil from a yoghurt lid.
Painting
I had decided, from the start, that I wanted a three colour camo scheme on this vehicle, so that's what I did .
I started with Model Master enamel 'Armor Sand', masking the interior with wet tissue so that overspray did not invade my previous paint work. When this was dry, I sprayed areas of Tamiya (acrylic) xf-61 'Dark green', and Tamiya (acrylic) xf-64 'Red Brown' to complete the paint work.
The exhausts were previously coated with liquid cement and stippled with an old brush (to give some texture) ,and then painted with Model Master acrylic 'Rust' .
After placing the decals, I mixed up a batch of Tamiya 'Matte black' ( 70% and 30%), and Tamiya 'Red Brown' acrylics (thinned at roughly 70% with rubbing alcohol). I adjusted my airbrush, so that I could spray thin lines, and started to run around all the edges and corners of the raised detail and the under side of the model. This was similar to a wash, but sprayed with the brush. I did the wheels as well. These were painted at the same time as the main model and given the cammo scheme. The tires were hand painted, with a mix of black and white to give a grey colour. I then mixed up another wash , this time leaning on the brown side (70% red brown and 30% matte black) These were Tamiya acrylics, thinned as before, and I sprayed this all around the edges and detail on the upper surfaces.
 I
then did a lttle dry brushing, here and there, to high light some of the
detail. At this point, I painted all the tools and hold down straps on
the jerry cans. I do this by hand, placing strips of paper under them.....
so I don't accidentally go onto places I shouldn't. The jack, shovel head,
axehead, and wire cutters were painted 'Dark Gray' , and then scrubbed
with powdered graphite and an old brush... to give that metalic finish.
After this, they got a coat of Rustall to tone down the shine.
I
then did a lttle dry brushing, here and there, to high light some of the
detail. At this point, I painted all the tools and hold down straps on
the jerry cans. I do this by hand, placing strips of paper under them.....
so I don't accidentally go onto places I shouldn't. The jack, shovel head,
axehead, and wire cutters were painted 'Dark Gray' , and then scrubbed
with powdered graphite and an old brush... to give that metalic finish.
After this, they got a coat of Rustall to tone down the shine.
A clear matte coat was applied using Model Master Enamel 'Matte Clear'.
Now, I know you are going to say that you should not put enamels over acrylics. Well I do this quite regularly and have had no problems. I will add that it is usually after a GOOD SPELL between coats.
Weathering
I scraped some pastel chalks of varying browns, and some black, into a plastic tray (I keep all those plastic lids from preserved fruit containers as they make great disposable paint mixing pallets and pastel dust trays). I combined them to get a nice dusty rust colour. This was applied to the exhaust pipes and mufflers. A bit of extra black was added to the outlet pipe ends. Then, I proceeded to apply the dust, lightly, to the other parts of the model. This helped to blend, and feather in, the previously sprayed 'wash'.
I think this lends a look of subtlety to the weathering and tones down the camouflage, while tying every thing together.
Spraying the wash stops pooling and tide marks and gives a nice feathered effect. There is also no problems with base colours coming off, or being wrecked by over zealous use of the brush.
Finally
This was a nice kit to build and I thoroughly enjoyed building it .
I would like to do the other eight-wheeled armoured car kits that Italeri have in their range. I believe there are four all together. I have my sights on the 234/1. I just have to negotiate with the current owner of the kit.
It would have been nice to have found the pictures on the net, before I finished it, so I could have done a bit more on the interior.
Some P.E. brass would have been nice as well . Again, I am not sure if any are available for this kit, so I may be barking up the wrong tree.
As previously stated, with some good references, and a bit of imagination, one could really go to town on this kit.
I purchased this kit from NKR models in Australia


Previous: Contents

