


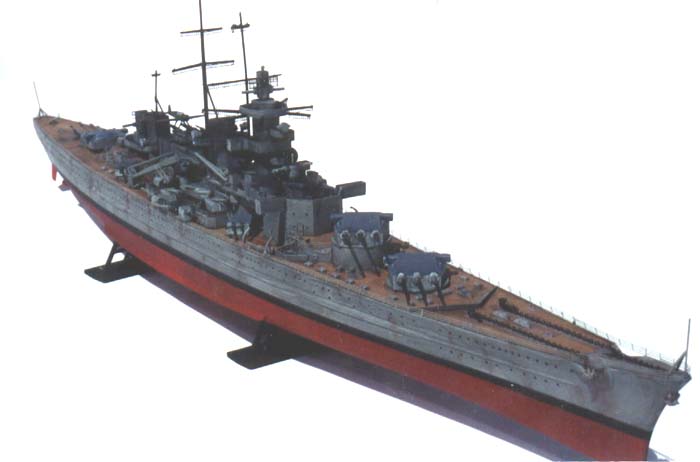
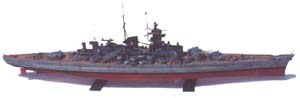
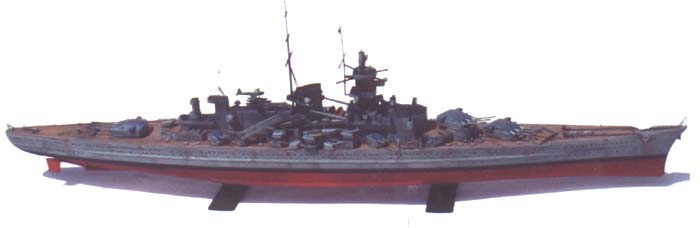
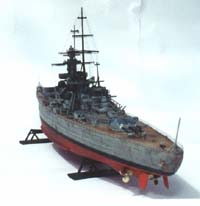
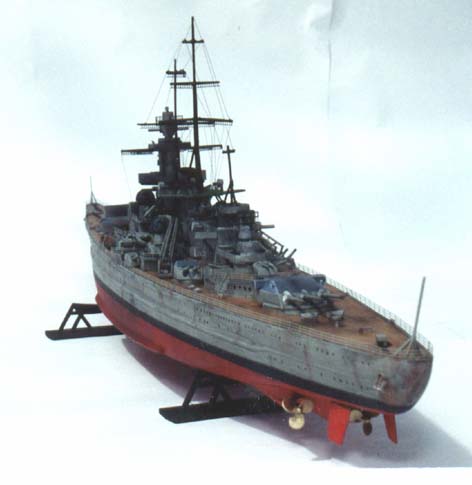
 Heller
1/400 Gneisenau
Heller
1/400 Gneisenau
By Richard Eaton
Introduction
I am a great fan of 30's era German warships. Recently, I got a chance to build the Kriegsmarine battleship Gneisenau. This is a large (1/400 scale) Heller kit that has fair (but not extensive) detail. I scrounged around for items to spice things up a bit and found a good deal of the excellent Gold Medal Models photo etch railing. A trip to the local shop added GMM's 'Extra Ladders' and 'Extra Hatches.' Now I was ready to build!
The History
The battleship was the ultimate symbol of naval power in the 30's. The British led the world with their fleet. German Admiral Raeder's Plan-Z was Germany's blueprint to rearm, and battleships were a major part of this. The Kriegsmarine had seven battleships at the beginning of the war and two larger (Bismarck J-class) ships under construction. Germany prepared to build a class of super 'H-class' battleships that could take on anything in the British Fleet.
At the start of hostilities, in 1939, the sister ships Scharnhorst and the Gneisenau were Germany's largest capital ships. Based on a world war one design, they were fast battleships that could outrun most enemy that they encountered at sea. They needed this speed because they were terribly under-gunned for their size.
 Both
ships were laid down in 1934 in Admiral Raeder's Plan-Z as stopgap ships.
They were meant to eventually complement the larger Bismarck and Tirpitz
in the new German fleet. Unfortunately (for the Kriegsmarine) German aggression
triggered the war before Plan-Z came to full fruition. Gneisenau was completed
in May of 1938, while the Scharnhorst would not be finished until January
of the following year.
Both
ships were laid down in 1934 in Admiral Raeder's Plan-Z as stopgap ships.
They were meant to eventually complement the larger Bismarck and Tirpitz
in the new German fleet. Unfortunately (for the Kriegsmarine) German aggression
triggered the war before Plan-Z came to full fruition. Gneisenau was completed
in May of 1938, while the Scharnhorst would not be finished until January
of the following year.
The 11 inch guns of these ships were not up to the standard of ships of this size. Comparable ships of the British fleet, had 14 and 16 inch guns. German high command justified the smaller guns saying that the weight savings was dedicated to more armor protection. Many argue that the 11 inch guns of these ships were a cost saving measure (being guns that were ordered for a previously canceled design). It can not be argued that this showed how ill prepared the Kriegsmarine was for the upcoming war.
The Germans planned an invasion of Norway. They needed the rich iron ore deposits there and an invasion ensured their supply feeding the factories building machines for the Werhmacht. The British, sensing the coming invasion, started an evacuation of their forces.
The British recalled the aircraft carriers H.M.S. Ark Royal and the H.M.S. Glorious from the Mediterranean theater to assist the evacuation. Glorious was to recover all aircraft possible and return them to Britain. This entailed the dangerous business of landing Gloster Gladiators and Hawker Hurricanes on the moving deck of an aircraft carrier. While the Gladiator was a sturdy plane, they feared the Hurricane would not survive the rough landings. The person put in charge of this operation for the British was Admiral G. D'Oyly Hughes.
 The
Germans knew of the presence of the British carriers from Luftwaffe reports.
They dispatched Scharnhorst and Gneisenau in pursuit. The main targets
of the German capital ships were the troop ships that were leaving for
Britain.
The
Germans knew of the presence of the British carriers from Luftwaffe reports.
They dispatched Scharnhorst and Gneisenau in pursuit. The main targets
of the German capital ships were the troop ships that were leaving for
Britain.
Admiral Hughes prepared to recover the land-based aircraft. Amazingly the Hurricanes recovered without incident. Hughes, however, committed serious errors in the operation. He had no patrol planes in the air, no lookouts in positions. There were no ready planes to launch in case of a surprise attack by the Kriegsmarine.
As the Glorious was recovering planes, Scharnhorst and Gneisenau closed for attack. The German command ordered the fleet to avoid confrontation with British ships of war, but a carrier with two destroyer escorts, was too tempting a target. Closing to 16 miles, the Scharnhorst and Gneisenau opened fire. While the first salvo missed, the second salvo found its mark. Immediately, the escorting British destroyers laid down a smoke screen so the wounded carrier could escape. This did not help. The Scharnhorst and Gneisenau opened fire again and fatally wounded the Glorious. The escorting destroyers closed to attack the German ships and were blown from the water. Scharnhorst took a hit from one of the attacking destroyers and slightly damaged.
 Fearing
detection and reciprocity for the attack, Scharnhorst and Gneisenau retreated
back to Germany. On the return trip, the Gneisenau took a torpedo hit
from a British submarine. The British troop ships arrived home safely
due to this German policy of avoiding encounters with the Royal Navy.
Fearing
detection and reciprocity for the attack, Scharnhorst and Gneisenau retreated
back to Germany. On the return trip, the Gneisenau took a torpedo hit
from a British submarine. The British troop ships arrived home safely
due to this German policy of avoiding encounters with the Royal Navy.
After the Norwegian tour of duty, and needed repairs, Scharnhorst and Gneisenau embarked on a highly successful commerce raiding session together in 1941. The ships together sank 122,000 tons of Allied shipping. The orders to avoid Royal Navy contact hindered their mission. An example of this was the Rawalpindi incident. The Rawalpindi was a British escort that was guarding a convoy that the Scharnhorst and Gneisenau attacked. Detecting the German ships, the captain of the Rawalpindi turned towards them and attacked. The courageous British ship was blown to pieces by the German ships. Watching that from the deck of a (now unprotected) ammunition ship would tend to make one think of several better ways to serve king and country! In a favorable position to attack the wide open convoy, the German ships turned and fled the scene fearing that they had been detected.
 Scharnhorst
and Gneisenau returned to Brest in need of repair and refit. The Scharnhorst
was in dire need of an engine overhaul and the Gneisenau had torpedo damage.
These repairs prevented Scharnhorst and Gneisenau from going on the fateful
maiden voyage of Bismarck as Admiral Raeder had envisioned. The Bismarck
suffered her fate and Scharnhorst and Gneisenau lived on to fight another
day.
Scharnhorst
and Gneisenau returned to Brest in need of repair and refit. The Scharnhorst
was in dire need of an engine overhaul and the Gneisenau had torpedo damage.
These repairs prevented Scharnhorst and Gneisenau from going on the fateful
maiden voyage of Bismarck as Admiral Raeder had envisioned. The Bismarck
suffered her fate and Scharnhorst and Gneisenau lived on to fight another
day.
The British were not happy with the presence of the German battlecruisers in a position to pounce on Atlantic convoys. Prime Minister Churchill ordered the ships sunk at all costs and carried out a series of unsuccessful bombing raids.
With the start of Operation Barbarossa, Germany needed assets in the North Sea to stop the convoys headed to the icy Soviet ports of Murmansk and Arkangelesk. Scharnhorst and Gneisenau received orders to leave Brest for a closer port. This move involved one of the most daring and successful operations by the Kriegsmarine in World War II.
Operation Cerberus was planned as a grand deception. The plan was to slowly increase radar jamming to prevent any alarm and for Scharnhorst, Gneisenau, and Prinz Eugen to make a high speed run through the channel. The British expected the ships to move at night. They did not notice the low level of jamming as it increased on their radar. When finally spotted speeding through the channel, the British did not have assets ready to use against them. They unsuccessfully attacked with Spitfires and motorized torpedo boats. British Swordfish torpedo bombers hastily attacked to no effect. Finally, the British sent in bombers and destroyers, but Gneisenau and Prinz Eugen repulsed them.
 Despite
Scharnhorst and Gneisenau striking mines, operation Cerberus was a success.
All three ships made it back to German ports leaving no German surface
elements on the Atlantic. Admiral Doenitz's U-boats now became the number
one target of the Royal and now American Navies.
Despite
Scharnhorst and Gneisenau striking mines, operation Cerberus was a success.
All three ships made it back to German ports leaving no German surface
elements on the Atlantic. Admiral Doenitz's U-boats now became the number
one target of the Royal and now American Navies.
The Allies got vital ULTRA information about the mine hits that the Scharnhorst and Gneisenau suffered. They sent heavy bombers against the ships as they lay in the repair yard. Gneisenau received severe damage in port. She never again sailed into battle and ended the war scuttled as a barrier ship at Gotenhaven in 1942.
Scharnhorst survived and made several deployments before becoming the prey of a British task force led by Duke of York. After a terrific sea battle Scharnhorst's magazines exploded. Scharnhorst rolled over and sank with the majority of her men. Raeder's prophecy was now complete.
Building Gneisenau
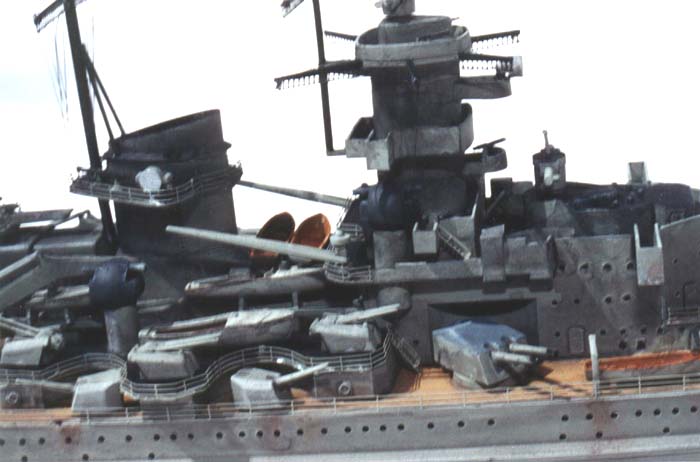
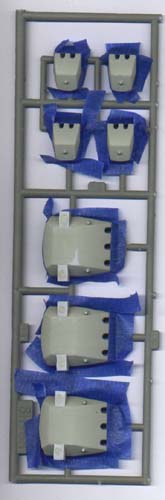
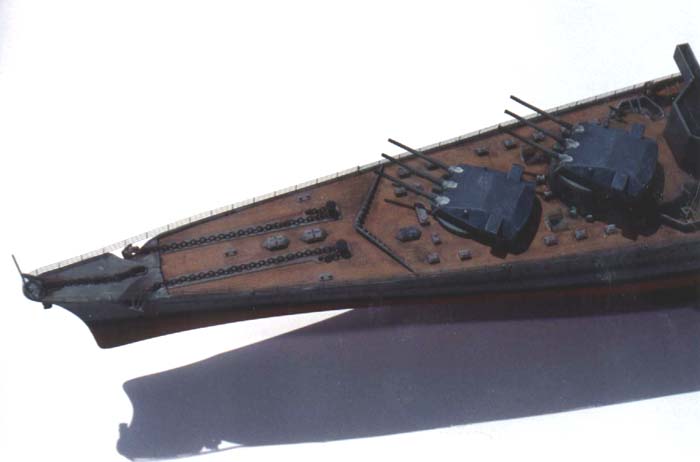
The huge box and tree upon tree of parts are impressive. I planned to employ several basic techniques to add details to the model. Sink holes and ejector marks abound so drag out the CA and sanding sticks on this one. First I drilled out several hundred port holes in the hull halves, superstructure, and bridge.
I then prepared the parts as much as possible while still on the sprue. I filled and sanded, cleaning as many sink holes and ejector marks as I could stand. Next I CAed the PE bulkheads and doors on and then sprayed everything Testors dark aircraft gray. The ship's decks were natural wood. The model deck had raised deck board detail. I painted the deck Testors wood and the drybrushed with dark brown to bring out detail. I went back over the numerous molded-on deck detail with gray to clean up any slip ups.
The Hull
I assembled the two large hull pieces. I taped the deck in place to keep thing aligned while drying. Fit was good with little gapping to fill. Once the hull gray was dry I masked off the water line and sprayed flat black. Once the black dried I masked over the black and finished up with flat red. The kit waterline is clearly marked with raised detail. Peel off all that masking tape and presto... painted hull! I then cut individual port hole glass from clear styrene using a #11 point and glued them in place one at a time in the hull.. OK, not really, but I had you going there didn't I?
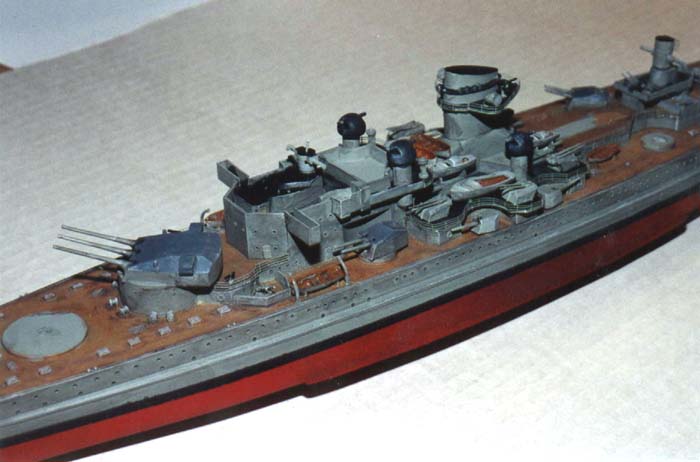
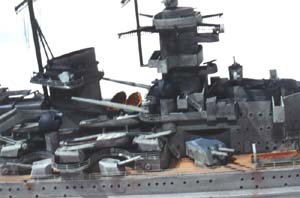
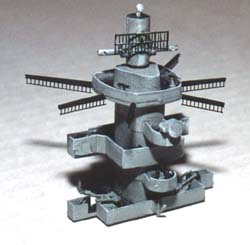
The Guns
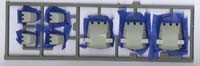 My
references showed that the primary and secondary gun turrets were topped
with a bluish gray color. I assembled the primary turret components with
the turret body attached to the sprue. The turret range finders had huge
sinkholes so I filled them with CA and sanded – I got pretty good
at filling sinkholes with this kit. I masked the turrets on the sprue
and sprayed the tops intermediate blue. Next I cleaned up the primary
and secondary gun barrels and drilled them out. I assembled the main guns
using masking tape to back the large turret gaps that allow the barrels
to elevate. I just poked the barrels through the tape. I planned on posing
the model attacking off the starboard bow so I assembled the forward main
guns in an elevated position. I then assembled the secondary gun turrets.
I used white glue to fill the barrel elevation gaps and applied several
layers to form blast bags. I painted the 'blast bags' light gray.
My
references showed that the primary and secondary gun turrets were topped
with a bluish gray color. I assembled the primary turret components with
the turret body attached to the sprue. The turret range finders had huge
sinkholes so I filled them with CA and sanded – I got pretty good
at filling sinkholes with this kit. I masked the turrets on the sprue
and sprayed the tops intermediate blue. Next I cleaned up the primary
and secondary gun barrels and drilled them out. I assembled the main guns
using masking tape to back the large turret gaps that allow the barrels
to elevate. I just poked the barrels through the tape. I planned on posing
the model attacking off the starboard bow so I assembled the forward main
guns in an elevated position. I then assembled the secondary gun turrets.
I used white glue to fill the barrel elevation gaps and applied several
layers to form blast bags. I painted the 'blast bags' light gray.
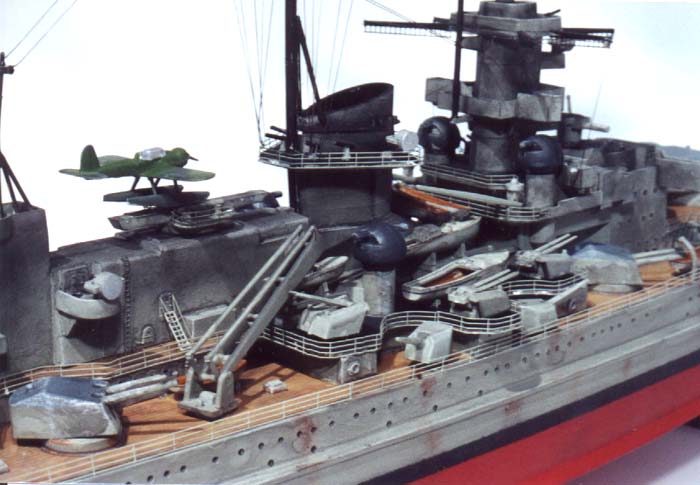
The Superstructure
 I
took things in sections so that detailing would be easier and to cut down
on PE damage as the kit progressed. Each section included cleanup, assembly,
a scale black wash, drybrushing with Testors flat light gray and PE details.
I assembled the lower superstructure and glued it to the hull. I painted
aft of this level wood and a large section flat black to simulate the
linoleum used by the Germans in this period. I then added the bridge structure
to the hull. I am a firm believer in adding PE rails from the top down
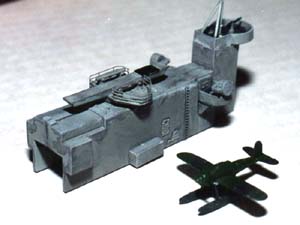
with ships. I assembled the aft gun mount, the hangar/catapult assembly,
funnel, and forward flying bridge structures separately. I dry fit everything
to the first level superstructure and deck just to make sure there were
no surprises. Once happy with that, I added the PE railings to the individual
structures. The catapult deck greatly benefited from the rails and ladders.
I then added the small anti-aircraft guns to their various positions.
These smaller weapons are generally crude and should be replaced.
I
took things in sections so that detailing would be easier and to cut down
on PE damage as the kit progressed. Each section included cleanup, assembly,
a scale black wash, drybrushing with Testors flat light gray and PE details.
I assembled the lower superstructure and glued it to the hull. I painted
aft of this level wood and a large section flat black to simulate the
linoleum used by the Germans in this period. I then added the bridge structure
to the hull. I am a firm believer in adding PE rails from the top down
with ships. I assembled the aft gun mount, the hangar/catapult assembly,
funnel, and forward flying bridge structures separately. I dry fit everything
to the first level superstructure and deck just to make sure there were
no surprises. Once happy with that, I added the PE railings to the individual
structures. The catapult deck greatly benefited from the rails and ladders.
I then added the small anti-aircraft guns to their various positions.
These smaller weapons are generally crude and should be replaced.

 The
forward superstructure had a crown of spars radiating out from the top
level. I drilled out holes for rigging and added PE details to each spar.
I then rigged a star pattern using nylon thread. The kit supplied radar
was a large block of plastic with raised details on one side. Out it went.
I used various PE ladder parts to put together a similar sized radar array,
painted it flat black and glued it to the upper range finder turret instead.
I made up a similar arrangement for the rear radar installation. Once
all the superstructure components were done I set them aside and did the
railings for the first level gun deck. I used my usual method of measuring,
bending, and dryfitting to make the long runs around this complex structure.
I wished that I had formed these rails before gluing this level to the
deck. Live and learn! I tacked the railing in place and then ran a line
of thin CA for strength. Use care at the joins to keep a clean look. Once
that was done I assembled all superstructure components to the model and
added the remaining guns.
The
forward superstructure had a crown of spars radiating out from the top
level. I drilled out holes for rigging and added PE details to each spar.
I then rigged a star pattern using nylon thread. The kit supplied radar
was a large block of plastic with raised details on one side. Out it went.
I used various PE ladder parts to put together a similar sized radar array,
painted it flat black and glued it to the upper range finder turret instead.
I made up a similar arrangement for the rear radar installation. Once
all the superstructure components were done I set them aside and did the
railings for the first level gun deck. I used my usual method of measuring,
bending, and dryfitting to make the long runs around this complex structure.
I wished that I had formed these rails before gluing this level to the
deck. Live and learn! I tacked the railing in place and then ran a line
of thin CA for strength. Use care at the joins to keep a clean look. Once
that was done I assembled all superstructure components to the model and
added the remaining guns.

Weathering
 I
wanted a real mid-mission look for the model so I weathered extensively.
I used a scale gray wash throughout assembly. I washed the hull and deck
as well. A ship builds up a nasty coat of soot on a long patrol so I used
black pastel dust and a brush to darken the upper superstructure surfaces.
I also used this to darken the gun muzzles and areas of the deck effected
by blast. I used a pastel red and brown dust mix to add rust marks to
the hull. This allows some subtlety to an effect that is easily overdone.
Once I was happy with the look, I oversprayed with Dullcote.
I
wanted a real mid-mission look for the model so I weathered extensively.
I used a scale gray wash throughout assembly. I washed the hull and deck
as well. A ship builds up a nasty coat of soot on a long patrol so I used
black pastel dust and a brush to darken the upper superstructure surfaces.
I also used this to darken the gun muzzles and areas of the deck effected
by blast. I used a pastel red and brown dust mix to add rust marks to
the hull. This allows some subtlety to an effect that is easily overdone.
Once I was happy with the look, I oversprayed with Dullcote.

Masts and Rigging
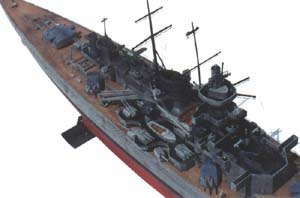 The
kit masts are scale thin making them flimsy. I added PE details, painted
them flat black and added them to the kit. The main mast had alignment
problems that are easily corrected. I use invisible nylon thread colored
with permanent marker for this scale. I used kit supplied references and
went to town. I ran support and wireless aerials to represent the ship's
rigging at a distance without doing too much damage to the PE.
The
kit masts are scale thin making them flimsy. I added PE details, painted
them flat black and added them to the kit. The main mast had alignment
problems that are easily corrected. I use invisible nylon thread colored
with permanent marker for this scale. I used kit supplied references and
went to town. I ran support and wireless aerials to represent the ship's
rigging at a distance without doing too much damage to the PE.
Wrapping her up
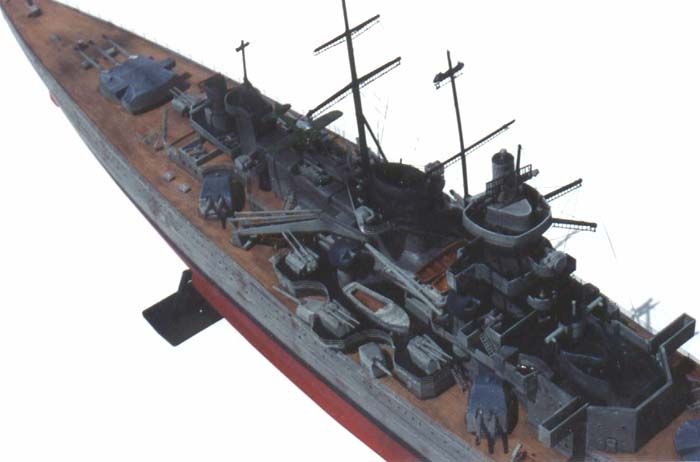
The kit comes with passable anchors and nicely scaled anchor chain. I sprayed the chain flat black and CAed them in place. I weathered and added the anchors (three on the bow, one astern). Decals went down nicely. Now, at last, I added the final railing. I always add the outer hull railing last to prevent damage. (Well almost last in this case)
 The
Gold Medal 'Extra Railings' set has some nicely angled bow pieces that
you curve in the middle to form the bow. Working from the bow I strung
the railings together first one side and then the other. This left just
a small area at the stern to fill in. I then added the bow and stern flag
poles and decals. I did a general touch up followed by a few more well
aimed puffs of Dullcote to hide the CA shine and she was complete.
The
Gold Medal 'Extra Railings' set has some nicely angled bow pieces that
you curve in the middle to form the bow. Working from the bow I strung
the railings together first one side and then the other. This left just
a small area at the stern to fill in. I then added the bow and stern flag
poles and decals. I did a general touch up followed by a few more well
aimed puffs of Dullcote to hide the CA shine and she was complete.
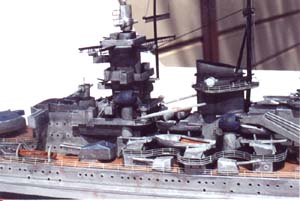
Conclusion
I recommend this kit to most ship lovers. Average level ship builders would have a lot of fun building right out of the box. It builds up to a nice representation of this sleek, yet dangerous looking ship. Due to the amount of cleanup required and large number of small detailed parts and PE, I recommend this upgraded kit for experienced modelers. I want to thank Squadron Mail Order for supplying the Heller kit for this project.
Sources:
-
Hildebrand/Röhr/Steinmetz: "Die deutschen Kriegsschiffe" Biographies of German warships 1815-1985
-
"The German Navy at War- Vol. 1 Battleships" by Siegfried Breyer and Gerhard Koop (Schiffer Publishing 1989)
-
E Faust's excellent web site The German Navy in World War II


Previous: Contents

