 Planet
Models 1/48 Ar396
Planet
Models 1/48 Ar396
By John Lester
Background
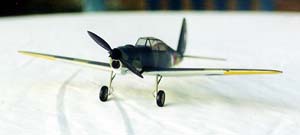
The Arado 396 was the planned successor to the Ar 96, Germany's primary trainer during the war. While outwardly similar, the 396 was in fact a wholly new design. Planned in 1944, as the war situation worsened, it was to use a minimum of metal and to be powered by a new engine, the Argus As 411. The French company SIPA was to have produced the plane, but Allied advances forced the Nazis to move production to the Czech Letov and Avia facilities near Prague.
The prototype took to the air for the first time in late November, 1944. No major teething problems were encountered, and production was rapidly authorized. Only 12 machines were built before Germany capitulated. However, SIPA built over 200 after the war for the French Air Force. Designated S-10, S-11, S-12 and S-121, these variants were similar to the original aircraft, with the addition of machine guns and bomb racks under the wings. They were used for training and as COIN aircraft in North Africa.
The Kit
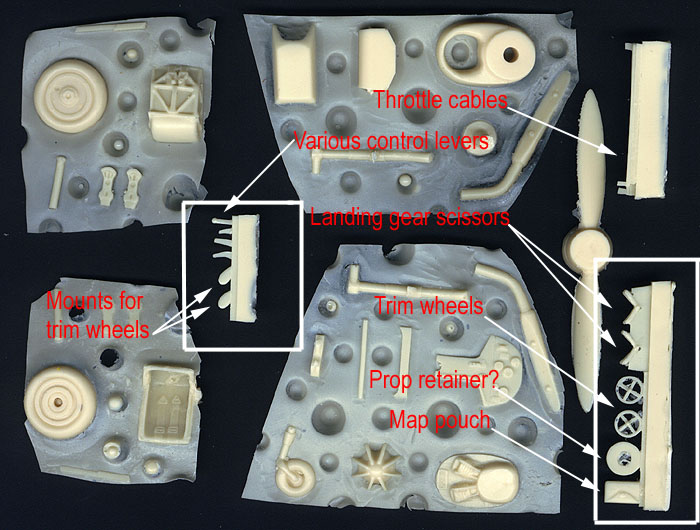
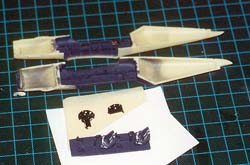
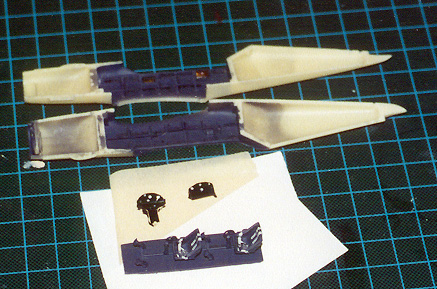
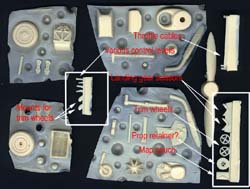 Inside
the typical flimsy cardboard box are nearly forty resin parts, plus two
vacuformed clear canopies (thanks, Planet!). All parts come in separate
sealed pouches to keep them from damage, a nice touch. The fuselage is
molded as two halves, with finely scribed panel detail on the exterior,
and sidewall detail (a bit heavy but acceptable) molded in the cockpit
area. The wings are one piece, as is the horizontal stabilizer. With the
exception of the cockpit floor and the vertical tail fin, all the other
parts are either attached to thick resin runners, or part of "wafers"
of resin. Casting is quite good; I only encountered a few bubbles and
pits on this one. The only difficulties I had, in fact, was sanding the
seams off the smaller parts after separating them from the wafers (more
on that shortly).
Inside
the typical flimsy cardboard box are nearly forty resin parts, plus two
vacuformed clear canopies (thanks, Planet!). All parts come in separate
sealed pouches to keep them from damage, a nice touch. The fuselage is
molded as two halves, with finely scribed panel detail on the exterior,
and sidewall detail (a bit heavy but acceptable) molded in the cockpit
area. The wings are one piece, as is the horizontal stabilizer. With the
exception of the cockpit floor and the vertical tail fin, all the other
parts are either attached to thick resin runners, or part of "wafers"
of resin. Casting is quite good; I only encountered a few bubbles and
pits on this one. The only difficulties I had, in fact, was sanding the
seams off the smaller parts after separating them from the wafers (more
on that shortly).
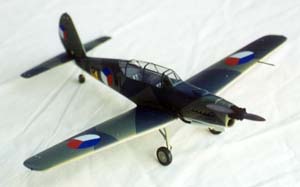
Instructions are quite basic, and come on one sheet of paper that also includes marking/painting guides and a catalog. The short history included is the most extensive reference I could find on the aircraft. Assembly is shown in three exploded diagrams. It's mostly adequate to the task, except that there are several parts that are not shown on the instructions. It took a while, but with the help of Scott VanAken's Modeling Madness site, I was able to figure everything out.
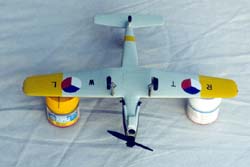
 Decals,
printed by Propagteam, are provided for two versions. One is a Luftwaffe
prototype tested at the Letov factory airfield in 1945. The other was
apparently a production aircraft captured by partisans, hastily re-marked,
and flown over Prague during the uprising on May 5, 1945. The decals are
flawlessly registered and turned out to be thicker and more opaque than
previous ones I've used made by this manufacturer.
Decals,
printed by Propagteam, are provided for two versions. One is a Luftwaffe
prototype tested at the Letov factory airfield in 1945. The other was
apparently a production aircraft captured by partisans, hastily re-marked,
and flown over Prague during the uprising on May 5, 1945. The decals are
flawlessly registered and turned out to be thicker and more opaque than
previous ones I've used made by this manufacturer.
Interior Construction
After washing down all the parts in a pine oil cleaner, I turned to building. Construction starts with the cockpit - surprise, surprise. Detail is basic, but mostly acceptable. The instructions show where to place the seats, pedals, instrument panel and sticks. They neglect, however, to show where the "mystery parts" go. All the parts were painted Testor's Model Master RLM 66 grey, except the instrument panel. These were then cut from their wafers using a new blade on my hobby knife, and the remaining seams cleaned away with either the back edge of the knife or some 400 grit wet-and-dry sandpaper.
 Starting
at the bottom and working my way up, I glued the rudder pedals, sticks
and seats to the floor. I briefly thought about sanding off the molded-on
seatbelts and replacing them with photo-etch – until I discovered
I had no German seatbelts. Ah well, the kit parts are decent enough, so
I painted them a light grey and colored the hardware with a sharply pointed
Prismatic silver pencil. After the seats were in place, I added trim wheels
to the right of each - there are small blocks there, and it looked as
good a place as any. (Needless to say, I never did find a photo of one
of these aircraft to use as reference – let alone a photo of the
cockpit!).
Starting
at the bottom and working my way up, I glued the rudder pedals, sticks
and seats to the floor. I briefly thought about sanding off the molded-on
seatbelts and replacing them with photo-etch – until I discovered
I had no German seatbelts. Ah well, the kit parts are decent enough, so
I painted them a light grey and colored the hardware with a sharply pointed
Prismatic silver pencil. After the seats were in place, I added trim wheels
to the right of each - there are small blocks there, and it looked as
good a place as any. (Needless to say, I never did find a photo of one
of these aircraft to use as reference – let alone a photo of the
cockpit!).
Next I turned to the sidewalls. These got a wash of black to add some shadowing, after which the raised areas where drybrushed with a lightened version of the RLM 66 base coat. There were a few electrical boxes and such that I painted black; switches and dials were picked out with white and silver pencil. I added the map pouch and a few of the levers from the "mystery sprues", but balked at cutting out the throttle cables. No way that was going to happen without me breaking the thin resin. Instead, I measured pieces of thin wire and glued them in the appropriate places on the left sidewall.
 Finally,
the two instrument panels were painted black. I had a few instrument dial
decals left over from other projects, and with no concern at all for authenticity,
applied several wherever they fit. These were then covered with a drop
of white glue to simulate the glass, and the bezels highlighted with the
silver pencil. Looks good, whether or not the faces actually represent
what was really there!
Finally,
the two instrument panels were painted black. I had a few instrument dial
decals left over from other projects, and with no concern at all for authenticity,
applied several wherever they fit. These were then covered with a drop
of white glue to simulate the glass, and the bezels highlighted with the
silver pencil. Looks good, whether or not the faces actually represent
what was really there!
Before closing up the fuselage halves, I also painted the engine front. The backplate was painted TMM RLM 02 grey; the two engine cylinders were painted gunmetal and drybrushed with TMM Aluminum. The area around the engine that would be visible after the fuselage was assembled also was painted RLM 02.
Exterior Constuction
 I
expected some problems trapping the completed interior bits inside the
fuselage halves, then getting the halves together. I had none. Dry fitting
had shown me the fuselage halves would need just a bit of sanding to align,
and both the cockpit and engine front fit right where the instructions
indicated with no problems. A little bit of superglue for the interior,
some five minute epoxy for the fuselage halves and - boom - I was there.
The seams weren't even that bad. I needed a bit of putty all around, but
not much. The nose piece then went on, and without the difficult seams
others had reported. I left the prop and spinner off until the end though.
I
expected some problems trapping the completed interior bits inside the
fuselage halves, then getting the halves together. I had none. Dry fitting
had shown me the fuselage halves would need just a bit of sanding to align,
and both the cockpit and engine front fit right where the instructions
indicated with no problems. A little bit of superglue for the interior,
some five minute epoxy for the fuselage halves and - boom - I was there.
The seams weren't even that bad. I needed a bit of putty all around, but
not much. The nose piece then went on, and without the difficult seams
others had reported. I left the prop and spinner off until the end though.

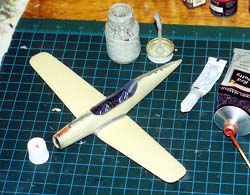
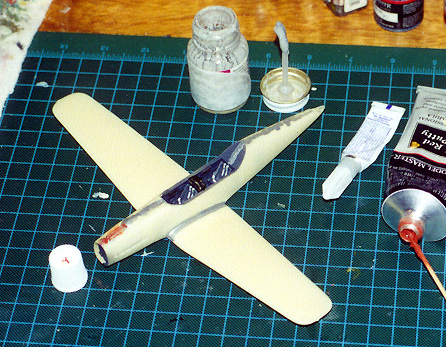
Attaching the wings and tail was trickier, because there are no real alignment aids. I should have attached the wings first - they're fairly easy to get right. Instead, I attached the horizontal stabilizers and the tail fin. Parts cleanup was easy. All it took were a few swipes with a sanding stick, mostly at the tips. I made a rough jig from small blocks of styrofoam glued to scrap wood, taped the airplane to it and attached the parts. I used five minute epoxy to attach them, as it allows one to adjust things in the first minute or so. Even with the jig, it turns out my stabilizers are just a hair out of alignment with the wings. The vertical fin is fine though. Again, I needed putty to smooth the joints, but not very much.
 After
the wings and tail assembly had set up for a day, I added most of the
rest of the "bits". The odd shaped exhausts and oil cooler were cut out,
cleaned up and attached up front. I elected to add the landing gear struts
and tailwheel at this time, so the model would have something to stand
on while painting. These parts gave me the most trouble of the entire
kit. The landing gear castings were not the greatest, and it was tough
to clean up the seams and keep them cylindrical. I gave serious thought
to scratchbuilding them from various diameters of wire and tube, and I
probably should have. The detail would look better, and they would certainly
not bow and deform from the weight of the model over time as I fear the
resin parts will. As it was, I used the main struts, but made the bracing
from brass wire and styrene tube.
After
the wings and tail assembly had set up for a day, I added most of the
rest of the "bits". The odd shaped exhausts and oil cooler were cut out,
cleaned up and attached up front. I elected to add the landing gear struts
and tailwheel at this time, so the model would have something to stand
on while painting. These parts gave me the most trouble of the entire
kit. The landing gear castings were not the greatest, and it was tough
to clean up the seams and keep them cylindrical. I gave serious thought
to scratchbuilding them from various diameters of wire and tube, and I
probably should have. The detail would look better, and they would certainly
not bow and deform from the weight of the model over time as I fear the
resin parts will. As it was, I used the main struts, but made the bracing
from brass wire and styrene tube.
The tailwheel caused me no end of aggravation. It snapped in half while I was trying to clean up the seams from its wafer. No biggie, as I glued the stump to the airframe and painted the wheel separately. I probably should have replaced the strut with wire though, because the darn thing snaps off if you look at it cross-eyed now. I think I've re-glued it a dozen times since I finished the model! The main wheels were painted separately and added at the end, as were the scissors from the "mystery sprue". I laughed at the pitot tube - another long, thin piece that was better replicated with a length of fine steel tubing that was added at the end.
 Lastly
came the canopy. Planet provides two, which is much appreciated if you're
fumble-fingered like I am, or you wish to cut it open to better display
the inside. I gave serious thought to doing just that, but without any
idea which sections opened, and how they opened, I left everything closed.
For a wonder, I didn't screw anything up cutting the part from the rest
of the plastic sheet, nor while sanding it to fit. I also managed to dip
it in future and mask off the glazing without trouble. I did, however,
have to rip it off and reattach when the primer coat revealed I had a
decided step on the starboard side, and overhang on the port. Good thing
I used white glue to attach it! I was able to slip the tip of my hobby
knife through the glue and gently slice/pry the canopy loose. Cleanup
was easy, using the back of the knife blade and some careful scrubbing
with a water-soaked Q-tip (cotton bud). White glue again attached the
piece to the fuselage - and this time, I got it right. A little more white
glue smoothed the join between the two. Then it was off to the basement
to get painting.
Lastly
came the canopy. Planet provides two, which is much appreciated if you're
fumble-fingered like I am, or you wish to cut it open to better display
the inside. I gave serious thought to doing just that, but without any
idea which sections opened, and how they opened, I left everything closed.
For a wonder, I didn't screw anything up cutting the part from the rest
of the plastic sheet, nor while sanding it to fit. I also managed to dip
it in future and mask off the glazing without trouble. I did, however,
have to rip it off and reattach when the primer coat revealed I had a
decided step on the starboard side, and overhang on the port. Good thing
I used white glue to attach it! I was able to slip the tip of my hobby
knife through the glue and gently slice/pry the canopy loose. Cleanup
was easy, using the back of the knife blade and some careful scrubbing
with a water-soaked Q-tip (cotton bud). White glue again attached the
piece to the fuselage - and this time, I got it right. A little more white
glue smoothed the join between the two. Then it was off to the basement
to get painting.

Painting/Marking
 The
whole model got a light primer coat of whatever generic grey enamel I
had laying around. This exposed all the flaws - spots that needed a bit
more putty, the misplaced canopy, and sanding scratches I had not smoothed
out. Gunze's Mr Surfacer 500 took care of the first and last problems.
Another coat of grey blended it all together and readied the model for
the color coats.
The
whole model got a light primer coat of whatever generic grey enamel I
had laying around. This exposed all the flaws - spots that needed a bit
more putty, the misplaced canopy, and sanding scratches I had not smoothed
out. Gunze's Mr Surfacer 500 took care of the first and last problems.
Another coat of grey blended it all together and readied the model for
the color coats.
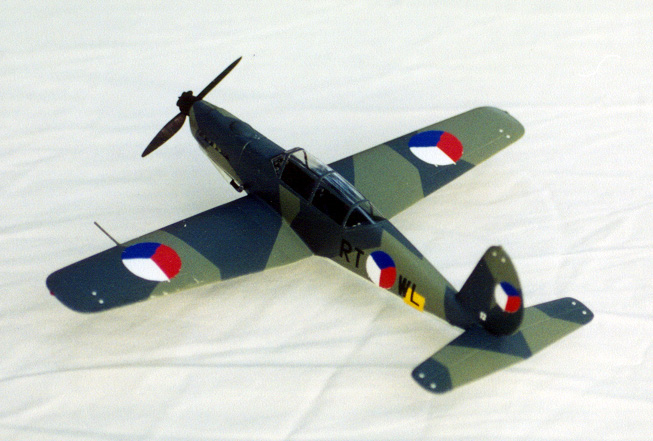
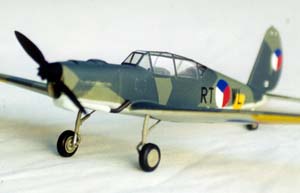
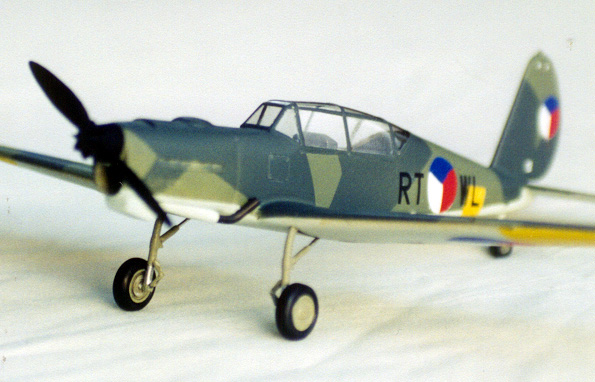
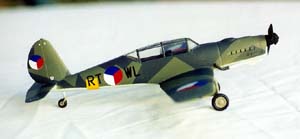
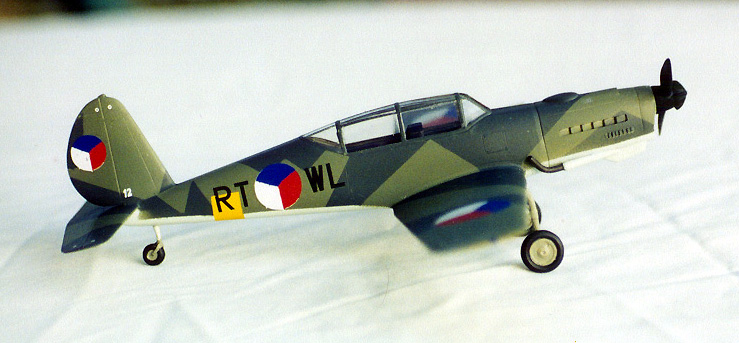
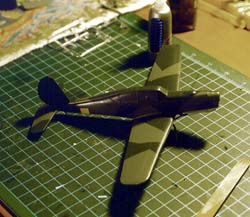
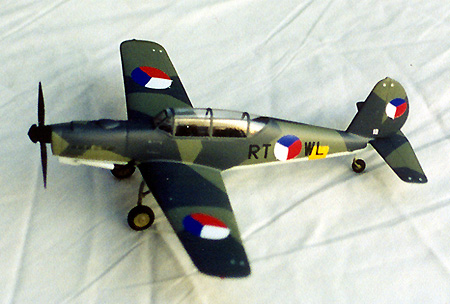
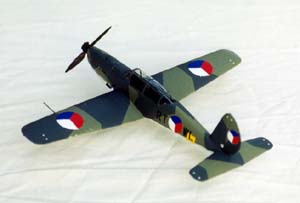
Both aircraft for which markings are provided wore the early war RLM 70/71 over 65 splinter scheme. I sprayed the RLM 65 undersides first, using Gunze Sangyo's "Light Blue" acrylic. Next came the yellow ID bands. I tried using Gunze's RLM 04, but yikes, that did not go down well at all. It was too transparent, and I must have thinned it too much since it ran all over. A quick trip to the deep sink washed the yellow off. After drying, I remasked and shot Humbrol "Matte Yellow" enamel. Much, much better. Unfortunately, I didn't realize at this point that the yellow band I painted around the aft fuselage was canted to the rear, and not tall enough. Ah, well. The wheel wells were brush painted RLM 02.
After the underside colors were allowed to dry for a couple days, I masked them off and sprayed TMM RLM 70 enamel. I masked this off after another day of drying and followed it with the RLM 71. Unfortunately (again) the paint appeared to orange peel on me (actually, the tip of my airbrush is worn down and the paint spattered as it was applied). I didn't want to strip everything, and the texture wasn't horrible, so I bought a bottle of paint polish (the kind of stuff used by auto modelers). I soaked a cotton make-up pad swiped from my wife's sink in the stuff and carefully polished the bad spots smooth. Once the surface was to my liking, I wiped everything clean with window cleaner.
 Though
the TMM paints and the Gunze dried glossy, I did spray a clear gloss coat,
because of the matte yellow areas. This is when disaster struck. I used
Future as I always do. Unlike every other time I sprayed Future, it puddled
on the wings and tail. The first run was so bad that I immediately ran
the model to the deep sink to wash it off. So was the second application.
The third try, I misted on several light coats before trying a heavier
one. This was better, but still not good. After letting it cure for a
week, I came back with the polish and smoothed it out - which at least
got rid of the worst blemishes.
Though
the TMM paints and the Gunze dried glossy, I did spray a clear gloss coat,
because of the matte yellow areas. This is when disaster struck. I used
Future as I always do. Unlike every other time I sprayed Future, it puddled
on the wings and tail. The first run was so bad that I immediately ran
the model to the deep sink to wash it off. So was the second application.
The third try, I misted on several light coats before trying a heavier
one. This was better, but still not good. After letting it cure for a
week, I came back with the polish and smoothed it out - which at least
got rid of the worst blemishes.

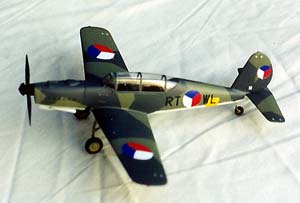
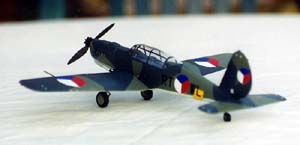
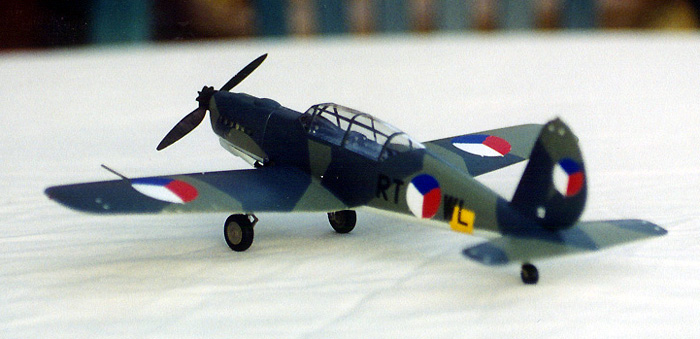
Now it was time for decals. I read all the time how Propagteam decals are hard to use – fragile, and stick like barnacles to the first surface they touch. I didn't have any problems, especially with the large ones. I decided to do the Czech aircraft, with it's crude, handpainted roundels. All the decals went on with out complaint, and were easy to position, needing just a bit of water on the model surface to let them slip into position. They dried without silvering , and needed only one application of Micro-Sol to melt into every crevice and panel line. It was while I was attaching the radio call letters that I discovered the yellow fuselage band was off - angled backwards, and not extending as high on the fuselage as required. That was a hard one to mask properly, as there are no panel lines or other cues to align off back there. At any rate, it was too late to do anything about it at this point.
 After
the decals had dried, I wiped everything down with a damp rag and got
ready for the final coats. Because the decals were a different sheen than
the rest of the aircraft, I had to shoot another layer of Future to even
everything out. I approached this operation with all the enthusiasm of
a Christian being led to the lions in the Coliseum. I consulted with a
number of folks, trying to figure out what I needed to do to solve the
problem. The consensus was to thin the Future 1:1 with a mix of 50% water
and 50% alcohol, so that's what I did, the theory being that this would
take care of any surface tension that was causing the Future to bead up.
After
the decals had dried, I wiped everything down with a damp rag and got
ready for the final coats. Because the decals were a different sheen than
the rest of the aircraft, I had to shoot another layer of Future to even
everything out. I approached this operation with all the enthusiasm of
a Christian being led to the lions in the Coliseum. I consulted with a
number of folks, trying to figure out what I needed to do to solve the
problem. The consensus was to thin the Future 1:1 with a mix of 50% water
and 50% alcohol, so that's what I did, the theory being that this would
take care of any surface tension that was causing the Future to bead up.

Nope, that didn't work either - in fact, it just made the beads smaller! And this over both the Gunze acrylic-painted areas and the TMM polished enamels. I couldn't wash this off either, not with the decals on and liable to be washed off. So, after it had dried, I grimly polished that coat out too. I won't go into the gory details of all I did over the next two weeks, except that nothing really worked. In the end, I went for overwhelming - I brushed the Future on full strength, let it begin to set up, and then spread it around with the brush -and kept spreading it- as it tried to bead up. Inelegant, but what else was left? This last was polished out to even out the brush marks, until finally, at long last, I had a uniform clear gloss surface.
The final step was anticlimactic, thankfully. I sprayed Polly Scale clear flat over everything, then painted the exhaust pipes TMM Burnt Iron. Whew.
Final Assembly
 I
removed the masking to the canopy to find – no overspray, bleed under,
or other problems. That was a relief. I added a pitot tube to the left
wing from thin steel tube. The wingtip nav lights were painted silver,
then over-painted with clear red and green. The main landing gear struts
were painted RLM 02, with the oleo areas getting chrome silver. I chucked
the resin bracing struts and made new ones from wire and tube, painted
silver and RLM 02 as appropriate. The scissors were carefully removed
from the last "mystery sprue", painted them RLM 02, and affixed as indicated
in a small inset diagram in the instructions. The prop and spinner were
cut out, cleaned up and painted Tamiya Flat Black before being glued on.
Lastly, I painted the wheels and tailwheel, and attached them with superglue.
I then reattached the tailwheel when it fell right off as soon as I flipped
the model over. And again, and again
.
I
removed the masking to the canopy to find – no overspray, bleed under,
or other problems. That was a relief. I added a pitot tube to the left
wing from thin steel tube. The wingtip nav lights were painted silver,
then over-painted with clear red and green. The main landing gear struts
were painted RLM 02, with the oleo areas getting chrome silver. I chucked
the resin bracing struts and made new ones from wire and tube, painted
silver and RLM 02 as appropriate. The scissors were carefully removed
from the last "mystery sprue", painted them RLM 02, and affixed as indicated
in a small inset diagram in the instructions. The prop and spinner were
cut out, cleaned up and painted Tamiya Flat Black before being glued on.
Lastly, I painted the wheels and tailwheel, and attached them with superglue.
I then reattached the tailwheel when it fell right off as soon as I flipped
the model over. And again, and again
.
Conclusion
The only real problems I had with this kit had nothing to do with the kit. It went together smoothly enough that I can recommend it to someone with a few kits under their belt wanting to branch out into resin. It looks good on the shelf, and it'll certainly stand out from the hordes of Bf109s on contest tables. All-in-all, I'm pleased with how it turned out.


