 Dayglo
Lawn Dart Drone:
Dayglo
Lawn Dart Drone:
Building Hasegawa's 1/48
F-104C as an F-104A Drone
By Will Riepl
History by Norm Filer
Origins of the F-104A Drone Program
By the early 1950s engine development had finally caught up with airframe development. The resulting new engines such as the J-57 and the J-79 were allowing aircraft builders to produce some very impressive performers.
This long sought ability to go fast and high overshadowed some of the more practical aspects of some those aircraft. Foremost might have been a simple "What are we going to do with this thing"?
The F-104 may be one of the better examples of this short sightedness. No one can dispute that the bird was a fantastic performer. It set most of the speed and altitude records as well as time-to-climb records. The opposite side of this was it carried a gun and two Sidewinder missiles for a very short distance, had no all weather capability, limited radar, and was not a particularly pilot friendly airframe.
 After
a very long and difficult flight test program, the Air Force finally had
its new sports model dragster. By this point they had already committed
to 153 A models for the Air Defense Command and 77 C models for TAC. Of
course they also purchased the usual assortment of two seat trainers as
well.
After
a very long and difficult flight test program, the Air Force finally had
its new sports model dragster. By this point they had already committed
to 153 A models for the Air Defense Command and 77 C models for TAC. Of
course they also purchased the usual assortment of two seat trainers as
well.

Air Defense Command quickly realized that the bird was not going to work in the every day world of ADC. Almost all of ADCs mission was in the Northern portions of North America and as we all know, the weather up here is not always pleasant. To compound the problem, the bad guys were not expected to take nights, winters or bad flying days off and go home to Mama and the Kids.
In short, they had an airplane that could not fly the mission. The assignment to Hamilton AFB, just North of San Francisco and not really the hot spot of ADC indicates that maybe the problems were beginning to be seen. Well, at least the weather usually was decent there.
The other problem, and really the death sentence, was SAGE. This was the ADC program to tie all its assets together into one integrated operating system. The big ground radar and GCI system would be able to control the interceptors without verbal instructions. They would be able to pass data to the fighters via what is now know as data link.
 Oops,
big problem! Not only did the Starfighter not have the SAGE capability,
but it also did not have any space to install it. Remember, this is still
the days of the old huge tube type electronic systems. They took up considerable
space. As an example, the local Air Force Base SAGE building is still
in existence. It is about the size of a big high school gym and has walls
about 3-4 ft. thick. I have been told that a desktop computer of today
could do the old SAGE mission very well. (Whoops!! Hold on a minute while
the Air Force uses my puter to take out this incoming Bear. Ill be right
back.)
Oops,
big problem! Not only did the Starfighter not have the SAGE capability,
but it also did not have any space to install it. Remember, this is still
the days of the old huge tube type electronic systems. They took up considerable
space. As an example, the local Air Force Base SAGE building is still
in existence. It is about the size of a big high school gym and has walls
about 3-4 ft. thick. I have been told that a desktop computer of today
could do the old SAGE mission very well. (Whoops!! Hold on a minute while
the Air Force uses my puter to take out this incoming Bear. Ill be right
back.)
For a while ADC kept their F-104s around. Two squadrons went to Formosa during the Quemoy crisis in September 1958. But it was all over shortly thereafter. The Air National Guard of Arizona, South Carolina and Tennessee got many of them, Pakistan and Nationalist China got others, and the rest went to NASA and about 24 were converted to drones for use by the 3205th Drone Squadron at Eglin AFB, Florida.
I would suspect that the bird had finally found a mission is was well suited for. At this point several new interceptor missile systems like Nike and Bomarc were coming on-line and were capable of shooting down targets with high and fast capabilities. Or at least they thought they were. Problem was they were having a hard time finding anything that would go high and fast to shoot their new toys at. Enter the left over F-104As. They flew the mission very well and I suspect no one much cared if they were destroyed in the process. They must have done a good job because there are pictures of QF-104As with multiple Bomarc mission symbols on their sides.
TAC soldered on with their F-104Cs for several more years, and of course the real longevity came overseas. We will leave 'the rest of the story' to another time.
The Kit
With plenty of Monogram F-104s under my belt and knowing how much detail that kit had in it, I was somewhat curious as to how much Hasegawa was going to improve things. Once I saw the kit, though, I could see that this was leaps and bounds better than the venerable Monogram kit. Recessed panel lines throughout, and the typical Hasegawa construction, this was almost guaranteed to be a fast build. While my interests in the F-104 lean more towards the F-104G, I just had to build one of these new Starfighters right away. Since the F-104C was the first one available, my only choice was a dayglo drone, as the rest are pretty drab (especially compared to a dayglo plane!).
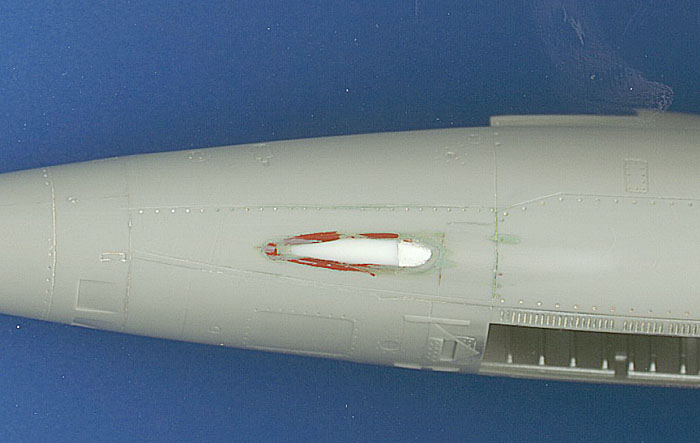
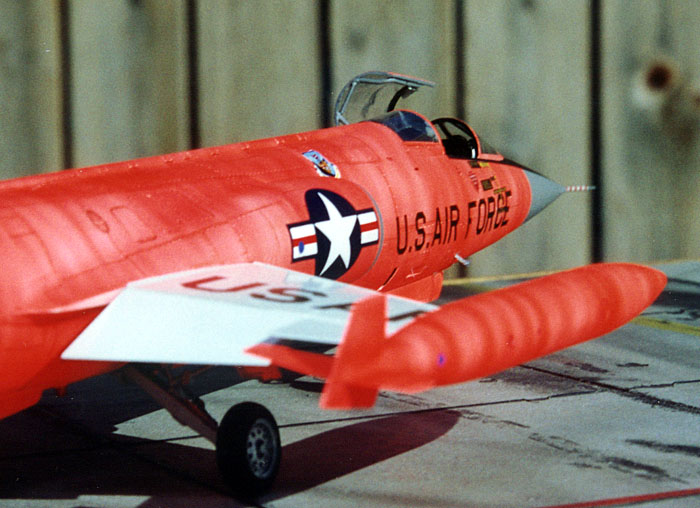
 There
were some modifications that I would have to do to make a proper F-104A
drone, the most obvious one being the fairing in of the gun port in the
nose. This I did with a piece of Evergreen quarter round styrene stock,
finding that the V of the quarter round fitting perfectly in the trough
of the kit. In checking various photos I discovered that there were at
least two fairings used on the F-104, so be sure to check your references.
I also removed the plate that appears around the gun port on the Hasegawa
kit, as I could find no example of this in any F-104 photos that I had.
There
were some modifications that I would have to do to make a proper F-104A
drone, the most obvious one being the fairing in of the gun port in the
nose. This I did with a piece of Evergreen quarter round styrene stock,
finding that the V of the quarter round fitting perfectly in the trough
of the kit. In checking various photos I discovered that there were at
least two fairings used on the F-104, so be sure to check your references.
I also removed the plate that appears around the gun port on the Hasegawa
kit, as I could find no example of this in any F-104 photos that I had.
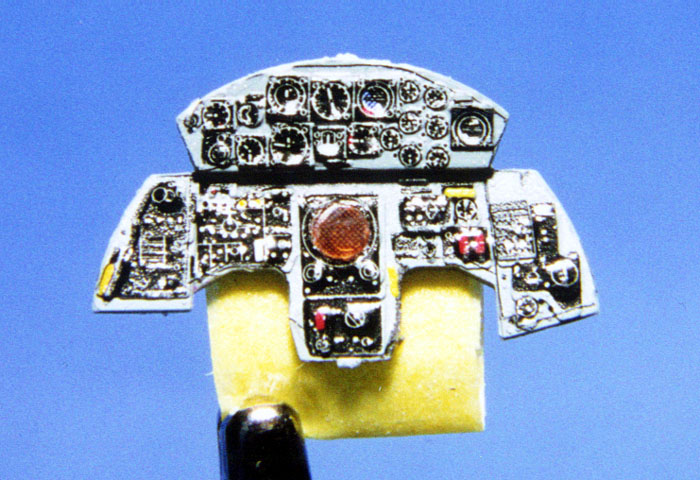
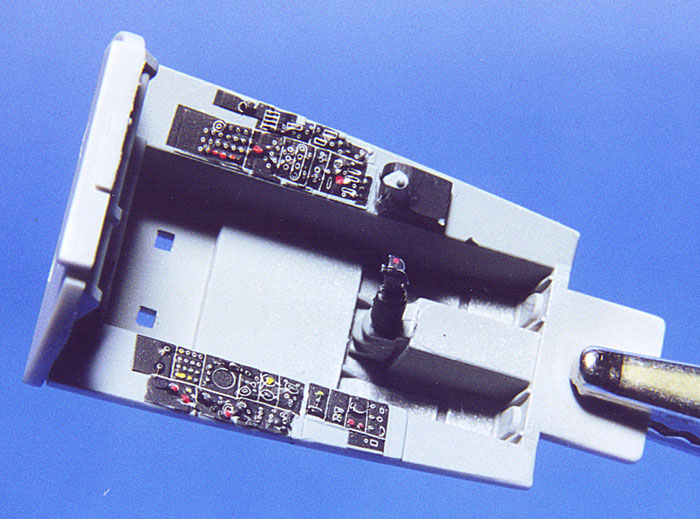
 Once
I had the gun port faired in, I turned to the cockpit. This was straight
out of the box here, with the cockpit tub and instrument panel receiving
a coat of gray paint, followed by the decal instruments. While initially
this seems like it wouldn't look very good, as long as you make sure the
instruments are aligned properly and use a setting solution such as Solvaset
you will end up with a very nice looking cockpit. The seat was built up
stock and painted gray, with the headrest getting some red on it and the
seat belts painted a pale green. Now to be totally accurate I should have
made all the different changes in the instrument panel and cockpit tub
to make an accurate F-
Once
I had the gun port faired in, I turned to the cockpit. This was straight
out of the box here, with the cockpit tub and instrument panel receiving
a coat of gray paint, followed by the decal instruments. While initially
this seems like it wouldn't look very good, as long as you make sure the
instruments are aligned properly and use a setting solution such as Solvaset
you will end up with a very nice looking cockpit. The seat was built up
stock and painted gray, with the headrest getting some red on it and the
seat belts painted a pale green. Now to be totally accurate I should have
made all the different changes in the instrument panel and cockpit tub
to make an accurate F- 104A,
and I also should have included all the changes done to the cockpit when
it was made a drone. But since I didn't have any kind of references showing
what the drone changes were or the differences between an F-104A and F-104C
cockpit, this one is stock kit for the most part. I did add rear view
mirrors and the conspicuous piping at the rear of the canopy, as well
as the two "bullets" that stick up just behind the windscreen.
104A,
and I also should have included all the changes done to the cockpit when
it was made a drone. But since I didn't have any kind of references showing
what the drone changes were or the differences between an F-104A and F-104C
cockpit, this one is stock kit for the most part. I did add rear view
mirrors and the conspicuous piping at the rear of the canopy, as well
as the two "bullets" that stick up just behind the windscreen.
 Once
the cockpit was done the next step was to get everything glued together.
This is typical Hasegawa here, with everything just falling together.
The only putty I needed on this entire kit was on the faired in gun port,
which means that if you're going to build a straight F-104C you won't
even have to look at your tube of putty. I left the wings and tailplane
off to ease painting. I decided to put the wing tip tanks on mine, even
though many of the drones didn't carry them. The tip tanks are one confusing
area of the Hasegawa kit. The engineering of them is very odd, with two
tank halves, a separate tail cone, and individual horizontal fins. This
makes for some interesting alignment issues. The way to makes sure that
you have no problems here is to glue the tank halves together and glue
the fins onto the tail cone. Then fit the tip
Once
the cockpit was done the next step was to get everything glued together.
This is typical Hasegawa here, with everything just falling together.
The only putty I needed on this entire kit was on the faired in gun port,
which means that if you're going to build a straight F-104C you won't
even have to look at your tube of putty. I left the wings and tailplane
off to ease painting. I decided to put the wing tip tanks on mine, even
though many of the drones didn't carry them. The tip tanks are one confusing
area of the Hasegawa kit. The engineering of them is very odd, with two
tank halves, a separate tail cone, and individual horizontal fins. This
makes for some interesting alignment issues. The way to makes sure that
you have no problems here is to glue the tank halves together and glue
the fins onto the tail cone. Then fit the tip 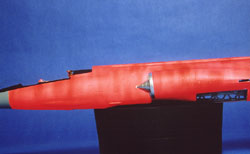 tank
onto the wing and then glue the tail cone on, positioning the fins so
that the horizontal fins are aligned with the trailing edge of the wing.
tank
onto the wing and then glue the tail cone on, positioning the fins so
that the horizontal fins are aligned with the trailing edge of the wing.

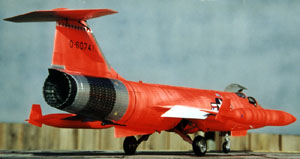
With all the major assembling done, I turned to the painting. Dayglo
is not an easy color to paint on, depending which paint you use. I decided
on the Pactra acrylic dayglo orange. To start, though, the first step
is to paint everything white. For this I used Testors Gloss White Pla,
the one in the little jar. After letting this dry for a couple days, I
painted the gray nose & black anti-glare panel and the  natural
metal engine section. I used the same method of painting the metal areas
as I did on my H-21, using Floquil's Old Time Silver.
Once that was done I masked off everything and started with the dayglo.
natural
metal engine section. I used the same method of painting the metal areas
as I did on my H-21, using Floquil's Old Time Silver.
Once that was done I masked off everything and started with the dayglo.
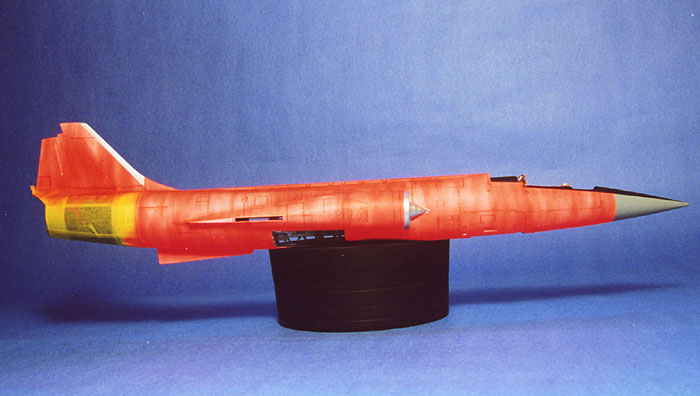
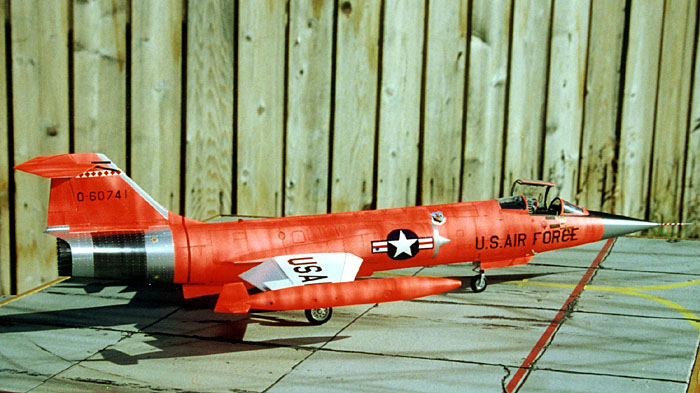
Since I wanted a faded drone, I wanted to make sure that I could put down light coats until I got the effect I wanted. I mixed the dayglo paint with a bit of Future, roughly 1/3 Future to 2/3 paint. I also mixed just a touch of water. This gave the paint in the cup a white tinge, which really got me wondering. But I started airbrushing and was amazed at how it looked. It went on thinly, but the more coats I put on, the deeper the color got. After about 40 minutes I had this plane looking the way I really wanted, with the tops faded out, with streaks running down the sides. The undersides I went a bit heavier on, simulating the lack of sun fading on the bottom.
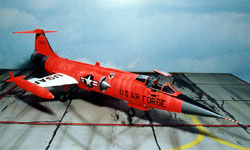
 Since
I now had a nice faded look to the plane, I started to think about how
I was going to wash the panel lines to make them stand out a bit more.
I couldn't use my regular standby of black and brown, as that would have
really stood out. My solution was to take some Testors gloss orange paint
and use that for my panel line washes. This was just subtle enough to
make the panels stand out, but not overpower the dayglo.
Since
I now had a nice faded look to the plane, I started to think about how
I was going to wash the panel lines to make them stand out a bit more.
I couldn't use my regular standby of black and brown, as that would have
really stood out. My solution was to take some Testors gloss orange paint
and use that for my panel line washes. This was just subtle enough to
make the panels stand out, but not overpower the dayglo.
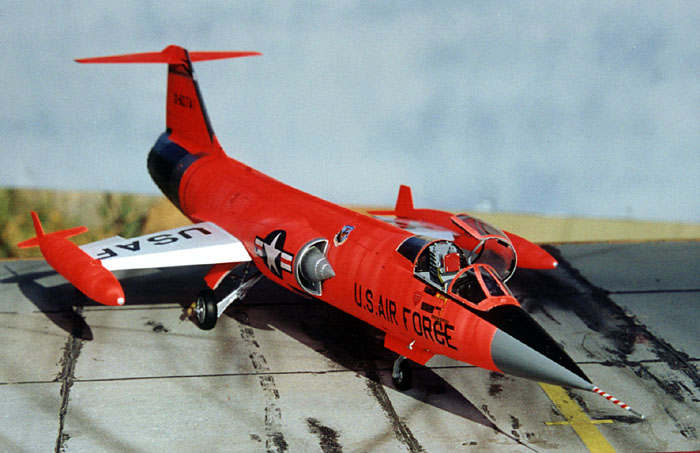
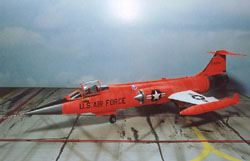
Decalling came next, and for the most part I used the kit decals. The only ones I had to change were the fuselage star-n-bar, as the white was too translucent. I replaced those with Superscale decals. The squadron markings are a combination of things. The badge on the left side came from an IPMS decal sheet, while the one on the right was hand-painted. The tail band was a white decal strip with diamonds cut out of red decal sheet. The black stripes on the tail came off of some other sheet that had the appropriate thickness of striping.
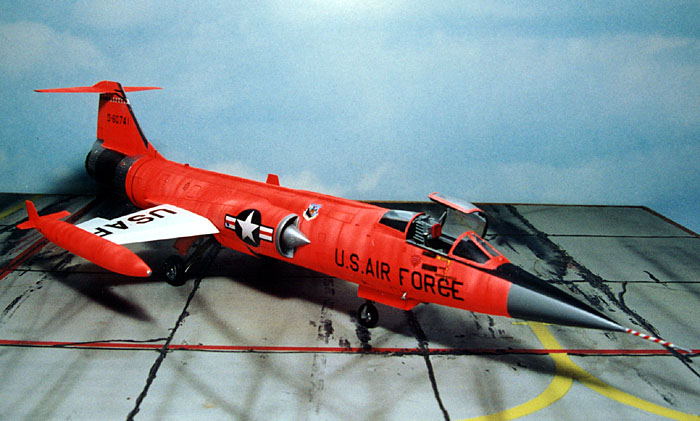
 From
there on out it was smooth sailing. The landing gear went together without
a hitch. I pinned the canopy, making it simple to put on. I didn't glue
the hinged part on, nor did I glue the wings or tip tanks on. They fit
so well and so snugly that I decided to not mess with the finish of the
fuselage or wings. I painted the pitot tube white, then cut out a strip
of red decal and wrapped it around, using plenty of setting solution.
The tip was painted silver and I was done. I had a drone F-104.
From
there on out it was smooth sailing. The landing gear went together without
a hitch. I pinned the canopy, making it simple to put on. I didn't glue
the hinged part on, nor did I glue the wings or tip tanks on. They fit
so well and so snugly that I decided to not mess with the finish of the
fuselage or wings. I painted the pitot tube white, then cut out a strip
of red decal and wrapped it around, using plenty of setting solution.
The tip was painted silver and I was done. I had a drone F-104.
Conclusion
This simple model was made more complex by the challenging paint scheme, but in the end it all balanced out. I can't wait for the release of the F-104G and TF-104s and there will be plenty more Starfighters finding their way onto my shelves. With the great quality of the kit and ease of assembly, you can guarantee that there will be plenty of aftermarket detail sets and decal sheets coming up.
Publisher's Disclaimer: These photos, folks, don't do this kit justice. I spent over an hour trying to get the color right on the cover, and it's close, but this is really something that needs to be seen in real life. Dayglo just doesn't photograph well.


