
Nightfighting Biplane: MisterKit's 1/72 Fiat CR.42
By Allan Wanta
Background
The C.R.42 was one of the best biplane fighters ever built, but this did not compensate for the fact that it was already obsolete before its first flight in 1938. Nevertheless the C.R.42 provided the backbone of the Italian air force in 1940 and was exported to Belgium, Hungary and Sweden. Participation in the Battle of Britain was disastrous, but the production continued well into 1943. Even the German Luftwaffe used 150, as night attack aircraft! Over 1780 built. A single C.R.42B prototype with an 1100hp DB601 engine may have been the fastest biplane fighter ever flown, reaching speeds of 520km/h.
The Kit
MisterKit is a relatively new company seldom seen here in the States, but they've been around for a number of years distributing kits of Italian design and interests. This kit was previously reviewed in the box by Chris Banyai-Riepl in the May issue.
 Upon opening the box I noticed a similarity to some other kits I frequently make, namely we have a limited run injection kit made by MPM in the Czech Republic. Now, I'm not averse to having an Italian company make their kits in the Czech Republic, but I was expecting an Italian made C.R.42. Molded in typical MPM fashion, the highlight of this kit has to be the CMK resin extra parts and bits. A small photo etched fret for various parts of the cockpit and exterior are also included. Two small clear vacuform windscreen are provided should you misplace one or the carpet monster eats it. Thankfully the decals at least are made in Italy by the great decal firm Skymodel. According to the instructions we have the options of building an Italian night-fighter or a Luftwaffe night harassment bomber, I'll be dealing with the all black distempered Italian aircraft.
Upon opening the box I noticed a similarity to some other kits I frequently make, namely we have a limited run injection kit made by MPM in the Czech Republic. Now, I'm not averse to having an Italian company make their kits in the Czech Republic, but I was expecting an Italian made C.R.42. Molded in typical MPM fashion, the highlight of this kit has to be the CMK resin extra parts and bits. A small photo etched fret for various parts of the cockpit and exterior are also included. Two small clear vacuform windscreen are provided should you misplace one or the carpet monster eats it. Thankfully the decals at least are made in Italy by the great decal firm Skymodel. According to the instructions we have the options of building an Italian night-fighter or a Luftwaffe night harassment bomber, I'll be dealing with the all black distempered Italian aircraft.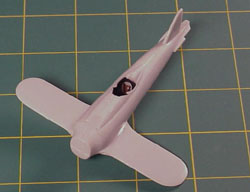 The number one item to deal with is the cockpit, and deal we must, talk about being overly ambitious, especially for a 1/72nd-scale aircraft. First off, get the Squadron/signals book on the C.R.32/42; you'll need it. Instructions state that you'll need to fabricate some items, but they don't tell you which ones or how it should look. It's actually expected of the modeler to scratchbuild a compressed air cylinder, and side wall stringers and braces. Not to matter, chances are it won't be seen through the small opening anyway but in general a resin interior would have been simpler and more realistic. The seat is a three piece, etched metal monster with a resin back, I was in deep trouble bending the side rails of the seat pan, and what are those etched chains on the seats for? To really do this interior justice, one needs to sand the sidewalls thinner, adjusting the floor and just plain be very careful. Oh, the gunsight bracket in etched metal is much to oversized to fit on the control panel and the right side instrument panel is neatly suspended somewhere on the right hand side wall. In otherworlds, the instructions are definitely lacking in clarity, even for a seasoned builder.
 The number one item to deal with is the cockpit, and deal we must, talk about being overly ambitious, especially for a 1/72nd-scale aircraft. First off, get the Squadron/signals book on the C.R.32/42; you'll need it. Instructions state that you'll need to fabricate some items, but they don't tell you which ones or how it should look. It's actually expected of the modeler to scratchbuild a compressed air cylinder, and side wall stringers and braces. Not to matter, chances are it won't be seen through the small opening anyway but in general a resin interior would have been simpler and more realistic. The seat is a three piece, etched metal monster with a resin back, I was in deep trouble bending the side rails of the seat pan, and what are those etched chains on the seats for? To really do this interior justice, one needs to sand the sidewalls thinner, adjusting the floor and just plain be very careful. Oh, the gunsight bracket in etched metal is much to oversized to fit on the control panel and the right side instrument panel is neatly suspended somewhere on the right hand side wall. In otherworlds, the instructions are definitely lacking in clarity, even for a seasoned builder.
 The two fuselage halves have been slightly sanded to insure a good fit all round, the lower wing and underside of the fuselage are one piece, which is a great idea. This gives no wing joints to sand or putty. Understanding that 'Limited' injection molding does not allow for the finer details, we are going to use the supplied plastic wing support struts anyway. The instructions ask for you to measure off the locations of the strut fixing points on the lower wing as no marks are scribed on the wings themselves. I located and glued the two most inner strut assemblies to the upper wing, then glued this to the fuselage. The longer struts were added, although they didn't fit according to plan A, I employed plan B. Just put them where they fit! It would have been a greatly involved process to discern the problem and it will, in the end, not make a whole lot of difference. Only someone with a millimeter scale would
 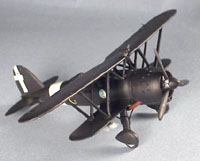 notice. Now we come to the fun stuff, namely the resin parts. Superbly molded and easily affixed they add a whole new dimension of realism to the kit. In the Italian night-fighter version, we need to add the specialized flame dampeners and search lights at a later stage of construction, so prepare them and set aside. A wonderful cowling and engine are up front, and numerous exhausts for three different night-fighter craft are presented.
 The two fuselage halves have been slightly sanded to insure a good fit all round, the lower wing and underside of the fuselage are one piece, which is a great idea. This gives no wing joints to sand or putty. Understanding that 'Limited' injection molding does not allow for the finer details, we are going to use the supplied plastic wing support struts anyway. The instructions ask for you to measure off the locations of the strut fixing points on the lower wing as no marks are scribed on the wings themselves. I located and glued the two most inner strut assemblies to the upper wing, then glued this to the fuselage. The longer struts were added, although they didn't fit according to plan A, I employed plan B. Just put them where they fit! It would have been a greatly involved process to discern the problem and it will, in the end, not make a whole lot of difference. Only someone with a millimeter scale would
 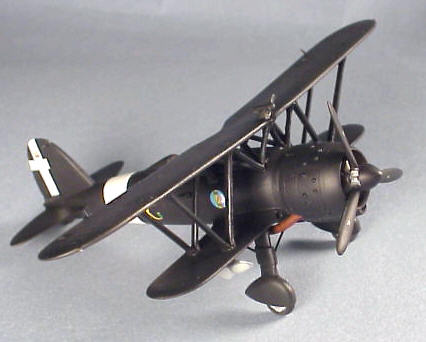 notice. Now we come to the fun stuff, namely the resin parts. Superbly molded and easily affixed they add a whole new dimension of realism to the kit. In the Italian night-fighter version, we need to add the specialized flame dampeners and search lights at a later stage of construction, so prepare them and set aside. A wonderful cowling and engine are up front, and numerous exhausts for three different night-fighter craft are presented.
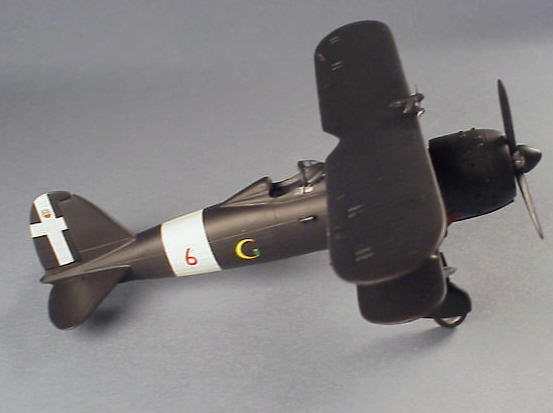
All the preparation for the transfers are done, the whole craft painted Testors Aircraft Interior black, although the white cross on the rudder is given as a transfer, I opted to paint it on so to match the fuselage band. All transfers go on without any need for setting solutions and are in perfect register and very glossy. The small resin venturi, wind powered generator for the searchlights and the lights themselves are 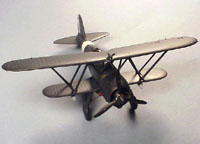 the last items to go on. Give the whole lot a clear flat over spray and there you have it, a wonderful Fiat C.R.42. The last best Biplane of the war, and certainly this is the best kit in 1/72 scale on the market.
 the last items to go on. Give the whole lot a clear flat over spray and there you have it, a wonderful Fiat C.R.42. The last best Biplane of the war, and certainly this is the best kit in 1/72 scale on the market.