 Royal
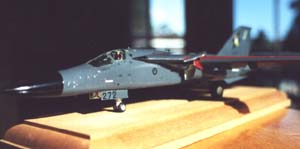
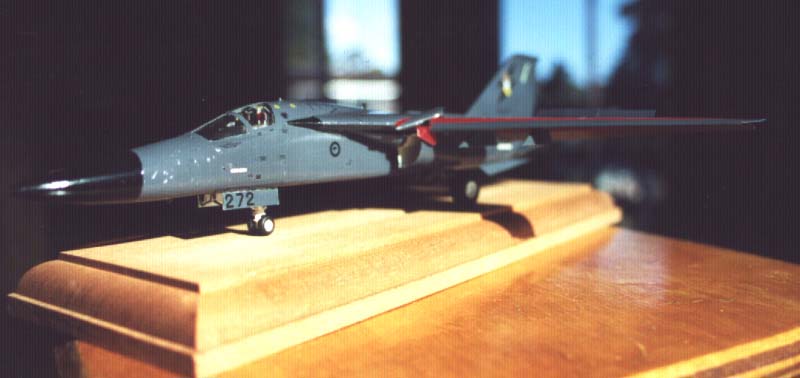
Australian Airforce F-111G "Boneyard Wrangler"
Royal
Australian Airforce F-111G "Boneyard Wrangler"
Hasegawa F-111A w/Eduard PE
By Tony Paton
Introduction
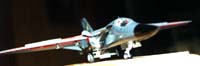
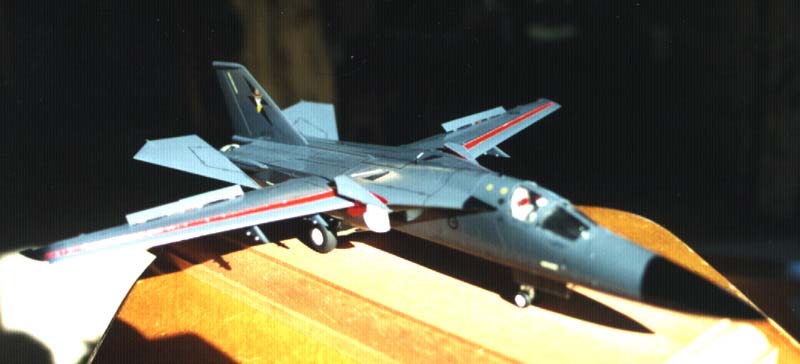
Australia is the sole operator of the F-111 as of the year 2000. After many years of problems, the first batch of F-111C's were delivered in 1973 to replace the aging Canberra bombers. In the early 1990's, the Australian government ratified an agreement to replace those aircraft out of the original 24 that were lost. The order was for 15 'new' F-111G's from McClellan AFB in the USA. F-111G "Boneyard Wrangler" carries the serial A8-272 which combines the A8 Australian designator for all F/RF-111 variants and the last three digits of its original USAF serial, 68-0272. She was originally an FB-111A built for SAC, then later converted to "G" standard when operated by TAC. It was then stored at AMARC at Davis-Monthan AFB, Arizona before it was rescued by the RAAF.
 Out
of the fifteen aircraft that were deemed suitable, 68-0272 was the only
one that was stored at AMARC. She was (at the present time unless the
RAAF order more) the only F-111 to fly out of the facility - the only
other aircraft to depart the "Boneyard" were target drones.. The crew
that worked on 272 recognised that this was the first to do so and named
her "The Boneyard Wrangler". Stan Murray created the artwork by using
strips of tape. As the aircraft was ready to depart, a generator failed,
this was replaced after some time. All pre-flight checks were completed
and one engine was started but the navigator was nowhere to be seen. After
30mins he was found asleep in one of the crew rooms! 272 finally left
for McClellan where the rest of the work was carried out.
Out
of the fifteen aircraft that were deemed suitable, 68-0272 was the only
one that was stored at AMARC. She was (at the present time unless the
RAAF order more) the only F-111 to fly out of the facility - the only
other aircraft to depart the "Boneyard" were target drones.. The crew
that worked on 272 recognised that this was the first to do so and named
her "The Boneyard Wrangler". Stan Murray created the artwork by using
strips of tape. As the aircraft was ready to depart, a generator failed,
this was replaced after some time. All pre-flight checks were completed
and one engine was started but the navigator was nowhere to be seen. After
30mins he was found asleep in one of the crew rooms! 272 finally left
for McClellan where the rest of the work was carried out.
On the 6th of May 1994, the aircraft departed for Australia. The route took in Hickham AFB, Hawaii, and Pago Pago IAP, American Samoa. It arrived at RAAF Amberley, Australia on the 10th. Group Captain Dave Dunlop and Flight Lieutenant Dave Riddel was the crew. "Boneyard" is in service for No 6 squadron alongside the F-111C's engaged in Maritime/strike and reconnaissance roles.
The kit
 I
decided to do a replica of the "Boneyard Wrangler" in 1/72. Hasegawa make
plenty of F-111 kits but none of the G model. On investigation, the FB-111A
was renamed the F-111G when they were transferred from SAC to TAC. Apparently
there are no major external differences. For extra detailing, I got an
Eduard PE set for the FB-111A [set no. 72-074]. This includes spoilers
for the wings, replacement lower wing sections and lots of parts to make
the cockpit more realistic. These include, ejection handles, mirrors and
replacement instruments.
I
decided to do a replica of the "Boneyard Wrangler" in 1/72. Hasegawa make
plenty of F-111 kits but none of the G model. On investigation, the FB-111A
was renamed the F-111G when they were transferred from SAC to TAC. Apparently
there are no major external differences. For extra detailing, I got an
Eduard PE set for the FB-111A [set no. 72-074]. This includes spoilers
for the wings, replacement lower wing sections and lots of parts to make
the cockpit more realistic. These include, ejection handles, mirrors and
replacement instruments.

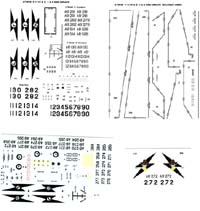
After market decals were required to complete this project. Aussie decals cater for people that want to build aircraft that are or have been in Australian service. Two sheets are required, [A72028], which has generic decals for all F-111G's. The other sheet is [A72031[ that includes the fin decals for "Boneyard Wrangler" another fin decal is included to celebrate 25 years of the F-111 in Australian service.
Construction.
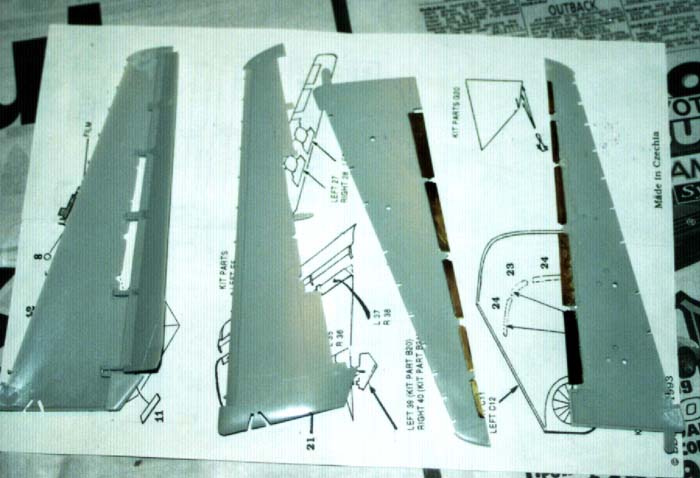
 The
first step was to convert the wings. This meant cutting out all the lower
trailing edge panels and the spoiler panels on the top half. I especially
like the wings in this kit as they show the flaps and slaps in the fully
extended position. The two wings were then constructed minus the leading
edge slats. I decided to add them after they were painted.
The
first step was to convert the wings. This meant cutting out all the lower
trailing edge panels and the spoiler panels on the top half. I especially
like the wings in this kit as they show the flaps and slaps in the fully
extended position. The two wings were then constructed minus the leading
edge slats. I decided to add them after they were painted. The same thing applied for the spoilers. All the lower trailing edge PE
boards were added to the wing. The end result was pleasing. These were
then primed and left to dry. The internal parts of the flaps that are
exposed when extended are painted red. I had to decide if I should paint
these parts first or the wing. As the F-111G's are painted overall gunship
grey, I decided to spray that first. Two coats of Tamiya's Gunship grey
paint were applied.
The same thing applied for the spoilers. All the lower trailing edge PE
boards were added to the wing. The end result was pleasing. These were
then primed and left to dry. The internal parts of the flaps that are
exposed when extended are painted red. I had to decide if I should paint
these parts first or the wing. As the F-111G's are painted overall gunship
grey, I decided to spray that first. Two coats of Tamiya's Gunship grey
paint were applied.

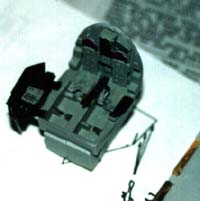 As the
wings were left to dry, work was started on the cockpit section. The PE
replacements for the instrument panels and radio stacks were painted black
with highlighted parts picked out. Adding the seats and control columns
followed this. The PE ejection handles were painted yellow with black
stripes added with a pen later. The inside of the canopy was painted black
with the help of masking tape. When it was dried the PE mirrors were glued
to the inside with white glue. I then covered the areas that were not
to be painted with tamiya masking tape and the canopy was glued to the
nose section.
As the
wings were left to dry, work was started on the cockpit section. The PE
replacements for the instrument panels and radio stacks were painted black
with highlighted parts picked out. Adding the seats and control columns
followed this. The PE ejection handles were painted yellow with black
stripes added with a pen later. The inside of the canopy was painted black
with the help of masking tape. When it was dried the PE mirrors were glued
to the inside with white glue. I then covered the areas that were not
to be painted with tamiya masking tape and the canopy was glued to the
nose section.
 The
main underbody interior, spikes and air intakes were sprayed flat white.
Then the part that displayed the fans of the two engines were painted
silver with the surrounding areas painted black. The Eduard set has numerous
small parts to replicate the vortex generators that are situated inside
the intakes. The vortex generator parts are so small that it looked too
fiddly to attempt so I left it out (too much pain for little gain!). The
kit had some molded in so I left it that way.
The
main underbody interior, spikes and air intakes were sprayed flat white.
Then the part that displayed the fans of the two engines were painted
silver with the surrounding areas painted black. The Eduard set has numerous
small parts to replicate the vortex generators that are situated inside
the intakes. The vortex generator parts are so small that it looked too
fiddly to attempt so I left it out (too much pain for little gain!). The
kit had some molded in so I left it that way.
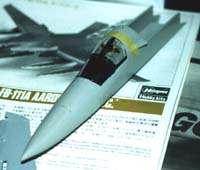
 The
two halves of the fuselage were brought together. There were a few fit
problems due to flash getting in the way but after it was trimmed the
halves went together without fuss. The nose section was mated to the fuselage.
There are large gaps where they meet but before you start filling in gaps,
the spikes actually cover up these joins. I thought that was very clever
on Hasegawa's part.
The
two halves of the fuselage were brought together. There were a few fit
problems due to flash getting in the way but after it was trimmed the
halves went together without fuss. The nose section was mated to the fuselage.
There are large gaps where they meet but before you start filling in gaps,
the spikes actually cover up these joins. I thought that was very clever
on Hasegawa's part.

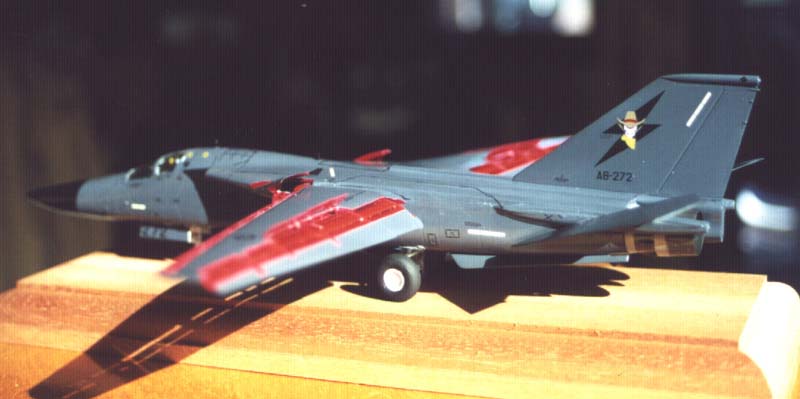
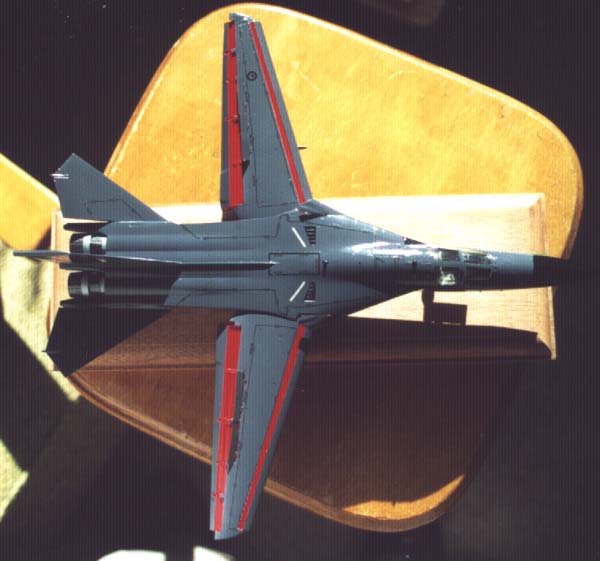
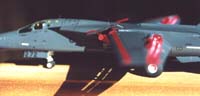 The
gray parts of the wings were masked and primer applied to the exposed
inner flap sections. Tamiya Bright red was applied after the primer had
dried. On removal of the mask, I was quite surprised that no paint crept
underneath. The difference between the red and grey was striking. The
leading edge slats, spoilers and other wing sections to be added later
were painted.
The
gray parts of the wings were masked and primer applied to the exposed
inner flap sections. Tamiya Bright red was applied after the primer had
dried. On removal of the mask, I was quite surprised that no paint crept
underneath. The difference between the red and grey was striking. The
leading edge slats, spoilers and other wing sections to be added later
were painted.

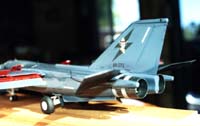 The
horizontal stabilators were added to the fuselage. As I was modeling the
aircraft just seconds after touch down, I deflected them a few degrees
to simulate back pressure on the stick. The vertical tail was glued and
the engine intakes were masked over. Two coats of gunship grey were applied.
This was left to dry for a few days.
The
horizontal stabilators were added to the fuselage. As I was modeling the
aircraft just seconds after touch down, I deflected them a few degrees
to simulate back pressure on the stick. The vertical tail was glued and
the engine intakes were masked over. Two coats of gunship grey were applied.
This was left to dry for a few days.
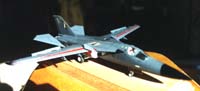
While the wings and body dried, I completed other small tasks. This
included painting the wing extras and completing the landing gear. The
wing and fuselage were connected. In this example the wings are in the
fully extended low speed configuration. No problems were encounted and
 the
wings didn't droop down. The spoilers were glued to the wings at an angle
of 45 degrees to the wing surface. I found this information from the webmaster
of the F111 website. A great site that
has all the information you would ever want on the F-111.
the
wings didn't droop down. The spoilers were glued to the wings at an angle
of 45 degrees to the wing surface. I found this information from the webmaster
of the F111 website. A great site that
has all the information you would ever want on the F-111.
 A
coat of Tamiya clear was applied, mainly to avoid silvering when the decals
were applied. The decals from Aussie decals were great. They are complete
for the F-111 so you do not need to use any of the kit decals. All walkway
lines and fuselage information boxes are included. The hardest thing to
do was the walkway lines and a few did break but it was easy to line them
up. The extra 'Boneyard' sheet went on with no problems. After they dried
I had a problem of what the final coat will be. Clear or glosscoat would
be to glossy for an F-111 and dullcoat would be too matt. On most photos
and after seeing a few Aussie grey F-111's in the flesh, they have a slight
semi gloss to them. On consulting the news groups, someone pointed me
in the direction of Testor's Metalizer sealer. When first applied I thought
it was too glossy, but it toned down to be the exact finish I was after.
A
coat of Tamiya clear was applied, mainly to avoid silvering when the decals
were applied. The decals from Aussie decals were great. They are complete
for the F-111 so you do not need to use any of the kit decals. All walkway
lines and fuselage information boxes are included. The hardest thing to
do was the walkway lines and a few did break but it was easy to line them
up. The extra 'Boneyard' sheet went on with no problems. After they dried
I had a problem of what the final coat will be. Clear or glosscoat would
be to glossy for an F-111 and dullcoat would be too matt. On most photos
and after seeing a few Aussie grey F-111's in the flesh, they have a slight
semi gloss to them. On consulting the news groups, someone pointed me
in the direction of Testor's Metalizer sealer. When first applied I thought
it was too glossy, but it toned down to be the exact finish I was after.
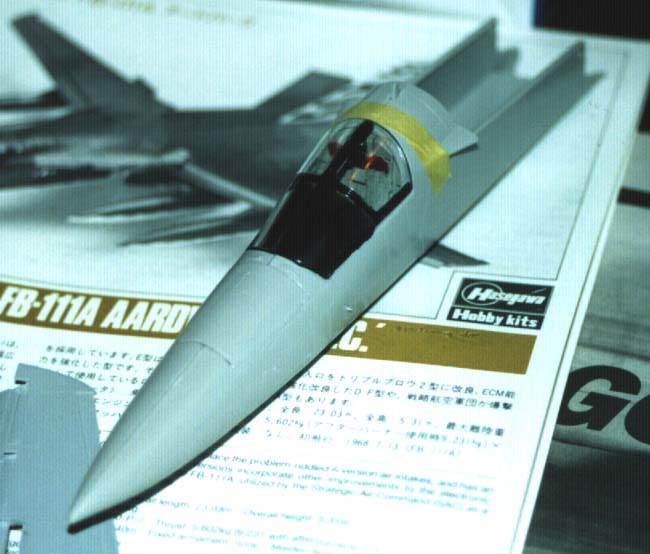
 The
cockpit mask was removed and again I was relieved when no paint creep
was detected. The many layers of paint gave the canopy painted areas a
small raised look, exactly as in real life.
The
cockpit mask was removed and again I was relieved when no paint creep
was detected. The many layers of paint gave the canopy painted areas a
small raised look, exactly as in real life.
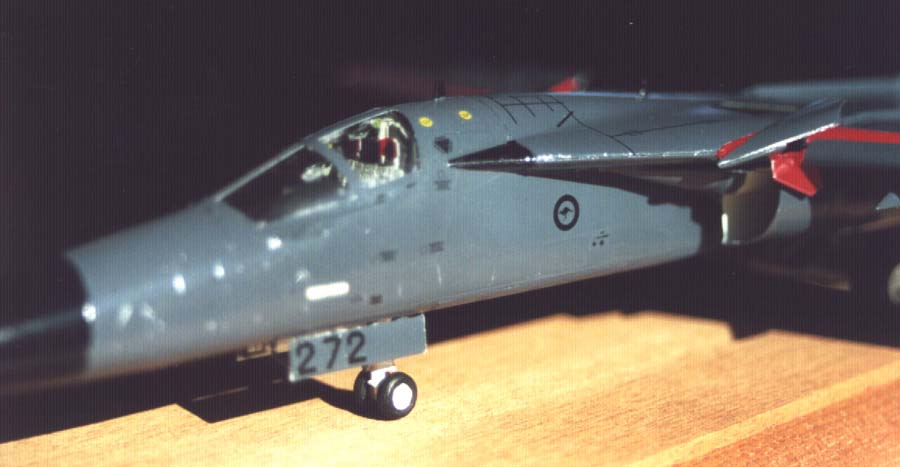
Final details were added. This included spraying the nose semi gloss black, installing the landing gear and the engine nacelles. No dramas were encountered here.
This model turned out better than I expected and has spurred me on to attempt more aircraft in Australian service.
Sources:
-
Kit bought from: Rainbow Ten
-
Eduard PE set from: Hannants
-
Decals from Aussie Decals. Check the link below for details
-
Reference materia:l F-111 Website
-
"The Flight of the Pig" Mal Lancaster
-
Air International April 2000
-
"F-111: Success in Action" Anthony M Thornborough


