 Showbirds:
Chamber's Flag Bus
Showbirds:
Chamber's Flag Bus
Testors' 1/48 SPAD XIII
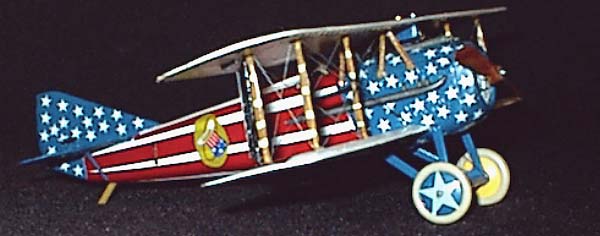
by Steve Perry
Introduction
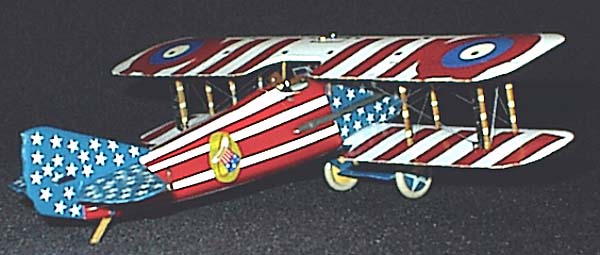
Since this will appear along with other Showbirds, I will not repeat the brief history since my reference which contains those details are on loan at the time of this writing. Frankly, I never cared much for the Showbird's schemes except for Reed Chambers' Stars & Stripes. This scheme I really like.. DML kits being less easy to come by these days, I wanted to save mine for a different scheme, so, being unable to locate a Glencoe kit, I decided to try the Testors SPAD. This kit has been around since the mid 1950's and still makes the basis for a decent SPAD model. I thought "I'd just shoot that puppy white and slap the DML decals on it and Bingo!, instant Showbird." Weeelll, it didn't quite shake out that way.
 Let
me review the Testors SPAD kit before I get into the markings. It is a
dead simple molding. Nice thin upper and lower one piece wings. There
is some of the 1950's style raised marking engraving, but it is much lighter
and more readily removed than the infamous Aurora raised markings. The
rib detail is a bit ridgy, but tones down nicely with a bit of sanding.
The lower wing is integral with the belly fuel tank. The struts can use
a good bit of scraping, or new ones can be scratched from bamboo.
Let
me review the Testors SPAD kit before I get into the markings. It is a
dead simple molding. Nice thin upper and lower one piece wings. There
is some of the 1950's style raised marking engraving, but it is much lighter
and more readily removed than the infamous Aurora raised markings. The
rib detail is a bit ridgy, but tones down nicely with a bit of sanding.
The lower wing is integral with the belly fuel tank. The struts can use
a good bit of scraping, or new ones can be scratched from bamboo.
The fuselage is pretty close to the shape except for the upper deck where the guns go. This area needs attention. There are also some extra engravings of panels that weren't there like an inspection panel under the stab on both sides. These errors can be easily fixed or ignored.
 The
rudder/fin is molded on the fuselage halves and is way too thick. You
can sand it paper thin from the inside or you can replace it with one
made from card or even sand it down from the outside and re-scribe details
after the sides fuselage are joined. Just don't leave it alone.
The
rudder/fin is molded on the fuselage halves and is way too thick. You
can sand it paper thin from the inside or you can replace it with one
made from card or even sand it down from the outside and re-scribe details
after the sides fuselage are joined. Just don't leave it alone.
The landing gear needs a proper spreader bar as the kit only provides a single axle, The guns are useless and need replacement. Rosemont makes an excellent resin Vickers. There is neither windscreen nor pylon and the cockpit is devoid of detail. And to be honest the engraved louvers around the nose are a bit soft.
 In
respect to the Testors SPAD, there are more worse WWI kits on the market
than there are better ones, so don't hesitate to use a Testors SPAD, the
price is right and it is readily available. It's an ideal kit if you are
doing a diorama or club project involving several SPADs or just want to
showcase a special color scheme rather than a super detail job. Every
dedicated WWI modeler should keep a Testors SPAD or Nieuport kit or three
on the shelf just for when you run into a young person who evidences any
interest in the hobby.
In
respect to the Testors SPAD, there are more worse WWI kits on the market
than there are better ones, so don't hesitate to use a Testors SPAD, the
price is right and it is readily available. It's an ideal kit if you are
doing a diorama or club project involving several SPADs or just want to
showcase a special color scheme rather than a super detail job. Every
dedicated WWI modeler should keep a Testors SPAD or Nieuport kit or three
on the shelf just for when you run into a young person who evidences any
interest in the hobby.
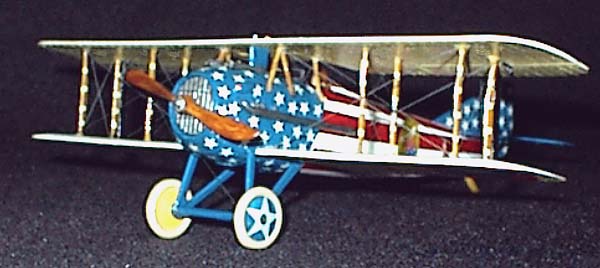
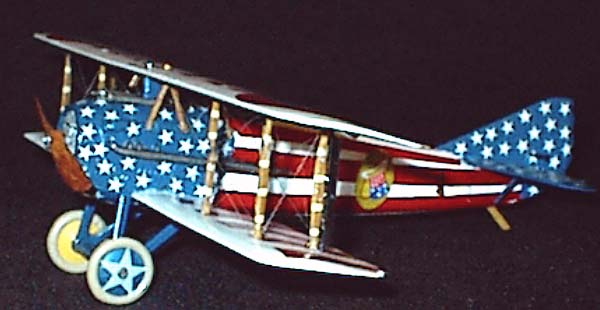
A word or two about the DML decals. The DML decals give you the tail feathers printed in blue with white stars, however they only give you the white stars for the nose and leave it to you to match the blue of the tail feathers. They also do the same with the red, they provide roundels and two of the fuselage stripes and none of the wing stripes. You match the red and paint what is missing.
 Since
the base color for most of the scheme is white, I was worried that I would
have the traditional problems with coverage. Since I switched to using
Acrylic paints thinned with Future I haven't had a problem with light
color coverage like I always did with enamels. I used Liquitex Titanium
white thinned with Future and airbrushed in several finely misted coats.
This gave me a perfectly even coat of pure white.
Since
the base color for most of the scheme is white, I was worried that I would
have the traditional problems with coverage. Since I switched to using
Acrylic paints thinned with Future I haven't had a problem with light
color coverage like I always did with enamels. I used Liquitex Titanium
white thinned with Future and airbrushed in several finely misted coats.
This gave me a perfectly even coat of pure white.

After wasting several dollars worth of paint attempting to match the red andblue of the decals I was reminded of a statement by Thomas Edison, "I have successfully identified 5000 materials which are unsuitable for an incandescent filament." Well I had way less than 5000 shades that didn't match when I ran out of patience and decided to paint the tail feathers the same blue as the nose. This of course left me without stars for the tail. A call for help on the WWI Modeling List and AL Superczynski was able to provide me with a sheet full of tiny white stars printed on an Alps printer. Those little white Alps stars were totally opaque and no blue showed through. The DML large stars for the wheel covers did allow the blue background to show. For the red, I just picked the shade I liked best and sprayed up a sheet of clear decal material . This was used for the fuselage and wing stripes as well as the red ring on the upper wing roundel so that would match too, (it doesn't match on the DML kit box photos).
 I
used Rosemont resin
guns and carved out the top deck to recess them as on the real SPAD..
The spreader bar I modified by using a piece of 10 thou card folded over
and glued together at the trailing edge. Two spreaders were added out
of rod. The windscreen I made from fairly thick clear sheet. I also added
a fuel filler cap behind the pilot, some lifting straps and a step on
the fuselage sides. I used strips of black decal to outline the water
& fuel tanks on the top wing center section. The pylon was made of folded
10 thou card like the spreader bar. An Aldis sight out of rod and a brass
gunsight and prop boss were all the additional detailing I did. The kit
was rigged with stretched sprue pre- painted with Testors Metalizer Steel.
I
used Rosemont resin
guns and carved out the top deck to recess them as on the real SPAD..
The spreader bar I modified by using a piece of 10 thou card folded over
and glued together at the trailing edge. Two spreaders were added out
of rod. The windscreen I made from fairly thick clear sheet. I also added
a fuel filler cap behind the pilot, some lifting straps and a step on
the fuselage sides. I used strips of black decal to outline the water
& fuel tanks on the top wing center section. The pylon was made of folded
10 thou card like the spreader bar. An Aldis sight out of rod and a brass
gunsight and prop boss were all the additional detailing I did. The kit
was rigged with stretched sprue pre- painted with Testors Metalizer Steel.
The kit struts need some reshaping especially on the mid-bay support "H". I chose to reshape rather than scratch. You're probably better off just scratching the struts from plastic or bamboo. I had some trouble getting the top wing positioned correctly and keeping the struts vertical. I looked and perhaps the strut holes in the bottom of the top wing are a bit too far forward. The best I could do was a compromise that left a slight stagger to the struts, but kept the upper wing in the correct position. This leads me to believe that the Testors SPAD is an ideal candidate for a conversion to a Spad XII which had wing stagger to balance the cannon in its nose.
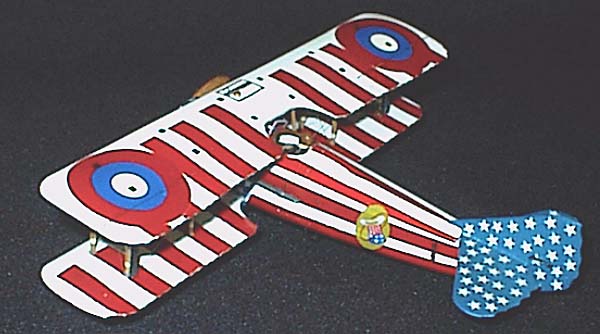
 The
red stripes I made from clear decal sheet sprayed red. I found that the
Liquitex/Future paint makes good but very thin decals. They need a good
coat of clear decal film. I use the stuff by Micro Scale. With stripes
applied to the wing, I ran into the fact that the roundel red was an annoying
shade and 7/8 off the homemade decal red. I fixed a compass with a sharp
#11 blade and was able to cut two red doughnuts that covered the red in
the kit roundel and made it match the stripes. I had the satisfaction
of seeing the DML box art roundel & stripes did not match. (Now somebody
write and inform me that there is incontrovertible proof that they were
two different shades)
The
red stripes I made from clear decal sheet sprayed red. I found that the
Liquitex/Future paint makes good but very thin decals. They need a good
coat of clear decal film. I use the stuff by Micro Scale. With stripes
applied to the wing, I ran into the fact that the roundel red was an annoying
shade and 7/8 off the homemade decal red. I fixed a compass with a sharp
#11 blade and was able to cut two red doughnuts that covered the red in
the kit roundel and made it match the stripes. I had the satisfaction
of seeing the DML box art roundel & stripes did not match. (Now somebody
write and inform me that there is incontrovertible proof that they were
two different shades)
Conclusion
All together I must say that the Testors Spad isn't a bad kit and that if you are going to do a Reed Chambers Stars & Stripes Spad, then forget the DML decals they are just poor quality.


