HR Models 1/72 FOKKER B.IIBy Dennis Ugulano | 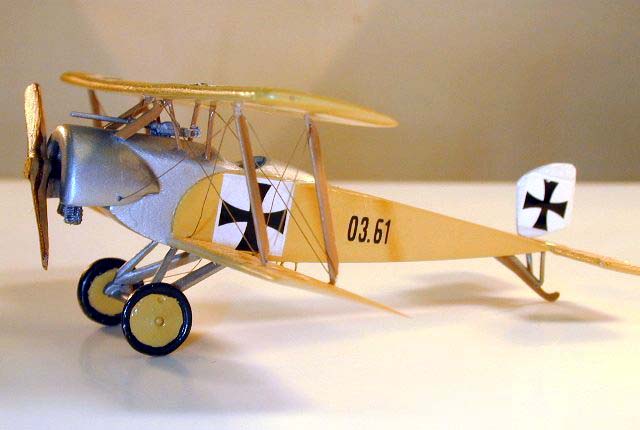 |
Introduction
In addition to building aircraft for the German government, Fokker supplied a number of types to Austria-Hungary. The early planes were two seat reconnaissance monoplanes followed by a training biplane which carried the military designation B.I.
 In 1916 he brought out the M.16 biplane powered by an 80 hp Oberusel rotary. In typical Fokker fashion, the fuselage was welded steel frame covered with fabric. The fairings to circular cowling, top deck and side panels in front of the cockpit were aluminum. The fuselage was rectangular and tapered to a horizontal knife edge to which a balanced elevator was attached. The prototype had a small rectaangular balanced rudder which was later replaced by a comma-shaped rudder.
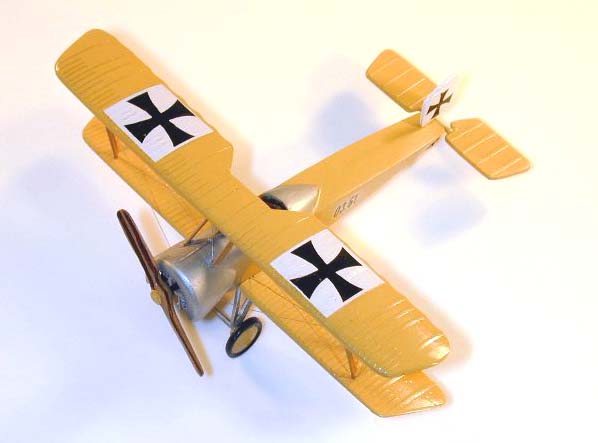
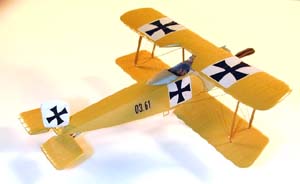
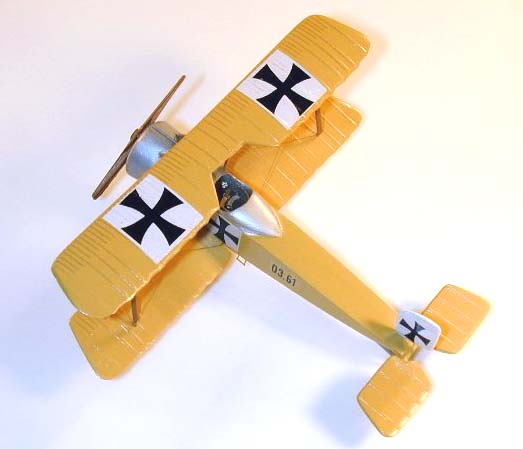
The German Inspectorate was unimpressed by the fighter's performance and the M.16 was not ordered into production. However, the development of a plane with longer two-bay wings, the M.17Z, was put into production as the Fokker B.II. Fifty aircraft (03.60 to 04.10) were supplied to Austria-Hungary and designated as the B.II. It should not be confused with the two seat trainer used in German which was the Fokker B.II.
The type was called the "Baby Fokker" and was used as a light scouting plane with little success. It had a limited range and a ceiling of about 8500 feet, making it inferior to the Fokker E.I with the same engine. Various type of machine guns were tried with little success. After a brief operational career, the type was relegated to role of a trainer.
THE KIT
 The kit is 100% resin and has all parts necessary to build the kit; ie, struts, seats, wheels, prop, machine gun, etc. Also included is a clear sheet with the windscreen and a PE sheet that includes a prop boss, seat belts, instrument panel and foot holds. To show how close knit the Czech kit manufactures are, the Clear and PE sheets are marked Fok E.III from the MAC kit. It is also an indication of how closely related the B.II was with earlier Fokker aircraft. The kit provides two types of rudders, the prototype and the later Fokker comma version. There is also a decal sheet for both German and Austro-Hungarian versions. Holding the kit up to a light, voids were noted in the wings and the cabane struts.

The instruction sheet is a single sheet with three line drawings, four copied photos and some Czech and English text. There are no construction details. My reference material is Harleyford Publication "Fighter Aircraft of the 1914-1918 War" pages 21 and 22. HR does not list its reference material but it does not appear to be the Harleyford book, or at least not one in my reference collection. The kit follows the line drawings except with the wings which are 1/2" shorter than the plans.
CONSTRUCTION
The Fuselage
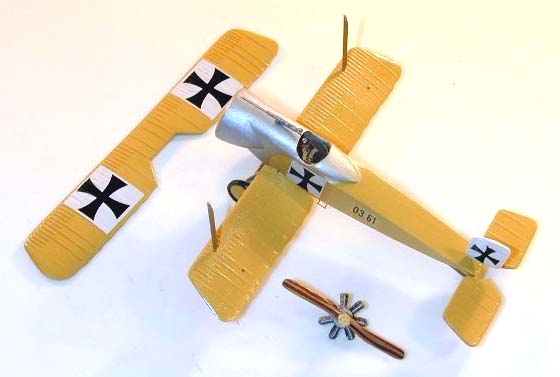
 The fuselage halves fit well together, with only a light sanding to flatten both halves. I thinned the sides only in the area of the cockpit and just painted the steel frame on the sides. If the entire interior is thinned, round stock can be used to make a more authentic look for the frame. The interior was detailed using the PE parts and resin seats. The control stick and pedals were added, along with a scratch built compass. The halves were then glued together. The cowling was attached as the engine will slide in after it is attached. The rear portion of the cowl is molded to the fuselage and needs to be reamed out to give it the proper look. This was done with the Dremel Mini Mite. Putty was applied to the seams and all sanding and shaping was done at this time.
After all seams are completed, the entire fuselage was painted. I used my own mix of CDL and the metal is SnJ Metal Spray, unbuffed. The decals were applied at this time and the fuselage is complete.
The Wings
In my opinion, the wings are the weak point of the kit. As already mentioned, they do not match in size to my reference material. The main ribs and false ribs are much too wide, along the lines of the Airfix HP 0/400. There are numerous voids in the wings, two in the trailing edge on my kit. The trailing edge had to be thinned. I accomplished this from the bottom, after the edge was thinned, the voids were filled and the lower ribs were re-scribed with a single stroke of a hobby knife. The lower wings were the same thickness, leading edge to trailing edge. Again sanding from the bottom shaped them to the proper shape. I had no voids in the lower wing and the ribs were re-scribed. The wings were painted CDL and decals were applied.
There are two options for the overly wide ribs. One is sand off all detail and replace them with smaller ribs. The other is to leave them alone. I chose to leave them alone.
Tail Assembly and Tail Skid
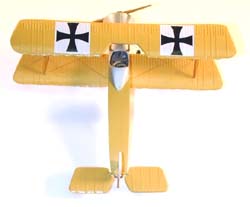
 Since I built the prototype, I used the squarish shaped rudder. Again the thick frame detail was apparent but again I did nothing to correct it. It was painted white and the decal applied. I added a locating pin as it sits on top of the fuselage at a funny angle and I wanted some strength.

The elevators are two separate pieces, but I added the rod connecting them, modelled after the E.III. A Revell E.III gave up its tail skid as again the B.II shared many of the same features as the E.III.
Wing Assembly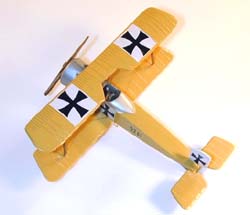
I added a locating pin on the lower wings because they barely touched the plane at the fuselage. Again I wanted as much strength as possible. The thickness of the wings allowed me to drill a hole and insert a piece of round stock. A matching hole was drilled in the fuselage and the lower wings were attached.
All of the struts were replaced due to voids in all of the struts. Also, my rigging method and resin struts do not get along well together. The struts were sanded, shaped, drilled and painted. I use styrene glue on the struts and set the model aside for a day to dry. After totally dry, I add the cabane struts and that locks in my final alignment of the top wing.
Final Assembly
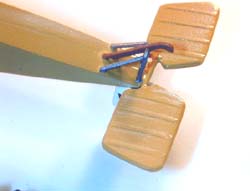
The next step was the undercarriage. I was able to salvage the struts as they have a very complex shape to them and would have been difficult to duplicate. The spreader bar is much too wide so it was replaced. After trimming and shaping, this assembly was pretty easy. It was painted and drilled for rigging prior to attachement to the fuselage. The wheels were added after the under carriage was attached.
The machine gun was a Bergman so I pulled one out of my Aeroclub stock and mounted it as best as I could determine from the the photo. A windscreen was added, the rigging was installed using DURAS and the engine was attached and the model was complete.
Conclusion
 This is an interesting addition to any collection and a subject that has been neglected by the other manufacturers. While I have nothing but admiration for the Czech model manufacturers, especially the cottage industry type, I would like to see a better instruction sheet including their reference source. The photos included on the sheet are excellent but are copies of copies so many times that valuable detail is lost. I will not fault their translation into English because I'm the last person you would want to translate something into Czech. But some line drawings showing locations of certain items, especially the machine gun and rudder, would be a great asset to the builder.

My thanks to VAMP Mail Order for providing the kit and Bob Pearson for letting me build it.


