Formaplane's 1/72 | 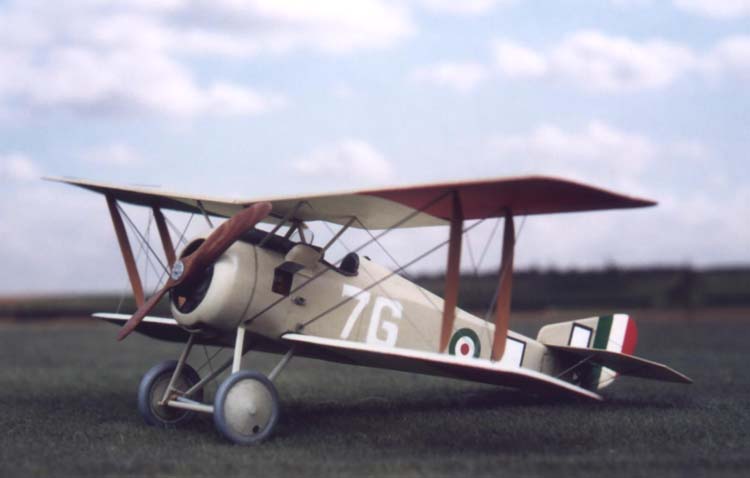 |
Foreword
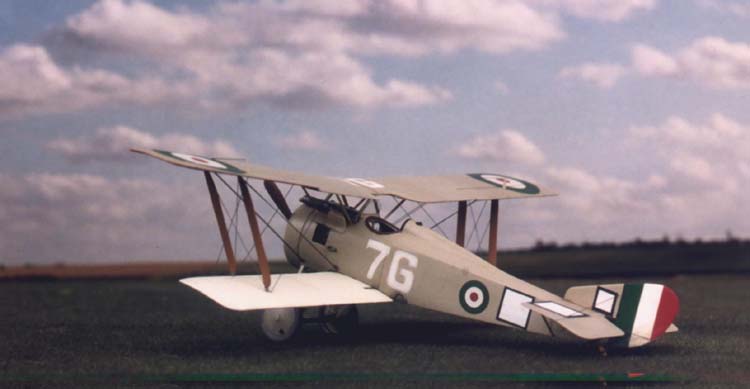
The Hanriot Hd.1 was one of the most important fighters of the first world conflict. Designed in France, it was refused by the Armée de l'Air but was readily adopted by Italian and Belgian pilots, who found it sturdy, highly manoeuvrable and with an excellent rate of climb. Although published references deal mainly with the Belgian pilots' exploits, this single-seater was much more extensively used by the Italian Aeronautica del Regio Esercito, and became the Italian standard fighter for 1918. Ten. Silvio Scaroni was probably the most brilliant exponent of the Hd.1 as a fighting machine, as he scored all of his 26 confirmed victories on the type, over a period of only eight months. Other well known Italian aces flying the type were Flavio Baracchini (21 confirmed victories) and Mario Fucini (12 victories).
Italian Hd.1 pilots probably got their most brilliant success on the 26th December 1917, when, taking off from the Istrana airfield under a German bombing raid, they shot down 11 enemy aircraft without suffering one single loss. On that occasion, Ten. Scaroni shot down three enemy aicraft, a Gotha bomber amongst them.
After the war, the Hd.1 lingered on not only with the Italian and Belgian air forces, but also in the U.S.A.. The U.S. Navy launched Hd.1s from platforms on battleships and flew them as ship-to-shore couriers, for scouting and gun-fire spotting and in catapult testing from 1919 to the early 1920's.
The Kit
 Back
in 1989, during one of my visits to England, I bought the old Formaplane
vacuum-formed kit. Although I usually keep old kits for collection, I
was lucky enough to find two complete kits in that same box, so I decided
to build one of them sooner or later. The kit is nicely moulded, albeit
with Formaplane's traditional engraved ribbing. As soon as parts were
separated from the backing sheet and main pieces were checked against
scale drawings, serious outline problems surfaced. The fuselage is about
2mm too slim in plan at the engine bulkhead and lacks about 0.5mm in side
elevation. Wings are undersized in span by about 3mm and tailplanes are
undersized overall. Even so, I consider this kit a better alternative
to both the old and heavy Pegasus short-run kit and to the recent HR resin
kit.
Back
in 1989, during one of my visits to England, I bought the old Formaplane
vacuum-formed kit. Although I usually keep old kits for collection, I
was lucky enough to find two complete kits in that same box, so I decided
to build one of them sooner or later. The kit is nicely moulded, albeit
with Formaplane's traditional engraved ribbing. As soon as parts were
separated from the backing sheet and main pieces were checked against
scale drawings, serious outline problems surfaced. The fuselage is about
2mm too slim in plan at the engine bulkhead and lacks about 0.5mm in side
elevation. Wings are undersized in span by about 3mm and tailplanes are
undersized overall. Even so, I consider this kit a better alternative
to both the old and heavy Pegasus short-run kit and to the recent HR resin
kit.
Since the Hd.1 is such a nice aeroplane and formed the backbone of the Italian fighter force in the latter part of the war, I could simply not resist the temptation of working on the Formaplane vac.
Surgery
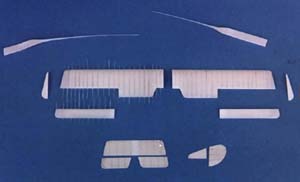
Dimensional problems were dealt with first. The wings had their tips cut off and replaced with new plasticard sections, which were superglued and sanded to shape. Then the ailerons were separated. Tailplanes were cut and carved from 0.3 mm sheet styrene.
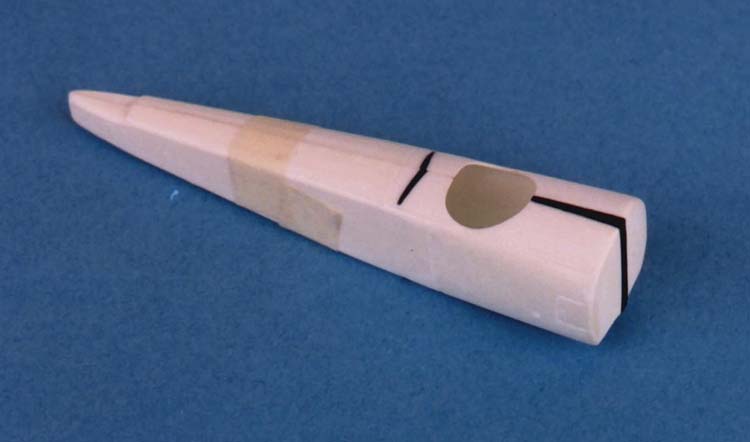
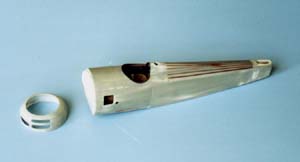
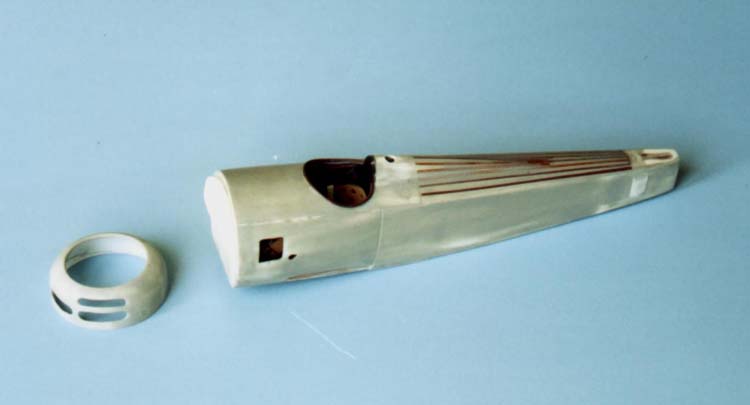
 Each
fuselage half received a cut behind the cockpit opening (through the bottom
and through the top decking) and was gently and slightly bent outward.
Black plasticard inserts filled in the resulting gaps and brought the
nose to its correct dimensions in plan. The accompanying picture gives
an idea of the result of such modifications. Proper cutouts for lower
wings roots were then drilled out.
Each
fuselage half received a cut behind the cockpit opening (through the bottom
and through the top decking) and was gently and slightly bent outward.
Black plasticard inserts filled in the resulting gaps and brought the
nose to its correct dimensions in plan. The accompanying picture gives
an idea of the result of such modifications. Proper cutouts for lower
wings roots were then drilled out.
Ribbing
 Ribbing was next. The original lightly engraved detail was sanded off and new ribbing stations were simulated by very narrow strips of heat-stretched plasticard sections. Usually, I cut 5 x 100 mm strips out of 0.5mm sheet styrene and stretch them over a candle flame, just as it is done for stretched sprue. Strips are then set to the wings by means of clear enamel. A light additional coat of the same paint is applied after 24 hours and, when all has set hard, finishing up with fine wet-n-dry paper completes the job.

Fuselage Interiors
 |
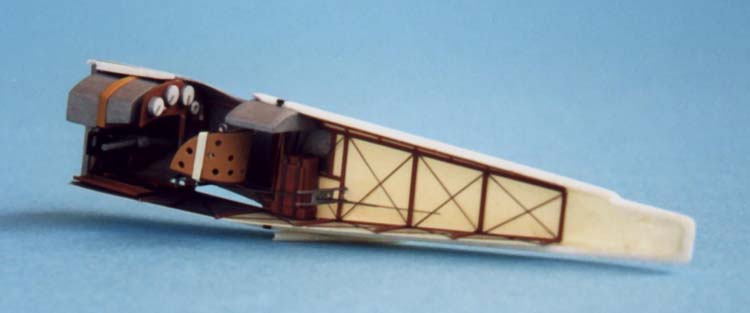 |
This is always my favourite step. I usually try to add as much detail as I can and although the Hd.1 cockpit was quite a simple affair, it took several hours to complete the 'office'. All details were scratchbuilt by means of plasticard and sprue, with no use of photo-etched parts, as I did not have a suitable detail set at hand. To hide the fuselage halves mating line, a new 0.3mm plasticard floor was added. Halves interior areas were then painted, remembering the Hd.1 forward fuselage covering was aluminum. After that, frame components and rigging were added, followed by the other details. The seat was simply built by glueing a 0.3mm plasticard back to a 0.5mm sheet styrene base, then carving the back to shape and adding the typical lightening holes.
Engine cowling
 Because of the fuselage modifications, a new engine cowling had to be scratchbuilt and this was done by means of the classic male-female method. The male mould was carved from an old Revell Sopwith Triplane cowling, filled with Milliput. The frontal opening and the cooling vents were done with a modelling drill. Note that Macchi-built Hanriots usually did not carry the port vent.
Pre-painting operations
 After
fuselage halves were glued together, the extreme tail was cut off, to
be later replaced by stretched sprue items, and some external details
were added, such as inspection panels (0.1mm sheet styrene), cockpit coaming,
the oil tank and a new headrest fairing, as the kit's offering was too
short. Turtledeck ribbing was also added, following the same method employed
for wing ribbing but using decal strips instead of heat-stretched plasticard
strips, as I wished to keep ribbing minimal in this area. The fuselage
was made deeper by adding a section of 0.5 mm plastic card to its bottom.
This gave the opportunity to get sharper lower fuselage edges, by means
of filling the gap between the rounded kit edges and the new plasticard
bottom. A light coat of grey enamel helped judging imperfections. Finally,
the whole complex was finished up with very fine wet'n dry paper and washed
with cold water.
After
fuselage halves were glued together, the extreme tail was cut off, to
be later replaced by stretched sprue items, and some external details
were added, such as inspection panels (0.1mm sheet styrene), cockpit coaming,
the oil tank and a new headrest fairing, as the kit's offering was too
short. Turtledeck ribbing was also added, following the same method employed
for wing ribbing but using decal strips instead of heat-stretched plasticard
strips, as I wished to keep ribbing minimal in this area. The fuselage
was made deeper by adding a section of 0.5 mm plastic card to its bottom.
This gave the opportunity to get sharper lower fuselage edges, by means
of filling the gap between the rounded kit edges and the new plasticard
bottom. A light coat of grey enamel helped judging imperfections. Finally,
the whole complex was finished up with very fine wet'n dry paper and washed
with cold water.
Colours
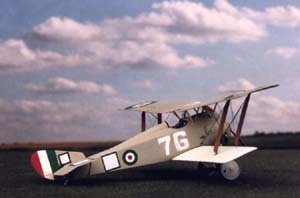
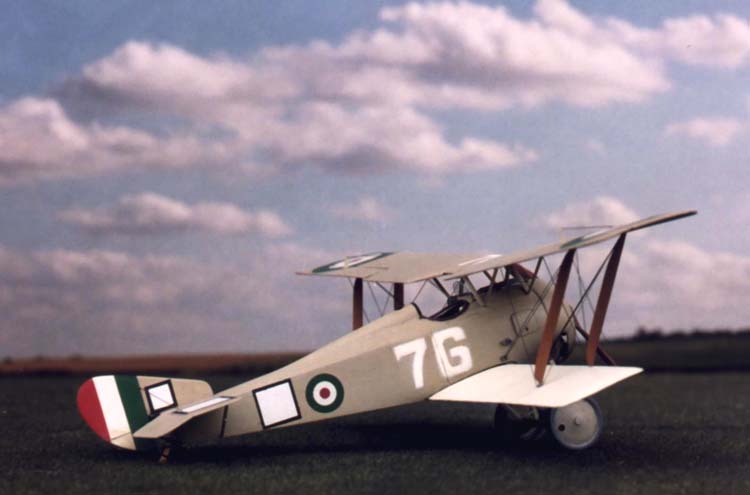
 I
chose H.d.1 6239, one of the aeroplanes flown by Ten. Silvio Scaroni.
Contemporary pictures suggest that this machine departed from the usual
Macchi factory colour schemes in having clear doped lower wings. Scaroni's
personal marking was a white square with a black outline and this was
painted on fuselage sides, as well as the fin and horizontal tailplanes.
The model was painted by means of the new Mister Kit acrylic WW1 Italian
colours. Although I was an enamel devotee, I must confess those water
based paints are better, providing you thin them down with no more than
15% distilled water. After painting, the model received weathering: pictures
at my disposal show that the original machine was not exactly a clean
one, so I decided to go for a little more weathering than usual with this
model.
I
chose H.d.1 6239, one of the aeroplanes flown by Ten. Silvio Scaroni.
Contemporary pictures suggest that this machine departed from the usual
Macchi factory colour schemes in having clear doped lower wings. Scaroni's
personal marking was a white square with a black outline and this was
painted on fuselage sides, as well as the fin and horizontal tailplanes.
The model was painted by means of the new Mister Kit acrylic WW1 Italian
colours. Although I was an enamel devotee, I must confess those water
based paints are better, providing you thin them down with no more than
15% distilled water. After painting, the model received weathering: pictures
at my disposal show that the original machine was not exactly a clean
one, so I decided to go for a little more weathering than usual with this
model.

Decals
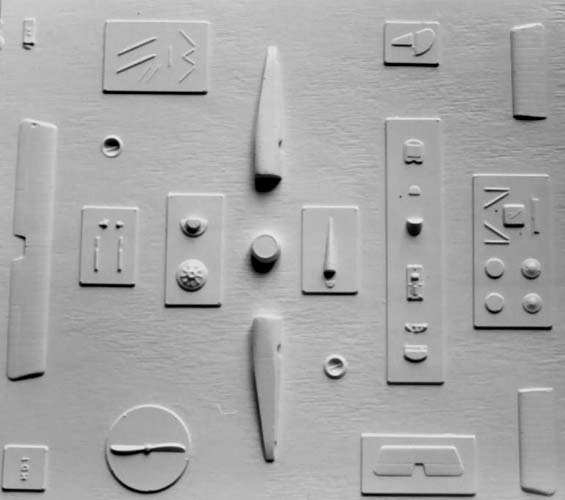
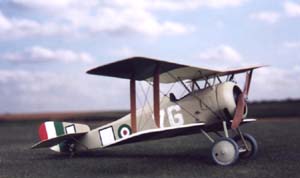 Roundels came from the Pegasus sheet for Italian aircraft. Unfortunately, the sheet does not include the perfect Hd.1 fuselage roundel, so I had to be content with a slightly smaller one. Squares were cut from solid black and white decal sheets, the white squares being kept smaller to get the black outline. Red and green areas under the wings were obtained by means of decal film painted in the required colours. The Squadriglia numbers were painted by spraying white enamel over clear decal sheet through suitable masks. The latter were were hand carved from 0.3mm sheet styrene: results are not perfect perhaps, but acceptable, at least in my view.

Last details
 After painting and decalling, the main parts were assembled and small details were added. Interplane struts were carved from cocktail sticks, while undercarriage and fuselage struts were cut from heat-stretched plastic extruded lengths, to get very thin, aerofoil sectioned items. Wheels are from the Aeroclub catalogue, while the airscrew is a modified real laminated wood Sopwith Camel propeller by Martin Digmayer. The engine is again from the Aeroclub catalogue, with an improved front plate. Rigging is 0.065mm stainless steel wire, fixed with white glue. The wire was exposed to a candle flame to straighten it out and to turn its bright colour to dark steel.
Conclusions
 All in all, an enjoyable project, albeit time consuming and, on occasions, not a very simple one for me, as it was my first vacuum-formed kit. I believe that the kit's softer plastic and reduced thicknesses made some jobs a lot easier !