Roseplane 1/72 Hanriot HD.3By Matt BittnerPhotography by Scott Hackney | 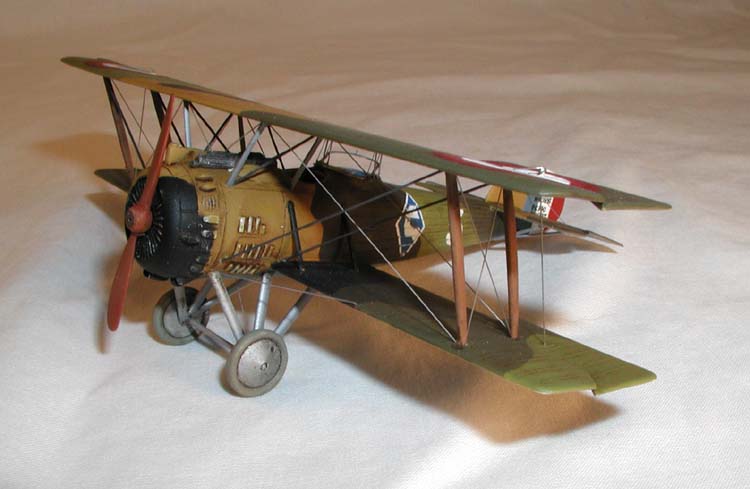 |
History
Some of the design of the Hanriot HD.3.C2 can be traced directly to Hanriot's license building of the Salmson 2A.2. The Hanriot designers liked the Salmson (Canton-Unné) 9Za radial engine so much they decided to build a two-seat fighter around it. Not only was the engine taken from the Salmson, but so was the landing gear strut arrangement. Hanriot wanted a compact two-seat fighter where the pilot and rear observer were close together to facilitate easy communication. Once design "bugs" were worked out, it ended up being a very formidable aircraft. However, the war ended before the type could be tested in the war torn skies over Europe. Only one Escadrille is known to have flown it - Escadrille HD.174 - and while the exact number of HD.3's HD.174 had is unknown, it is thought that 75 were delivered before production ceased sometime after the war.
The Kit
 The Roseplane (Rosemont) Hanriot HD.3 consists of eight vacuformed pieces on one sheet, and eight pieces of resin. The vacuformed sheet also includes true-size templates for all the struts. The resin covers such things as the forward fuselage "hump" and integral Vickers guns; the beautifully molded cowl; tires; Lewis guns; propeller; and seats for both the pilot and observer. There are no decals nor any material included for struts.

Construction
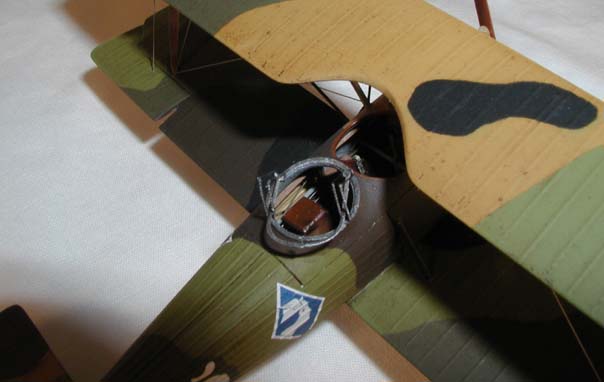
Once all vac pieces are removed from the backing sheet and sanded down, construction continues as any other kit. With no cockpit references, I decided to base most of the cockpit and observer area off of the Salmson 2A.2 (most of my references for this came from Jim Landon and his excellent 1/16th scale scratchbuilt model).
With this in mind, I discarded the kit-supplied seats because that for the pilot is too small, and the observer appears to only have used a fold-down "bench". To the rear of the fuselage sides I added plastic rod to represent the stringers present on the linen-covered part of the fuselage. To the forward areas I added vertical plastic strip to represent the formers.
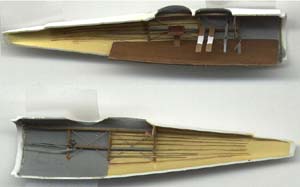 Since I had an extra photoetch fret from a Flashback Sopwith 1 1/2 Strutter, I used that for some of the kit. In the cockpit I used the photoetch seat belts, the instrument panel and clear film, and the engine control. I added some parts from the Tom's Modelworks French PE set - another engine-type control and the rudder pedals.
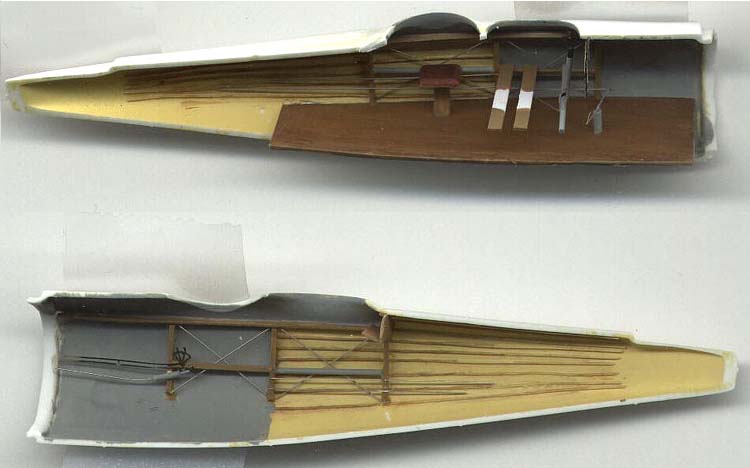
The forward part of the fuselage – being wood and metal – I painted a medium gray, while the floor - scratched out of sheet styrene – and cockpit side structure I painted "wood". The rear part of the cockpit sides were painted Clear Doped Linen (CDL). For the rear observer I made a "wood shelf" that could have been used to store spare Lewis ammunition, to which I added two scratched Lewis drums.
 Once the cockpit was finished I could close up the fuselage. With this being a vac you have total control of how great - or bad - the fit is. So, there was very little filling needed along the fuselage seams. However, with even the smallest amount of sanding you lose the stringer that sits directly on the upper fuselage seam. I re-added it using .010 plastic rod and sanded it down until it matched the rest of the stringer detail.

There are a couple of aspects of the kit that I don't agree with. The engraved lines on the forward fuselage are molded as three "different" lines - from the one photo I saw in the Bruce book this is one continuous and straight line. Also, Rosemont molded the "access door" on the forward fuselage raised, wherein it was flush with the fuselage. I filled in the engraved lines and re-scribed and I sanded the raised "access doors" flush with the fuselage and also re-scribed. In hindsight I should have scribed around the "access doors" before sanding, keeping the outline intact.
 The louvers I thought of as awfully soft so I decided they were best replaced. After trying to figure out what to do, Lance Krieg from the WW1 list came to my rescue and found some HO-gauge, model railroad louvers originally to be used on a diesel engine (Cary Locomotive Works EMB 10 Louver Set). These louvers were pressed into a sheet of thin aluminum and were too close together for the HD.3. However, pressing every other one in would make it more acceptable for the HD.3. Once I had every other one pressed in along a row, I added the rows I could, and where the row ended had to add separate louvers cut from the sheet. After I glued them down using CA - and being sure they were dry - I then sanded the sheet between the louvers away, leaving nothing but the original kit plastic. I think it worked great. Unfortunately the louvers are no longer made and I wish someone would come out with PE louver replacements for something like this.
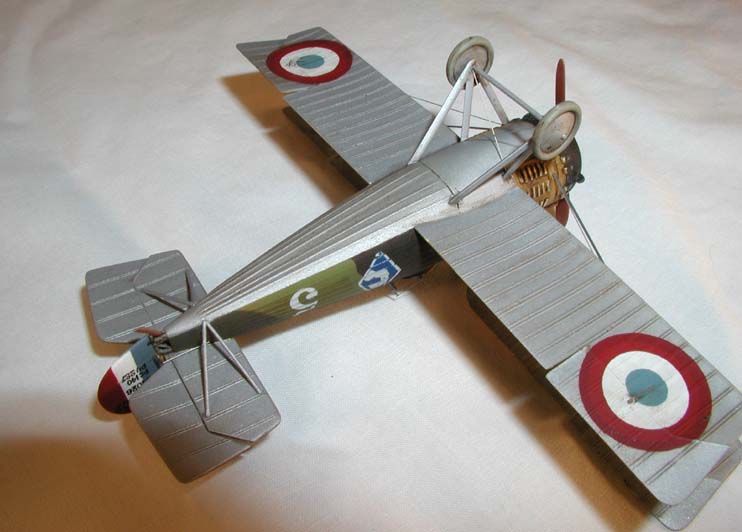
 Now that the louvers were taken care of I turned my attention to the superbly cast resin cowl. This cowl is an exquisite piece of resin and with the right amount of sanding you can get it to fit almost perfect to the front fuselage. I painted the inside the same medium gray as the rest of the forward fuselage and then glued it to the fuselage using a slow setting CA.
After the cowl was firmly dried I started work on opening up the rear fuselage. On the real aircraft - just like on the Hanriot HD.1/2 and various Sopwith aircraft - the rear fuselage around the tailskid area was opened showing a "tubular" structure. Having some excellent photos and drawings in hand sent by modeler extraordinair Alberto Casirati, I replicated this structure using .020 and .010 rod. I also scratched a tailskid out of brass rod. I prefer using brass for the tailskid for added strength.
 I now turned my attention to the wings. Since this was a vac kit, that meant that there was no indication of the ribs on the undersides of the flying surfaces. To remedy this I took a .010 black marker and drew in the rib stations. Then, using a sharp #11 X-Acto blade and a ruler I scribed lines on both sides of the marked in ribs which resulted in two raised "lines" on both sides of the marked in ribs. It took some time but I believe it represents the ribs on the undersides of the flying surfaces the best. Once I finished scribing the wings I removed the ailerons from both upper and lower wings. I now added the lower wings to the fuselage, using only a little filler because I wasn't very careful with the sanding of the wings' mating surfaces and I could not afford to shorten the lower wings anymore.
I now glued on the upper, forward fuselage "hump" (which contains the Vickers' guns molded in-situ) and the horizontal tail after cutting off the stabilizers. I removed the rudder from the fin and glued the fin to the top of the horizontal tail.
Final Assembly and Painting
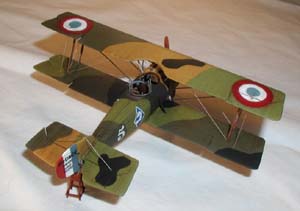
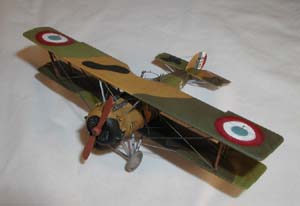
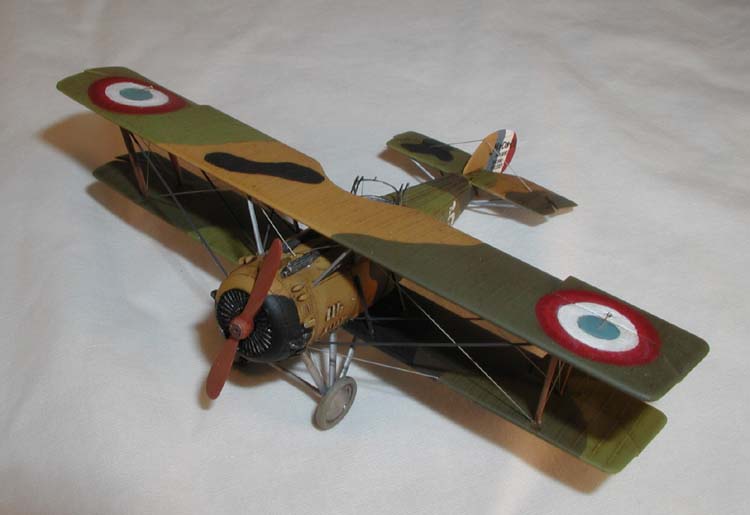
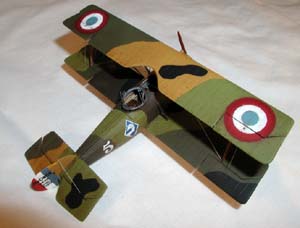
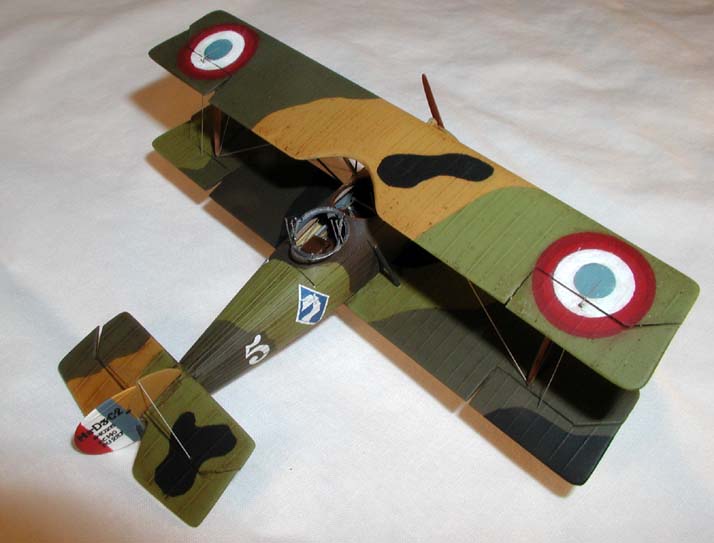
 Before I started painting the five-color I scratched the landing gear struts out of Contrail struts. I did this now so I could spray them at the same time I sprayed the underside of the model. The underside was then sprayed Polly Scale Flat Aluminum and left to dry. Then, in order, I sprayed and masked the French five-color using all Polly Scale colors: beige (British Middlestone); light green (RLM 83 Light Green); dark green (French Fokker Dark Green); chestnut brown (German RLM 61 Dark Brown) and finally black. (Note that I waited at least a day between colors to avoid paint pull off.)
I sprayed an overall coat of Future and after more than a day of drying I started on the oil wash using Van Dyke Brown. Another coat of Future then I started to add the upper wing. The interplane struts were made from Contrail strut and suitably painted. The center struts were made from plastic strip sanded to give a semi-airfoil shape. The struts leading from the lower wing to the fuselage were made from brass Strutz, primarily due the line having the size needed for this area.
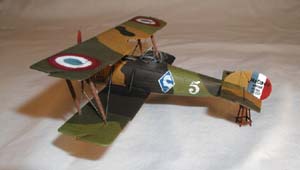
 After the top wing was on - which ended up going together very well due to the engineering of the kit - decals were added, the roundels coming from Americal/Gryphon and the rest being ALPS generated. Another oil wash over some of the decals and then I rigged. Some of the rigging appears "thick"; this is because these areas had double wires and were wrapped in tape. The "thick" areas of the center struts were plastic strip while those of the wings were made from brass strip. The rest of the rigging was .005 stainless steel wire.

The propeller that came with the kit I also didn't like - I thought it was too "fat" and not long enough, so I substituted the prop that came with the Roseplane SPAD 11. First I painted it with a wood-color Polly Scale thinned with Future. Once dry I brushed on an oil combination of red and Van Dyke Brown.
The observer's gun ring came from the Flashback Strutter PE and I decided to leave the Lewis guns off because in the picture of this specific machine they too were left off. Plus I was lazy.
Conclusion
This is a superb kit! Sure, it's not for people who have never built a vac before, and I wouldn't recommend it as a first vac, but for those who have built biplane vacuform kits it poses little problems. The HD.3 is a very striking aircraft, and I find it amazing that - being a two-seater - it's about the same size as an Albatros D.V single seater.
My thanks to Rosemont for providing the review kit; Alberto Casirati for photos and drawings of the opened tail; Lance Krieg for the model railroad louvers; Dale Beamish and Bob Swift for help with the decals; and Jim Landon for unknowingly providing the cockpit references.
References
-
Bruce, J.M., War Planes of the First World War, Volume 5, France, Doubleday and Co., Garden City, NY 1972, printed in Great Britain
-
Davilla, Dr. James J. and Arthur M. Soltan, French Aircraft of the First World War, Flying Machines Press, Stratford, CT, 1997


