Eduard 1/48 Hanriot Hd.1 and Hd.2By Tomasz Gronczewski | 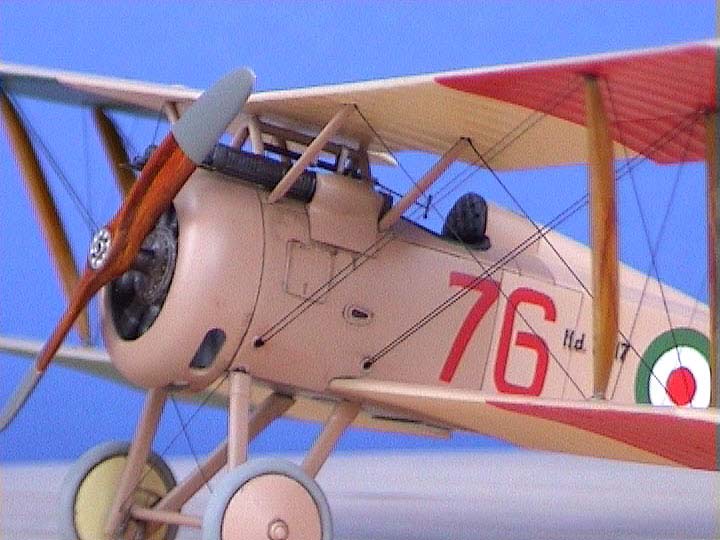 |
Introduction
Can you recall when you saw an SE5a or Fokker Dr.I for the first time? Difficult, huh? Same for me. However I remember precisely when I saw a Hanriot scout for the first time. It was during the early eighties. My dad bought me a book devoted to First World War first scout aircraft. A colorful picture of the flamboyant Olieslager's Hanriot attracted my attention strongly enough to remember its shape for years. Luckily I was not aware that it would take me almost twenty years to see the first Hanriot model on Polish shelves.
Thus it was not surprising to see me buying the first Eduard Hanriot Hd.1 model I spotted. It was a plain kit known as 'non-profipack' nowadays which carried no metal or resin parts, but I found beloved my Belgian markings inside the box. Soon I learned that the other multimedia 'profipack' set had many useful photo etched parts with cellular plywood pilot's seat as a main component. Of course I ordered a 'profipack' Hd.1 too, but I received the Hd.2 floatplane 'profipack' instead. Then I bought the Hd.1 'profipack' and thus I became happy owner of three Hanriot kits. Initially I planned to make two Hd.1 models cannibalizing the floatplane's p/e set, but the latter looked so cool that I eventually decided to make all three models.
The First One - Sacroni's Hd.1
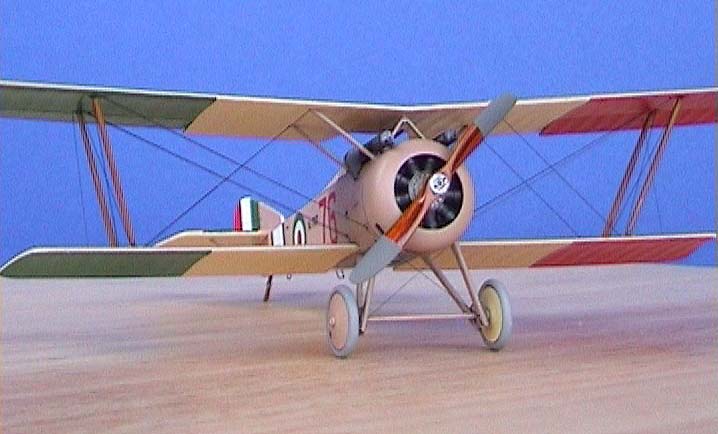
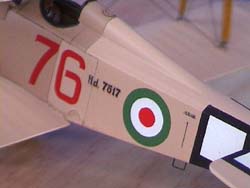
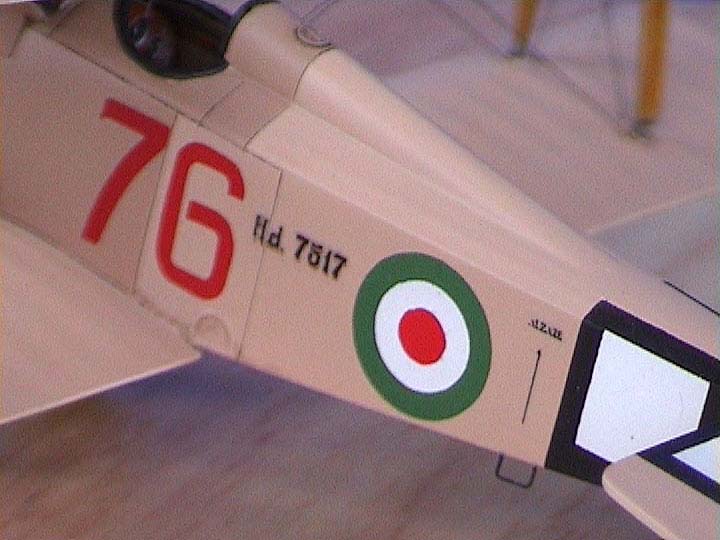
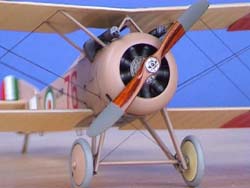
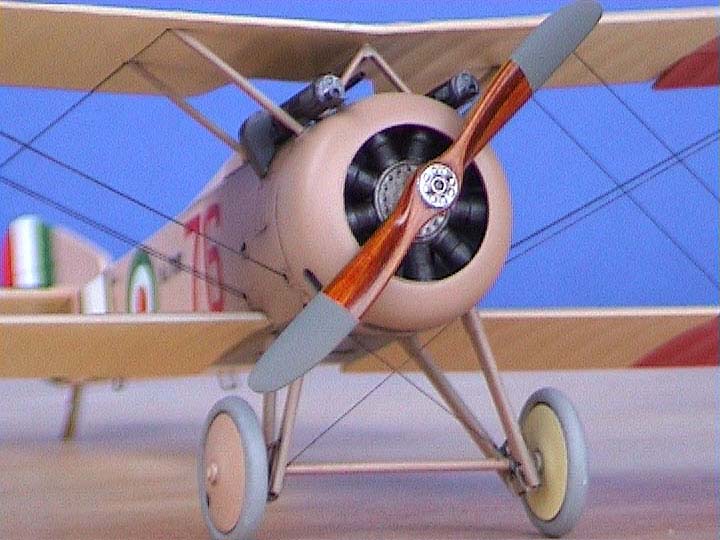
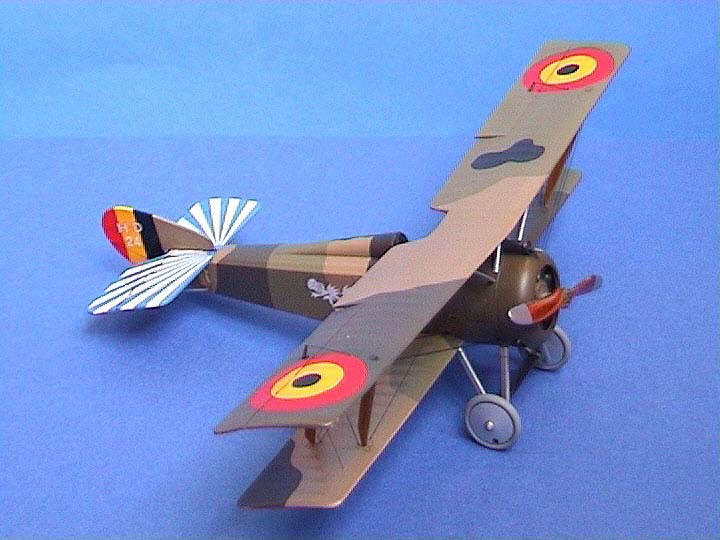
 Despite being so inspired by Belgian scheme, I decided to make that Hanriot as the last one. Instead of Coppens' mount I selected an aircraft of an an ace who shot down more enemy planes than any other Hanriot pilot. I mean Silvio Scaroni, the second ranking Italian ace with 26 kills. The majority of his victories were scored while flying Hanriot scouts. I decided to portray his most usual mount no.7517. By the time when I started construction of this model, I had known two variations on its camouflage. First suggested overall silver dope finish, but according to the second the plane had been left in clear doped linen livery. Luckily for me a voice in my head whispered me to contact fellow wwi-models mailing list listee Alberto Casirati who is known for his extraordinary knowledge on Italian aircraft. He convinced me that the Macchi-built aircraft had been painted with Italian light brown rather. More careful photo analysis seemed to confirm Alberto's theory and I followed my friend's guidance.
 As the first look at the sprues was very encouraging I didn't want to modify the kit too much in order to make it rather quickly. But the second look revealed that there had been three more or less serious omissions made by Eduard. First of them was lack of hollow 'Sopwith style' fuselage structure around the tail skid. Real Hanriots had the last section of the fuselage uncovered, but Eduard represented it as a solid structure. I cut an opening out of the rear part of the fuselage, and made the upper half of the tail skid out of the wooden scrap. A bunch of stretched sprues formed into horseshoe shape simulated bungee chord shock absorber.
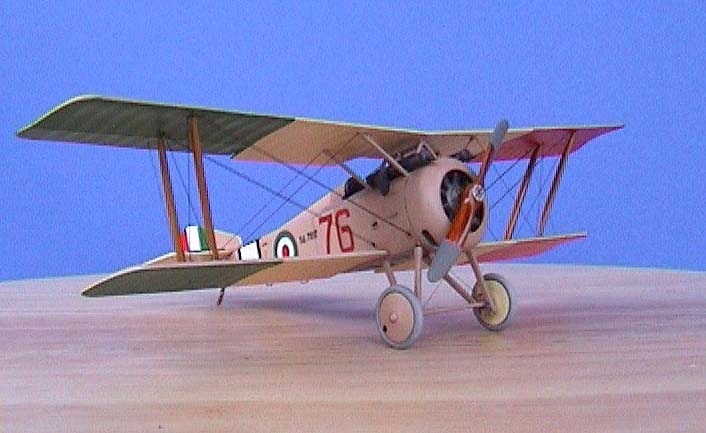
 The second omission was a lack of bolster cushion. I made it out of two compound Tamiya epoxy mass, but did not glued it onto the bolster. I used it as a master to make resin copies for the both forthcoming Hanriot models.
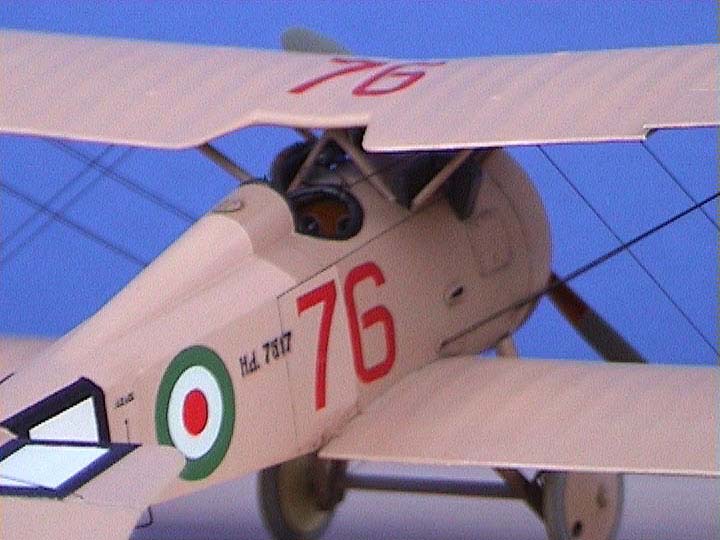
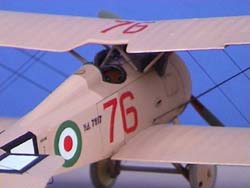
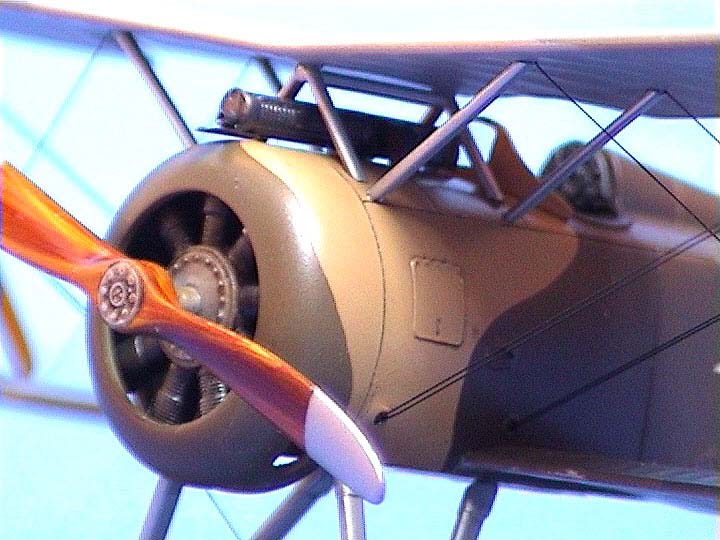
The third omission was the lack of an additional opening in the engine cowl. I considered the correction job tricky enough to live without it. In addition to all of these corrections Scaroni's Hanriots demanded two small and easy conversions. The first of them was an addition of second gun on the starboard fuselage. It was easy because a 'profipack' kit had provided me with two guns, but the fairing of the gun was not appropriate. In the case of a modification implemented on Scaroni's mount the ammo feeder was unfaired. Scratching the chute from a piece of soft plastic was trivial.
 The second conversion had seemed to be easy but it caused a few troubles. I mean scratchbuilding the telescope gunsight. I easily cut it out of a piece of syringe tube, but I had to approach it a few times in order to position it between the fuselage and top wing.
Otherwise construction was rather simple and very much enjoying. First I painted and assembled all interior parts. I didn't encounter anything worth mentioning, except for the pain suffered during closing fuselage halves. Simply, after I had glued them to each other, nothing but the seat and instrument panel remained visible. I attached the lower wing and horizontal tail surfaces before attempting exterior painting. But at that moment the time of color selection came.
 According to the Misterkit paint chips Italian Light Brown seemed to be a bit similar to US Tan. I decided to use two varied but somehow similar hues for 'fabric' and 'metal' version of the color. Both shades were mixed on the basis of Model Master Italian Sand enamel. In the case of 'metal' surfaces I lightened it with white enamel (two parts sand vs. one part white), and in the case of 'fabric' surfaces I lightened it in 1:1 proportions. If I had another chance to complete this model I would select 3:2 proportions when mixing 'fabric' paint as the achieved contrast between the shades seems to be too high. Bottom surfaces had to be left in clear dope linen finish with natural metal front panels. I used Testors Radome Tan and SnJ metalizer respectively.
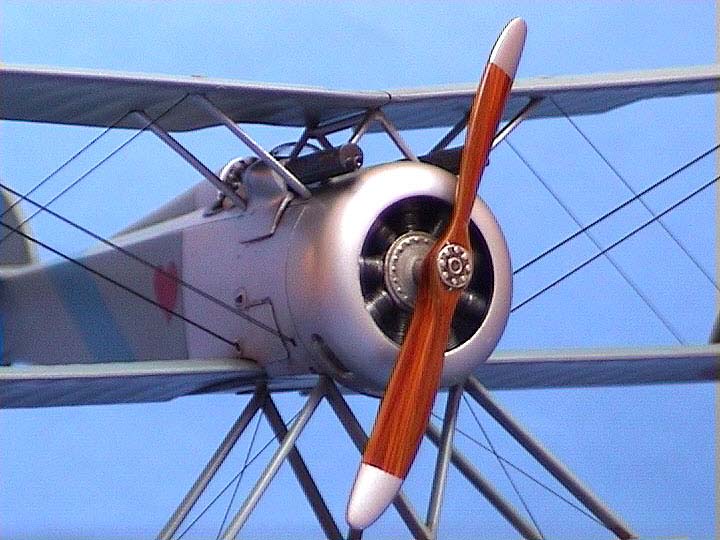
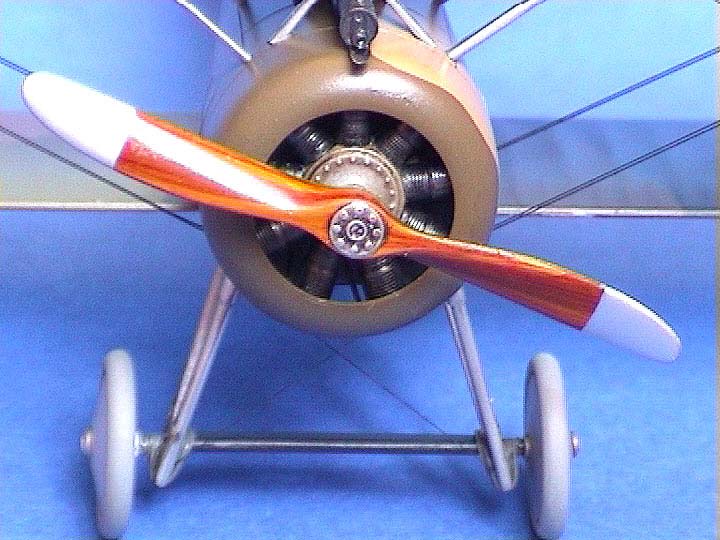
As with other airplanes of the era, Hanriots had many of their construction elements left in plain wood color, but with shellac applied atop. Outer wing struts, tail skid propeller were main components here. I simulated the effect of shellaced wood using a technique compiled from experiences of many skilled modelers subscribing to the wwi-models mailing list and participating in the Great Albatros Cookup. First I sprayed all elements with Humbrol 103 Cream. Then I drew woodgrain lines using brown watercolour pencils and made transparent blotches using thinned brown and buff Tamiya acrylics. Later I oversprayed everything with a mixture of Tamiya Clear Yellow and Tamiya Clear Orange and finally applied a thin coat of Future Floor Polish.
I had no decals of Scaroni's aircraft, so I decided to paint insignia using custom vinyl masks and custom decals. First I thought that only no. 76 and Scaroni's personal squares would be painted using masks, but when I realized that even inbox decals of fuselage roundels were unusable (Scaroni's roundels had 1:2:3 proportions while the kit's roundels had 1:3:5 proportions), I decided to paint everything.
 I have no idea what were the proper shades of Italian insignia colors, but on the all Hanriot photos green looks rather bright. Yes I know, that I shouldn't rely on old b/w photos, but when a green insignia has been painted over dark green background, and it stands of as a light spot clearly, I can assume that it is much brighter than the background. I tried out all of my light/medium green cans and bottles and decided to use Humbrol 101 Mid Green with a small part of Humbrol 73 Wine Red to break 101's vivid appearance. Humbrol 153 Insignia Red was used as the Red color. Tamiya Gloss White was used as the White color but it ended with total disaster, as masks lifted the paint. I had to repeat most painting, but then I used much more durable Humbrol 130 Semigloss White.

Some details of the markings were too small to paint them using masks. The serial number as well as arrow stencils had to be done as decal, and thus I used my Canon bubblejet printer and Supercal ink jet decal film to achieve this. Ready decal was applied on the wet spot of mixture of Future Floor Polish water and Aerosol decal solution. After all insignia had been painted I applied semigloss finish using a mixture of Future Floor Polish and Aeromaster Flat Clear.
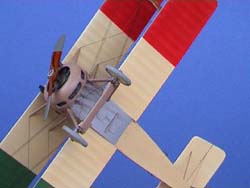
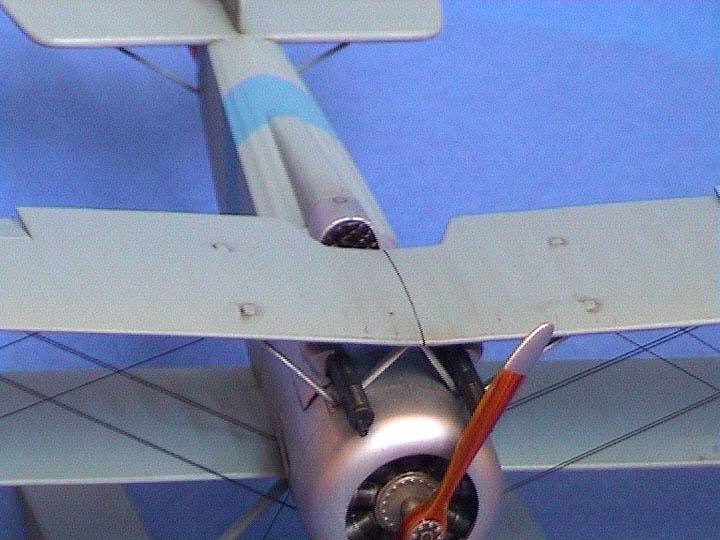
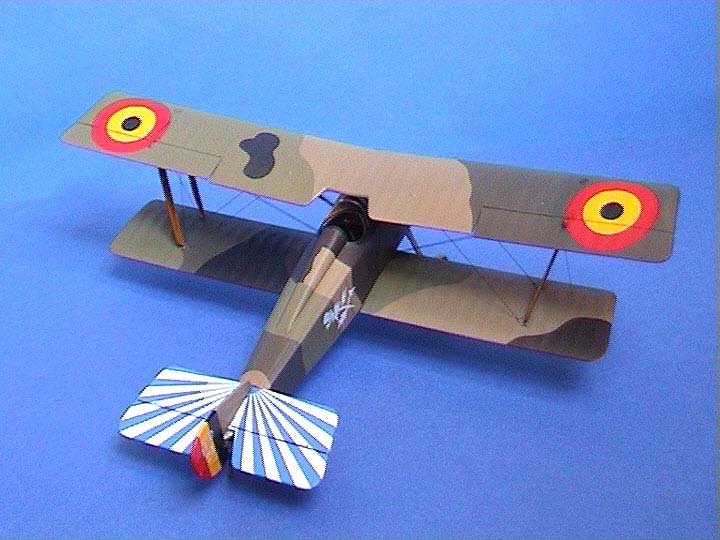
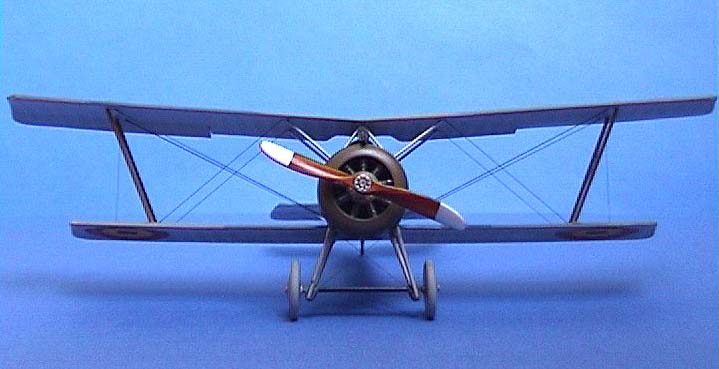
 Having all main components ready I entered the most feared biplane feature - upper wing attachment. I must say that application of Hanriot wings is much more challenging than that, for example, in the case Albatros scouts. I found that easiest way to follow is to attach central 'pyramidal' strut stand to the fuselage and to attach top wing using only two central support points. It is essential to use good brand of CA glue and watch carefully looking from the front and above if the attachment is symmetrical. Then I added interplane struts and cabane struts respectively. It is important to note, that interplane struts are not all the same and one of Hanriot kits suggested the wrong application. There are two 'narrower' struts and two 'wider' struts. 'Narrow' struts should be mounted ins front on both sides, while 'wider' struts should go to the rear locations. One of the instruction booklets had suggested incorrectly that two 'wider' struts should go to the left and two 'narrower' to the right. Anyhow even after attachment of all struts the construction is not rigid enough and I strongly recommend rigging it with fishing line threaded though drilled holes. I did so and it made the model significantly stiffer. After rigging had been made I masked holes over with drops of wood glue and/or drops of proper enamel.
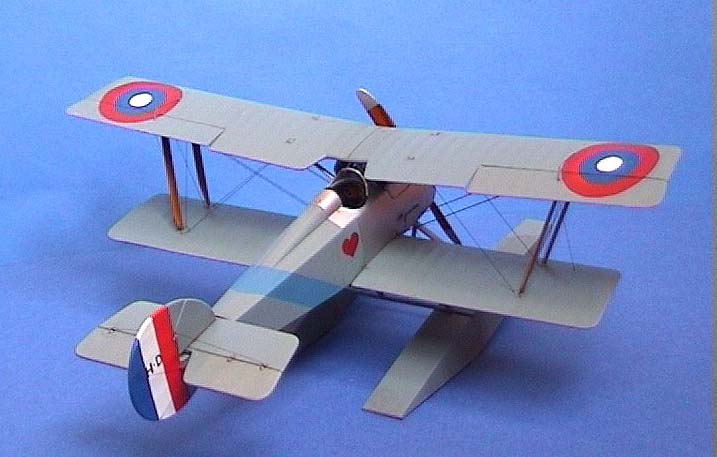
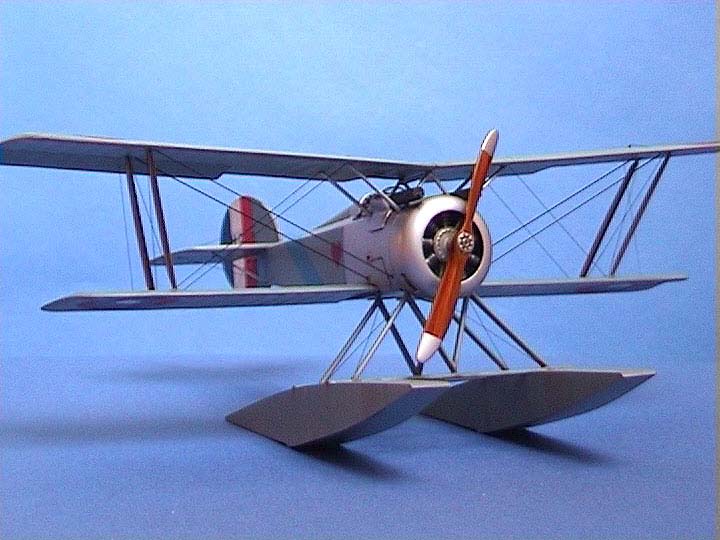
The Second one - USN Hanriot Hd.2
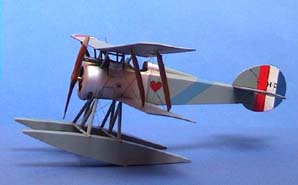 The second kit I approached was the US Navy Hd.2 floatplane. Despite being very afraid of how the sophisticated float structure would behave during construction, the build was very straighforward and troubleless. I have only to remark that the join pins of the front float struts, which are supposed to go to the fuselage just behind cowling, should be cut out completely. Every other aspect of the construction was very much the same like in the case of already built Scaroni kit. I selected the color option of Lt. Mosely's H.d.2 as a subject of my model. As the entire plane was painted with a solid light gray color its finish was extremely easy. First I coated cowling with SnJ metalizer, then masked it over and sprayed all other surfaces with Humbrol 87 blue gray paint. Now I think that the latter color was too dark and too blue for that role, but it was
 too late to correct it. Moreover I realized that the decal provided by Eduard suffered some inaccuracies. The heart seemed to be too big, and blue band too bright. Taking into consideration the fact that I would spray the rudder stripes, I decided to paint all markings using custom vinyl masks again.
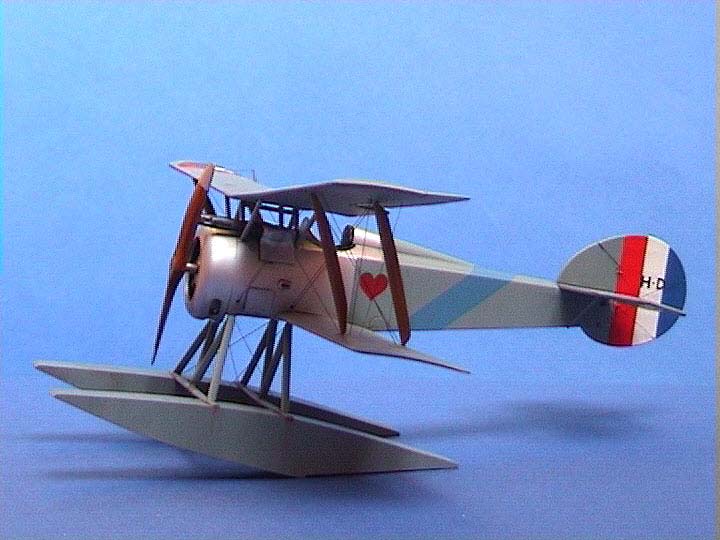
I tried to build the floatplane totally out of the box and decided to cannibalize all suitable photoetched parts to my forthcoming Coppens' model. Thus the only intervention in the kit's layout was to add bolster cushion and to add some panels to the sides and to the bottom of the fuselage.
 |  |  |
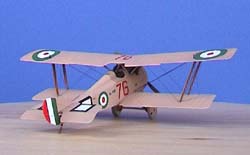
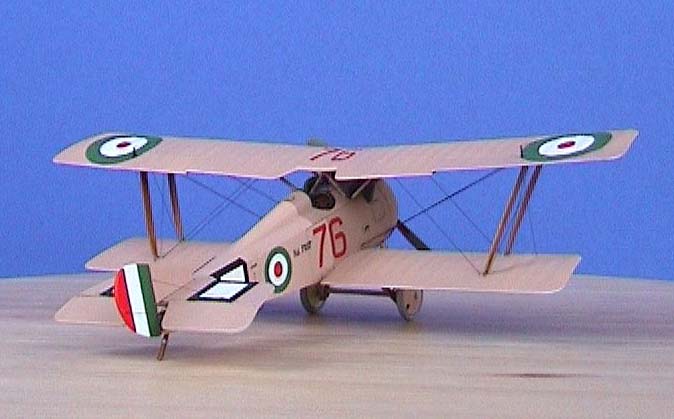
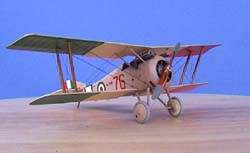
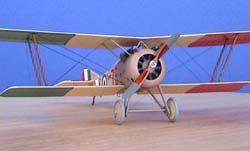
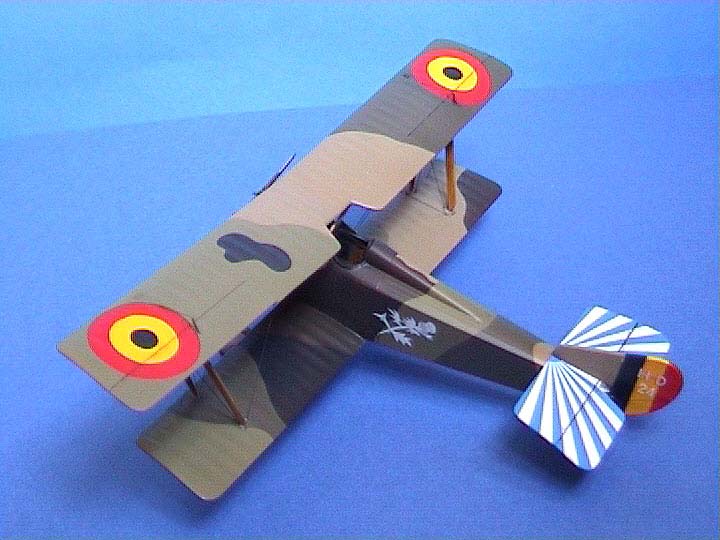
The Third One - Coppens' Hd.1
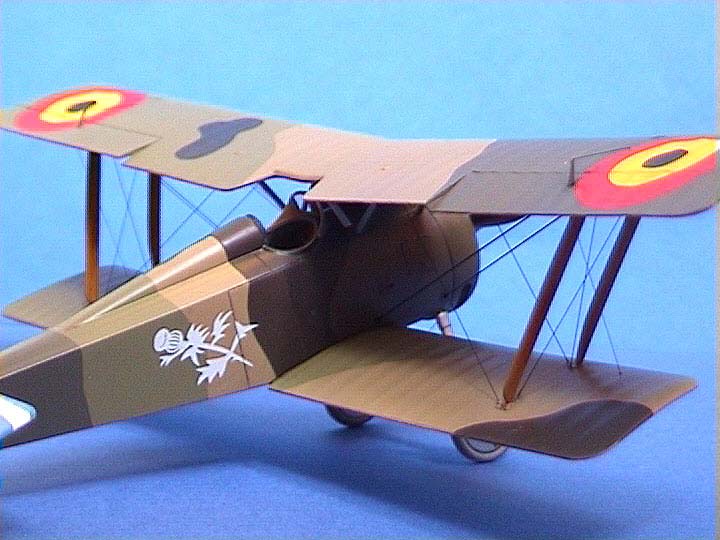
 The third Hanriot was intended to portray an aircraft flown by top world's balloon killer - Belgian ace Willy Coppens. He scored 37 kills, mainly balloons, and almost all of them were scored with H.d.1 scouts. The decals for Coppens' Hanriot had been provided in the 'non-profipack' Eduard kit, and I assumed that they were correct. But I couldn't agree with the kit suggestion to use a strange brown/green/gray camouflage scheme. According to a discussion that had been done before on the wwi-models mailing list, I selected classic French five color 'butterfly' scheme with two browns, two greens and soot black. In fact the number of colors was higher because all colors had been prepared in two forms. One for metal surfaces, and one for fabric surfaces. The latter had aluminum powder added. The only exception was black, which was used on fabric surfaces only but it was never supplemented by aluminum powder.
 |
 |
 |
 |
 |
 |
Analysis of Coppen's Hanriot scheme shows that all five colors appeared on the fabric surfaces and only three of them on the metal surfaces. Thus the number of colors was reduced to eight "only" not counting silver doped underneath. It is very hard to determine nowadays what the colors looked like exactly. It is only known that both greens and both browns were mixed out of the same components but according to different ratios. So it was clear for me that the colors couldn't be far away from each other, and I decided to follow olivish greens and olivish browns rather. Aluminized versions should be less contrasting, milder, and somehow greener than appropriate non-aluminized counterparts.
After a few approaches and an hour spent with my wide selection of cans and bottles I decided to use following substitutes:
-
Metal Fabric
-
Beige onto metal panels - Humbrol 93 (Desert Yellow)
-
Beige onto fabric surfaces - Humbrol 187 (Sand)
-
Light Green onto fabric surfaces - a mixture of 10 x Humbrol 84 (Mid Stone) plus 1 x Humbrol 66 (Olive Drab) plus 1 x Humbrol 2 (Emerald) Dark Green
-
Dark Green onto metal surfaces - Humbrol 155 (Olive Drab)
-
Dark Green onto fabric surfaces - Model Master ANA 613 Olive Drab
-
Chestnut Brown onto metal surfaces - Model Master Burnt Umber
-
Chestnut Brown onto fabric surfaces - Model Master Raw Umber Black
-
Soot Black onto fabric surfaces - Revell 9 (Anthracite Gray)
As I am airbrushing fan I decided to mask all those complex blotches and to spray what had been painted with a brush on the real thing. The masking was a bit tedious but rewarding. I used Tamiya masking tape cut to the shapes on the small glass square. After entire upper camouflage had been done I painted bottom surfaces with a mixture of SnJ metalizer with semigloss white.
As I have written it before I took the decals out of the box. I applied them onto wet spots of Future/water/Aerosol mixture. They were trouble less except of tail blue rays. First I painted the top surface of the tail unit with white, then applied a coat of glossy Future and the applied the decal on the surface wetted by Future/Aerosol mixture. It was little surprising for me to see that the decal did not fit all those corners and edges of the repositioned elevators. So I used my ultimate method of softening decals – which is as dangerous as it is effective. I coated the decal with Testors metalizer sealer. It softens decals enormously, and laminate them perfectly, but overdone it can eat decals and dissolve printout. I have found this method perfect for lozenge decals and the ray-like decal on the Hanriot tail seemed to be very much the same beast. I was right. The decal wrapped around every edge and after it had dried it was durable like nails. I sanded it over with Flexi-Files and added finishing touches of blue and white to mask imperfections.
Conclusion
All the kits are very much the same (provided you don't see the floats and rudders) and all of them are little gems. The only corrections I would suggest are:
-
cutting narrow but long opening in the engine cowling;
-
opening rear fuselage section;
-
revising some inspection panels of H.d.2 floatplane;
-
adding a cushion to the bolster.
The first correction is tricky, at least for me, as far as the long carving across complex surface should be done good enough to maintain plane perpendicular to the airframe axis. But the last is so obvious and so little, that it cries for a small aftermarket resin piece.
The construction of the kits are extremely enjoyable although one should take care when aligning top wing. Diagonal interplane struts make the airframe elastic and non-rigid. Because of that fishing line rigging method with its stiffening role is highly recommended.
Finally the kit has one serious drawback. It is addictive. After I had finished all of the trio I bought a fourth one just to test how it would look like in silver dope finish...


