Czech Models 1/48 Curtiss XP-55 AscenderBy John Lester | 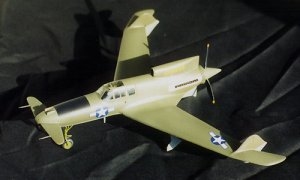 |
Note
For a brief history of the aircraft, and a look at what comes in the box, see my earlier kit preview in the September 2000 issue.
Construction
Like all Czech Models' kits I've tackled thus far, this one had it's share of problems - but no more, really, than any other well-made limited run kit. It didn't go together near as fast as a Tamiyagawa product, but then I didn't expect it to. Most of the problems I encountered were more due to my own clumsiness than any failing in the kit.
 It's a cliché, I know, but construction begins in the cockpit. The resin bits are very well cast, and go together easily. I carefully cleaned out the resin between the seat supports and the bar at the top that helps secure the seatbelt, then turned to with the paintbrush while everything was still on it's runners. All interior parts - including wheel wells, landing gear struts, inside faces of the gear doors and the hubs of all three wheels were sprayed Testor's Model Master (TMM) Interior Green. The molded-in seat belt (a feature I personally like far better than photetch or masking tape) was painted a light gray, with silver hardware. The instrument panel, tip of the control stick and various boxes in the cockpit were painted TMM Aircraft Interior Black (a very dark gray, actually), and dry-brushed to bring out detail. The batteries on the floor behind the pilot's seat were painted olive drab. I considered running wires around them, but decided the effort would have been wasted, as one really can't see much down there with the canopy on. Finally, the boot around the base of the control stick was painted a leathery brown.
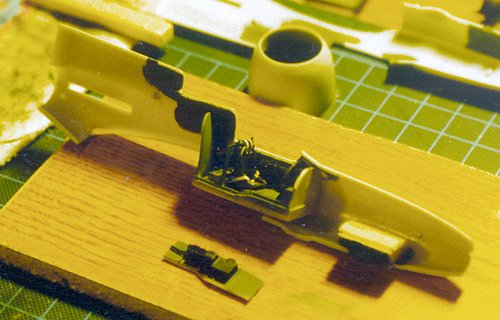
 Once all this was dry and covered with a clear flat, it was time to put it all together. Here's where I hit my first glitch. The instructions indicate one should attach the resin sidewall to the inside of the plastic fuselage first, then fit the rest of the assembled cockpit to them. Dry-fitting convinced me that I would never be able to get it all to line up - especially since this way it appeared the bottom edges of the side walls would not actually meet the section of the cockpit floor to which they are supposed to attach. I glued the sidewalls to the rest of the cockpit, and slid the thing in. The tops of the sidewalls, however, didn't come up to the edge of the canopy. What to do, what to do. In the end, I took the coward's way out, deciding that it would be hard enough to see with the canopy on and closed (and I was right, but not for the reason I thought I would be - more on that in a minute). I did nothing, and that gap is there for the penlight police to see - assuming any such person could survive my wrath at attempting to inspect my models with such a device.
 Unbowed, I forged ahead. The instructions suggest filling the nose with 9 grams of weight to keep the model on all three wheels. I super-glued steel bb's inside the plastic nose cap (part A25) and in the fuselage halves forward of the resin nose gear well. I must have got enough in there, as I have had no problems since. I lopped the pitots/probes off the canards and glued them in place, figuring I would only break them off while handling the model. The fuselage was glued with plain ole liquid plastic model cement and clamped together.
I then turned my attention to the wings, and ran into more glitches. First, the resin main gear wells are too tall to fit inside the wing halves, so some vigorous filing was needed. Worse, the wings are too fat as molded - but try thinning down the training edges, and you exacerbate the problem with the wheel wells - and throw off the fit of the wings to the fuselage. The fact that the forward edge of the wheel well inserts is a separate resin piece, and there are no alignment guides of any sort for all this, makes the job tougher. Tougher, but not impossible. I finally managed to get it all together to my satisfaction, though later I discovered that one main gear strut is a millimeter or two forward of the one on the other side - just enough to notice on a more than casual inspection.
 The rest of the wing assembly consisted of sliding the rudders in place, and attaching the lower wingtips - why these had to be separate pieces is another mystery - it just meant two more seams to attend to.
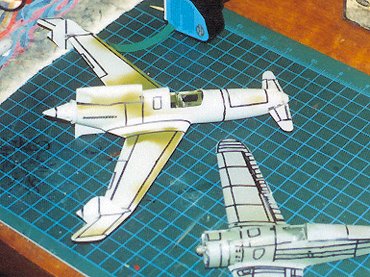
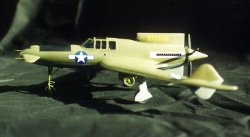
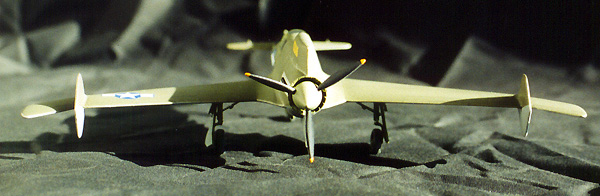
Once this had all dried overnight, I attached the wing assembly to the fuselage. Fit was better than I expected, but there was still a significant step at the front of the wing, under the fuselage, that needed attention. Vigorous attention. Then the under-fuselage air scoop and ventral fin were attached and the spinner built up. Fit here wasn't that great either. Before attaching the cowl flaps, I sawed them apart so I could pose them open, as seen in a couple of photographs I managed to dig up. The cowl flaps were glued to the fuselage, while the spinner (sans propeller blades) was left separate. The canopy was carefully trimmed, dipped in Future, and set aside to cure. Finally, I glued the two small scoops at the front of the nose on and opened up the holes for the machine guns with a small hand drill. Landing gear struts were left off until after painting so I wouldn't break them.
 When I had everything securely where I wanted it, out came the putty. I now use Bondo automotive spot putty to fill in the worst of seams (after shimming or using superglue on really BIG gaps) - a large tube is half the price of hobby putties, dries smoother and doesn't flake as much either. I needed putty at all the seams. The ones where the canards attach to the nose, and the rudders/fins to the wings, were particularly troublesome. After wet-sanding the bondo to get it smooth, I applied a layer of Liquid Paper (typing correction fluid) to fill in any pinholes and minor scratches in the putty. This was polished out with 600 grit wet-n-dry sandpaper (wet, of course), and any panel lines I'd removed along the way were rescribed. Then, the whole model was polished out with Blue Magic jewelers' rouge and wiped down with a rag soaked in ammonia-based window cleaner to get rid of anything that might interfere with paint adhesion.

Now the kit was looking like an airplane, and it was time to get it ready for paint. I was concerned about masking the canopy, because the framing is rather soft and I had a hard time using transparent (Scotch) tape to mask it off. What to do, what to do . The answer appeared coincidentally on a routine visit to the hobby shop (visiting the local emporium of wholesome modeling goodness is part of your routine as well, isn't it?). Pawing through a bin of goodies on sale, I came across the True Details Fast Mask set for this kit - and at just a dollar, too. Bonus! Extra bonus - masks for the wheel hubs too.
 I hadn't used these vinyl masks before, but it was quite simple. Peel a piece off, dunk it in some warm dish- soapy water, slide into position and pat down. Quick, easy - I'm sold on the method. Especially since it gives much straighter frames than I've been able to do in the past. After they were all in place, I cleaned off the fingerprints and soap film, and affixed the canopy in place with white glue.
I masked off all openings with wet tissue paper and at last - off to the paint shop!
Painting & Decals
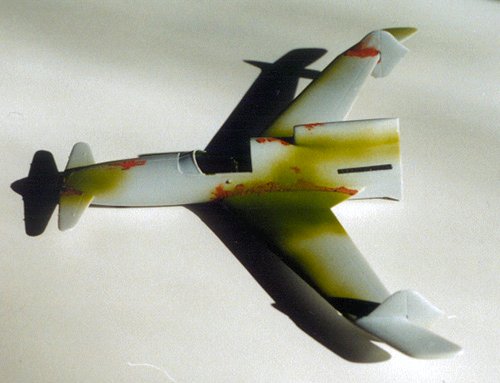
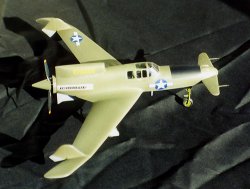
 The model first got a primer coat of a generic gray enamel so I could check for any flaws I'd missed before. Those corrected, I sat down to do some pre-shading. My control of an airbrush is not generally fine enough to paint the panel lines, so I use a permanent black laundry marker to draw over them all. This task complete, I sprayed the underside with TMM Neutral Grey. Then I did it again, because the pre-shading showed through too starkly. When this had dried overnight , I masked off the undersides and painted the uppers TMM ANA Olive Drab. This covered the pre-shading much better than the gray did, so only one coat was necessary. When it had dried, I went back over it with TMM Faded Olive Drab, misting a light coat inside all the panels on the wings and the upper fuselage. This I allowed to cure overnight.
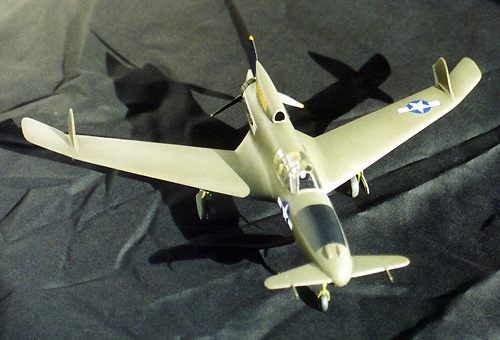
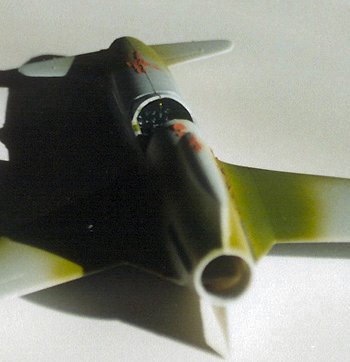
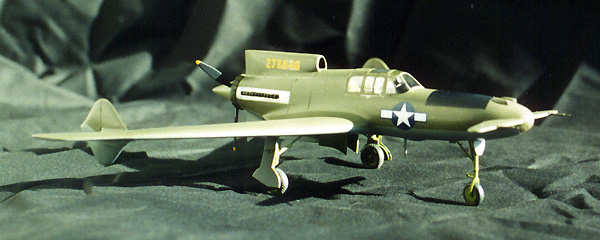
The anti-glare panel on the nose, visible in some photos but not others, was masked and painted, as was the aluminum area around the engine exhausts. The exhausts then were painted TMM Burnt Iron metalizer.
 I then stripped all the masking and sprayed a coat of Future in preparation for decals and weathering. Here I hit another glitch. For some reason, I can no longer get Future to spray properly - whether over enamels or acrylics, flat or gloss, and no matter how I thin it - the stuff beads up on me. When dry, it looks like a dusty car that's been in a rain shower, with visible "rain spots" everywhere. Brushing it on full strength doesn't work for me either - the coat is thicker, and still beads. Is there some new formula of Future being produced now, or is it a diabolical plot against my sanity? Who is to say? After much frustration, I scrapped the idea of using Future, scrubbed the stuff off, and sprayed Floquil Crystal Cote instead.

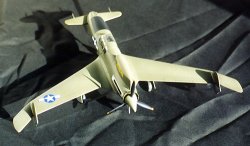
Before putting decals on, I mixed up a wash consisting of equal parts future, Tamiya Clear Green and Tamiya Smoke, added an equivalent volume of water and stirred it up thoroughly. This I used as a wash to paint the wheel wells with. The mixture was thin enough to collect along the edges of the ribs in each well, giving the illusion of shadows that I rather like. The effect would have been even better if there had been any cabling or hydraulic lines molded in those wells (and I was too lazy to scratch build any in).
 I've had problems in the past with the decals in Czech Models kits - they tend to bleed if one uses setting solutions, even mild ones. To head this off, I over-sprayed the sheet with MicroScale Liquid Decal Film. It sprays just fine undiluted, but note that you want to apply it in thin coats misted on instead of just blasting the target. This done, the decals went on without fuss, and settled right down with an application of MicroSol. The national insignia are smaller than what's depicted in the marking guide, so you can't line them up exactly as is shown there.

When the decals were dry, I wiped the model down with a damp rag to get rid of any residues, then sprayed Polly Scale clear flat over the entire model. Two coats were necessary to sufficiently tone down the gloss I'd sprayed earlier.
Final Assembly
 Now it was time to add all the things I might have broken off if they'd been put on earlier. Landing gear struts went in the required places. The instructions are vague on where everything goes *exactly*, and the photos I had weren't much help. I finally had to go online and see how other folks had done it. The gear doors were cut apart and emplaced with superglue, after more uncertainty. I found them to be too thick to allow everything to fit exactly as depicted in the instructions - or in photographs. I should have sanded them down, as they're rather overly thick for the scale as well, but I was tired of the whole thing and just wanting to finish up at this point. While I had the beast on it's back, I attached and painted the radio mast as well.
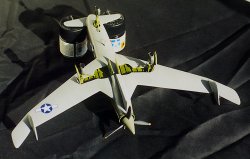
With the vinyl masks on (remember they came with the canopy masks?), sprayed the tires Gunze Sangyo Tire Black. When this had dried, I peeled off the masks ran a wash of flat black enamel into the rim area, and another green/black/future wash to define the spokes. When this had dried, a wash of flat light tan went on to define the tire treads. That dry, I dry-brushed Neutral Grey around the sides of the tires, the goal being to make them look like the ones on my truck. That done, they got a coat of clear flat ("Dead Flat", from the RustAll weathering set. The wheels were then sawed from their runner, the surface dressed up and painted black, and all three were glued into their respective positions.
Peeling back the canopy masks revealed another problem. Given the slow (nay, glacial) pace of my model building, I had thought the Future I had dipped the canopy in had had sufficient time to fully cure. That must not have been the case, as some of the stuff stuck to the masks, leaving the individual panes a mess. They looked like they had just had a bad run-in with a coarse sanding stick! Not sure what to do, I carefully brush-painted more Future over each pane, careful not to slop any over onto the framing. To my surprise, this worked well enough to repair the damage, though if you look closely, you can still see marks.
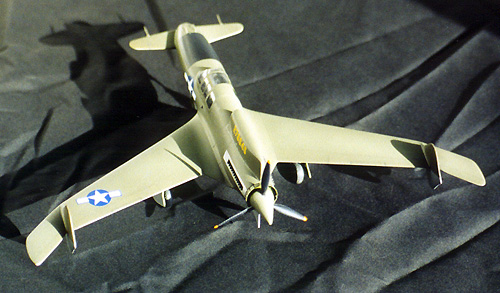
The next-to-final task was to replace the pitots/probes I'd snipped off earlier. I really should have drilled small holes for the replacements BEFORE I assembled everything - trying to do so at this point, I snapped one of the elevators clean off. Oops. The replacement pitots were made from 24 gauge hypodermic needles cut to length and smoothed with a file. After super-gluing these in place, I ran a slightly longer piece of steel wire inside them.
Once that was done, I cleaned up the propeller blades, painted them black with yellow tips, and placed them in the spinner. I'm not at all sure I got their orientation right, but there seemed to be only one way to get them to fit, so I assume I'm correct.
Done at last, I flipped the model over - and promptly snapped off the nose gear strut. I guess I hadn't created enough problems during assembly to satisfy the modeling gods.
Conclusions
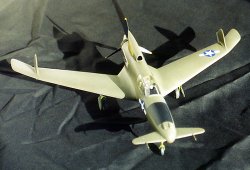
 Though not a shake-the-box kit, the Czech Models Ascender is not that difficult a build. Mine is by no means a contest contender - but that's really due to my clumsiness and not any flaws in the kit. No matter - I like the result, and it does look right purty up on the shelf.
Pros: Interesting subject, good cockpit, two vacuformed canopies Cons: Wings too thick, landing gear doors overscale, fit of wheel wells problematical, separate prop blades are a pain
-
Overall Rating: 8/10 - patience and attention to detail are rewarded with a unique, eye-catching model.
-
For intermediate and experienced builders.
-
MSRP: $25, available via Squadron Mail Order
Many and sincere thanks to Squadron Mail Order for providing the review copy.


