| Richard Marmo's SCALEWORLD |
After a brief hiatus due to missing a publication deadline, Scaleworld is back. The first order of business is some more housekeeping (Will it never end?). If any of you have been attempting to email me by clicking on the Richard Marmo's hyperlink above SCALEWORLD and wondering why it's been bouncing back to you, there's a perfectly good reason. It's the old address. My correct email address is tennexican@mindspring.com. Now on to other things.
As more modelers wind up living in apartments or townhomes or acquire new additions to the family noisy compressors make it difficult to do airbrushing. You wind up doing your spraying outdoors or in the garage or in your hobby room if no one else is home.
There are a number of solutions to the problem, but the various silent compressors are probably the best way to go. I've already reviewed the Automist 2000 and that's an excellent option if all you need is a light duty machine. Heavy duty requirements take something more durable and expensive. Large silent compressors and I'm talking about compressors that crank out anywhere from 85-115 psi, driving 2 to 6 airbrushes simultaneously in the process generally start at around $500 and go up. Sometimes way up. They'll also last 15-30 years, so the price really isn't unreasonable.
I recently started using a silent compressor in large part so I could hear the phone ring and it's been an experience. When this little puppy cuts in, you can barely hear the moderate level hum that it generates. I've held extended phone conversations while literally leaning directly over this compressor and had no problems hearing.
The compressor I'm talking about is the Sil-Air 50-10-S from Silentaire Technology, 711 Rutland Street, Houston, Texas 77007-1527. They don't have a website, but you can reach'em by phone at 713-864-8994 or 800-972-7668. E-Mail address is silentaire@silentaire.com.
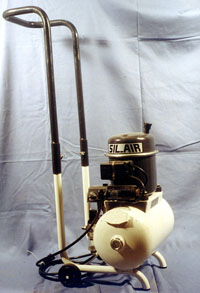 So what about the compressor? It sits on top of a 2.5 gallon tank that produces 2.15 CFM of free air. Operating pressure is anywhere from 84-114 PSI and it comes complete with a pressure regulator, moisture trap and filter. The entire rig is mounted on a wheeled frame for easy movement around your shop. Weight is a surprisingly low 55 lbs.
One reason why this compressor is so quiet is the fact that it's oil-lubricated (think refrigerator compressor). It's also equipped with a sight glass so you can check the oil level at a glance.
Now for the shock. I told you silent compressors aren't cheap and this one certainly isn't. MSRP is a substantial $1220. However, if you need a large, durable, silent compressor, it's worth the money. And if you're wondering how durable, they'll probably bury you before it wears out. Incidentally, Silentaire also offers a number of other silent compressors as low as $700. Give'em a call. You'll be glad you did.
Back in the old days of modelbuilding (Before Mattel), vacuforming was an esoteric art to the majority of us. Then the Mattel Vacuform landed under a few thousand Christmas trees and things changed overnight. Nor was it long before the small size of the Mattel working area started creating a demand for equipment that could handle larger patterns.
Manufacturers heard the cry and responded. Over the last three decades, there have been numerous vacuform designs produced for the serious modeler. Some you had to build, either partially or completely, while others were ready to go as soon as you opened the box. Most were designed to be powered by an ordinary vacuum cleaner a shop vac was even better and some had secondary, hand-powered pumps for even greater vacuum.
So much for vacuforming history. The latest vacuforms produced with the modeler in mind come from the shops of The Kingston Vacuum Works (http://www.warmplastic.com) .
 The vacuforms available from Kingston reach you ready to use. They're built from wood with a hand grip on one side to make carrying easy. Literally all you have to do is take it out of the box, plug in your vacuum cleaner or shop vac, set your pattern on the base and go to it. Well, that's an oversimplification. First, you have to have a pattern to vacuform. That's your job.
Kingston offers you a choice of four different sizes. The Kingston Micro is designed for 4" x 6" sheets of plastic, which is more than enough if all you're interested in is canopies or something similar. The Kingston Junior moves up to 6" x 8", which is enough to do an entire 1/72 fuselage half in many cases. Interested in 1/48 conversions and scratchbuilts? Then check out the one I have, The Kingston Mono that gives you a working area of 8" x 10". Finally, if your passion lies with ships, dirigibles or something of a similar size, The Zeppelin Master will allow you a humongous working area of 11" x 16". Prices range from $98 to $199 (my Kingston Mono was $159). Besides the vacuform, you also get full instructions and some tip sheets. And two large packages of plastic to experiment with, white styrene in two different thicknesses and one thickness of clear acetate butyrate.
Kingston provides you with two aluminum frames and four very strong office clamps. Trap the plastic between the frames and add a clamp on each of the four sides. It effectively controls the plastic preventing it from squirming out of it's restraints while it's heating, something that can't be said for Mattel's Vacuform unless you've found a source for perforated plastic.
Now for that all important question. How is the plastic heated? Kingston uses the same approach that virtually all vacuform manufacturers (other than Mattel) have used. It's recommended that you heat the plastic in the oven til it begins to sag, then drop it over the pattern and turn on your vacuum source. Sound awkward in the extreme, but it works quite well. Kingston has even gone so far as to build in three guides around one corner to facilitate positioning of the frame after the plastic is heated. Incidentally, with a little practice, you may find it desirable to turn the vacuum source on before removing the plastic from the oven.
Do you have to heat your plastic in an oven? Not at all. I used a standard heat gun with a round, large nozzle. Took a while to get the plastic to sag, but I got excellent results. I'd suggest that if you got your hands on a paint stripper gun with a platypus nozzle, the plastic would heat more evenly and quickly. It's just a matter of experimenting til you find what works best for you.
If you need greater working capacity than is available on your Mattel Vacuform or you've worn the poor thing out after 30 years The Kingston Vacuum Works probably has the perfect replacement for you.
Those of you who build 1/48th aircraft are going to think I've lost my mind some say I never had one but consider that variety is the spice of life. Besides, I happen to like science fiction.
That said, allow me to direct your attention to three new items from Wilco! Models, 2826 Russell Avenue, Abilene, Texas 79605, ph. 915-677-7009. Most of us think of spacecraft or other types of vehicles when asked to describe science fiction subjects. If pressed, we'll start naming specific characters everything from Captain Kirk to Predator and the Terminator. What most of us won't think of is exactly what Wilco! Models has produced full size (1/1) replicas of movie props. Anyone who likes to dress as a specific movie character will want these.
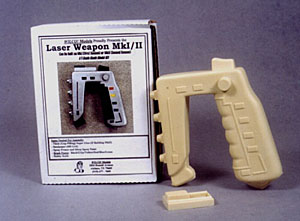 First up is the Laser Weapon MkI/II that appeared in Space:1999. There are only two parts to this kit and the second isn't used unless you want a weapon that can be switched from 'stun' to 'kill'.
Casting is excellent to the point that cleanup will be the absolute minimum. Instructions are clear and informative and everything is packaged in a very sturdy top flap box. Price is a most reasonable $25.00 plus $4.00 s&h.
Moving up the scale in complexity but not far we come to the Moonbase Alpha COMMLOCK. This was the communications and locking device that was worn on the belts of the main characters in the TV series Space:1999. Basically it looked like three stacked boxes with a cylinder centered at the bottom and one of the side faces mounting a nine-digit keypad (no zero for some reason).
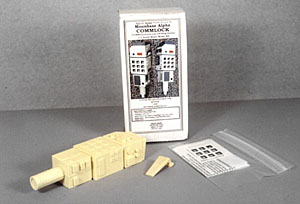 Wilco! Models has produced it as a high quality one-piece casting and a separate belt mount. Packaging is their familiar top flap box. Besides their thorough instructions, they've also included custom decals for the keypad and identification plate. If there's a weak point in this kit, it's the attachment point of the belt clip
and this is not the fault of Wilco! Models. Resin parts are normally joined with Cyanoacrylate (super glue). The problem is that CA has no shear strength
and that's exactly what you're dealing with if you try to clip the completed COMMLOCK on your belt. Shear stress. I would strongly recommend that you add some music wire pins to the belt clip installation. Do this and you can wear it wherever you want without worrying that it'll come loose.
Wilco! Models has produced it as a high quality one-piece casting and a separate belt mount. Packaging is their familiar top flap box. Besides their thorough instructions, they've also included custom decals for the keypad and identification plate. If there's a weak point in this kit, it's the attachment point of the belt clip
and this is not the fault of Wilco! Models. Resin parts are normally joined with Cyanoacrylate (super glue). The problem is that CA has no shear strength
and that's exactly what you're dealing with if you try to clip the completed COMMLOCK on your belt. Shear stress. I would strongly recommend that you add some music wire pins to the belt clip installation. Do this and you can wear it wherever you want without worrying that it'll come loose.
Other than that one little problem, the COMMLOCK is a superb effort. If you're an afficianado of Space:1999, this kit is a must. Price? $35.00 plus $4.00 s&h.
Last but absolutely not least is the piece de resistance, a 5-piece kit of The Sandman Pistol from the movie Logan's Run. This one is of particular interest to me since Logan's Run was filmed partly in Ft. Worth at the Water Gardens. Beyond that, I nearly got recruited as an extra in the movie, but the opportunity turned into a dying quail because of a very prominent surgical scar on my chest (many of the male characters are shirtless).
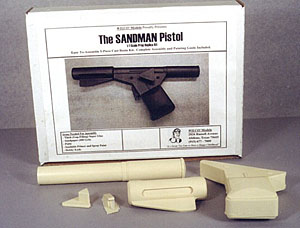 Anyhoo, the kit you get will be just as high quality, pressure cast in tan resin, as the previous two. And the packaging, once again, is a sturdy top flap box. Cleanup is minimal and pinholes, if any, will be nearly microscopic. If you're wondering why I said "the kit you get", it's because I had the chance to play with a test shot. There were several pinholes (and a couple of larger ones), along with a good size piece of flash. However, that's what test shots are for
to identify and correct any problems before you spend your hard earned money.
Anyhoo, the kit you get will be just as high quality, pressure cast in tan resin, as the previous two. And the packaging, once again, is a sturdy top flap box. Cleanup is minimal and pinholes, if any, will be nearly microscopic. If you're wondering why I said "the kit you get", it's because I had the chance to play with a test shot. There were several pinholes (and a couple of larger ones), along with a good size piece of flash. However, that's what test shots are for
to identify and correct any problems before you spend your hard earned money.
This is one of those kits that can be enhanced by the builder. Drilling out the barrel (bore) and the exhaust ports will elevate the replica to an entirely different level. But do keep one thing in mind. While drilling out the barrel is relatively easy, the exhaust ports are another thing entirely. Botch that job and you ruin a model, so think long and hard about whether or not you want to try it. (Note from Bill Lenches: If you try to drill out the exhaust ports and botch it, he'll be glad to get you a replacement cheap. He's all for experimentation.) You'll also need to pick up a Fox Glow Plug and mount it under the barrel in front of the fin if you want to replicate a functional prop gun. Wilco! Models makes a point of mentioning this in their instructions. Still, an excellent effort and reasonable price which is $35.00 plus $5.00 s&h.
See you next month.


![]()


