The Red Centaur: A simple conversion of the Emhar 1/72 Anatra AnasalBy Pedro Soares | 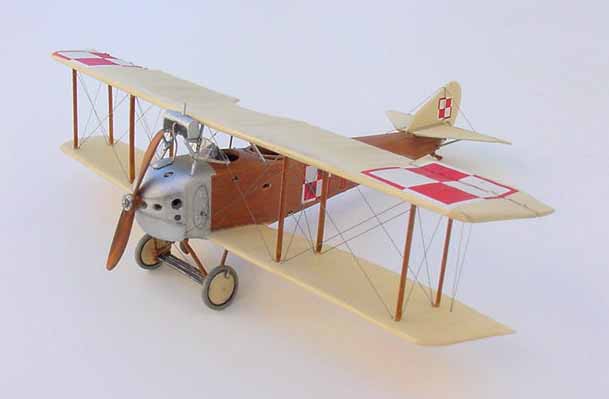 |
Introduction
The Anatra Anasal was the development of the earlier Anade aircraft, one of the designs that came out of the pen of French designer Elisée Alfred DesCamps who worked for the Anatra Aircraft Company, funded in 1913, in Odessa, by Artur Antonovitch Anatra. The similarities between the two aircraft are very apparent in photos of the types, the main differences between the two being the plywood covered fuselage of the Anasal, as opposed to the linen rear fuselage of the Anade and the different engines used: the 100 hp Gnome Monosoupape of the Anade was replaced by a more powerful 150 hp Salmson in the Anasal.
 The aircraft were used as trainers and as reconaissance and liasion aircraft (both armed and unarmed) and approximately 70 units were produced until the end of the war. Foreign users of the type, besides Poland, were Austria-Hungary and Czechoslovakia,where the type would see service until 1942, for ground instruction purposes, one of them still surviving today in Prague's Technological Museum.
The Discovery
Some years ago, when I started getting interested in WW1 modeling, I was in London and passed through Hannants on my way to the RAF museum. I noticed on the shelves a kit of an aircraft I had never heard about before, that met the pre-requisites I consider essential for a good modeling deal: it looked like being of WW1 vintage, was in the right scale and, most important of all, it was cheap.
The kit in question was the 1/72 Emhar Anatra Anasal, which I've since learned was also issued by Red Star and whose origins are somewhat obscure (I have even heard rumors that this was a Frog kit that was never issued).
The kit lay on my shelves untouched for more some seven years until a couple of months ago I decided its time had come.
The Kit
 The first impression you get when opening the box is one of 'chunkiness'. In fact the parts are all pretty thick and strong but, on the other hand, they are all very cleanly moulded with no traces of flash.

Quality of moulding aside, the kit has many dimensional inaccuracies: in fact the alleged scale of 1/72 is but a guide since it scales out at about between 1/61 and 1/66, according to the published dimensions in the FMP books quoted in the references section (both give slightly different dimensions for the same aircraft, though).
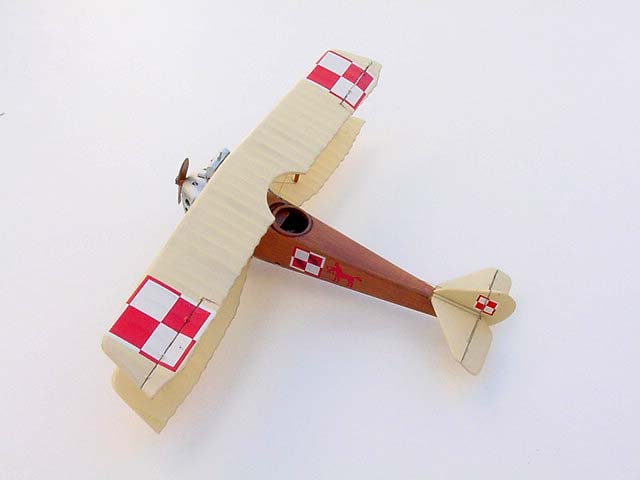
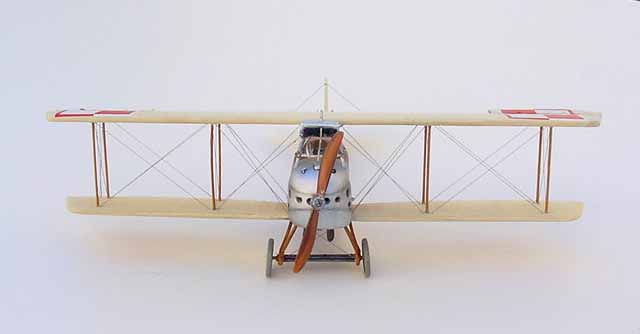
Still this is the only kit of this aircraft on the market and when finished I do believe it looks like an Anasal as you can see for yourself when comparing the model photos to the photos of the real thing that is hanging from the ceiling at the Prague's Technological Museum.
The first thing I did before starting the assembly was to try to thin the trailling edges of the wings which are a perfect example of the kit's chunkiness. This is very hard to do, the more so since the trailing edges are scalloped. Using wet and dry rolled over a brush handle I managed to achieve some thinning out but the result is far from perfect.
 As usual I started the construction by the cockpit and the only addition I did to the kit parts was to glue a side structure to the cockpit walls made of thin styrene strip. The original being of wooden construction meant that all the cockpit should be painted in wood shades and this I did using my wood replicating method which I will explain later in this article. In a feature in Scale Models International the author had chosen not to detail the front cockpit (that of the pilot) on the assumption that it would be hidden by the top wing and I followed his advice, though I think he wasn't completely right. Anyway, the only thing I would really change in the cockpits would be the seats, and then again I don't believe the seats on my model look that bad, after the addition of seat belts cut from masking tape.
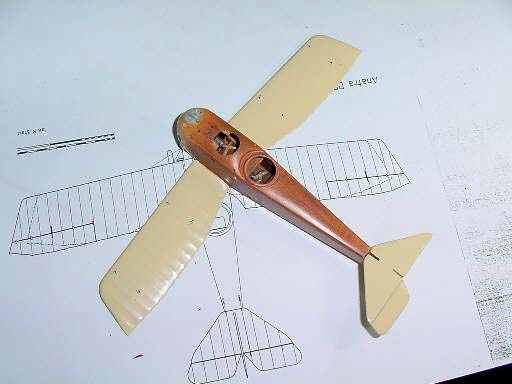
The fuselage was then closed and this follows a very unorthodox path since the fuselage is made out of three parts : two side/bottom and one top piece. This eliminates the problem of having to hide the main longitudinal central seam but in turns creates two side seams that were particularly difficult to deal with at the front end of the fuselage since the fit of the top part was pretty bad. Careful sanding (there is some louvre detail here that needs to be protected) and a touch of milliput did the trick, though.
The bottom wing and tailplane was then glued into place and I was ready to start painting.
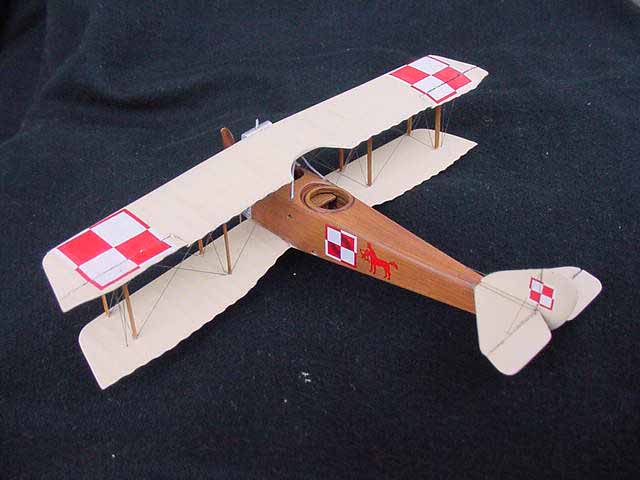
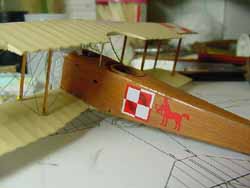 I was not very happy with the painting options given in the instruction sheet and I was contemplating doing a Russian aircraft in wood / silver / CDL finish as per a profile in the book "The Imperial Russian Air Service", published by FMP. Answering a question regarding painting schemes that I had put over the WW1 modeling list a friend from Poland answered that what I should do was one in a Polish scheme, and he directed me to a site full of very interesting information on which a picture and profile of the "Red Centaur" immediately grabbed my attention . From then on I knew what my Anasal would look like !

There was a problem though: the Polish aircraft had a different cowling/exhaust/radiator arrangement than that in the kit so I was in for some conversion work. Also there was the problem of the Polish markings to sort out, but this was meanwhile being taken care of by the Polish friends of the WW1 modeling list who were more than helpful and generous and for whose co-operation I'm greatly indebted.
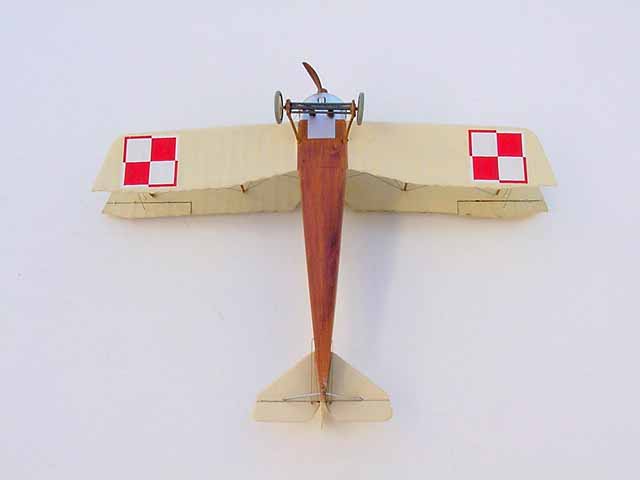
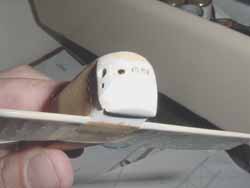 The picture I had of the "Red Centaur" showed a totally covered up engine and this I started to replicate by adding a back wall to the inside of the cowling and filling it all in with milliput that was later filed and sanded to shape. Having no plans of this closed cowling meant that a lot of it was guesswork but having the top cowl to act as guide I managed to make an acceptable lower cowling panel with a nice thin edge with a cutout for the Salmson rotary to cool.
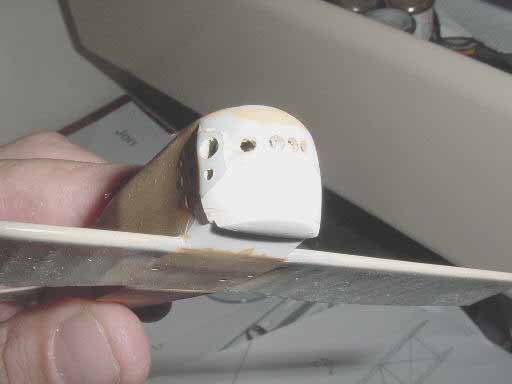
Some days after finishing the cowling I received a letter from Tomasz in Poland with the very nice decals he told me had been issued as part of a sheet commemorating the anniversary of the Polish Air Force and when I looked at the small three views with the locating plans for the decals I realised that there was no cutout in the cowling whatsoever and that it completely enclosed the engine. There was nothing to do: I took a deep breath, grabbed my milliput sticks and filled the hole in the cowling that I had so much trouble doing. File and wet and dry were again brought to work and while at it a shim of plastic was also faired into the area just behind the cowling in the bottom of the fuselage since if left untouched the fuselage would rise very steeply to the cowling with a very prominent step between the two that just didn't look right.
 The exhausts were also replicated out of styrene tubing bent after a quick pass over a naked flame, and glued into place.

At last, after much filling and sanding I had a finished cowling and I was finally able to spray the metal areas since the CDL and wood finish had already been taken care of, and this is my recipe for replicating the woodwork:
-
Spray the entire fuselage a base coat of Humbrol 63 (sand) or similar and let it dry for 24h
-
Get some watercolour pencils in different shades of brown
-
'Paint' over the base coat with the pencils. Don't be afraid to do it.
-
Paint hard as if you were colouring a drawing until you completely hide the base coat. Don't forget to use several shades
-
Buff the coloured surface hard with a cotton bud, or a piece of cotton. Be careful not to touch the surface with your fingers since sweat and grease in your hands can dilute the watercolour on the coloured surface.
-
Spray a couple of coats of matt varnish to seal the watercolour and Voila!
If during the process you're not happy with the results just wipe off the watercolour with a damp piece of tissue, and start all over again. I'm very happy with this technique since it is quite easy and the results are very satisfying.
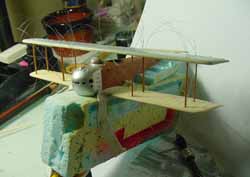
 All painting done, assembly was resumed and it was time to put the top wing on. The struts in the kit are another perfect example of how thick the more delicate parts are so contrail strut stock came to the rescue here and some new struts were fashioned in a matter of minutes. The kit's inverted V central strut was also discarded and a new one fashioned out of thin evergreen rod, though it would be just as easy to do it with streched sprue.
Rigging came next and this was a very standard procedure: invisible thread was run through the pre-drilled holes in the wings and secured in place with tiny drops of CA. A detailed explanation of how to do this was already given previous articles in IM both by me and other fellow modellers but if anyone wants to know more feel free to use my e-mail address.
The decals were then applied over surfaces pre-coated with Johnson's Klear floor wax and fixed in place with another coat of Klear.
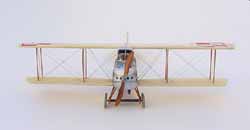
 I was getting near the end. All that was left was the undercarriage and this was also re-worked through thinning of the struts, what was accomplished by scrapping the kit parts with a blade and a couple of rubs with wet and dry. The kit wheels are moulded in clear as a way of trying to replicate wire wheels (you are meant to paint only the wires and the tyres) but fortunately the photos of the Red Centaur show it to have fully covered wheels, so I hunted my spares box for a pair that were painted and glued in place.
The elevator and rudder control cables were then applied, using the same method I used on the wings and the control horns on the control surfaces came from the nice PART PE set.
The last additions were the radiator (I used the kit part but made a new pipe with wire) and the propeller, that was painted in several shades of brown using the same principle that was described for the fuselage.
At last the model was complete and a final coat of semi-matt Humbrol varnish was applied. A touch here and there with watercolour pencils brought out some details and that was it.
 I would again like to express my gratitude to the Polish contingent of the WW1 modelling List: Gregorz for suggesting the scheme and pointing me to the site with the information and for asking Witold for his help in trying to find the decals, who then passed me on to Tomasz who, most generously, eventualy provided the decals that would be for me otherwise very difficult or even impossible to get. During the build up they were also always ready to answer my many questions and to provide encouragement. Thanks guys, I owe it to you all.
References:
-
The Imperial Russian Air Service, Durkota, Darcey, Kulikov, FMP 1995
-
Austro-Hungarian Army Aircraft of World War One, Grosz, Haddow, Schiemer, FMP 1993
-
Scale Models International, Vol 30, n. 354, Jan 99


![]()


