Eduard 1/48 Roland C.II ProfipackBy Ernest Thomas | 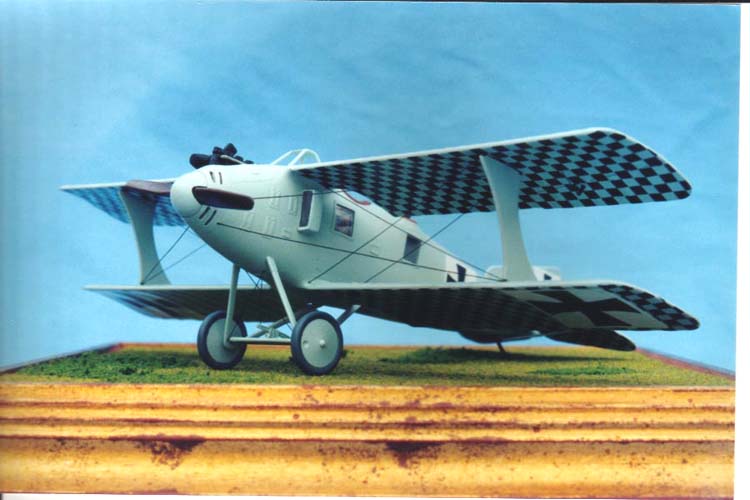 |
History
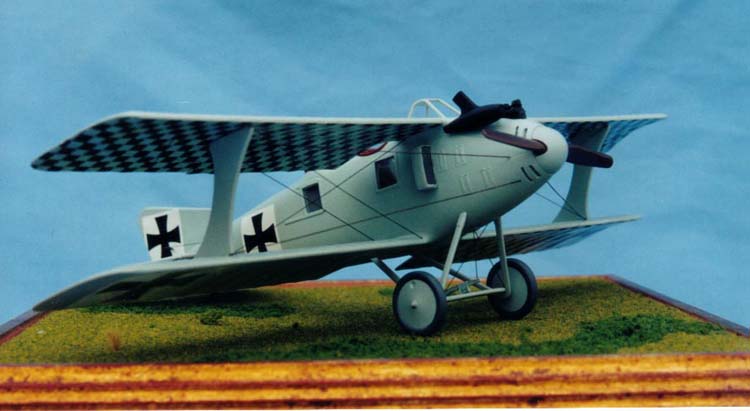
When the LFG Roland C.II first appeared on the front lines in March of 1916, it was a truly revolutionary design for its day, being unlike any other aircraft in the German or Allied arsenals. Its sleek, streamlined fuselage was a masterpiece of wood construction and was often compared to a fish, earning the design the nickname Walfisch (whale). The streamlined fuselage, coupled with the unique feature of attaching the top wings directly to the fuselage, gave the Walfisch an advantage in speed over similar German aircraft. The design also gave the pilot and observer an excellent field of view and fire. But only to the sides and above. The pilot's downward, and lower forward view were impaired by the location of the top wing, causing some handling problems, especially during landing. Throughout 1916, the Walfisch performed a variety of combat roles, including artillery spotting, escort missions, bombing raids and long rang reconnaissance. By the end of 1916, Allied and German aircraft had caught up with the Rolands performance and its usefulness as a combat aircraft began to wane. By July of 1917, the Roland was retired from front-line service. Due to its rugged design, the Walfisch found a home in the various flight schools until 1918.
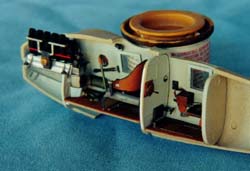
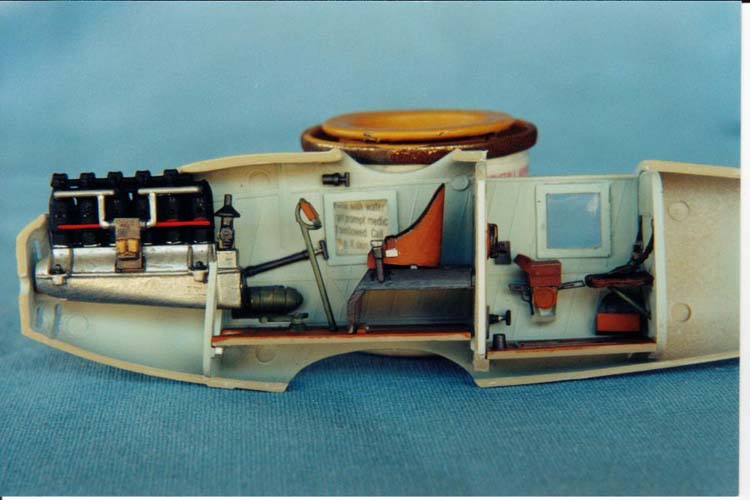
 The kit contains 75 well molded injected plastic parts, a fret of 53 photo-etch parts, instructions and decals for three different aircraft, and vinyl masks. Assembly is fairly straight forward but a little advanced notice will come in handy in a few areas. Like most airplane models, assembly starts in the cockpit. I started by painting the insides of the fuselage halves and bulkheads (parts A5 and C15) light blue (Humbrol 65), as indicated by photos in the Roland Datafile (#49). All sidewall details were then painted and installed as per the instruction sheet.
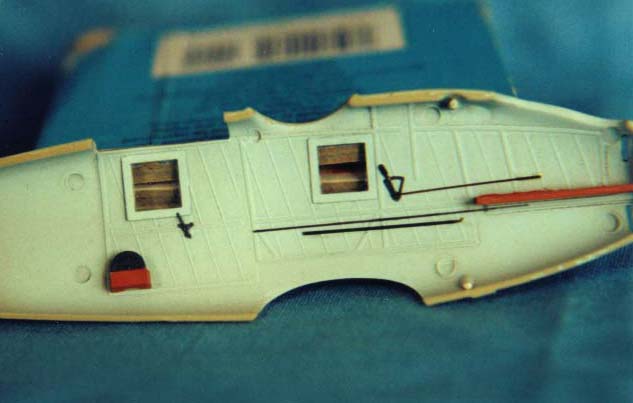
 The first little problem I ran into was installing the bulkheads. Eduard did a great job of molding the sidewall structure, even including the diagonal strips of wood that make up the outer fuselage shell. In between the fore and aft cockpits, the molded in detail breaks, leaving a smooth strip which is where I assumed the bulkhead(part A5) attached. However, when I installed part A5 in that smooth strip, and then dry fitted the fuselage halves, the bulkhead didn't connect with the other fuselage half, leaving a gap. I then tried fitting A5 directly on top of the piece of vertical structure just in front of the smooth strip. When I test fitted the fuselage halves again, the bulkhead did meet both halves, but the break in the sidewall detail was very visible.

 My fix was to add a piece of .01 styrene strip to the side edges of A5, which allowed me to install the bulkhead where I thought it should go while covering the break in detail. By installing the bulkhead A5 where I did, I left a 1mm space for the floor and engine mount to wiggle around in. For the sake of getting the engine in the correct position, I let the gap fall where the forward cockpit floor meets bulkhead A5. When the cockpits are complete and the fuselage halves are joined, this gap vanishes, getting buried in all the nice detail.
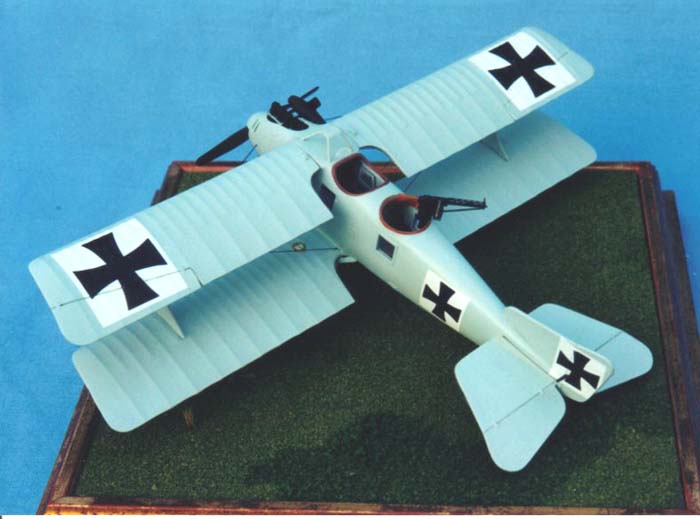
Eduard provides just about all the details found in the real aircraft, with the camera and antenna reel especially worth mentioning. The only things I added were some bits of wire to connect all the levers and switches and whatnots. To give the eyes of the viewer something to do, I used three different shades of brown for all the wood parts, as well as three different shade of steel/silver/metal.
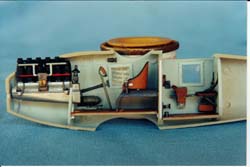 The engine came next. The only detail I added were some Grandtline bolts on the mounting points. In truth, this was a waste of time and Grandtline bolts because once the fuselage halves are assembled, they will never be seen again. While the quality level of Eduard matches, or surpasses just about any mainstream kits produced in the US or Japan, I find the in-line engines of their WWI models lacking. The in-line Mercedes and BMW engines had big, exposed valve springs on top of the cylinders. Eduard engines lack this feature. It is possible to purchase an after-market engine that has the springs, or scratch-build the valve springs by wrapping very fine brass wire around a piece of 1/64 (or smaller) music wire. However, being a review kit, I tried to limit myself to the parts in the box. This is not to say it's a bad engine, just lacking a very visible detail found on the real engine. (see photo)
 From here on out, it's all just a matter of following the instruction sheet. The scarf ring (B7) needed some filler and careful sanding, as did the bottom wing roots. But there were no other real problems or challenges. I will offer this advice; On the landing gear, it's a lot easier to put the claw brake (B25) on the spreader bar BEFORE the gear is assembled. Also, parts PE16 and PE17 should be attached to the landing gear struts before the wheels are put on. I tried to do it the other way around and eventually gave up, leaving my Roland without the proper landing gear rigging attach points.

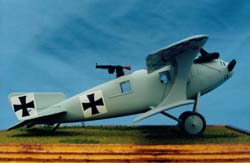
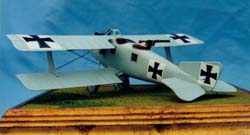 At this point, I've got a fuselage with tail feathers, a bottom wing and landing gear all in place. Now it's time for paint. I chose to model my Roland after the one depicted on the cover of the Windsock Datafile. Nothing is known about this particular machine, but there is an old photo of it inside the front cover. I first sprayed the entire model with Humbrol #65 light blue. After two or three thin coats of paint, with a few days to fully cure, I applied a coat of Future Floor polish, which gives the model a nice glossy surface for the decals to stick to, as well as a nice hard clear acrylic coating which protects the paint job from mishaps, such as accidentally picking the model up while having sticky paint on ones fingertips. Any such mishaps can, if done carefully, be wiped or sanded away with damaging the color coat.
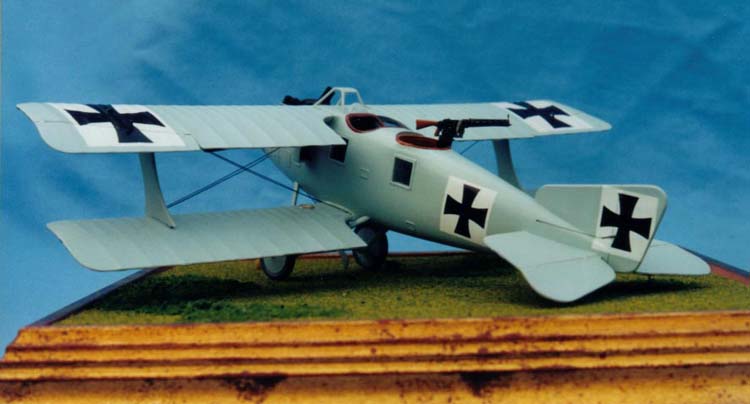
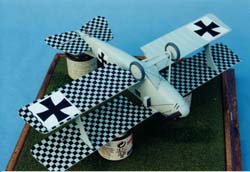 After the Future, I applied the decals using the kit supplied national marking and 1/8 inch black checkerboard decal film from Super Scale on the undersides of the flying surfaces. According to the Datafile, the colors of the checkerboard are unknown. I chose black checks over the light blue base color because I happened to have a sheet of black checkerboard film. Another possibility is the blue and white checked Bavarian national pattern. The photo also shows only three wing panels checked, but no reason is given for leaving one blank. The most likely reason would be that the wing panel had been damaged and replaced, or maybe the picture was taken before the checkerboarding was finished. Whatever the reason, it adds a bit of pizzazz to what would otherwise have been a boring color scheme. I did cut a square of white decal film to put under the national cross to prevent the checker pattern from showing through on the underside of the bottom wing. One the model was decaled, I applied a second coat of Future to protect the decals.

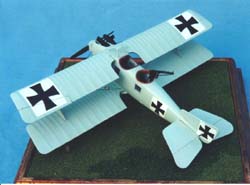 I then finished the model by attaching the top wing panels, wheels, prop and spinner, windscreen, Parabellum gun, and rigging wires. I use .006 brass rod dipped in Blacken-it for rigging 1/48 biplanes. The rod is made by Detail Associates and Blacken-It is commonly used by model railroaders to blacken brass track rails. And I attach the rigging with white glue, as it dries clear, it's flexible, it shrinks when it dries and most of all, any goof-ups can be cleaned with a damp brush. After the rigging is complete, the only thing left to do is sit at the bench making rnrnrnrnrnrnrn sounds while practicing touch-&-go's with my newly finished Roland model before putting it in the display case.
Conclusion
Eduard's 1/48 model of the Walfisch is a welcome addition to the ever growing number of high quality injected plastic WWI aircraft available today. It is the only injected 1/48 Roland available anywhere. In addition to the high quality of this kit, the design itself makes for a fairly simple build and an excellent candidate for that first WWI Biplane subject.


![]()


