56 Squadron SE5a: |  |
HISTORY
The first RFC Squadron fully equipped with the Royal Aircraft Factory's SE5/5a was the soon to be famous 56 Squadron. The SE5/5a was the best fighter the Royal Aircraft Factory produced during World War I. Together with the Sopwith Camel, it helped regain control of the air for the RFC/RAF during the last 18 months of the war. The SE5a had a maximum speed at sea level of 135 mph and a service ceiling of 20,000 feet. Its wing span was 26' 7", length 20' 11", height 9' 6" and had a wing area of 245.8 sq. feet. A total of 5,225 were built during the war, 77 SE5s and 5,148 SE5as.
56 Squadron turned out to be a rarity among RFC units, an elite squadron composed of 26 aces or future aces. Foremost among them were Albert Ball, James McCudden, Arthur Rhys Davids and Gerald Maxwell, a 27 victory ace.
This model started out as a project suggested by members of the World War I Modeling List: Gerald Maxwell was an ace in WWI and his brother, Michael Constable Maxwell, was an ace in World War II. Like his brother, Michael flew with 56 Squadron. During the Battle of Britain he flew a Hurricane and, later in the war, Mosquito night fighters. I had finished the Hurricane and decided it was time to complete the brotherly duo of 56 fighters.
 The SE5a I decided on for Maxwell was B502. This was the plane flown by Maxwell in which he achieved seven of his victories. It was one of 200 built by Vickers Ltd. under a contract dated 2/6/17. It was powered by a 200 horse power Hispano-Suiza engine and carried the usual SE5a armament of one over wing Lewis gun and one Vickers offset to port, synchronized to fire through the propeller at a 5 degree elevation. B502 was flown by other members of 56 Squadron and was used until it broke up on landing on 11/18/17, killing the pilot, Lt. J.P. Waters.

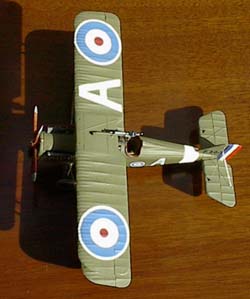
I chose to model it in the markings it wore shortly after the famous encounter with Werner Voss on 9/23/17. At the time of the fight with Voss, the Squadron marking was a dumbbell. Two days after the fight, the Squadron was ordered to change the marking to a white band around the rear of the fuselage. It is in this condition that various photos of B502, some taken by McCudden, show Maxwell taking off, in the cockpit or in front of the airplane. Using these photos as a guide, I began construction.
KIT CONSTRUCTION
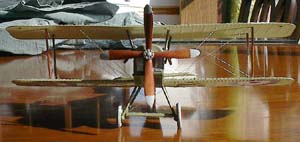 There are basically four injected kits in 1/48 scale of the SE5a: Lindberg, Monogram, SMER and Blue Max. I decided to use the Lindberg kit. Although it is titled an SE5, it is really the SE5a. The major difference is that the SE5 had a greenhouse like semi-canopy over the cockpit while the SE5a dispensed with it. One of the reasons I chose the Lindberg kit is that it does not have the troughs in the wings for strut attachment. The struts are thin and fit into the pre-drilled holes. The cabane struts, however, are a problem. The holes in the fuselage neatly surround the shaped ends of the cabane struts. Unfortunately, when so attached, they come nowhere near the holes in the top wing. I fiddled with them and finally got them to align properly, but the attachment points on the fuselage leave a little to be desired.

Before discussing construction, a word or two about rigging is required. While everyone has their own method, I stick pretty much with drilling holes and using very thin thread. In order to do this, you have to plan things out before you glue the fuselage together. I also found it helpful to delay attaching the radiator, front fuselage floor and engine until after the rigging is complete. These parts fit cleanly and leaving them off allows you room to get the rigging taut, gluing it inside the fuselage. For the wings, I drilled holes, ran the thread through the holes, filled the holes with superglue and sanded the area. The cockades on Maxwell's machine were on the outer portion of the wing, and pretty much cover up any marks left by sanding.
 The engine, engine cover, front fuselage floor and radiator all fit snugly, although there are visible lines. These attachment lines also appear on the real machine, so donít fill and sand them. The engine exhausts on Maxwell's Hisso were cut short and slightly bent away from the fuselage. Cutting the kit's exhausts and bending them a little after a small amount of heat is applied easily duplicates this. The front fuselage floor contains a circular bump in the middle of the cooling louvers that does not appear on the original, so I sanded it off.

The louvers still aren't exactly correct, but do give the impression desired. Similarly, while the radiator provided in the kit is not for the Hisso engine but for the Wolsley engine, it ends up looking all right.
Maxwell's SE5a had bulged cockpit sides in order to give him a little more room. While I didn't duplicate this, it shouldn't be a major problem to build up a layer of superglue or putty to represent the bulges near the cockpit coaming. The photos I looked at show no windscreen used on this machine. They also show that the ring sight usually attached to the port cabane was absent on this aircraft. There was a small 'skylight' on the top of the fuselage, just forward of the cockpit on the right side that allowed some daylight in to help lighten up the instrument panel. Drilling out a small, rectangular shaped hole and then filling the hole with gap filling superglue can duplicate this.
PAINT & DECALS
PC10 is one of those elusive colors that most WWI modelers have an opinion on. I chose Polly Scale US Olive Drab acrylic on this aircraft and applied it by airbrush. The PC10 covered the entire fuselage bottom on this aircraft, although that isn't necessarily true on all SE5as. I masked off the area around the fuselage band and sprayed it from a can of Tamiya white enamel and it covered without any real problem. The under surfaces of the wings and tailplane are in clear doped linen. To get this color, I used Polly Scale French Beige acrylic. I like this better than their version of CDL since it has less of a green tint to it. An alternative would be to use ModelMasters Modern Desert Sand. In looking at the photos, I decided that the PC10 did not extend to the underneath of the wings like on some SE5as. The engine was done in silver and then given a wash of black. The exhausts were done in ModelMasters Rust enamel. The wheels were ModelMasters Dark Gull Gray.
 Decals were from Americal/Gryphon's 56 Squadron sheet, # 145, Non-Royal Aircraft Factory built aircraft. I didn't use the white decal band since I chose to paint it instead. The wheel covers were provided on the sheet along with a lot of other decals for wheels, lifting arrows, etc. This sheet, combined with #144, Royal Aircraft Factory built aircraft, combine to allow the modeler to build almost any 56 Squadron SE5 or SE5a. I try to avoid using any decal solvents with Americals since they don't usually need them and have a tendency to get a lot of air bubbles when solvents are used. When in doubt, use a little Future floor polish.

CONCLUSION
While not accurate in every respect, the Lindberg kit can be built into a nice looking SE5a. The decal sheet from Americal/Gryphon is great and comes with a booklet laying out the markings for over 60 different aircraft from 56 Squadron. The Airwaves interior set is pretty stiff and not nearly as easy to use as the current interior that Eduard is putting out with its World War I airplanes. Hopefully, they will decide to do the SE5/5a in the near future. Until then, look for the Lindberg kit.
SOURCES:
-
J.M. Bruce, RAF SE5a Datafile Special, Albatros Publications, 1993, ISBN 0 948414-47-2
-
Alex Revell, High in the Empty Blue, Flying Machines Press, 1995, ISBN 0-9637110-3-2
-
Alex Revell, The Vivid Air, William Kimber & Co., Ltd., 1978, ISBN 07183-0385-7
-
Ray Sturdivant & Gordon Page, The SE5 File, Air Britain, Ltd., 1996, ISBN 0-85130-246-7


![]()


