A French Bearcat in Indo-China: Building Sword's | 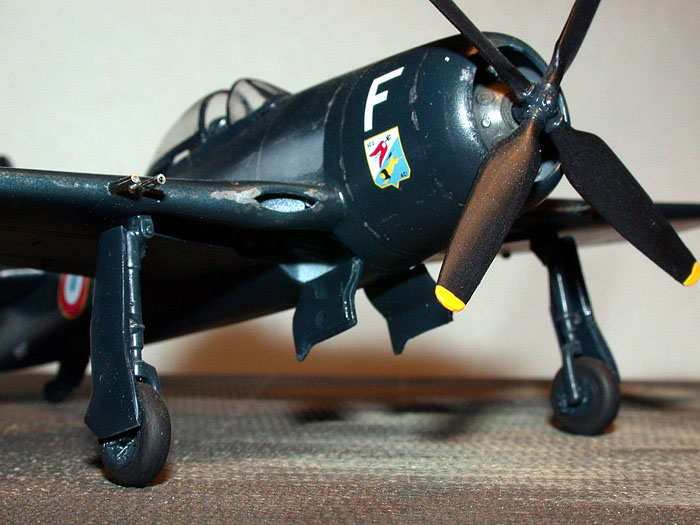 |
History
After the Second World War the United States found itself in an interesting position regarding Indo-China. On one side there was a strong anti-colonial view, pressing for countries like France to give up their Far East colonies. This held sway with the powers that be until 1949 when mainland China became communist. At this time the anti-colonial viewpoint took second seat to the anti-communist movement, and the US took an active part in supporting France and their battle in Vietnam. A big area of 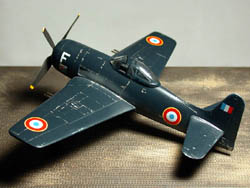 support was in providing equipment, mainly aircraft, to the newly rebuilt Armée de l'Air.
The challenges of fighting a conflict in Indo-China made the requests of the Armée de l'Air a bit different than what might be expected. While jet aircraft were quickly becoming popular, the rugged territory and lack of easily accessible spares quickly ruled them out. Another problem was the very short runways found in Vietnam. Early jets generally required lots of runway, another strike against them. So France started looking for easily maintained aircraft that had excellent short-field capabilities. This led to the selection of naval aircraft, as they fit the bill perfectly. Initially ex-US Navy Hellcats were provided, soon to be followed by the Grumman F8F Bearcat.
 The Bearcat proved to be an almost perfect airframe for the counter-insurgency role. It did have some problems, though. The first problem that became apparent was the high-pressure tires used. While ideal for carrier usage, the rough fields in Indo-China tore the tires up, resulting in many blowouts during takeoff, landing and taxiing. The second problem was the lack of dust filters for the engine. This led to an increase in oil consumption and more work for the ground crews and no suitable fix was ever realized. The final problem dealt with the pilots themselves. The Bearcat cockpit had no air conditioning, which wasn't much of a problem over the sea at altitude, but over Indo-China at low altitude it was not uncommon for the cockpit to heat up to 60° C.

In spite of these problems the Bearcat found its way into a total of eight Groupes de 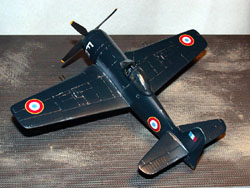 Chasse during the war in Indo-China. These were 1/6 Corse, 3/6 Roussillon, 1/22 Saintonge, 2/8 Languedoc, 1/9 Limousin, 2/21 Auvergne, 1/21 Artois, and Escadrille de Reconnaissance d'Outre Mer 80. Out of these units 1/22 Saintonge suffered the highest losses during its 1951-1956 tour of duty, losing 18 planes and 19 pilots while flying over 15,000 hours. All together the French Bearcat units flew over 60,000 missions, resulting in over 40 pilots being killed and over 50 aircraft destroyed.
The Bearcats used a variety of weaponry during the conflict, mostly being American 500lb and 1000lb bombs. Some French 440lb bombs were also used, but these 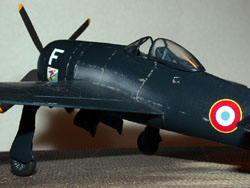 weren't popular with the pilots as they were unstable and likely to explode at the wrong time. In fact, one pilot from 1/21 was killed when he aborted a take-off and suffered a hard landing, exploding the bomb. Rockets were also used, being especially useful against rail traffic, and the Bearcat's 20mm cannons were also extensively used in the strafing role. Other weaponry included napalm and cluster bombs, but these weren't very common.
The Bearcats had three main targets during their career in Indo-China. The goal was to cause the Viet Minh infrastructure to crumble and lose its influence on the people of Vietnam. To do this the Bearcats were tasked with three main target types. The primary 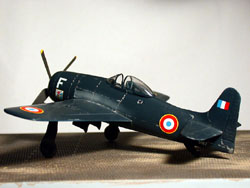 target was weapons & ammunition workshops that were scattered all around the countryside. The secondary target was foodstocks, a challenging target as the pilots were tasked with destroying only military foodstocks, not civilian ones. Another aspect of this was to target water buffaloes, both a food source and a way of transport through the rice paddies. The tertiary target was road, rail and river traffic. Like that of the targeting foodstocks, the primary challenge here was one of identification.
Operation Castor marked the last big battle by French forces and basically spelled the end of French involvement in Indo-China. The basic plan was to provide a rich target for the Viet Minh and draw their forces out for a decisive battle. The French selected Dien Bien Phu as their place to hold this decisive battle, and from the beginning the plan was destined to fail for the French. Dien Bien Phu was in a valley and as soon as General Giap found out about the French occupation he quickly accumulated his forces, placing five divisions with artillery in the hills surrounding Dien Bien Phu. From this high ground Giap shelled the French, damaging the airfield and destroying many aircraft, including six Bearcats. With the runway out of action, the only supplies 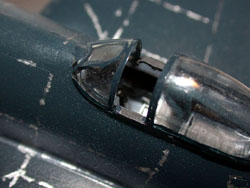 could be airdropped, and those planes suffered greatly from Giap's AAA placed around the valley. On May 7, 1954 the last French position was overrun, effectively ending the conflict.
The Bearcats didn't stop there, though, as most of the remaining Bearcats were turned over to the fledgling South Vietnamese Air Force, where they continued to fly for many years. In fact, when US forces went into Southeast Asia in the 1960s, there were a few Bearcats still in flying condition (although barely).
The Kit
 When Sword came out with their 1/72 Bearcat I was very impressed with the kit. While the old Monogram kit wasn't too bad, it fell down in a couple areas, namely the cockpit and the wheel wells. Additionally, the Monogram kit could only be built as the tall-tailed final F8F-2 variant. Sword's kit took care of all of these issues with an exquisite resin cockpit, a detailed resin wheel well insert, and two separate fuselages to cover all the Bearcat variants.

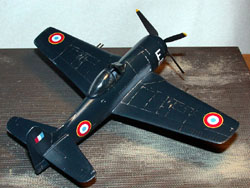
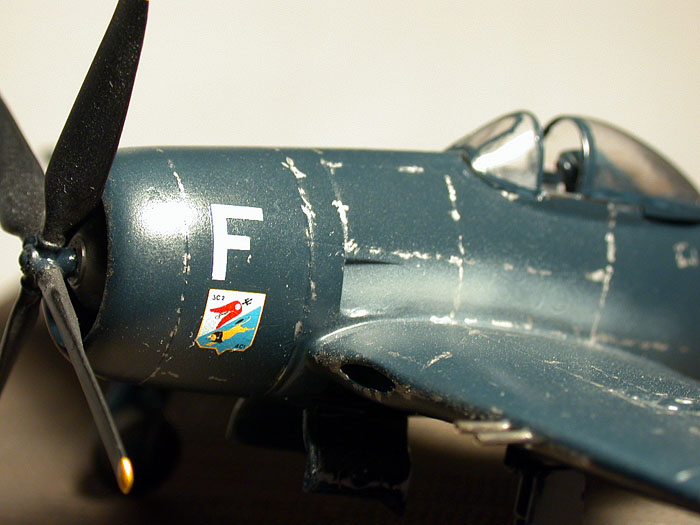
Since Sword went to all the trouble of providing a short-tailed fuselage I decided on that option for my build. I also wanted to depict an aircraft that was used and abused, so I naturally moved to the Southeast Asian operators. Since France was the only one to use the Bearcat in combat operations, and since the decals were included in the kit, my choice was made. With that knowledge under my belt, I started the build.
 The Beginnings: Resin Innards
The Sword kit comes with plenty of resin, covering the cockpit, engine and wheel wells. All of these pieces were removed from their rather large pour gates. The engine and wheel well insert separated easily, but for some reason the one-piece cockpit tub decided to be cantakerous. While separating it from the backing the brittle nature of resin reared its ugly head and I cracked the tub along one side. After much teeth gnashing and usage of proper modeling vocabulary, I carefully glued the broken pieces together. This left a noticable seam that would have been a tough one to fill, but during the test fit phase I discovered something that eased my worries greatly: 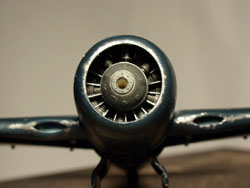 once the fuselage is together and the canopy in place, even in the open position you're not going to see anything. I could have left the broken part off and no one would have been the wiser. Breathing a sigh of relief, I painted the tub up with black, gray and silver, and did a bit of chipping and weathering. I didn't do much here because of the lack of visibility, mainly just painted areas in varying levels of contrast.
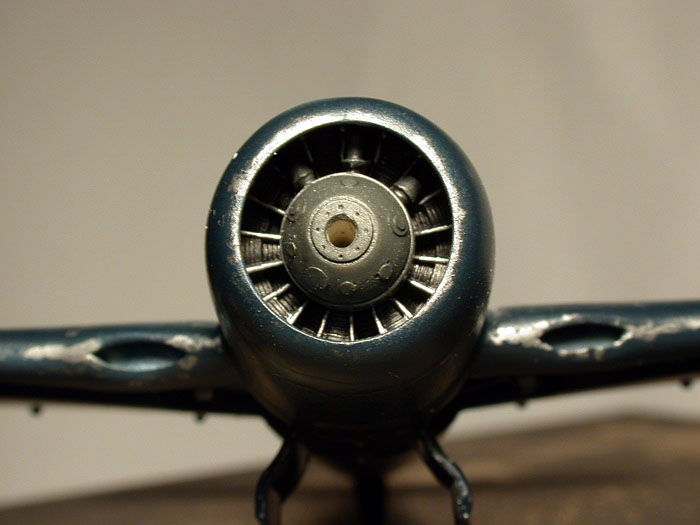
With that done I turned to the wheel wells & engine. The engine painted up nicely, but like the cockpit, the close-fitting cowling and large propeller hides much of this. That, plus the fact that the insides of the cowling are dark sea blue about the only thing left visible is the engine gray crankcase. The wheel wells are another story. While sea blue as well, they are a very visible part of the Bearcat, being deep and featuring a very prominent ductwork from 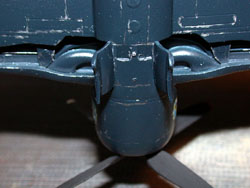 each wing root. This piece fit well into the lower wing piece, but during test fitting I discovered that the bottom of the cockpit tub ran against the top of the wheel well insert, keeping the wing from fitting properly. Out came the coarse files and respiration mask. After much filing and test fitting I got everything to fit just right. On the positive side, I now had a much stronger wing join as I could glue the wheel well insert to the cockpit tub in addition to the leading and trailing edges of the wing.

Plastic Time: Fuselage & Wings
With everything looking good at the dryfitting stage, I committed myself and attached the resin pieces to the fuselage with cyanoacrylate. Once they were secure in one fuselage half I did a final test fit and after sanding down the side of the cockpit tub a bit, I joined the fuselage halves. The main problem area with the fuselage  comes at the tail end, where Sword decided not to split the vertical fin between the two sides. Instead, it's one piece on one side and only at the base is it split. Of course, this left a rather large step, so some grinding down on the inside, followed by filler on the outside helped blend this area in. In fact, this area is just about the only area that needed any significant amount of filler. In retrospect I probably could have avoided all filler use by more dryfitting and sanding/filing on the inside, so I'll remember that for my next Bearcat build.
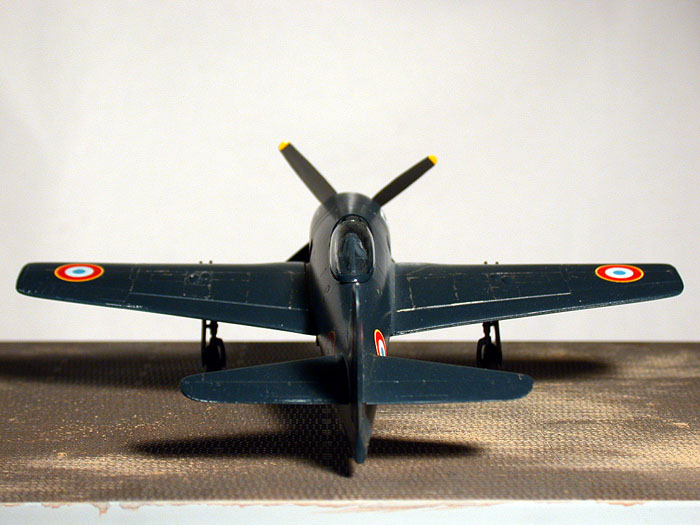
With the fuselage together and things starting to look like a Bearcat, I carefully fit the lower wing in place. Of course, I didn't get the cockpit tub in the fuselage exactly right, so I had to sand a bit more off to fit it with the wheel well insert, and once that was done I attached the lower wing. A touch of filler at the front and rear on the fuselage and I was ready to add the top wings. A bit of sanding was needed at the  wing root edge to get a smooth fit, but other than that the fit was very good. I left out the plastic pieces for the wing guns as I was planning on replacing those with steel tubing later on. As long as things were going this smoothly I attached the stabilizers, drilling small pilot holes and using a piece of brass wire to pin them in place.
Painting my Dimunitive Kittie
With the main assemblies together it was starting to look like a Bearcat and thoughts went to putting some color on this little guy. Being a Bearcat I had an incredible number of choices for color. I could paint it sea blue, or sea blue, and I even came across a reference that said that some were painted in sea blue! After much deliberation I decided on sea blue. I stuck a stick in the hole for the propeller, masked off the engine & cockpit, and sprayed everything liberally with Testors Acryl Gloss Sea Blue. This was my first try at spraying the new Acryl gloss paints, and 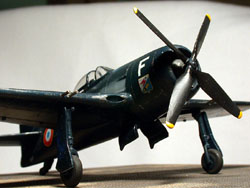 while I like their flats, I wasn't too pleased with the gloss. I couldn't get a smooth finish, and my attempts at polishing the paint out resulted in flakes coming off instead of smoothing out the finish.

After some grumbling and cursing I got things looking halfway decent, so I sprayed on some Future prepatory to decal work. Of course, the Future didn't go down smoothly either, so at this point I decided to just step back for a while. Six months later, I returned to the Bearcat. I took some polishing paper and lightly went over the Future and it smoothed out pretty well, so I decided to move to the decalling stage.
 Sticker Shock
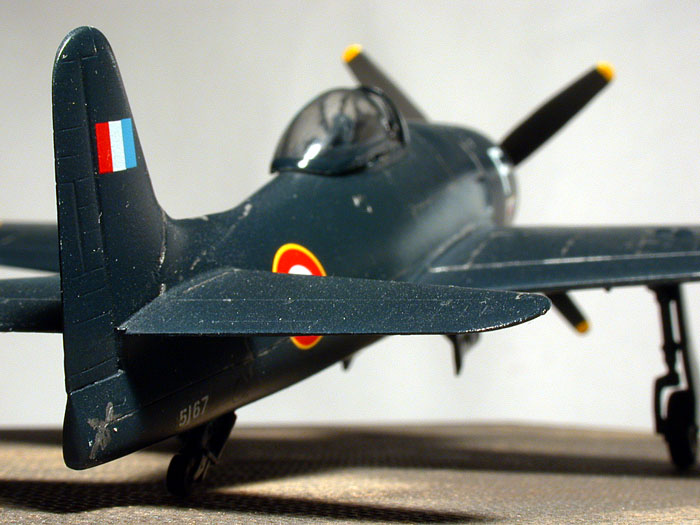
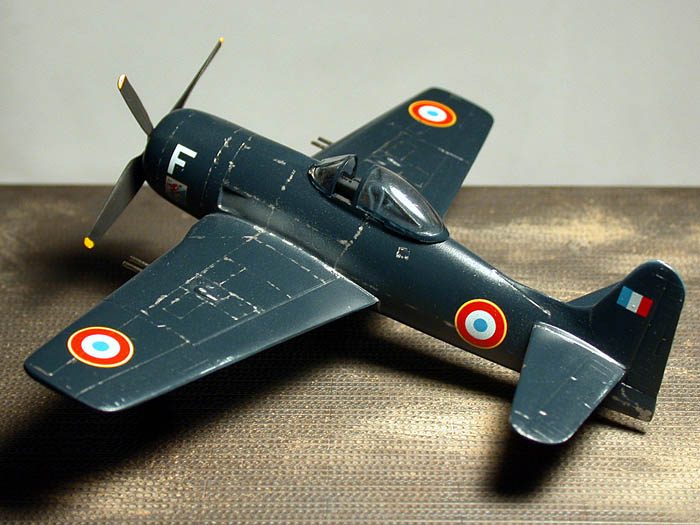
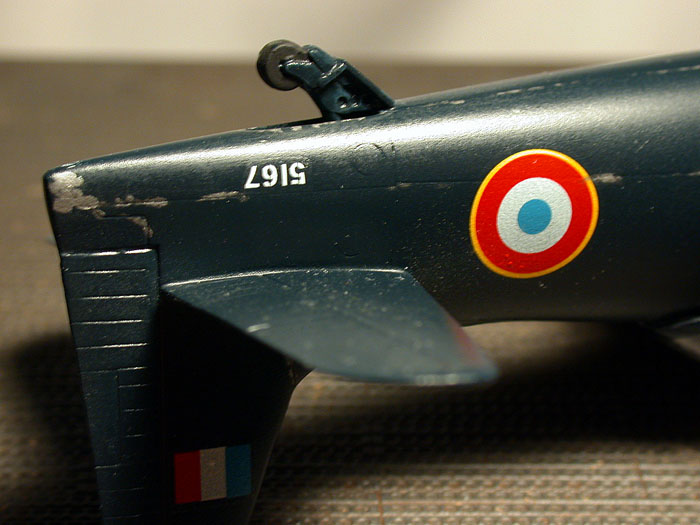
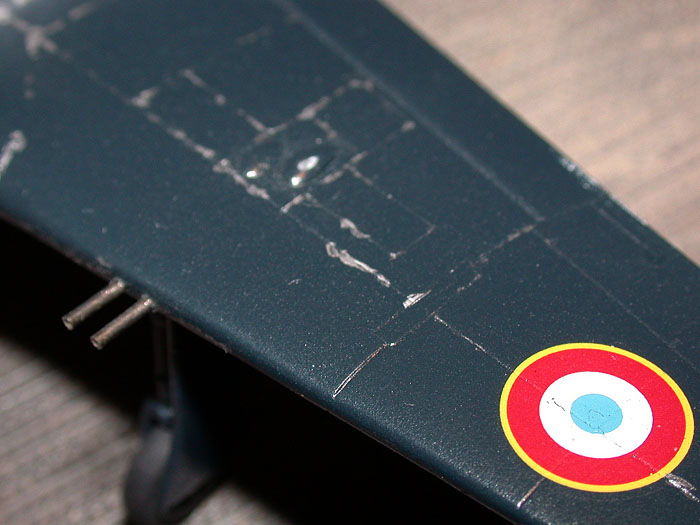
After the troubles with the painting, I looked at the decalling with trepidation. Knowing the difficulties I've had with Czech decals in the past, I knew that I had best take my time here. Surprisingly, though, none of the past problems showed up here and the decals went on incredibly well. Another area of concern was the opacity of the decals. Going down over that dark blue finish I was worried that the whites would end up being translucent and show the blue through. Unfortunately this proved to be the case, but it's not too bad so I didn't worry about it. If I were to do another one I'd probably cut out some white discs from stock and put those down underneath the roundels. The nose letter and badge didn't seem to have this opacity problem, interestingly.
 Chipping the Paint
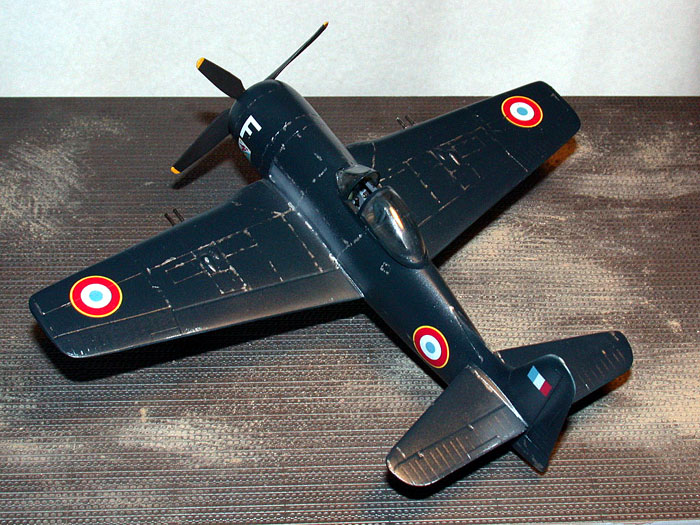
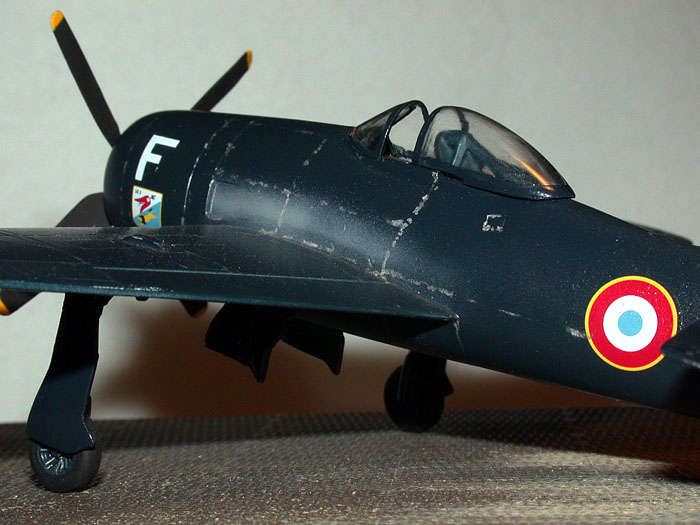
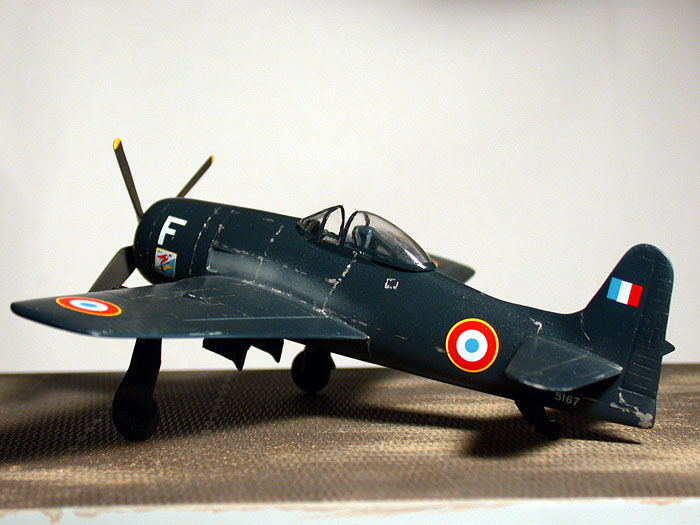
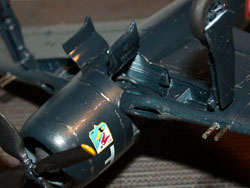
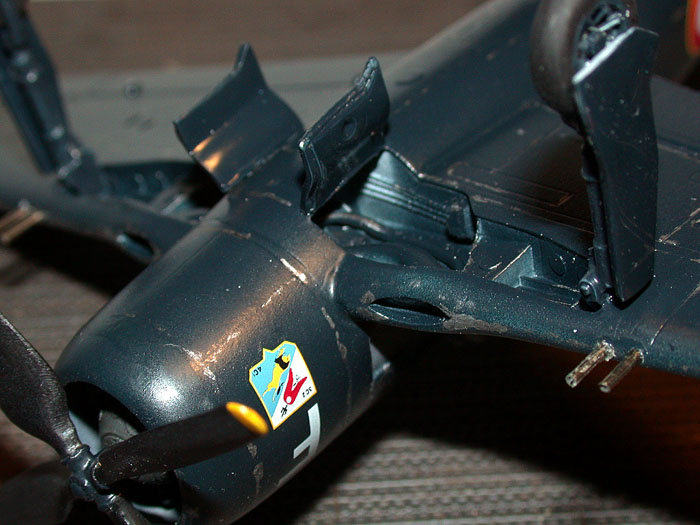
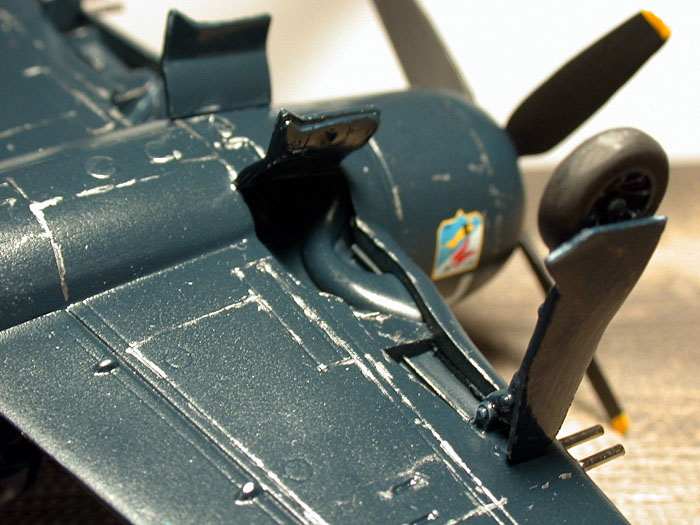
Now that the decalling woes were over, I sprayed on another coat of Future and turned to fixing some of my finishing errors with weathering. With the French using these planes as ground attack platforms from inland airfields, they weren't kept in the cleanest of shape, and the paint quickly chipped off. So out came the paint chipping tools. I decided to try something new on this model and used a silver watercolor pencil to draw on paint chips. I've seen the results from other people using these pencils and while their results really look good, mine suffered miserably. I haven't given up on the technique, though, and I'll definitely be trying it again after talking to some of the people who use them. Meanwhile, I broke out the traditional Testors Metalizers and my fine-tipped brush and chipped away. One important point: don't get carried away here. Not only is it too easy to do too much, it's also easy to get overenthusiastic and the next thing you know you've chipped fabric surfaces. Luckily I did this on the underside where it's not as noticable and I wasn't as worried about my touchup work.
 Final Assemblies
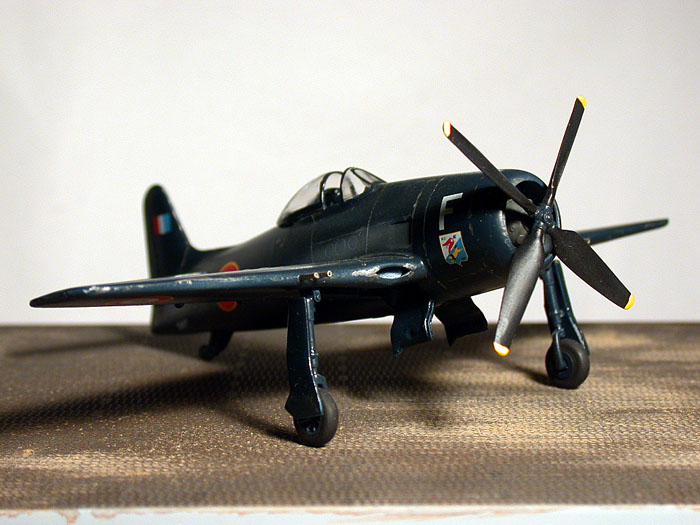
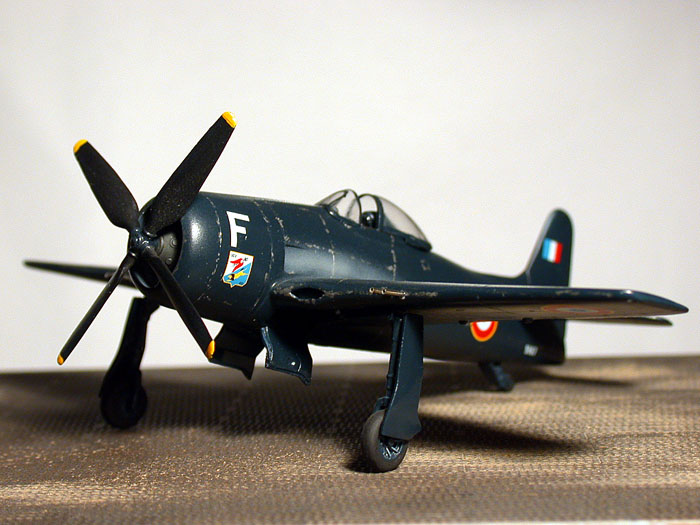
Now that the 'cat was looking worn it was time to stick it on its stalks. The wide stance of the tall landing gear really gives the Bearcat a distinctive look, and the landing gear pieces in the Sword kit are nicely done. I trimmed them up and, like everything else in this kit, I sprayed them sea blue. Since the wheel wells were resin I had to use CA to attach the gear struts. The wheel doors add a bit of structural strength as well, and there's supposed to be a couple actuating arms leading from the strut to the wheel well. And these struts are somewhere on my workbench, I just know it. The main wheels are well done and after painting them sea blue I painted the tires with lightened black. The tailwheel assembly also received the sea blue/lightened black treatment, and after a bit of gluing work my Bearcat was sitting on all three.
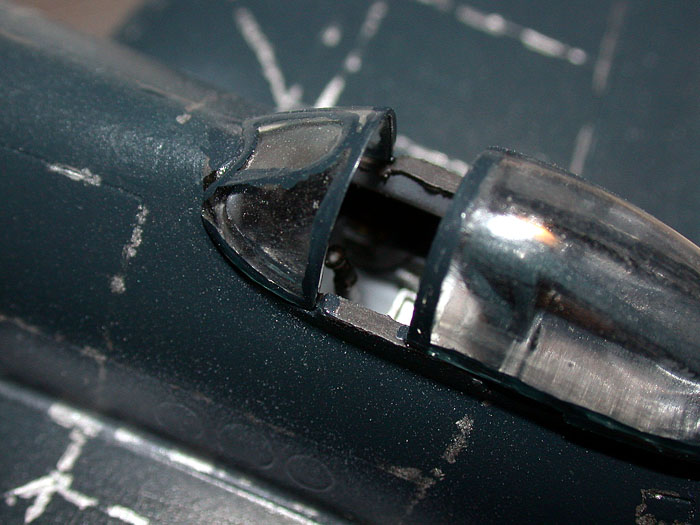
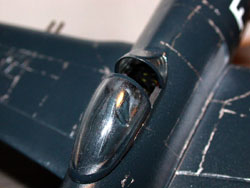
 Attention to the wings was next, and I opened up the holes for the wing cannons a bit and fed in some steel tubing for the gun barrels. The propeller was painted with lightened black blades, sea blue hub and yellow tips. A short shaft was fitted to the propeller to fit into the corresponding hole in the engine. The final step was to fit the canopy. In retrospect I probably should have fit the windscreen and faired that in a bit better before the initial painting, as it doesn't fit very well. The canopy hood was attached in the open position and my worries about the cockpit being visible were definitely misplaced. I could barely see the seat, much less the actual consoles & instrument panel!
 Final Notes
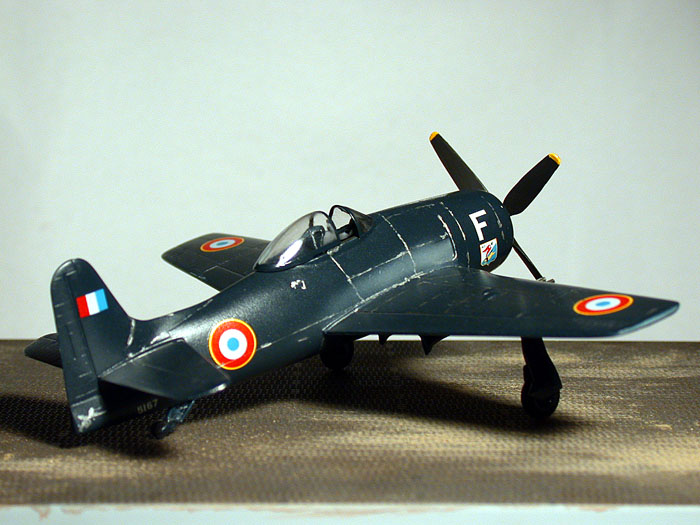
My Bearcat was finally finished and on the whole I am quite pleased with the results. The majority of the problems encountered were of my own doing and when I build a second one I'll definitely take more time with the dryfitting stage and do more work with getting the paint perfect. Then again, I'm tempted to do a Thai Bearcat in natural metal, so I'll have my work cut out for me in getting everything absolutely perfect before painting. The French example is quite colorful for a Bearcat and the interesting history of the type in Indochina makes for a nice piece of history on my shelf.
 ..........
References
There's not as much out there on the Bearcat, and even less on the French operations in Indo-China. There is a bit here and there, though, and if you're interested in reading more I can recommend the following:
Air International, Volume 44, Number 6, June 1993. French Bearcats in Indo-China 1951-1954 by Jean Christophe Manevy.
Air Enthusiast, Number 70, July/August 1997. Indo-Chinese Fighting 'Cats by Albert Grandolini.
Aircraft in Profile, Volume 5, Doubleday & Company, Inc., 1970. #107: The Grumman F8F Bearcat by Hal Andrews.


![]()


