• Menu
  • Home
  • Columns
    • Industry News
    • Editorials
    • Now and Then
  • Features
    • Armor
    • Automotive
    • Aviation
    • Figures
    • Ships
    • Space/Sci Fi
    • Special Reports
  • How To
    • Construction
    • Detailing
    • Painting
    • Finishing
  • First Looks
    • Armor
    • Automotive
    • Aviation
    • Figures
    • Ships
    • Space/Sci Fi
  • New Releases
    • Armor
    • Automotive
    • Aviation
    • Figures
    • Ships
    • Space/Sci Fi
    • Book Reviews
    • Tools
  • Gallery
    • Armor
    • Automotive
    • Aviation
    • Figures
    • Ships
    • Space & Sci Fi
    • Drawings
    • References
Internet Modeler : Features: Aviation RSS News Feed

Building the 1/72 Revell/ESCI SE5a with the Roseparts Resin Upgrade Set

By Steve Perry

Introduction

The SE5a is a very well known aircraft and its illustrious history has been well documented, so I will spare you my rehash of that story and proceed to describe my build of a 1/72 scale SE5a using the new Rosemont resin conversion kit.

When Bob contacted me about doing the article, I shot over to the Rosemont web page and looked at the photo Barry has provided. The image had barely loaded when I minimized the browser and fired an e-mail back to Bob with a big YES!

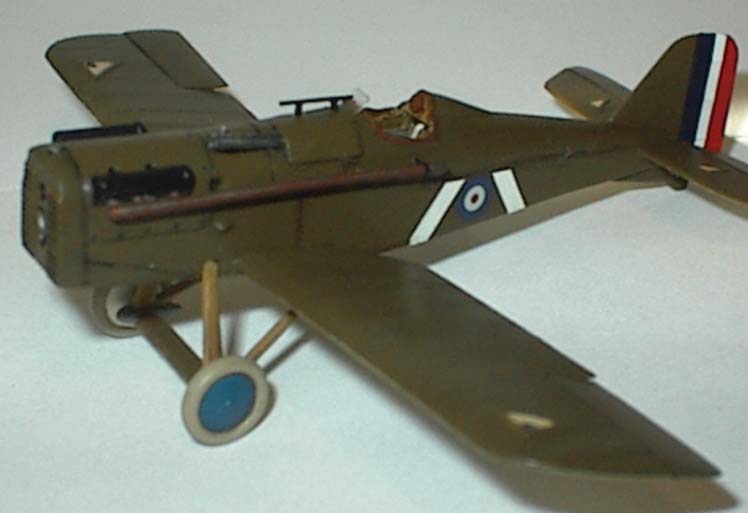
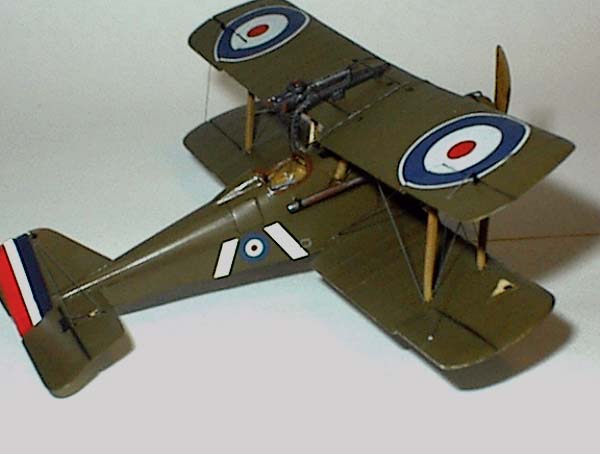
My donor SE5a was a mix of broken parts from an Esci and a Revell kit. These were salvaged from a bunch of broken up kits, but that is another story kids. I decided to do one of Joe Boudwin's planes. Boudwin was an American who flew with Sholto Douglas' 84 Squadron of the RFC and later with the 45th Aero Squadron of the USAAS. He flew an SE5a in both outfits. Boudwin's account of his experiences can be found in the book Child Yank Over the Rainbow Division, 1918.

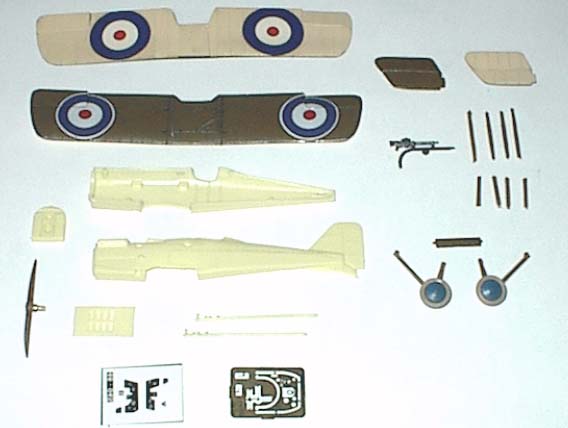
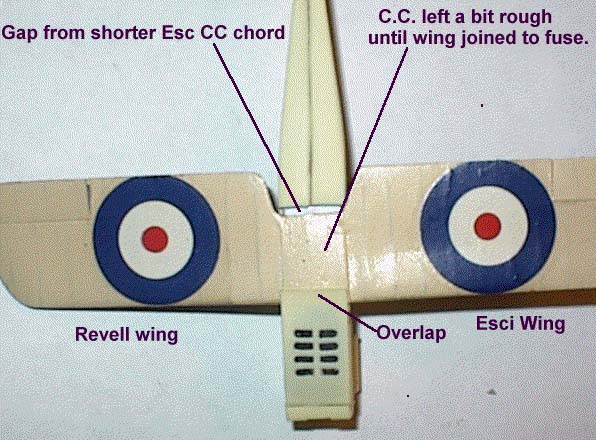
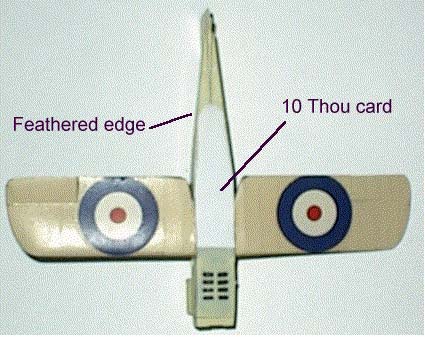
While waiting for the Rosemont resin kit to arrive, I began to fix up the wings. The lower one was made up of one panel from the Revell kit and the other from the Esci joined at the center. I carefully sanded down the rib and fabric texture detail and noticed that the two panels had different ailerons. Longer span & thinner chord and shorter span & wider chord. The upper wing was whole and had the short/wide ailerons. No problem I simply filled the engraved separation line of the offending aileron with CA, sanded it down, re-scribed and patted my self on the back for being so alert.

I went on to re-scribe rib tapes at each station (two lines per rib). Filled in the strut trenches with plastic & CA, painted the lower surface CDL, drew watercolor pencil lines with a straight edge on each lower station, misted with more CDL paint to almost cover the pencil marks, painted the top PC-10 and cut out and repositioned the ailerons.

I was sure pleased with myself until I noticed that one lower wing tip was blunt and the other one was raked....

!$%&*()!@#$&*)$&*)%^&*()$^(_@#$^&(!$&)@%^*()@#^&*(@%*()

How did I miss that??? What was wrong with me ??? I have no idea, (although my wife was full of suggestions). I did all that work and I swear it never even registered.

Well the fix was mercifully easy. I lopped off the blunt tip and CAed on a piece of 40 thou white styrene card. This wasn't quite thick enough so I slapped on a piece of 10 thou which made it a bit too thick. A little hacking, sanding and matching up and it was ready to repaint. The aileron was cut and sanded to shape out of 40 thou card.

While I was at it, I also cut the struts apart into individual pieces and drilled each end with a #79 bit and CAed in a piece of 28 Ga brass wire. This was clipped off to make a pin about 1/32" long. The struts were painted a wood base, (I use Pactra Acrylic Flat Africa Yellow), and then marked up a bit with a darker brown watercolor pencil. This was gently buffed with a slightly damp cotton swab.

I also painted the undercarriage the same way as the wing struts and painted the wheels and horizontal tailplanes. This brought everything to the point of readiness for the Rosemont conversion kit whenever the mailman saw fit to bring it.

The Rosemont resin set arrived, much to the relief of the postman who was getting tired of being pestered. Beautiful parts!. Barry is second to none when it comes to casting 1/72 resin parts. The set includes fuselage halves with fin and rudder, louvers, radiator front and exhaust pipes.

I began construction with the cockpit interior. For reference I used the photos of theShuttleworth example.

I scratchbuild cockpits in layers. The first step is to spray the interior with clear doped linen. I mix my paints from artist's acrylics thinned with Future, so I can't quote you a store-bought color number, but I start with unbleached titanium and tint from there. After this dried, I painted the vertical structural members molded into the interior wood base. I extended the truss structure with paint two bays fore and one bay aft. I used strips of 10 thou card to fill in the lower longeron between the molded in struts. I painted both upper and lower longerons fore and aft with the wood base also. The upper longeron is covered by the Spadlike instrument shelf so I did not represent it in that area. I added heat stretched and painted, (Metalizer, titanium), sprue bracing wires to the molded in bays and drew the bracing wires in the painted bays with pencil. Metal fittings were represented with bits of black decal material applied over the joints of the truss structure, (at least those visible through the cockpit opening).

I intended to use an Eduard 1/72 PE brass interior detail set for an SE5a. Unfortunately it is far too big. I had to scratch the panel and shelf from card. I used 10 thou for the shelf and 5 thou for the panel. The panel is split in the middle with an instrument suspended in the gap, so I was able to make a port and starboard panel. The floorboard was made from 10 thou card covered with plywood decal material. Notches needed to be cut in the raised molded struts on the fuselage sidewall for the floor and the shelf.

The shelf makes a kind of oval with the end at the panel, so I made my shelf in two pieces meeting at this point so the join is hardly noticeable. Panel and shelf halves were installed and painted in each fuselage half. I mounted the floorboard in the starboard half and fit and sanded it until the halves joined properly.

Once this had all dried and cured, I began detailing the sidewalls. Slices of rod and bits of stretched sprue made the switches on the starboard side. Film instrument faces and Foto-Cut bezels made up the instruments. I cut these out by cutting straight lines tangent to the circle with an X-acto blade flat against the film and pressed down to cut. I keep nipping the corners with tangential cuts until it is close enough to a circle for my purposes. I used the Eduard brass fuel line plumbing on the port panel and cut a slot in the port shelf, (prior to installation) for the little brass control levers from the Eduard set. Behind this on the port side is the throttle, again a slice of rod and a piece of sprue made a likeness. The hand pump was made from rod with a bent wire handle stuck in a hole drilled in the end. The mount for the pump was made from 5 thou card. Various sidewall cables were from stretched & painted sprue.

Once I had the basic structure and sidewall details finished, I began adding the details in the middle of the cockpit. This included the cross brace members, rudder bar, heel trays, joystick, seat and headrest.

Painted rod was used for the tubular cross brace members, painted 5 thou card for the heel trays. The rudder bar is a piece of basswood strip with brass wire toe loops and a Grandt Line bolt at the pivot point, rudder cables are painted, stretched sprue, turnbuckles are a lump of thick gold paint.

The joystick handle is a brass bezel CAed into a slot cut in the end of a piece of styrene rod. Lever on the side is made from a small Grandt Line bolt head and a strip of 5 thou card for the lever. The triggers are very narrow strips of 5 thou card, the trigger cable is copper armature wire painted black. The joystick mount was made from 5 thou card triangles.

The seat is made from 10 thou card covered with ply decal with the edges painted dark brown. Metal 90 deg angle brackets holding the bench to the sidewall were made by cutting mirror images out of 5 thou card, scored in the middle and bent 90 deg along he score. Seat belts were made from painted foil.

I messed up, ("Surprise..Surprise..Surprise.." as Gomer Pyle would say), and mounted the seat too far back. I added a thickness to the conjectural back that partly corrected the problem. I couldn't remove and reposition the seat without destroying too many details. Look twice, engage brain, look again, dry fit and then think about the glue. Another good rule I frequently ignore in spite of the consequences.

The interior being as good as it is going to get, the next job is the joining of the fuselage halves and the addition of the front grille and bottom louvers.

Here is where I ran into a bit of predictable trouble. The center section on the lower wing is of different chord on the Esci and the Revell kits. Since my bottom wing is mixed, I trimmed the CS to the narrower chord. Thus a 1/16" gap between the TE of the CS and the end of the notch in the Rosemont fuselage. This has to be filled or covered.

The radiator nose fit well and the louvered bottom panel the same. It extends about 1/16" over the leading edge of the lower wing. Being about 10 thou in thickness, I took the easy way out and cut a piece of 10 thou card to size and butted it up against the louvered panel and ran it back past the wing. This I feathered into the bottom of the fuselage. It took a bit of careful trimming and sanding on the edges, but far less work than filling and sanding the gap.

After going over the fuselage and making sure to catch all the imperfections I could, it was time to paint. I masked the cockpit with a piece of stretched Parafilm. I trim this carefully with a very sharp knife just where the bottom edge of the cockpit coaming is supposed to run. Later when I peel off the mask, I have a ready made guide for applying acrylic gel medium to simulate the combing. This is painted leather color when dry.

I masked the lower wings and sprayed the fuselage with several light coats of my Future/acrylic mix. Once that misted base dries a bit you can hit it again and the color will cover well while the Future magic levels the coat.

A good coat of straight Future goes on after the color coat has set well, usually overnight at a minimum. When this clear coat has set hard, I use a #11 blade to scribe VERY CAREFULLY all panel lines. It is critical to make ONE line per cut. If you mess up, scrape the errant scratch and touch up with paint & Future.

The scribed panel lines are painted over with India ink. It is removed with barely damp swabs. Behind is left a fine black line where the ink remains in the scribed cut. The India ink comes right off the Futured surface. Same technique for control surface hinge lines and other surface details.

The Rosemont fuselage has some very finely engraved stitching marks along the proper seams, these were highlighted with a brown watercolor pencil and blended very slightly.

The molded in gun on the Rosemont fuselage is fine, but I went ahead and cut it out and replaced it with a separately cast Rosemont Vickers gun – the barrel part of it anyway. It gave that look of "separate pieces" that the molded in one didn't catch. A sight from the spares box went on the barrel. The Aldis sight was made from small rod and stretched sprue. The windscreen was cut from clear plastic and attached with Testors clear canopy glue.

The mounting pin on the exhausts doesn't fit well in the hole in the engine, so I just wacked it off and stuck the exhausts right on the engine. Rear support mountings for the pipes were from rod with the strap around the pipe painted.

The radiator front was given the India ink treatment. I painted the shutters a mix of Testors Gold and Brass followed by another India ink wash when it had dried. The radiator cap I painted steel for contrast although it might have been brass or painted on the real thing.

The horizontal tail surfaces were from...well I don't rightly recollect where they're from. It was either the Revell or the Esci kit, in any case the ones I had needed the little attachment tabs trimmed before they would fit in the slots in the Rosemont fuselage. Dry fit, dry fit, dry fit.

The landing gear fit very well. The holes for the rear strut pins were covered by the card over the bottom. So I nipped the pins and attached the rear legs flat to the surface. I could get away with this because the front legs fit into a huge notch and ensured perfect alignment and a strong joint. Nice job here by Rosemont. The spreader bar popped in between the two sets of struts and the L/G gave no further trouble.

A last detail to the wings and stabilizer was needed. There were triangular inspection panels for aileron and elevator control pulley inspection and access. These I made by cutting small triangles with hollow centers from 5 thou card. I stuck these on the surface and carefully sanded them down a bit when dry. I painted CDL in the ones on the lower wings and the ones on the stabilizer because you could see the CDL lower surface covering through the clear panel. Opposite with PC-10 for the ones on the underside of the upper wing. I painted a pulley in each and then made the clear part by putting a drop of Future in the center of the triangle and letting it dry. This was repeated a couple of times to build up the clear part of the inspection panels.

That brings it down to the final assembly. When I cut the struts from those "helpful" plastic connectors that are supposed to go in the wing trenches, I was careful to preserve the angle of the cut so it matched the angle of the wing surface. I drilled the holes for the pin wire straight down into the strut and the receiving holes in the wings straight in, so with the pins in the holes, the struts sit at very close to the correct angle.

The mainplane struts were glued to the bottom wing and when set, the top wing was added. First only one mainplane strut was glued to the top wing, then the one kitty corner and opposite on the other wing panels. The remaining two were popped into place and secured with glue. A little wiggling and eyeballing from all angles as the glue set up hard and the top wing was in place, no jig needed.

The cabanes were fitted in place. They were a tad short, but the exhaust pipes camouflaged that. Better plan on scratching your own if you are real particular.

The Revell Lewis gun was cleaned up and painted. I did drill out the holes in the curved portion of the Foster mount and added a Bowden cable from painted copper wire.

Rigging was with stretched sprue that was pre-painted. I usually rig point to point and attach with CA, but the tailplanes and the aileron controls did lend themselves continuous runs. Where I needed to attach a piece of wire, I drilled a small dimple. That's all that is needed to get it to attach and hold. Loose wires were tightened with a hot pin.

Conclusion

I was real pleased with the model. The Rosemont fuselage is much superior to either of the kit offerings and allows you to build a very nice model of an SE5a. I had a few problems with this model, but they were 100% of my own making. The Rosemont resin kit for the SE5a posed zero problems and is a must have if you want a really nice 1/72 SE5a. Thanks to Barry at Rosemont Hobbies for the resin and to Bob at IM for the opportunity to build it.