Blue Rider/Phoenix 1/72 Vacform Junkers J-2by Steve Cox |  |
Introduction
I bought this kit from a 'bargain box' at the Southern Expo in Hornchurch (UK) earlier this year. This is an unusual aeroplane for the First World War, an all-metal, low wing monoplane with the radiator slung under the fuselage, this could describe a fighter from 25 years later. I'd never seen the kit before so out came the wallet. £2.50 ($3.50) well spent.
This build was intended to be more or less 'Out-of-the-Box'. It never works out quite like that of course, but I didn't worry too much about accuracy, particularly in the cockpit.
The Aircraft
Developed from Professor Junkers experimental aircraft, the J-1, the J-2 was an all-metal design with semi-monococque fuselage and stressed skin wings. Great attention was paid to aerodynamics in the design, but the all up weight limited its performance. Its flying characteristics were compared to that of a heavily laden freight train. Only six were built, two to the original design, with armament, and four with a longer nose and larger rudder, to try to improve deficiencies found in initial flight trials. This kit models the first version.
The Kit
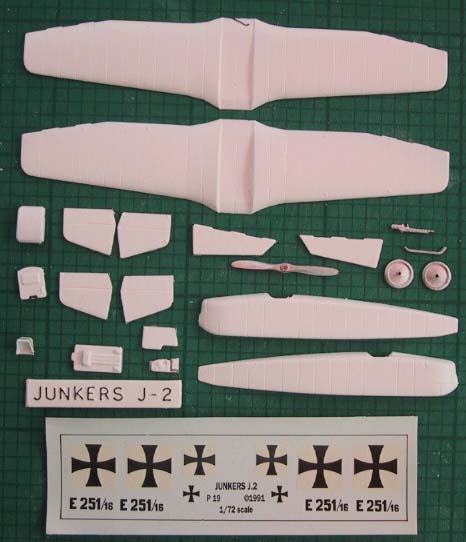
 The kit consists of one vacform sheet, with white metal prop, wheels, gun and tail skid, decal sheet for one aircraft (E251/16). Metal parts are by Aeroclub.
All pieces were marked out with black felt pen, cut out and smoothed down. I use a Stanley knife blade to scrape the wings to a fine edge, and only use sandpaper for the wingtips and final finishing. The tailplanes are moulded in two halves, but I discarded the lower halves, to keep a more realistic scale thickness, about two inches when I measured. Once the wing shaping was finished I stuck wings together. I don't think the profile of the under surface is correct, compared to the picture of E251/16 before the wings were attached. This shows a much flatter undersurface than the kit has.
 Next cockpit detail was added to the fuselage halves, with longerons and ribs cut from stretched square section sprue. Because you can just see into the engine compartment - the instrument panel is not full width - I made an engine - 'Out-of-the-Box' goes 'Out-of-the-Window'. The sump and six cylinders were made from sprue, with piping from sprue and copper wire. This was painted in gun-metal. As engines go it's probably not very accurate, but it fills the empty space if you peer into the cockpit around the gun. It was mounted in the cockpit on two cross members that sat on two bearers glued to the bottom of the cockpit floor. The interior of the cockpit was finished in aluminium paint, with the longerons and ribs darkened with gun-metal to make them stand out a little.
The instrument panel was made from plastic card painted aluminium, with instruments cut from plastic rod and painted black. With no references the panel is not intended to be accurate - just give an impression.
 The kit cockpit floor and rear wall were used with no modification. A control column was made from brass wire, with a control handle made from a piece of 3 mm tube. The end was sawn off, then the corners rounded. The circle thus formed was then squashed to give an oval shape which was stuck to the column, and painted dark grey. The seat was made from plastic card. The cockpit still looked a bit bare so I made a hand-pump from a 1/2 inch round nail, cut to length, with a handle from a scrap part from the bits box. This was stuck to the port side with CA glue. I tried making mounting clamps for the pump out of fly-fishing tinsel. The idea basically worked, except I couldn't get any glue to stick the tinsel to the metal of the nail reliably, so I took the easy way out. A fine copper wire to represent tubing was stuck along the cockpit side from the tank behind the seat to the engine compartment, and another down the cockpit wall from the tank to the floor behind the seat. Again this is speculative, but fills some blank space.

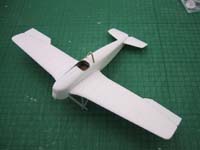
With all the fiddley bits done the fuselage was closed up and left to dry overnight, held tight with elastic bands.
 When it came to gluing on the wings, I found I had been over enthusiastic in sanding down the wing root on one. Therefore I had to build up the lower edge with thin plasticard to get the wing to sit at the right angle on the fuselage. This done, the wings were attached, and the wings set on lumps of modelling clay to make sure they held the right angle. Some large gaps were filled with 'plastic goo', scrapings dissolved in liquid cement.

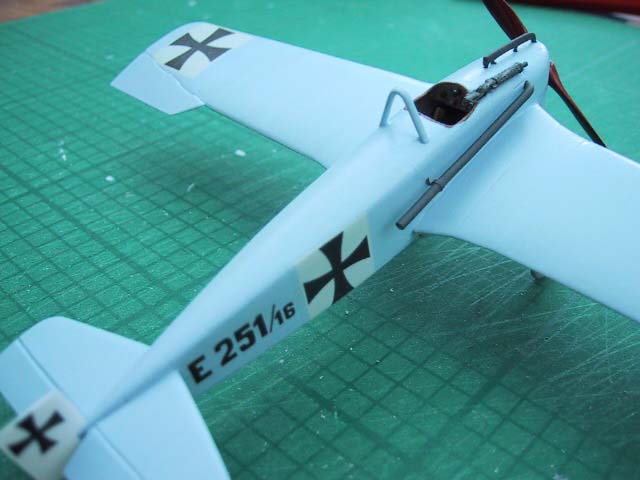
Once the goo had set and been smoothed with fine sandpaper I made the leather coaming to the cockpit using white glue. This was carefully spread around the cockpit edge and allowed to dry, then repeated until a satisfactory layer had built up. When finished it was painted in mid brown.
Next fitted were the tailplanes and elevators. The elevators were angled down a few degree by scoring along the hinge line and bending. One of the tailplanes sat at the wrong angle to the fuselage, so this was discarded and one of the unused halves was thinned down and stuck on. The reference pictures show support struts to the tailplane, so these were made from stretched sprue. The ailerons were added next, angled slightly up and down.
 The undercarriage was made from strut stock, the legs cut to match the drawing and glued together to form the 'V'. The axle was made from more stock, the ends being shaped to make axles at either end. I drilled a hole in each of the undercarriage 'V's then stuck the undercarriage in position.
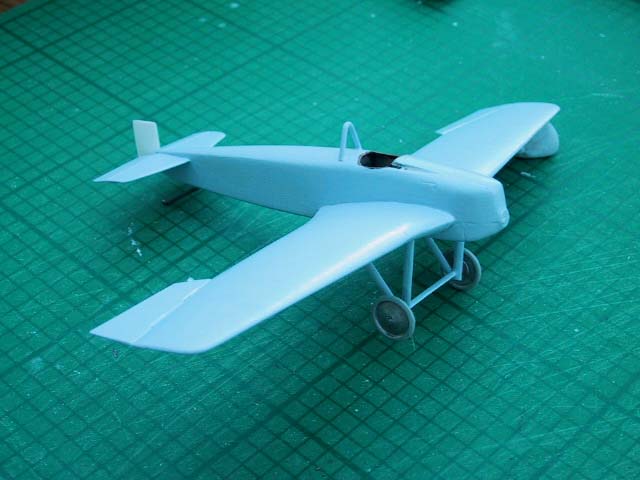
The final steps before painting was to add the crash bar, made out of Strutz brass bent into a 'V' to the top of the fuselage, and attach the radiator to the bottom.
Finishing
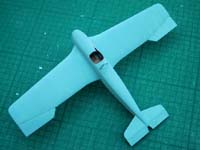
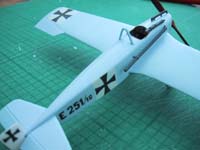
The crash bar was given a coat of white primer, then the whole aircraft painted matt aircraft blue, Humbrol No 65. This looked too green when dry so I used a pale blue "Moody Blue" from a Citadel Miniatures paint set for the top coat. The whole aircraft was then given a finish of Johnsons 'Klear' to add a bit of gloss ready for the decals.
 The wheel discs were finished in darkened aluminium, as they look darker than the airframe in the reference picture. The tyres were painted mid grey.
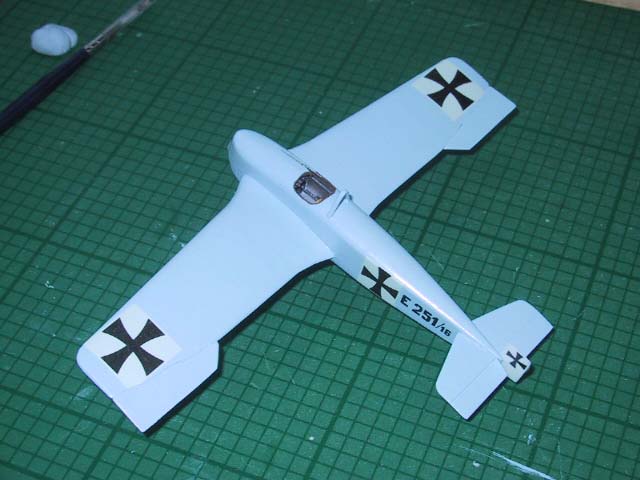
Decals went on next. They are commendably thin, and went on with no trouble with a spot of Humbrol Decalfix. The white squares of the wing crosses were cut to finish at the ailerons, as seen in pictures of the later J-2 variant.
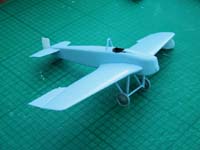
Final details were added from copper wire. The exhaust isn't shown clearly in any pictures I have, so was made as a straight pipe from a length of 1mm wire, rolled to straighten it. One end was bent at right angles and the other drilled to give the impression of being a tube and not a solid bar. I made a rear clamp for the exhaust by rolling a short length of fly-fishing tinsel around the exhaust pipe, fixing it with CA glue -this time it worked. The free end was cut off to length, then bent around so the flat could be glued to the fuselage side. The front end of the pipe was glued into a hole drilled into the fuselage at the rear of the engine position, as in the kit drawings and the rear clamp glued to the fuselage side so the pipe sloped downwards slightly.
A tube runs the length of the engine above the cowling. This was made from the same wire, rolled then bent to shape, then filed on both sides to give an oval cross section. The three thin pipes connecting to the main tube were cut from fine brass rod and CA glued into position. Small holes were then drilled into the top of the fuselage to match the assembly. Both this assembly and the exhaust pipe were painted in thinned dark grey acrylic before gluing in position.
Rigging
 Rigging didn't take long, there are only two wires in the undercarriage. I use nylon monofilament line - fish hook tie (0.1mm - 4thou) in this case. I drilled blind holes at the top of the front undercarriage legs and through holes in the spreader bar. This was done with a length of guitar string (.008) as a drill. This was the finest string my local music shop had. (This technique for tiny holes came from Robert Karr on the WWI mailing list) The rigging lines were glued into the top of the undercarriage legs with white glue and allowed to dry, then glued through the hole in the spreader bar, tensioned by hanging clothes pegs on the end till the glue set. When dry they were cut flush, and touched up.
Last thing on was the propeller. This was sanded smooth, painted in cream acrylic, then coated several times in a mix of Games Workshops red and brown shading washes and 'Klear'. Since the reference photos show no sign of the common striped effect of German props I was aiming for a laminated mahogany look. The Klear thins the washes and gives a nice deep varnished look after several coats.
A very different aeroplane from the normal 'stick and string' biplane of the First World War, and the first in a long line of Junkers warplanes. Certainly a unique item in my collection.
References
Profile Publications No 137: Junkers Monoplanes
Hugo Junkers Web Page


