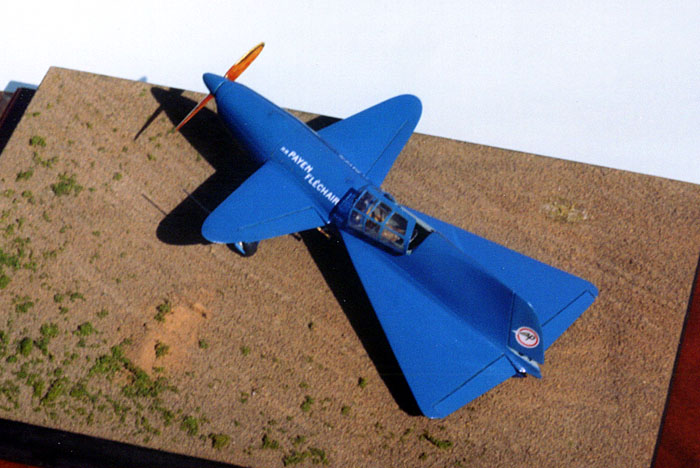
Model-Aire International 1/72nd Scale Payen Pa.22 FlechairBy Jim Schubert | 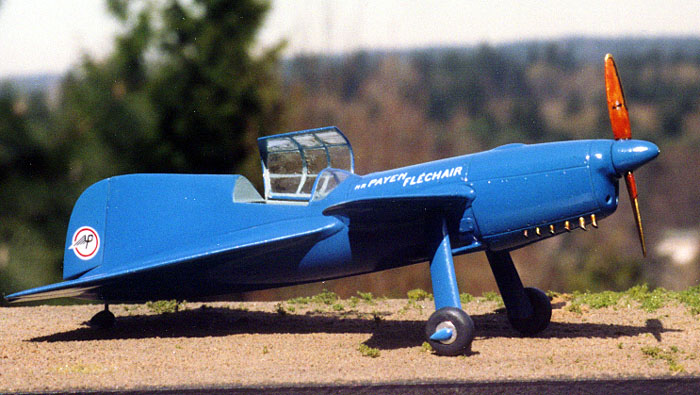 |
History
In 1935 Nicolas Roland Payen began design of a tandem-wing airplane to be powered by a "ramjet" being developed by H. F. Malot. The engine didn't work and Payen completed the design of his Model Pa.22 "Flechair" (Arrow) around an 8 litre 180 HP Regnier 6B-01 inverted, six cylinder, inline, air-cooled engine for the 1939 Coupé Deutsch de la Meurthe race. The unflown Pa.22 was being tested in the Eiffel Laboratories' full-size wind tunnel at Chalais-Meudon when Paris fell to the Germans. The Germans finished the wind tunnel tests and took the airplane to the Flight Test Center at Villacoublay where it was first flown in October 1942 by Payen's pilot, Jacques Charpantier. At Villacoublay the plane was repainted in German colors and returned to Payen's factory in the old Deperdussin works at Juvisy for modifications. There it was destroyed in an Allied raid on nearby rail yards in 1944. The time between its capture and its first flight make it clear the Pa.22 wasn't a priority program with the Germans.
 ..........
Only two of Payen's tandem wings actually flew: the Pa.100 entered in the 1934 Coupé Deutsch de la Meurthe and the Pa.22. The Pa.100 did not race as it was damaged in practice. Payen, a prolific designer, even designed a twin-engined, contra-prop, tandem wing fighter on tricycle gear, the Pa.400, for Mitsubishi in 1938. It too never got off the drawing board. Many other Payen designs including a few delta-shaped flying wings were built in some numbers but his favored tandem wing designs never did well.
Building the Model
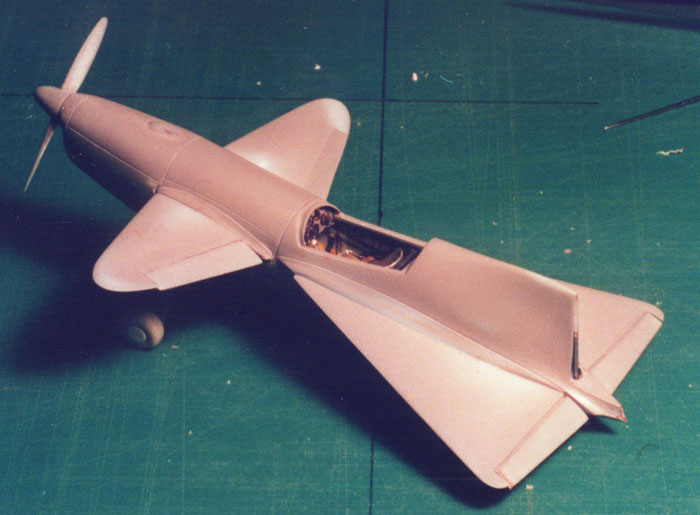
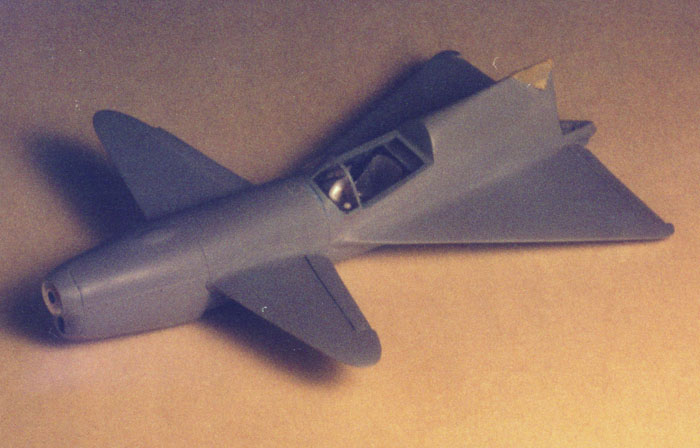
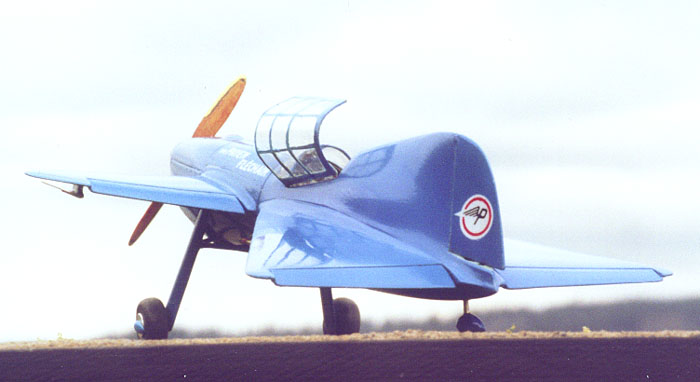
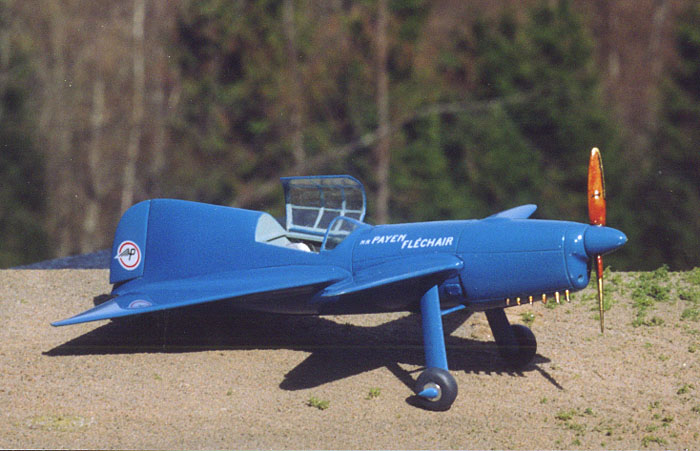
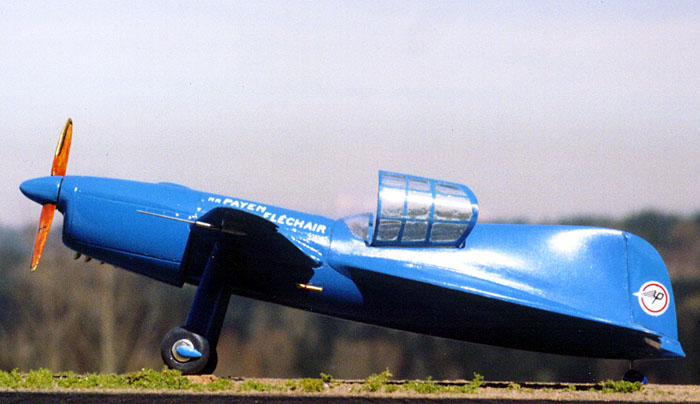
Chris Bucholtz's First Look review of this kit appeared in the November 1999 issue of this magazine and shows that the main parts of the kit are molded in translucent blue styrene. This and the soft detail remind me of Meikraft kits. Only one vac-formed canopy is included; so care must be taken to not screw it up. Three white metal castings are also included for the tail wheel and landing gear brace struts. One of my metal brace struts was a "short-shot" requiring a styrene graft. The decals provide for the three color schemes presented in the kit literature: Payen's markings in white on overall French Racing Blue and two yellow-bellied German flight test schemes. The kit literature provides a history of the plane and of the kit, which had its origin here in Seattle many years ago at the hands of Matt Hargraves. The literature also includes six poorly reproduced photos of the plane and three two-view drawings of the color schemes. There are no instructions. The kit box has four more, poorly reproduced, photos of the original plane.

The kit's wheels, main landing gear struts, cockpit floor, cockpit bulkhead, seat and instrument panel were discarded. The fuselage halves have token frame and stringer interior detail in the cockpit area. This was cleaned up and enhanced. A cockpit interior was imagineered around a new floor covered with a wood grain decal, a new rear bulkhead, a seat from the spares box, an instrument panel cut from an old Modelaid Magazine printed cockpit interior, a stick, flap handle, and photo-etched rudder pedals and seat belts from the spares box.
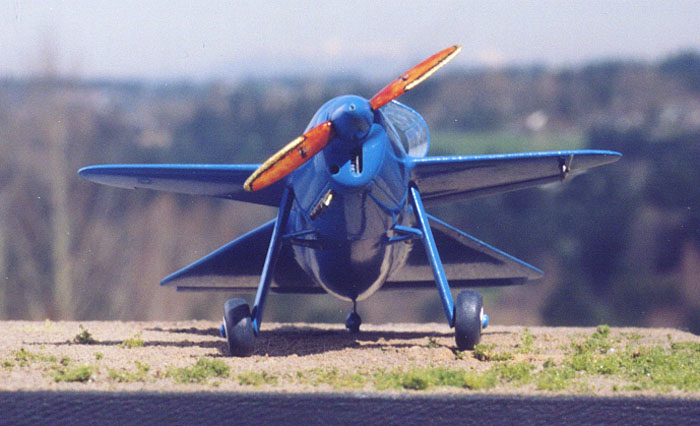
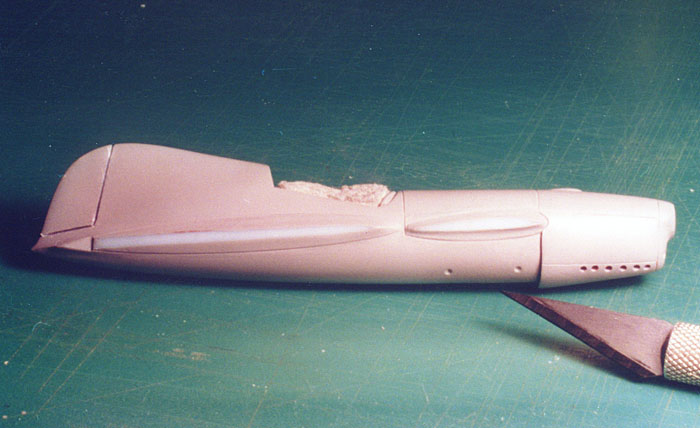
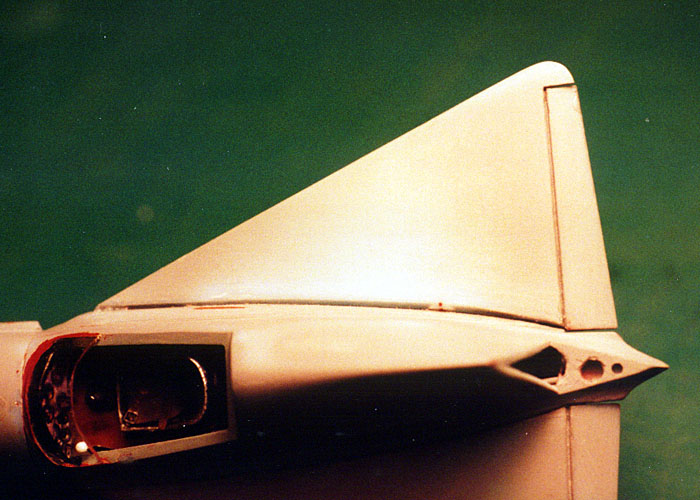
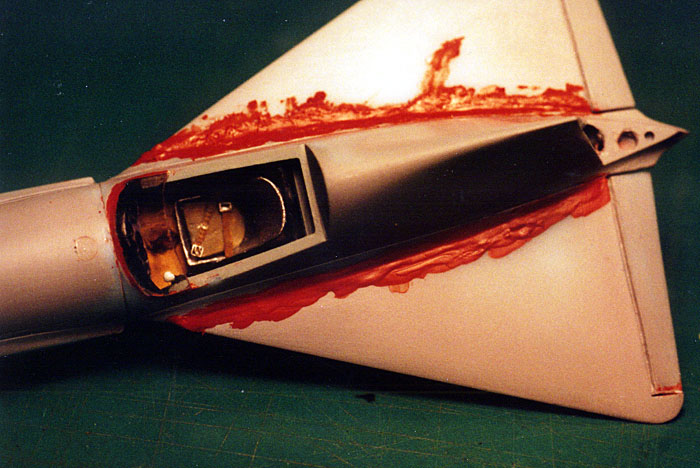
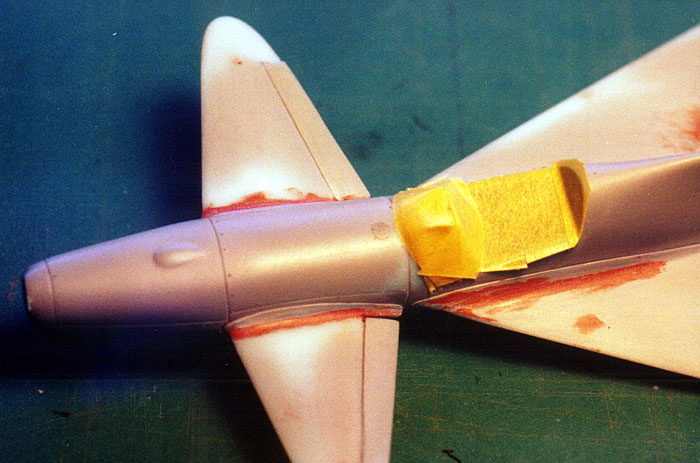
After joining the fuselage halves, the step at the bottom rear of the cowling was cut back 1/16th" and a piece of .010" styrene was wrapped around the area to add visual depth to the cooling air outlet. The wrapper was blended in with filler. The separate cooling air intake in the cowling bowl was opened. A number one cylinder for the engine was cut from an Aluminum 2-56 machine screw and given a chromed pushrod tube cut from a straight pin. This assembly was sited behind the cooling air intake hole and the carburetor intake hole was drilled alongside. Neither the spinner nor the cowling bowl boss were round. Two .010" styrene disks of the proper diameter were glued in place; one on the rear of the spinner and the other on the front of the cowl bowl. Centers were struck on both. A 1/16th hole was drilled in the spinner center and a 3/32nd" hole in the cowl bowl center. The propeller blades were cut off flush with the spinner and a length of 1/16th" rod was glued in the spinner hole. Filler was added to the spinner as required. When dry the spinner shaft was chucked in my 1969 Dremel Tool. With the speed control set to run the tool slowly, the spinner was turned to symmetry with a sanding stick. A length of 3/32nd" tubing was glued in the hole in the cowl bowl to receive the spinner's shaft. The face of the cowl bowl was filed to match the spinner. The propeller blades were thinned and reattached to the spinner with metal pins.
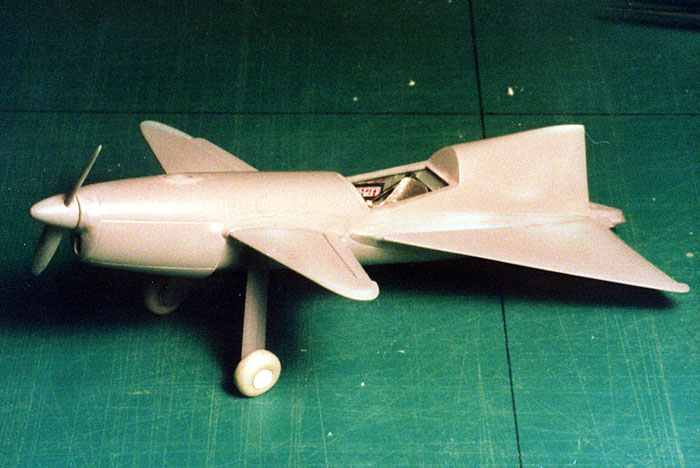
The cowl bowl was added to the fuselage and filled/filed as required. The prototype's fuselage ended in a sharp point; the kit moldings come to nothing like a point. I drilled a hole up the rear and glued in a headless straight pin, pointed end out, as an armature upon which to build the point with thick super glue and filler. My fillers, incidentally, are 3M Acryl-Red or 3M Acryl-Blue auto body putty. Both dry quickly and feather out well when sanded.
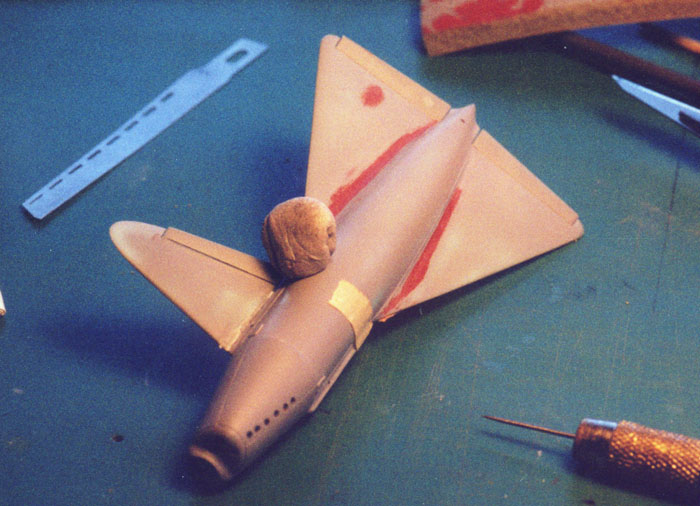
Control surfaces on the fore and mainplanes were scored almost through so that the flaperons and flapevators could be displaced. The rudder was cut free and displaced. The stick and rudder pedals were previously appropriately positioned.
New landing gear struts were made from Contrail strut stock. New main wheels were cut from the outriggers of an old Tamiya 48th scale AV-8A Harrier. Hub covers were punched from Aluminum duct tape and brake drums were punched from .010" styrene. The half-teardrop shaped fairings over the outboard ends of the axles were made from .020" styrene.
The exhaust pipes were cut from lengths of .036" Monel tubing. The wall thickness was reduced by reaming with a small dental burr.
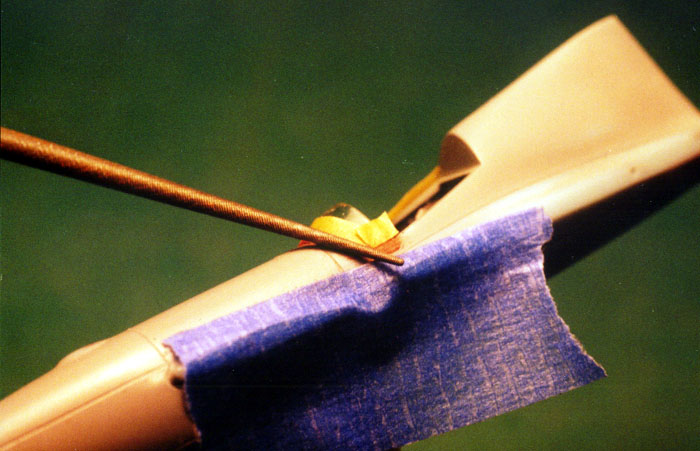
The vac-formed canopy was cut out and trimmed to fit the fuselage. After taping it in place the windscreen and hood were separated with a fine tooth .005" thick photo-etched saw blade from Airwaves AM-040 set (AM-043 is the .010" thick set). The sit of the windscreen forced me to cut a rebate in the fuselage to obtain a good fit. After three dips and drys in Future floor wax of the windscreen and hood, the windscreen was glued in place with Elmer's. Careful filling/filing blended the windscreen frame to the fuselage. The windscreen was fitted prior to the mainplanes in order to maintain access for the filling/filing. The windscreen and hood were masked with Bare-Metal foil and sprayed with the interior color. The hood was set aside for final painting later.

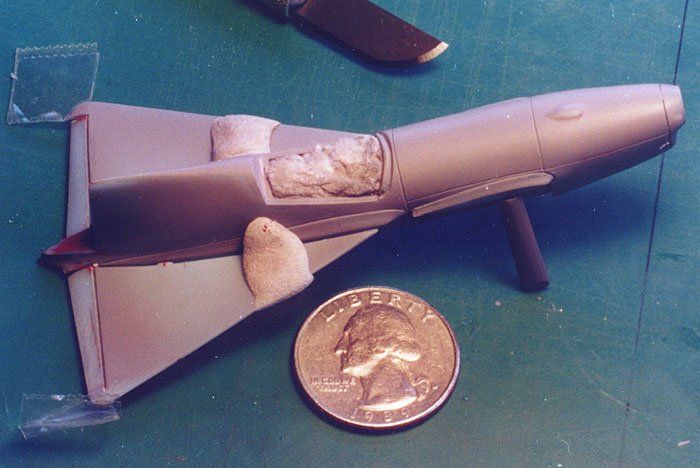
Pins reinforce the four super-glued wings/fuselage joints. Much filler was required on these joints due to the molds being misaligned about 1/16th" between uppers and lowers.
 ..........
Finishing
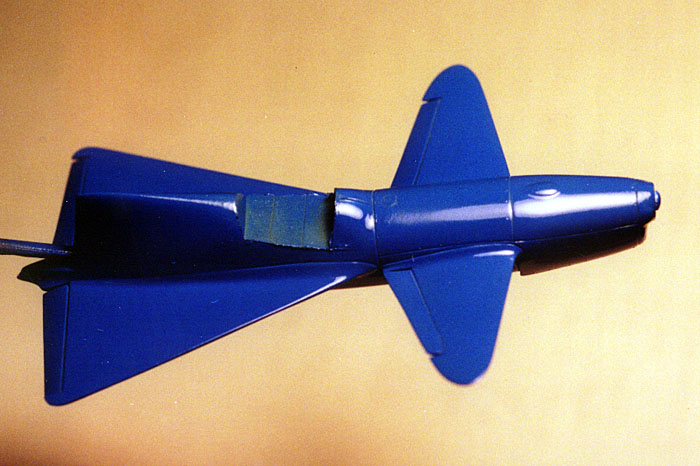
The parts were primed with Ditzler gray auto primer as work progressed. Now with the cockpit masked with Tamiya's new tape and the windscreen still masked with Bare-Metal foil, the entire model was primed as a final check on my work. Testors Modelmaster French Blue enamel is the base color, lightened a bit for scale effect. This was thinned with 4-5 parts of Ditzler auto lacquer thinner to one part of enamel and sprayed at 17-18 psig with a Paasche H single action, external mixing airbrush fitted with the #3 tip. I use a CO 2 cylinder for pressure. I spray very wet, on the brink of sag, and push the incipient sag around the model with the flow from the airbrush. This gives a smooth finish requiring little further attention when dry. This technique sometimes ends in disaster when I loose control of the incipient sag, but the time saved when it works is worth the risk.
 ..........
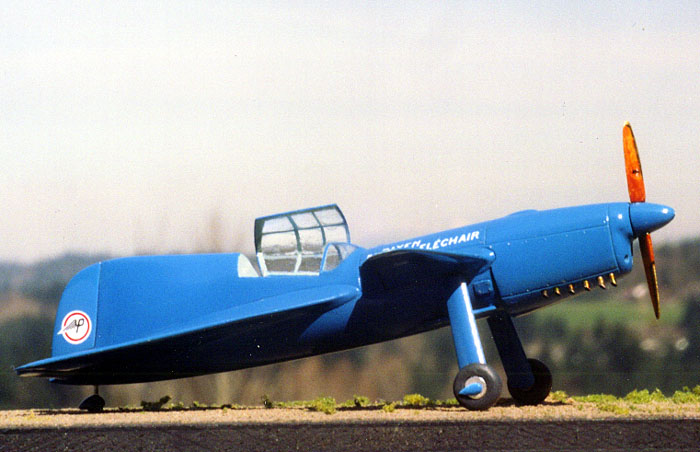
The kit decals were applied, sans solvent, to the gloss surface and left to dry. Four coats of Ditzler clear gloss auto lacquer were sprayed over the model to bury the decals and then sanded smooth and topped off with another coat of clear gloss.
 ..........
Conclusion
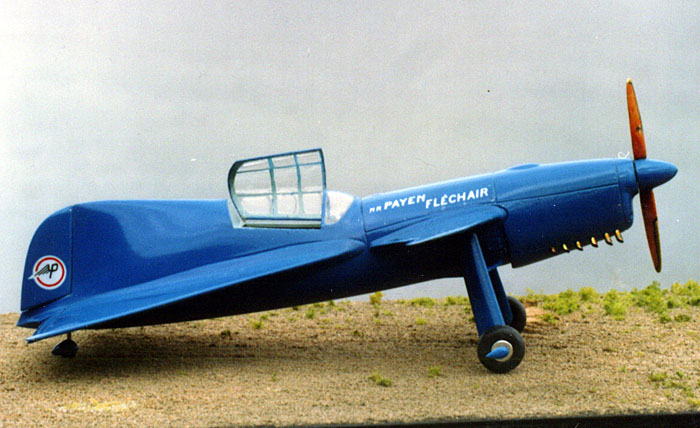
Detail painting and final assembly finished the job. The main landing gear struts were glued in place with Elmer's on their metal reinforcing pins. This provided working time for installing and aligning the white metal brace struts, which were also tacked in place with Elmer's. When all was properly aligned, the six joints were loaded with thin superglue for strength. I've no idea how many hours went into this model; it was on my bench four and a half months over the Thanksgiving, Christmas and New year's holidays and a week's vacation in the sun and I didn't work on it every day. The M.A.I. kit saved some time over scratchbuilding but not much; this is a rough kit. Nothing came close to fitting. Every part required extreme rework or replacement. Although much of this review sounds negative, I really did enjoy the challenge of the project and am quite pleased with, and proud of, the end result. The subject is extremely unusual and will never be done by any big manufacturer. Kudos to M.A.I. for issuing this interesting little bird.
 ..........
References
A. Le Fana de la Aviation #266 January 1991
B. RAF Flying Review May 1956
C. RAF Flying Review February 1967
D. Air International November 1977
E. Skyways Quarterly #s 19, 22 and 23
NB The only references to which I had access are as noted in E above. If any reader has the others, or any others, I would like copies. Please contact me; I will pay costs.
Denouement
The model was almost finished late the night before the IPMS-Seattle Spring Show where it was entered in the "Civil, Sport, Racing, Airships-All Scales" class and was awarded first place in that class as well as the "Muldoon Award" for "The best unusual 1/72nd prop driven aircraft". This award is sponsored by Kevin Callahan and Bill Osborn in honor of Bryan Mulron, who is unable to model anymore. This is the kind of oddball subject that Bryan loved to build. Subsequently I sanded the prop to reduce the gloss and completed rubbing out the finish that I didn't get done before the show. So it's finished now and on to Chicago.


