White Ensign Models 1/700 HMS Warspite ca. 1942By Dr. Kerry Jang | 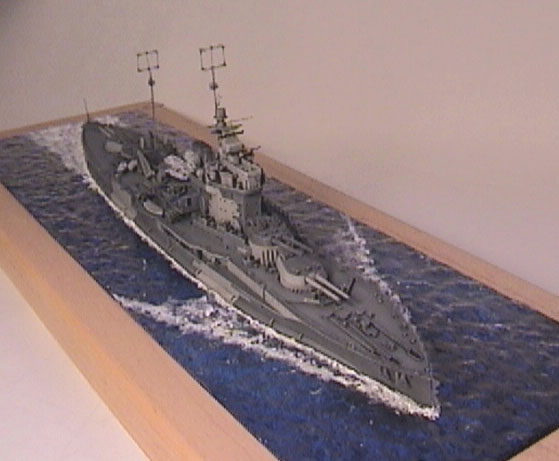 |
Introduction
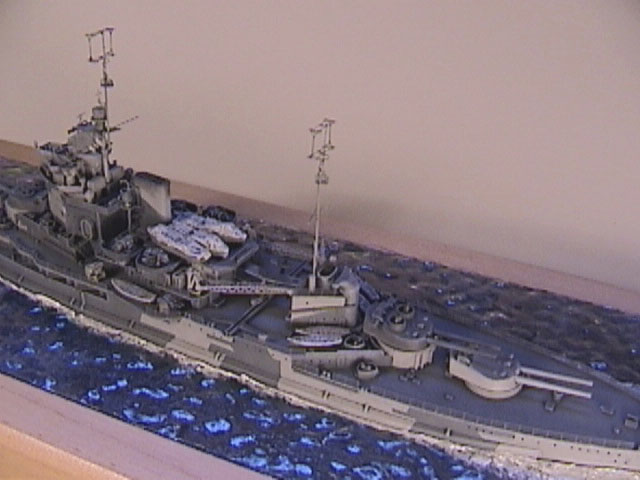
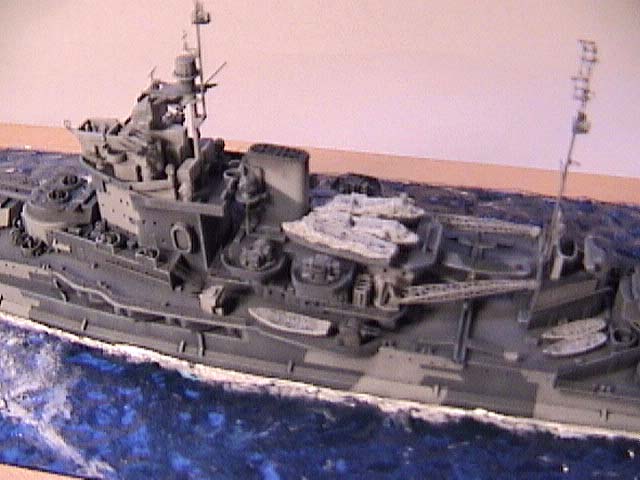
HMS Warspite, one of the five Queen Elizabeth class of battleships is one of those ships that need little introduction. Her operational history spans both World Wars and she is about as famous as Nelson's Victory. As such, lets move right on to the White Ensign Models 1:700 resin kit of Warspite as she appeared in 1942 . I purchased my kit from Warship Books
The kit arrived safely and all of the parts are packed in a stout cardboard box and plenty of bubble wrap. The main hull casting is taped to a stiff piece of card to ensure that the casting stays flat and all other resin, PE and brass and plastic rod are packed in separate plastic bags. The first thing I did was check for any missing parts or damage. As part of the instructions WEM includes a 'problem form' that can be sent via snail mail, or for quickest service, they can be contacted by email to replace faulty and defective parts. Examination of the kit contents revealed a few problems. All four paravanes and two 6" gun barrels for the hull casemates were missing. I also received two left-hand bridge lookout platforms (part #72) instead of one right- and one left-handed pieces. The kits contents and etch sheets can be viewed on the White Ensign Model's website.
Instructions
The instruction sheets leave nothing to the imagination. They run thirteen double-sided sheets of paper. They consist of a didactic sequence for building the model that is used in conjunction with three exploded views and two general arrangement views showing the placement of all of the photo etched and resin parts. Also included is a full colour sheet showing the camouflage pattern. I found the instructions complete and without error. However, their format is a bit dense and I spent a lot of time flipping back and forth between pages.
 The suggested sequence of assembly pays no regard to painting the model. If you assembled the model using the suggested sequence, it would be impossible to paint the model easily! I ignored the sequence myself and built things in the sequence that would permit easy painting. That meant leaving off most of the photo etch parts and painting most of the resin assemblies separately to be brought together in a final orgy of assembly fun.
Resin Castings
The centerpiece of the kit is the main hull, cast in an easy to work light gray resin. This casting contains a wealth of crisp detail, marred only by a few air bubbles that were trapped at the top of the bollards and mushroom ventilator tops. These were easily filled with medium viscosity cyanoacrylate glue applied with a toothpick. The main superstructure parts were also very well cast. Only one part, the hangar deck (part #65), was poorly cast. This casting was flawed by nodules of resin and that the part appeared to have a 15 degree backward slope to it. It may have been that the part was pulled from the mould too soon, distorting the piece. The resin nodules are likely caused by mould wear. Despite this problem, I was able to carve and sand the walls so that the edges were vertical. Much to my delight, all of the major resin parts clicked together and all but the hangar deck part needed very little preparation for final assembly.
The quality of the smaller resin cast pieces are a bit of a mixed bag. The main turrets and guns are very nice, but the 15" barrels are too long. I didn't actually notice this until my model was complete. Note that the base of the gun barrels does not have blast bags. The best of the small parts were the pom-poms. These guns are absolute gems!
 The ships boats, often a weak part of any model ship kit, are in this kit useable, but the interior detail is soft and indistinct in places. This softness would unfortunately stick out under a coat of paint and dry brushing. The only solution I could come up short of replacing all of the boats was to cover up this problem by modeling boat covers. My method is quite simple. I filled the open boats with a latex based filler putty for wood and when dry, sanded it smooth. I then brushed on a coat of acrylic gel medium straight from the jar, taking advantage of the brush marks to form folds and creases in the covers. The motorboats were covered with a piece of dressmakers tissue was roughly cut to shape soaked in white glue. This wet tissue is draped over the boats and when dry, acrylic gel medium was again used to fill in or cover up any spots not covered by the tissue and folds and creases were modeled using the brush bristles.
The worst resin parts are the searchlights, signal lanterns, and the 6" gun barrels (no loss that two were missing!). They are simply indistinct, undetailed blobs of resin. I replaced the searchlights with Skywave parts I had in my spares box. I omitted the signal lamps altogether, and replaced the missing gun barrels with brass rod. The missing four paravanes were also replaced with those from one of the Skywave IJN sets I happened to have lying around. It's a pity that these smaller parts didn't measure up to rest of the quality of the castings.
Photo eched Brass
 One of the things White Ensign Models does best is etched brass. The kit comes with two frets and both are relief etched. The frets are simply amazing and include everything that anyone could ever wish for. However, actually using some of these wonderfully detailed and delicate parts is another story! The brass is very thin and the parts are very fine as close to scale as can be achieved. I found that a number of the parts were just too small and fragile to use. They simply crumpled up as I tried to work in the multitude of folds such as part #22, the crane boom support platforms. I found myself simplifying a number of the parts. For example, I trimmed off the legs and supports for the stern walk platform because they bent out of shape very easily and I could not repair them.
Other difficult parts were the boat chocks. They simply do not fit the contours of the ships boats and there was no way I could fettle them to fit as the instructions state. Therefore I omitted them altogether. I cut the Yagi aerials in half, as I could not seem to fold them neatly. The instructions suggest that the base of the aerials is bent to a curved section and this defeated me time and time again on such a tiny part despite the jigs I devised.
Another part I modified was the ships rails. The etch parts come complete with fold down support stanchions that are to be bent down to the deck after the lengths of rail were attached to the hull. I could not bend them down uniformly along the length of the deck so simply snipped them off.
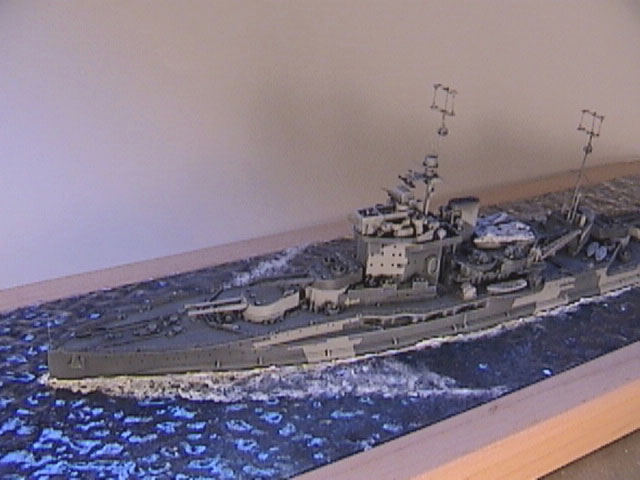
The larger etched brass parts, such as the crane booms (and I must say, the focal point of the model!) folded and fitted together accurately and look fantastic! The brass etch rigging to go along with them is very, very delicate and I ruined mine in no time. The frets also include some silly uses of etched brass, such as providing all of the davits and boat cranes as flat one-dimensional parts. The tiny davits (e.g., paravanes and smaller harbour davits) looks fine in this scale, but the larger ones look stupid. I simply deleted these or added a simplified one made out of round brass rod. Despite my troubles with the brass, what I managed to attach to the model looks great and WEM is to be congratulated for providing a comprehensive set of parts that are to scale. I just know that there is someone out there can use and make it all look perfect!
Painting
 I followed the painting instructions in the instruction sheet. These instructions match well with the camouflage drawings in Alan Raven's Warship Perspectives book Camouflage Volume One: Royal Navy 1939-1941. I mixed the three grays required for her paintwork (AP507C, AP507A and AP507B) using Tamiya acrylics to more or less match the Snyder & Short paint chips. My cavalier attitude may upset the more pedantic among us, but I weather and shade my models, so near enough is good enough. The main deviation to the kit's painting instructions was that I decided to painted the decks Medium gray (AP507B) instead of trying to replicate a teak wood deck. A picture of the ship in Raven and Roberts, 'British Battleships of World War Two' convinced me her decks were painted medium gray because the shade of the deck was the same as the turret tops. The camouflage scheme carried by Warspite needed a lot of masking and patience! I find that Tamiya masking tape, though expensive, is the very best. It is thin, flexible, and I have yet to have paint bleed through the edges. It is tacky enough to stay on the model, but not enough to pull up dried paint.

Once all the paint was dry, I did any detail painting and proceed to weather the model. I mix up a wash of blue-black using artists oils. I use artist oils in a tube (I have Windsor & Newton from the UK) as they are extremely finely ground with colours which are clean and strong, without any muddiness that you find with cheaper brands. I start with a black and add a little white and blue until the hue of my dark wash matches the dark gray, but is darker in shade. This wash is thinned with turpentine and applied to the entire model with a soft brush. Next I darken the wash quite a bit and add it to anywhere I want a shadow and to highlight portholes. Once this has dried, I mix up a very light gray, NOT WHITE, mix of artists oils (this time, to match the hue of the light gray but a shade lighter of the camouflage pattern), thinned with a touch of turpentine, and I dry brush the entire model. It's important to thin the dry brush mixture with a touch of turpentine. Turpentine acts as a dryer for oil paints, which if used neat, will take days to dry!
The shading and dry brushing is repeated until I am happy with the results and the detail molded onto the model stands out and sharpens up the model. Once all is dry, my trick is to apply a coat of gloss varnish (I used Tamiya Clear thinned with Tamiya thinner over the whole model using an airbrush). This clear coat tends to make all of the colours 'pop' out, and brighten up. I then bring the model to the more realistic matt finish by airbrushing a coat of Polly Scale Flat Varnish thinned with Polly S airbrush thinner.
Seascape
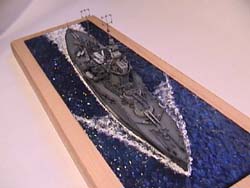 For this model I experimented with the clear plastic rippled sheet by Faller in Germany that the model railroaders sometimes use to represent water. I began by painting the base (a piece of maple finished with tung oil) various shades of dark blue using artist acrylics (in the tube), tinged here and here with green, white or dark purple so that a feeling of depth was achieved and left to dry out thoroughly. I next cut out a hole the exact shape of the hull for the model and cut out the outside of the plastic sheet to the exact dimensions of the painted 'sea'. This sheet was epoxied over the painted sea and left to dry. The model was next glued into the hole, but just before gluing the hull to the base I applied white artist acrylic paint straight out of the tube all around the hole to begin to simulate the wake and to fill in any gaps between the hull and the 'sea'. Once this was dry, I stippled white artist acrylic straight from the tube to create the wake and any turbulence and whitecaps. The whole base was set aside to dry and I gave the whole ocean a coat of Floquil Crystal Coat (that is what I had on hand having just run out of Tamiya Clear!). The Floquil Crystal Coat crazed the plastic a bit. It does not look bad at all as the crazing gave the 'water' some unexpected texture. Stick to acrylics or use Floquil Barrier before the Crystal Coat on this plastic sheet.

The finished sea looks OK, but I think in future I will go back to making the seascape out of plaster. First of all, with the plastic sheet you are limited to a calm sea. A second drawback is that if you don't cut a rabbet into the wooden base, the edges of the plastic sheet stick out like a sore thumb because they are rippled to. It simply looks like a plastic sheet glued to the base! Finally, when you glue the sheet to the base, I found that there were little puddles or pools of clear epoxy that can be made out under the plastic sheet, which some might think gives a sense of depth, but to my eyes, does not look right.
Conclusions
The White Ensign Models kit of Warspite is an excellent product. The fidelity of detail is excellent in most places; any omissions and simplifications that I made to my model does not appear to detract from the model at all. My changes are not necessary and are mainly due to my limited skills (if I were only a surgeon instead of a psychologist !!). White Ensign has produced a model that would please anyone and I wholeheartedly recommend it!


