Mac's 1/72 LFG | 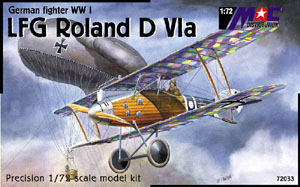 |
History
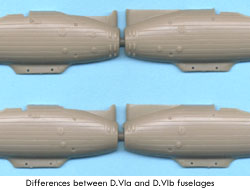
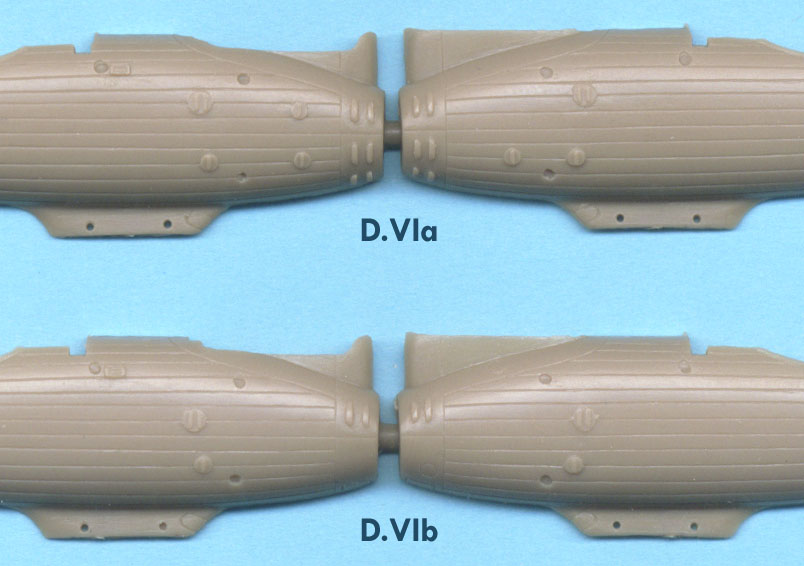
Luftfahrzeug Gessellschaft mbH (LFG) produced several planes during the First World War using the then-advanced semi-monocoque fuselage construction. More commonly known as Roland, the LFG company had some success with its earlier C.II Walfisch two-seater and the D.I/II/III single seaters. In 1917 Roland started design of a new fighter, the D.VI. This fighter was to use a slightly different fuselage construction, still semi-monocoque, but using uniform strips of wood instead of sheets of ply. This construction construction was common to boatbuilders and is known as 'clinker'. Two main variants were built, the D.VIa and D.VIb, differing only in the 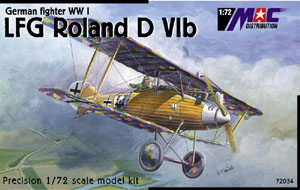 engine and other small details.
The Roland D.VI featured outstanding pilot's visibility, with the pilot sitting high up in the fuselage and the only totally blind spot being that under the lower wing. The performance was decent and it also featured some good handling characteristics. Based on this 350 were ordered, 150 of which were D.VIas and the rest D.VIbs. These reached the Western Front in August of 1918 where their popularity dwindled, mainly due to the prevalence of the slightly superior Pfalz D.XII and Fokker D.VII. The war ended before the Roland D.VI could see wide-spread action.
The Kits
Want to build a 1/72 Roland D.VI? Go buy this kit. Buy two or three in fact. In short, this kit is absolutely stunning. It comes in two boxings, one for the D.VIa and one for the D.VIb. Both kits share the same sprue, but they come with different fuselages, so you'll want to make sure which type you want to build beforehand. Well, not really, because you're going to buy two of each, right? The parts that are different for the two versions (aside from the fuselage halves) are the ailerons, stabilizers, and engines. I'm not sure what you'll use the extra ailerons and stabilizers for, but the spare engine could come in handy.
 For those of you who have a Mac Pfalz D.III kit, the construction is similar to that for the interior. You have a one-piece floor with a step in it, the forward part being for the engine to rest on. There's a mix of photoetch and plastic for the cockpit, with PE rudder pedals and control stick, a plastic seat, and a combination plastic/PE instrument panel. You might want to replace parts of the control stick with plastic rod for that round look, but for the most part the interior will look pretty good. The only thing I wish they had included was some photoetched seat belts.
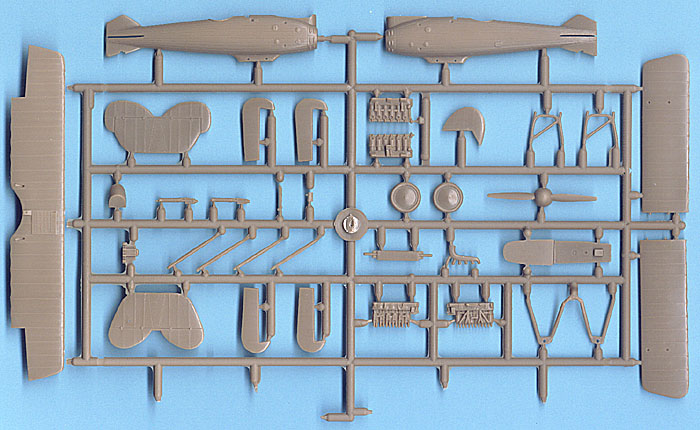
The engines come split into right and left halves, with a flat bottom designed to rest smoothly on the interior floor. My experiences with the Mac Pfalz shows that this arrangement should work pretty well, but be sure to test fit things thoroughly to make sure you don't have to thin down the fuselage walls any, especially in the upper cowling. The detailing on the engines is very nice and they appear to be accurate for their types.
 The wings are going to be an interesting bit of fun on this kit. In order to make the fuselage as seamless as possible, Mac has molded the unique lower wing fairing to the fuselage halves, leaving just two small pegs per lower wing as attachment points. While this may not be the most sturdy way to do things, I applaud it as you end up with a much better-looking fuselage with no odd areas to fill and blend. You will definitely want to think about ways to strengthen this arrangement, though. My initial idea is to replace the plastic pegs with steel wire. This way I can also bend in the slight dihedral of the lower wing into the wire. This arrangement also lends itself well to leaving the wings off until after painting.
The landing gear and other struts, while needing a bit of cleanup, are thin and really look good. There are plenty of drawings included with the kit to show the proper angle and spacing of these struts, so you should have no problems in getting everything lined up right. These drawings also do a decent job of showing where the rigging goes as well, so no need to guess there either.
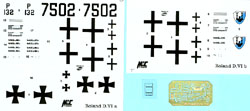 The decals in both kits are very nicely printed and are in excellent register. For the D.VIa there appears to be two options, while for the D.VIb there is only one. I say appears because there is no marking diagram included in either kit. You can go with the boxtop artwork for both kits, though, and get most of the information you'll need there. For the second D.VIa option, though, I have no idea. Bob Pearson has done some Roland D.VIa profiles and these can be seen at the Profile Art website, for those of you who want to do more.

Conclusion
This is an absolutely beautiful kit and one that every WWI modeler should pick up, even if they don't normally build German stuff. The molding of the kit is excellent and Mac should be commended and supported at every turn for putting out such high-quality kits of esoteric WWI subjects. Along those same lines, the next announced kit from Mac will be the Phönix D.III. Keep 'em coming!
For those who are interested, I have created a digital copy of the 1920 US summary report on the Roland D.VIb that was tested at Wright Field. You can download this file here (PDF format, 45KB).


