Building the AER Moldova 1/35 ASU-57by Richard Eaton |  |
Introduction
This is a neat little kit of this interesting Soviet airborne self-propelled gun. Mr. Alexander Popa of AER Moldova was kind enough to send Internet Modeler a review copy of this new model. AER Moldova has a line of very unique Soviet vehicles and aircraft. If you are into Soviet or airborne armor models, read on.
The History
 Airborne combat experience during WWII revealed a need for a light, maneuverable high velocity self-propelled gun. The Soviet's answer in the early 1950s was the ASU-57. Weighing in at only 3.3 tons the ASU-57 could be landed or parachuted from military transports of the day. At that time this vehicle was the only self-propelled gun capable of parachute insertion.

Equipped with a 50 HP engine and partially built of duraluminum, this light vehicle packed a punch with a high velocity 57mm antitank gun which was capable of piercing 100 mm armor at 1000 metres range. Its very small height enhanced survivability. With the conning armor lowered this vehicle came up only to the average mans waist. I wish I had time to do a figure to show scale.
The ASU-57 was very successful and exported by the Soviets to Yugoslavia, Viet Nam and Egypt. It served on into the 60s taking part in the 1967 war between Egypt and Israel.
In the Box
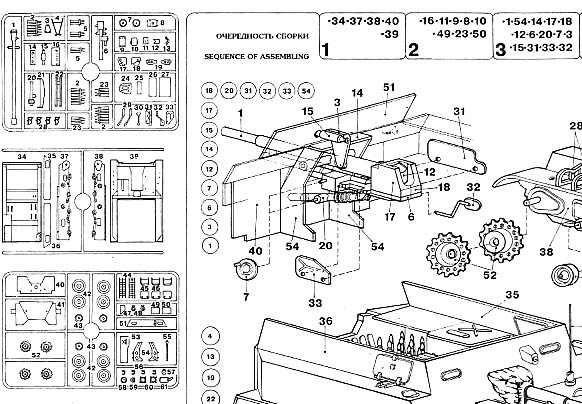
The kit is boxed in a small, very sturdy box. Inside is a single bag containing all five of the gray trees of parts. Also included are a decal sheet and a small, single sheet of instructions.
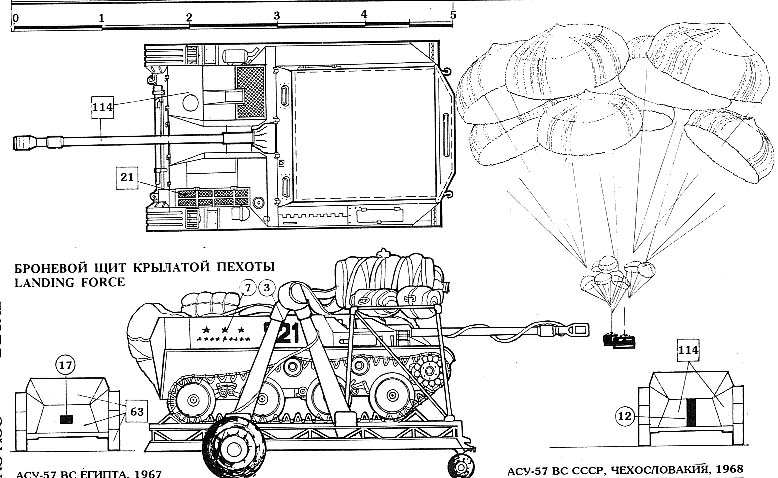
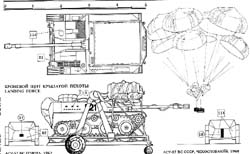 The instruction sheet contains a busy exploded drawing on one-page and markings and deployment drawings on the other. This drawing gives eight assembly steps. It illustrates four major areas of the vehicle and gives part numbers for the assembled component. It does give one pause to figure out exactly what goes where. The instructions give nifty deployment drawings depicting the ASU mounted on its airdrop mechanism. This would make a great little scratch project.
The parts trees in the kit are not lettered or numbered at all. There are the little tabs on the sprue...next to the parts... where one normally sees embossed numbers in most model kits. However, these are blank. Tree drawings are provided that identify part numbers.
There are two trees of finely molded individual track links. The tank only used 3/4 of these parts. The molding is well done and fit was good. There is little flash, or push out pin marks to deal with in this kit. Several parts had sinkholes including, unfortunately, the gun barrel. The vehicle sides are thickly molded and lack any rivet detail.
Building the ASU-57
Well, I have never built an AER kit before. It is an interesting experience. The first set of assembly instructions read:
1 -34-37-38-40-39
 After looking at the drawing and then the parts illustration for a while I figured out that it dealt with assembling the hull components. This process is too time consuming, and likely to give one a headache, so I decided to just assemble the vehicle as I would any other. I just referred to the drawings when I could not figure out what was what.
I assembled the hull and under carriage components without difficulty. The drive and road wheels are nicely done with only minor cleanup. Suspension arms are molded in and are basic though convincing. After painting the lower hull and road wheels I then assembled the separate tracks nights and applied them after each had set a tad. Track parts are nicely done with good fit. I had to thin down the drive sprockets to get the tracks to fit around them. I then ran into trouble around the road wheels. They were too thick to fit in the track teeth races. Hmmmm ... I had not noticed this before and I had to do something quick. I wound up cutting the inner track races so the tracks would snug up to the road wheels.
 I then assembled the lower hull, fighting compartment rear wall, and floor. Pretty much all the joins needed filling and sanding. The floor section has places for several projectiles at the ready. The compartment rear wall has what appears to be vertical strips of padding on the inside. Beats me, so I painted them as padding.
I then tackled the gun and gun mount. The breach is made up of four components that needed filling and sanding a tad to eliminate gaps. Then I cut out the long thin single piece barrel. The barrel had pretty rough seam marks and three areas of serious sinkholes. Hmmm.. I first went after the seams - the plastic in this kit is brittle and sands very easily. Unfortunately, eliminating the mold seams took the barrel out of round. I filled the holes with CA figuring I would have to sand to restore barrel roundness anyway. A few minutes of careful sanding and things were looking up. I then added the two-piece muzzle brake and sealed that up. I assembled the mount and went to put the barrel in place. Humm.. The muzzle brake would not fit through the gun port. I removed it and installed the gun and fabric cover before reinstalling the brake.
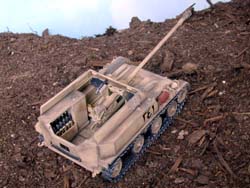 I then finished install the fighting compartment contents starting forward and working aft. Tank controls and instruments were basic but fit well. The seats are well done. I placed two mysterious containers on the shelf as indicated next to the driver. I assembled the three groupings of shells, painted them and put them into the various positions indicate. There was some mysterious three-sided bow-like thing broken in two in the box. I repaired it and then tried to figure out what it was and where it went. I figured it was either a fuel tank or refrigerator. It was one of the largest pieces in the build. I found a large square numbered 27 in the tree drawings and figure that had to be it. I placed it on the left side of the fighting compartment.

I then added the fighting compartment top surfaces and shields. The left surface had a contour that looked like it corresponded with the mysterious tank on that side. The tank was too large, however, so I pulled it out and cut it down until things dry fit well. That done, I put on the compartment shields. Again filling is required.
 I then placed the various hull-mounted items around the tank as I identified them. The muffler and headlights cleaned up well and went on. There were two very thick straight light protectors that I can only assume were to be bent to shape and installed and the lights. They broke readily so I used brass wire. I then wrapped up assembly by putting the various hooks, tools, shields, and antennae mount in place.
Painting and Weathering
Kit directions give color schemes and markings for a Soviet, Czech, or Egyptian vehicle. The Arabic markings intrigued me early on so I went with that. I sprayed the entire kit Testors Desert Sand at various points during assembly. I painted the tracks with scale black. Once dry, I added a wash of a mix of acrylic scale red-brown to the entire tank. Then I washed the tracks again with rust.
 And now my favorite part of armor modeling, dry brushing! I used Testors steel to highlight detail all over the tank and treads. I painted the tools wood brown and scale black. I finished up the weathering by applying ground pastel black and brown with a brush to the gun muzzle, breach, and pretty much anywhere I felt like it. I mainly accented the panel lines. I then weathered the tracks and lower hull with heavy brown pastel chalk.

Decals
Kit decals went on without a hitch. I applied the kit decals over a gloss base using Future. The decals were thin and easy to work with. I then sprayed dull coat over the model to seal things up.
Conclusion
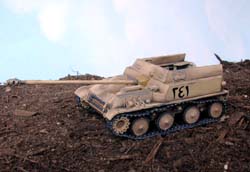
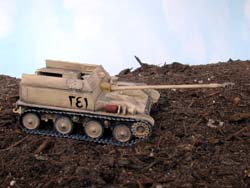
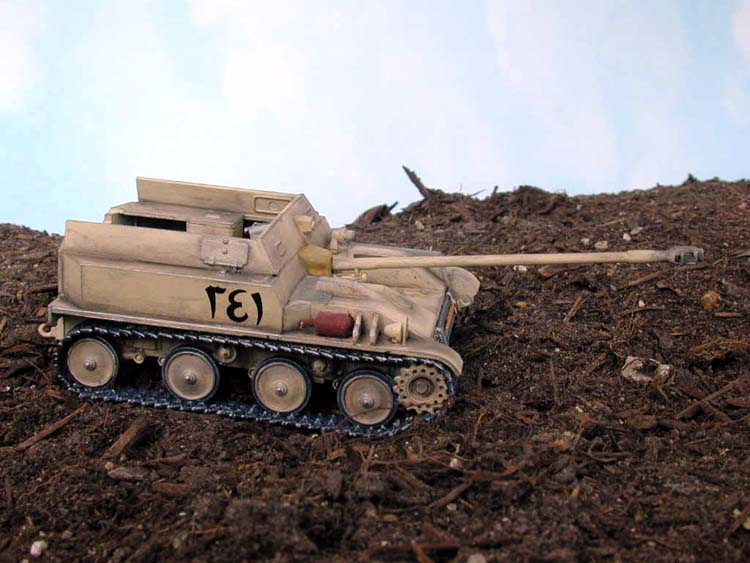
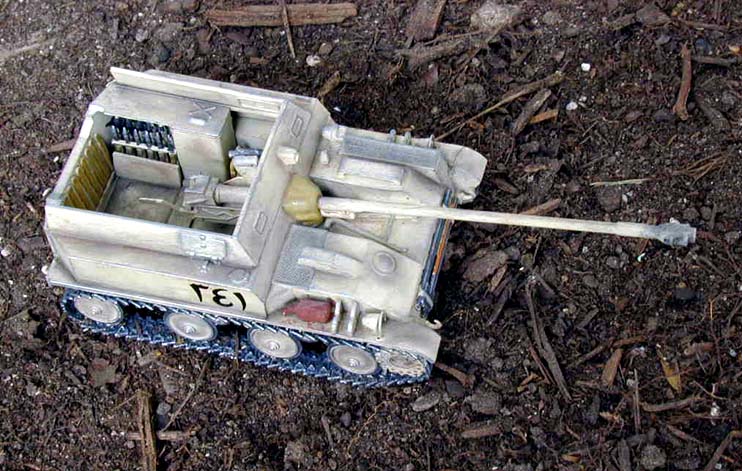
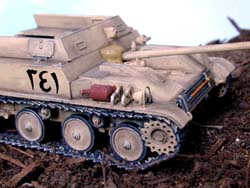
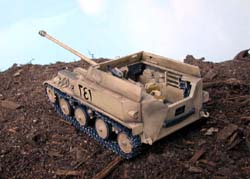 I took the completed model and set it in my garden for the completed shots. (Sorry we gave away the sand box) This kit builds up fairly easily to a really nice representation of this self-propelled gun. I have never seen a kit of this interesting vehicle. I recommend it to the advanced level armor builder due to the separate tracks, fit, and instructions. This kit makes a good base for a model of this vehicle. Advanced builders would want to enhance kit parts in several areas. AER makes some one-of-a-kind kits. I can't wait to see what they come up with next!

I want to thank Mr. Alexander Popa, of the AER MOLDOVA Company, for generously providing this review kit, and Ray Mehlberger for asking me to build it.
AER Colectie Ltd.
41 Bolgarskaya Street
office 11 PO 391
Chisinau, Moldova


