 "Eye Deep In Hell"
54mm vignette
by Andrei Koribanics
Introduction
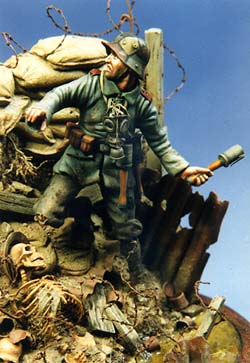
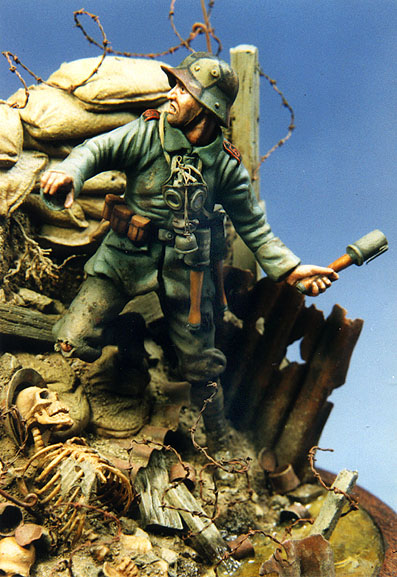
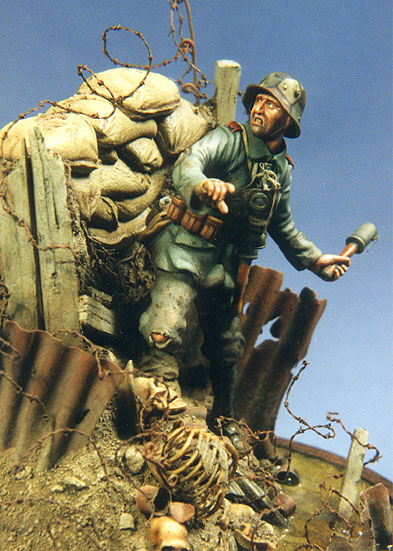
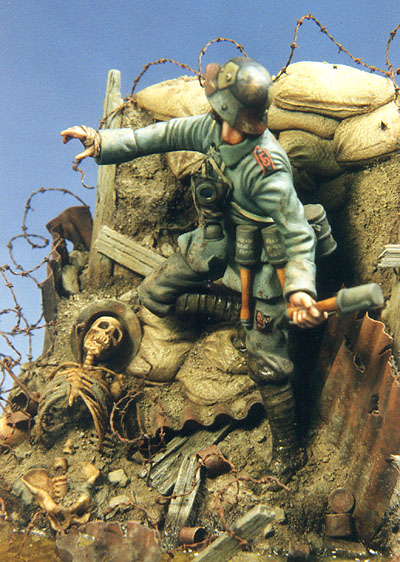
This vignette was inspired by the John Ellis book of the same name, (ISBN 0-8018-3947-5) graphically describing the horrors of trench warfare in the Great War. I highly recommend this volume to anyone interested in this particular aspect of the conflict. It is an engaging and enjoyable read! I had wanted to create a single-figure vignette that would illustrate these conditions and the title itself was fundamental in the vignette's design. The piece is really more about groundwork than the figure itself... in fact, I was so pleased with the way the 'terrain' turned out, I almost hated to add the Stormtrooper!
Design and composition
All my vignettes begin with a theme, and design and composition. As I mentioned, the title would dictate a lot of this design; if the soldier were to be truly "eye-deep" in this hell, then the groundwork would have to be created in such a way so that his eye level could be suitably positioned. I decided on placing a Stormtrooper within a portion of a partially destroyed trench, and decided the 'story' would be the attempted re-taking of that contested trench during the Germans' spring offensive of 1918.
I always design my pieces as a whole, that is, with both the groundwork and figure in mind, and developing both at the same time. I began with a crude figure composed of Airfix Multipose figure parts and a Scale Link head... the various parts all tacked together with PIC U-Knead It (similar to Blu-Tack), to allow for flexibility in the posing. The groundwork was roughly sculpted using Sculpey simultaneously. Once a suitable composition is arrived at, I take a few polaroids to record it, then can disassemble the lot and begin actual construction.
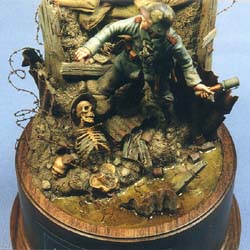
I should mention also that I always decide on a base at the outset of the work. It is crucial to the overall design and must be accounted for early on. The overall size of the base can add or detract from the finished piece. Too large an area and the figure or action can appear 'lost' or isolated. Too small an area and the figure can apear crowded or ill-planned. For the most part, I try to choose a size that will indicate there is action and/or terrain beyond the edges, and I intentionally design the piece so that some part extends beyond the edges for that purpose. In this case, I chose a pre-finished round walnut base I found from a vendor at a figure show. It is tall enough to allow easy handling without damaging the piece, but not overwhelming. One feature that caught my eye was that it had a routed surface. I had intended from the beginning to indicate a pool of fetid water at the bottom of the trench, so this base would be perfect! I can't stress enough how important presentation is when creating any vignette. I urge modelers only to choose the best quality materials they can afford, and that includes the base you put your work on. Furthermore, consider its shape. Round bases tend to invite inspection from all angles, whereas squares subconciously dictate what is the front, or prefered viewing angle.
The Figure
 Having decided a stormtrooper would be the focal point of my vignette, I began my research. Osprey's "The German Army 1914-18" from the Men-At-Arms series was my main reference and G.A. Embleton's superb illustrations provided a great deal of detail information, as well as inspiration. I decided the soldier would be hurling a grenade at the unseen enemy, which would provide some action. Although he wears cartridge boxes on his belt, you'll notice he hasn't the usual Mauser with him. This helps tell the story that he has scrambled forward to do his dirty work and, since the rifle would be superflous to the scene, it is simply eliminated.
The figure began as an Airfix Mulltipose figure. Which army is unimportant, as it is only used as an armature for the sculpting to come. Once the pose is worked out, the various limbs, torso, hips, etc. are all pinned together using pieces of paper clips or fine brass rod and super-glued. A&B epoxy is then used to fill in the major gaps and strengthen it. All the uniform detail is then ground off using a Dremel tool and grinder and the clothing is built back up using A&B epoxy and Duro. Where possible, the original hands are retained, sometimes modifying individual fingers, or, in this case, the stormtroopers' left hand was sculpted around the grenade handle to provide a convincing grip. Certainly this soldier would catch his clothing on all that jagged metal and wire, so rips adorn his trousers, and a bandage of Duro is wrapped around his right hand. A word of caution... go easy on the blood! A little goes a long way.
The figure's head comes from the Scale Link range and was modified by carving and adding Duro in order to achieve a proper expression... one of fear and horror!
Figure Details
 Other items that came from the Scale Link range include the grenades (with lead foil clip added), gas mask container, cartride pouches, water bottle and the German helmet which was slightly modified. Scale Link's parts are cast in white metal and are quite good, but the helmet needed a little refining in shape and the addition of lugs. I also wanted it hollowed-out, so I made an RTV mold and cast it with Alumilite. Overkill? Perhaps, but I'm a modeling masochist!

The gas mask was roughly shaped with A&B epoxy, then hollowed out from behind with the Dremel tool. Holes for the eye lenses were drilled out, rings of styrene added, and the lenses made from Micro Kristal Klear. The filter canister was added from styrene pieces and the appropriate cords and elastic straps added with lead foil.
The puttees were simply made by wrapping white artist's tape around the pre-shaped legs and sealing with a little CA.
This particular stormtrooper is a member of the 5th Sturmbattaillon 'Rohr', as indicated by his epaulettes, also of sheet lead. In truth, at this time in the conflict, assault troops would have undoubtedly removed such identifying badges from their uniforms (such information would be invaluable to the enemy should a soldier be captured or even found dead wearing them), but I believe in a little artistic license, too. They not only provide nice 'detail information' about the piece, but also a little color and a great opportunity to demonstrate detail painting. My one firm conviction concerning miniatures is "it's all in the details" (after the basic design work is done!) and this is a great little detail!
The figure was then primed with Humbrol enamels and finished with Winsor & Newton oils. The 'lozenge' pattern on the stormtroopers' helmet is typical of troops on the Western Front and based on one in my collection. I was sure to make his uniform good and dirty (remember to paint mudied garments the same way you paint clean fabric, i.e. with highlights and shadows... don't just slap 'mud' over a painted uniform!) and his lower legs were painted darker and then glossed to indicate he had just stepped from that pool of rank water.
The Groundwork
 The groundwork was originally sculpted in a rough form from Sculpey to give me an overall size and area, including the sandbags, which were only roughly indicated. Once I was happy with the composition, the whole was baked to set it, then the fun began! Studying photos and paintings from the period gave me the 'stuff' to include... earth, naturally, but also wooden supports, sandbags, corrugated sheet metal, barbed wire & their pickets, that nasty pool of fetid water and, of course... debris. In order to really make the scene 'hellish', I decided to add some human remains. A decaying body, I felt, while certainly authentic, would be just too grisly for most viewers, so I decided on skeletal remains... but more about that later.
Since I wanted this portion of trench to appear to have been somewhat demolished, gouges were created in the earthen wall, revealing roots, boards made from balsa suitably splintered, etc. The nice thing about Sculpey is that it can be easily carved... remove material where you want and add more, then re-bake.
The final sandbags were made from rolled, cut and shaped A&B epoxy; an old T-shirt was pressed into the surface once nearly hardened to impart some texture, then seams and bullet holes indicated with the tip of an X-acto. Each sandbag was placed one atop the other in stages, before hardened, to create a natural sagging between them... they have to look heavy!
The corrugated sheet metal was formed from sheet lead foil in a jig I constructed from two squares of styrene to which I glued suitably spaced lengths of Contrail styrene rod. Pressing the lead foil between the two jigs creates the corrugations... an Xacto provides the jagged holes.
By far the most time-consuming job was making the barbed wire, but it had to be done! There are photo-etched sets on the market.... great for huge dioramas, I suppose, but this being a very intimate piece, I had to have the real deal. Again, I created a jig of four upright nails in a rectangular block of wood (two at each end), and tied two pieces of fine copper wire to two at one end. I would braid the wire several times, then wrap the ends around the two remaining nails to hold them taught while I wrapped individual pieces of wire around one of the long wires to act as the barb. I only trimmed the barbs after each was attached. Continuing to braid the wires 'locks' each barb in place. It must have taken an entire evening to get 4" of wire, but the effect is worth it!
Other debris includes the omnipresent Jelly tins discarded by the British soldiers formerly occupying the trench. These were simply made by wrapping the same lead foil around a piece of rod and cutting discs of foil for the lids.
I further ground out the base to create a deep depression for the water. Once all the elements were in place (barbed wire, corrugated metal, boards and that nasty skeleton, Celluclay mixed with a small amount of white glue and colored with gouache (opaque watercolor) was applied as the earth, integrating everything as a whole. Final groundwork consists of dirt and fine stones aquired from the gutter and applied to a coating of thinned white glue. The entire thing is then painted with Humbrol enamels.
I mixed up a batch of clear casting resin, tinted with food coloring, and poured it in thin layers to create the pool. Accounts from the war tell of a greenish cast to water in shell holes from gas poisoning. I also made sure to add some brownish grey paint to several layers, stirring the mix a bit, to indicate from where the stormtooper had just stepped. Once the pool had cured, the final touch was to create fine concentric 'ripples' on the surface using clear resin applied with a toothpick. Remember... an exciting vignette tells the viewer two things: what has just happened as well as what is about to happen!
A Little Magic
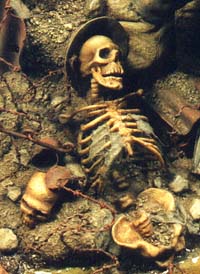 In each of my pieces I try to include what I like to think of as 'a little magic'... something unexpected that catches the viewer's eye or makes someone say "how the hell did they do that?" The skeleton gave me that opportunity and, sure enough, it is the one thing I am most questioned about! I have also been criticized for adding it... one fellow at a show firmly insisted that such a thing would never have been seen! Well, perhaps not an 'intact' skeleton, but then, where would the magic be, right? The fact is, constant shelling often unearthed buried remains, and, artistic license in hand (oh... gotta remember to renew that!) I decided to add my somewhat intact skeleton, complete with British helmet... I figure somewere along the front, some poor sot died without a burial... and it is the perfect addition to this hellish scene... otherwise it's just a dirty hole in the ground!

The skull was carved from an Airfix Multipose head. This insured it would be the proper size, since I could only make it smaller, and the existing features gave me excellent points of reference for the eye and nose sockets, bone structure, etc. Yes, an anatomy book always comes in handy! Since two skulls are always more hellish than one, I molded it along with the German helmet, because I hate doing anything twice. Now I have an inexhaustable supply of skulls... (but good ideas are best not repeated ;)
The lower jaw was carved from scrap plastic and later attached. The pelvis and vertebrae were sculpted from a blob of epoxy. The challenge was the ribcage... how to sculpt something so fragile and have it hold its shape? I really wanted to use epoxy, as wire would be too uniform, but how to support it while it cured? Then an idea struck me. I carved a shape slightly smaller than the torso from beeswax and used it as a form for the ribs, which were made from rolled out epoxy. Once the epoxy had set, I placed the piece in the trusty toaster oven and cranked her up.
Like magic, the wax suddenly turned to liquid and I was left with a free-standing ribcage! Dontcha just love problem-solving? The final touch was to add some fabric remains from shredded bits of tissue adhered with white glue and painted and.... voila! One vision of Hell!
Andrei Koribanics II
8 Falcon Place
Wayne, NJ 07470
USA
Voice/Fax: 973-696-9378
email: andreikor@aol.com


