Eastern Express 1/72 Morane Saulnier Type "I"By Cameron Riley |  |
Introduction
|
|
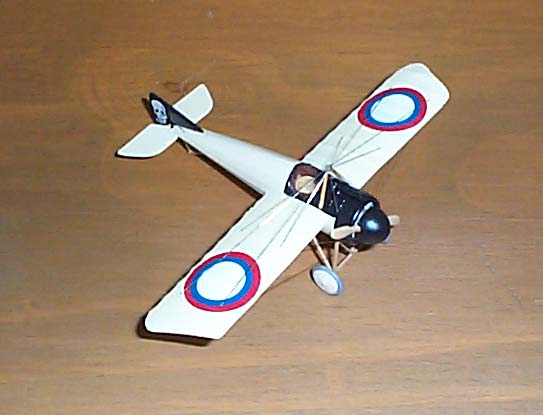

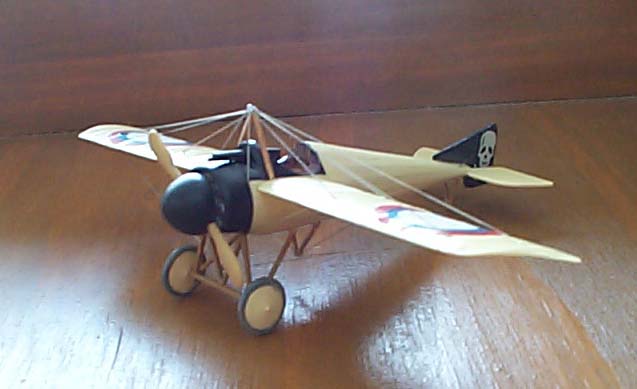


I have a soft spot for the Morane Saulnier, when I was a young anklebiter, it was the first kit I rigged. Back then I used cotton thread and after the dust got to it, the rigging ended up looking like the legs of a funnel web. But I was proud of myself and at 8 years of age, that is all that matters. If I recall correctly I even left it in the silvery grey plastic colour the kit was molded in. Re-doing Kazakov's Morane Saulnier all these years later with it's distinctive black tailed skull and crossbones was something I couldn't let slide.
The Kit
The Eastern Express Morane Saulnier is cheap and readily availble, a re-issue of the Toko kit of the same name. There are two gates of sprue, the detail on the parts is a bit lacking in comparison to the modern releases by Eduard and Roden, but is more an indication of the maturing of both of those Eastern European manufacturers into first rate kit making companies that rival the Japanese for detail, accuracy and quality.
The engine pistons on the kit's rotary are bare, but under the large "cone de penetration" there is little that can be seen of the engine anyway. The cockpit is pretty barren for parts from the sprue, but to most WWI modellers much of the fun is in adding a more details cockpit. There is also some flash, the wings required some very judicous trimming while keeping an eye on the wing outline, but again it was nothing that a sharp X-acto knife couldnt overcome.
The cockpit parts consisted of a Vickers Gun and a leather headrest. I made a base floor for the kit and added two thin strips of styrene painted wood for the floor runners for the rudder bar. I also made a seat. I make seats by dunking a thin strip of styrene into a hot cup of just boiled water and then wrappig it around a pen or pencil. Once it is set in a semi-circular fashion I glue it to a flat square piece of styrene. Once the glue has set, I trim the excess styrene from the flat piece and trim the seat back to the desired shape with a knife. To finish the cockpit I also added a joystick, some ribbing to the inner walls and a fuel tank. None of it took long and it added a lot of life to the model.
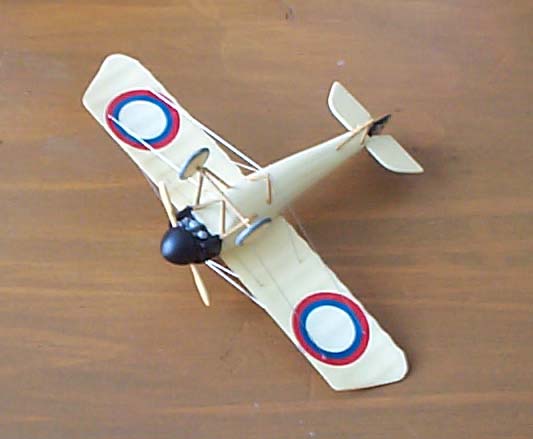
The kit went together easily, all the parts fitted well. The cowling fitting snugly and tightly over the two glued fuselage halves which always fills me with confidence as to the fit of a kit. As this aircraft is a monoplane there really isn't that many parts to put together and no struts to make sure that line up with a top or middle wing. Construction is very simple and the plastic easy to work with. What seams there were on the fuselage I filled with "White Out" [Liquid Paper], which thanks to a tip from Micheal Kendix I have been using as a simple filler with a lot of success. I replaced all the struts with the exception of the front undercarraige arrangement with rod styrene. I do this on all kits, as my fit and fiddle usually guarantees the struts will match perfectly and cover up any constructional errors I make. The struts supplied with the kit were a bit thick, but very usable.
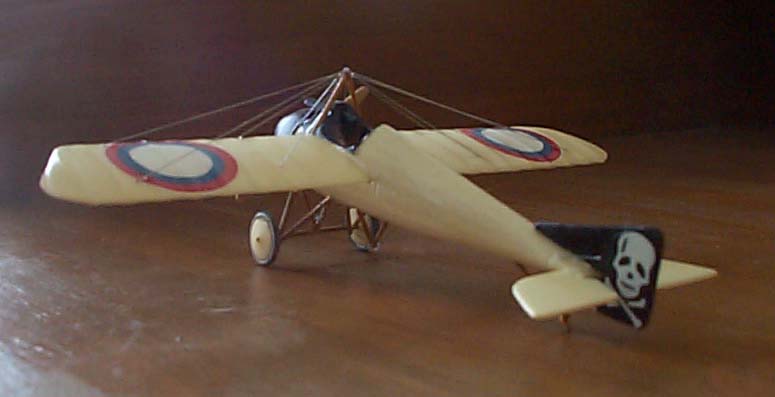
The parts were painted before being assembled, the Clear Doped Linen is Testors Modern Desert Sand. Thanks also to a tip from Diego Fernetti, I added the decals before assembly and after painting. After painting a part I painted it with "Future" [Klear] and then added the decal. I then gave the decal a coat of Future as well. It worked well. The parts have the same lustre, decaling was less of a hassle and it didnt make the build process any messier. The cowl and tail are in Testors Acryl Semi-Gloss black. The trim around the cockpit is painted in a Leather colour. The wheel rubbering was painted with Testors Acryl Neutral Grey.
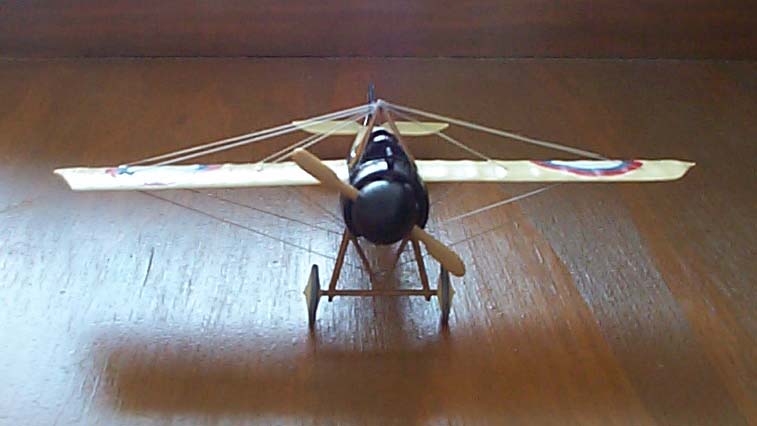
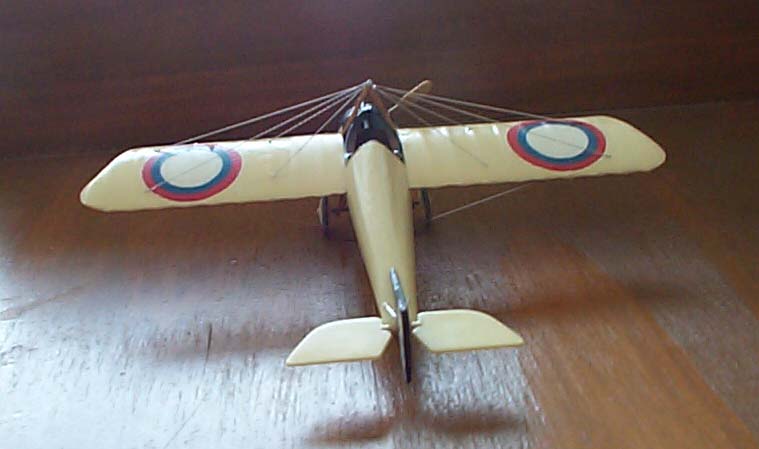
Rigging was done using straightened stainless steel bought from smallparts.com, the slivers of metal being cut to size and then glued down with white glue. One of the advantages of whiteglue is it clear once drying, meaning you know you cant touch it while it is still white! It is also water soluble, so mistakes are recoverable with a Q-Tip dipped in water. The one catch to be aware of with the Morane is that the lower rigging isn't a mirror of the rigging on the top of the wing. The rigging for the front wires runs from the undercarraige. I love the rigging on the Morane, i think it captures the feel of early WWI aviation exceptionally well. The rigging looks like it is holding the wings up and stopping them curling like a banana peel.
Conclusion
I have always thought that for someone wishing to get into WWI modeling, a monoplane fighter like the Morane Saulnier or Fokker Eindecker are an exellent introduction. They are of simple construction and certainly are no more difficult than the popular WWII monoplane fighter kits, with the added advantage of not having to worry about setting a biplane top wing. The rigging on a monoplane is easily accesible and less difficult than stringing up a biplane. And I think that the rigging form in the Morane or Fokker with the series of diamonds from the front view makes the aircraft more attractive. In 1:72 there are several quality, inexpensive and readily available kits of both the Morane and Fokker from quality manufacters.
I was happy with how this kit turned out and got a lot of enjoyment from building it. I now have a "skull and crossboned" early Russian aircraft in my little collection with an attractive CDL scheme.


![]()


