Building Historic Plastic Models' 1/35 Sdkfz. 232 (6 rad) Radio CarBy Richard Eaton |  |
Introduction
Like many armor modelers, I was excited when the Historic Plastic Model's (HiPM) SdKfz. 231 (6rad) Armored Car appeared last year. No other reasonable model of this important early WWII vehicle has been produced in 1/35 scale. This year HiPM has come out with a radio car version. This kit was expertly reviewed in the August 2001 issue of Internet Modeler. When the kit arrived from IM, I couldn't help but jump on the project. If you are into early WWII armor subjects, read on.
Background
The SdKfz. 231 (6rad) armored car was designed in 1929 and became the pride of the German army at the frequent military parades before the start of hostilities. These vehicles first tasted combat with the campaigns against Poland, France and the Low Countries. Shortly after, these vehicles were replaced by the more advanced eight wheeled cars and ended their career with training and police units. There were many manufacturers and types of the 6rad car types with some 123 units built. This model is based on the Bussing NAG G-31 variant.
Building the SdKfz. 231 (6rad) Radio Car
|
|
|
|
|
|
|
|
|
|
|
|
|
|
 |


On page one of the instructions I assembled the vehicle frame and lower engine components. Things are a tad vague here so be sure and dry fit before cementing. I trimmed the frame cross members to fit inside the long frame side part. Be sure that the frame side is positioned flush with the hull side. I modified the exhaust pipe leading into the muffler so that the assembly could fit at the front of the motor as indicated.
On page two I added the exhaust pipe, drive train, and other lower hull components. I opened up the axle holes in the right rear suspension members so that the rear axles would fit through them as indicated. I then assembled the rear drive train and transaxles and glued the assembly to the suspension piece. This later turned out to be a mistake. Leave the transaxles free at this point.
On page three I added the left side frame, rear suspension and rear components. At this point I discovered that the rear transaxles are too short to go through the rear suspension pieces as indicated. I freed up the cemented right side and aligned the transaxles as best I could. I cemented everything in place and secured the four rear wheel disks to the rear suspension instead of the axles as indicated.
On page four I assembled the simple front axle, suspension, steering linkage, and wheel disks without any problems. There is a nice underside view drawing here so that you can check out the completed undercarriage for alignment.
Following pages five and six I assembled the vehicle's wheels and large fenders. The kit supplied wheels, while nicely molded, are a tad skinny. You might want to replace them. I cemented all wheels in place and set the model down on a table to check alignment and let things firm up. Dry fit the fenders as they are large and it is not perfectly clear where they should fit. Page seven gives a nifty parts ailment guide for the wheels, fenders, and the myriad of storage boxes. Once I was happy with their alignment I cemented the fenders in place.
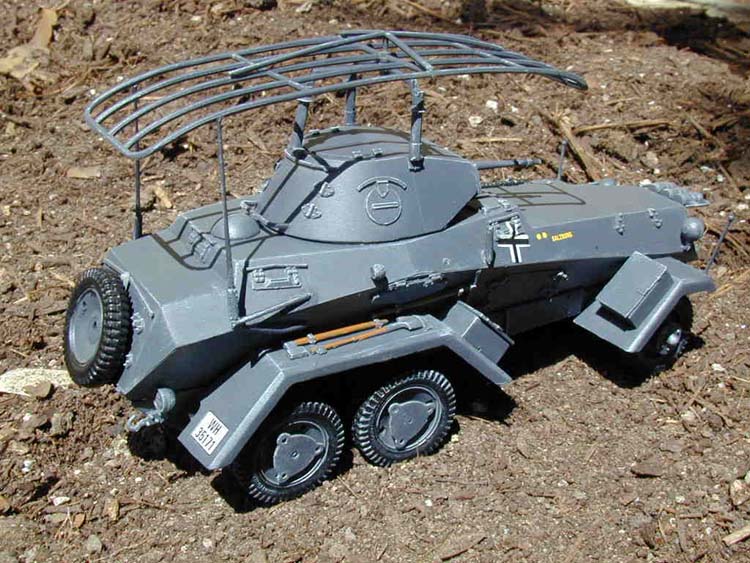
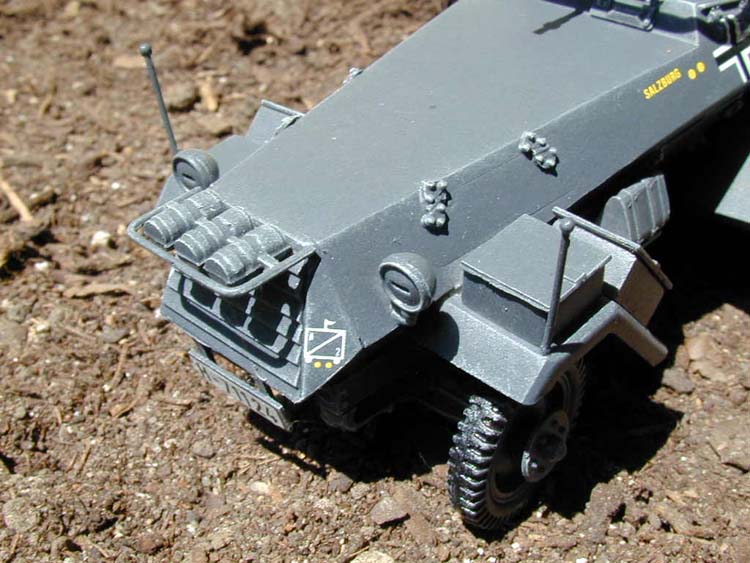
Pages eight and nine have instructions for the side hatches and the plethora of storage boxes on, first, the left and then right sides of the vehicle. You can place as few or as many boxes as you like. I tend to like to give my models lots of storage room! I first attached the side doors. I had to trim the doors quite a bit to get them to shut flush with the hull. You may pose them in the open position. I then cleaned up box components and placed them around the hull and fenders. The rear top fender boxes would not fit so I left them off.
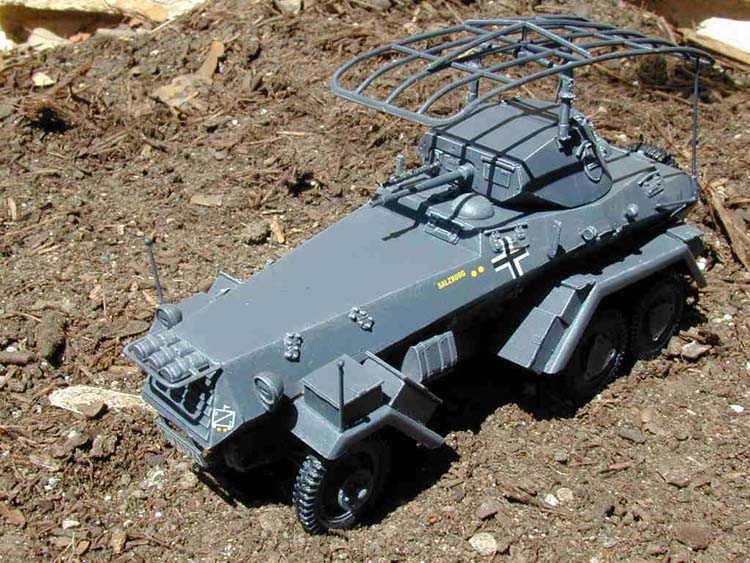
I then placed the large upper hull into place on the lower hull (page 10). It fit like a dream! I added the turret ring and lower turret to the upper hull. Again fit was good. I cemented the upper hull in place on the lower hull. It require no filler and little sanding to form a perfect hull. I then added the upper hull hatches, vision ports, and various details to the model. The upper hull two-piece hatch required sanding to fit flush. I then added upper hull components to the right side of the vehicle (page 11).
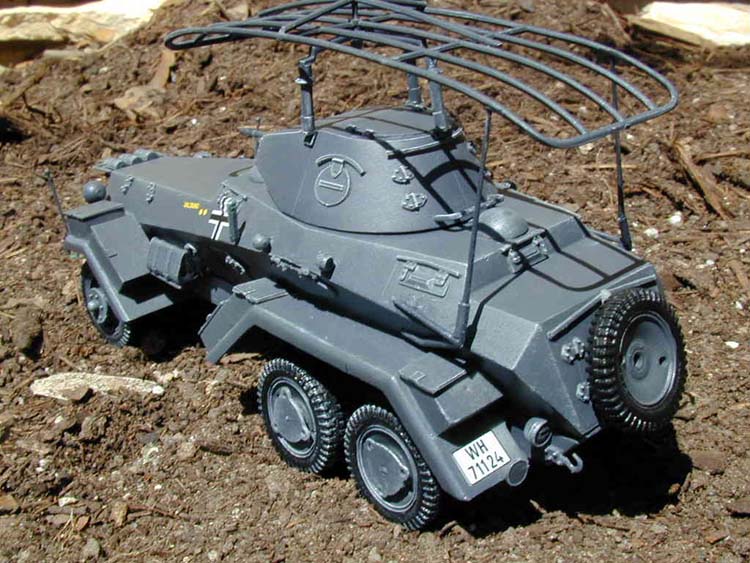
Following page 12, I added all rear hull hardware and components. The spare tire is mounted under the rear of the vehicle though it isn't clear in the instructions. It is unclear where the rear antennae supports go on the hull so I left them off at this point.
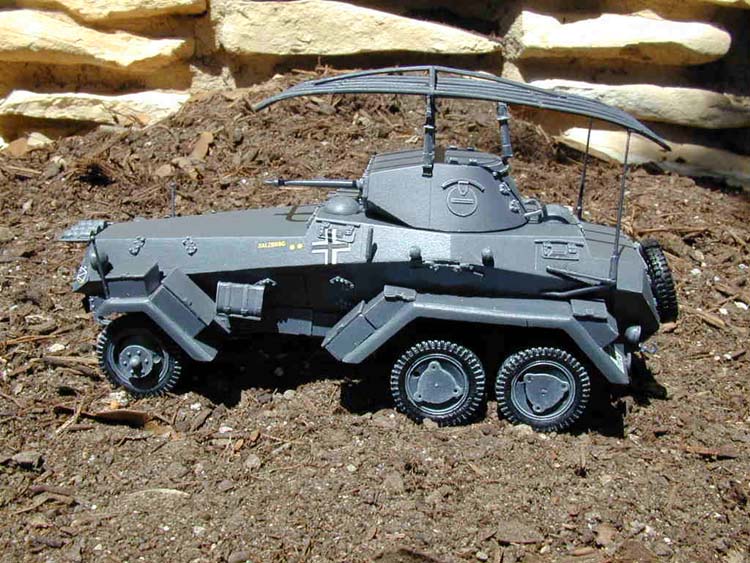
I then assembled the turret and added the detailed parts (page 13). I opened the business ends of the 20mm and machine gun using a number 11 point and secured them to the turret faceplate. HiPM really did a nice job with the turret of this vehicle. It has nice shape and the details are scale thin. I then secured the completed turret onto its base and did the swivel test. I then added the nicely molded smoke generators to the vehicle front of the. Interesting that these are not mentioned in the directions.
Wrapping up, I then assembled the large antennae array. Take care in bending the top support brace into shape. The turret-mounted support went together well. I then tried dry fitting the components. The turret antennae mount did not fit the turret well so I did some trimming and glued it in place. I then fit the antennae and rear mounts to the hull. The rear mounts are too short. I glued them to the hull and then replace the mount poles with stretched sprue. Once I was happy with fit, I glued the antennae in place. I suppose one could keep the turret mount free so the turret could turn but this would make the model extremely fragile.
Painting and Decals
I sprayed the entire vehicle with Testors Panzer Grey. Once that was dry, I painted the tires with slightly lightened Testors flat black. This kit just cries for a light dry brushing to make those details pop out! I dry brushed very lightly with light gray over the entire vehicle. Don't forget the wheels and tires! I then sprayed all the decal surfaces with Testors Glosscoat to shine them Up for the decals.
The kit provides at least three different markings for the vehicle. I chose the 2nd Panzer Division's marking for France, June 1941. The decals are well done and in register. The only problem I had was fitting the front ID plate to the piece provided. The decal was too large so I trimmed it. I use Solvaset to help the decals snuggle down with success. After they were dry I sealed the decals with another thin coat of Glosscoat. I then finished things up with a quick coat of Testors Dullcoat.
Conclusion
HiPM kits seem to be getting better as they come along. The detail and clean moldings make this one the best HiPM products I have seen. Because of some fit problems, I recommend this kit to the experienced armor modeler though I think anyone could make a fine model out of this if they use care. I love German armored cars and this HiPM jewel sure fills a big hole in my fleet! I thank Chris Banyai-Riepl for sending me this review sample.


![]()


