Autumn Leaf Aviatik | 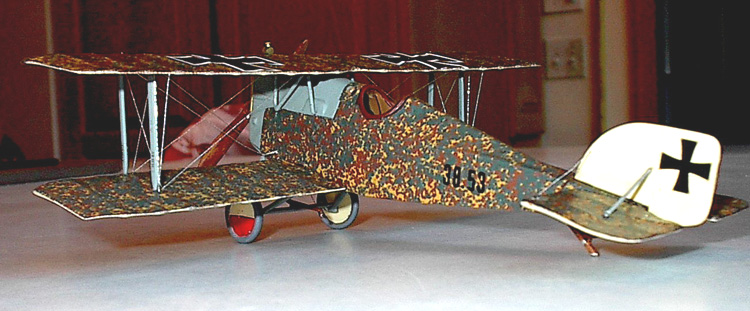 |
History
The Aviatik D.I fighter was the first indigenous fighter designed and built to enter Austro-Hungarian Luftfahrtruppe (LFT) service. Designed by Aviatik chief engineer Julius von Berg (hence the commonly known name of "Berg' D.I), construction of the prototype began in August, 1916. Production of the D.I began in April, 1917. The Berg was built by Aviatik (series 38, 138, 238 and 338), Lloyd (series 48, 248 and 348), Lohner (series 115 and 315), MAG (series 92), Thone & Fiala (series 101 and 201) and WKF (series 84, 184, 284 and 384). A total of 677 D.I fighters were accepted by October, 1918.
The Berg was flown, at some point in their career, by most of the Austro-Hungarian aces. Frank Linke-Crawford was killed while flying D.I 115.32, a Lohner built aircraft. The D.I was powered by different engines. Those D.Is that were powered by the 200 hp Daimler engine were the best due to their superior climb and speed. The D.I sported a variety of radiator designs. Similarly, the location of the twin Schwarlose machine guns also varied, some being mounted at eye level and some alongside the engine.
THE KIT
Flashback has produced, in 1/48 scale, a pretty good version of a Lohner built D.I. The kit has one sprue of injected medium gray plastic. The basic parts are all there, plus there is a sheet of photo-etched detail parts including seat-belts, cockpit, control horns and the wires for spoked wheels. There is a full sheet of hexagon camouflage decals to complement the sheet that allows you to build Linke-Crawford's fatal aircraft; although the red band around the fuselage and on the top wing is in red, as opposed to generally accepted black. Finally, there is a resin Daimler 200 hp engine with resin exhausts and manifold.
CAMOUFLAGE/PAINTING
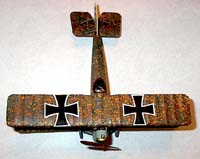
 The Berg was dressed in a variety of colors during its operational career. There was the basic wooden fuselage with clear doped linen wings, the multi-colored hexagonal pattern provided in the kit, the serrated band pattern, and my personal favorite, the 'Autumn Leaf' pattern. A great looking model by Bob Laskodi showing the hexagonal pattern can be found at the WWI Models site - I decided to go with the Autumn Leaf pattern after having seen how striking it looked on the D.I at the Champlin Fighter Museum.
The effect was obtained by daubing the airframe with sponges or wet rags soaked in three different paint colors. The late Dr. Martin O'Connor, the leading authority regarding Austro-Hungarian colors, believes that the first color to be applied was a mustard yellow (Metheun 4B6), followed by a reddish brown (Methuen 7D7) and completed with a medium green (Methuen 27E8). There was no pattern followed, simply a random application of the paint, never allowing one color to dominate.
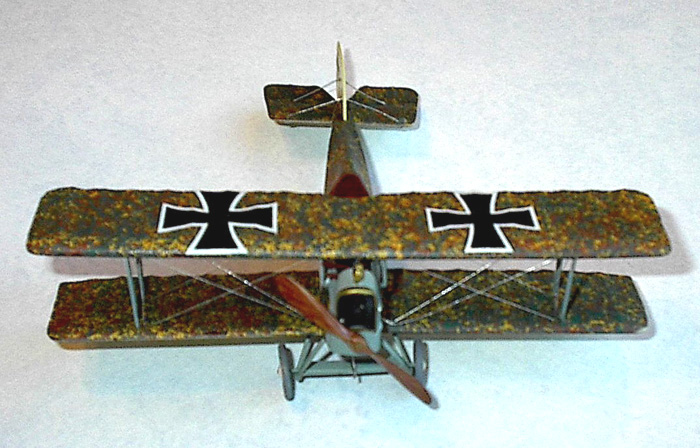
The D.I had this pattern applied to all upper flying surfaces as well as the fuselage sides and top. The bottom of the fuselage was left in its natural, polished wood condition and the under surfaces of the wings were left in clear doped linen. Metal parts and the landing gear were painted in a blue-gray.
 For the Autumn Leaf effect, I opted for Americal/Gryphon sheet # 91. It has enough to cover two complete D.Is. I cut out the hexagon decals and used them as a pattern on the 'Autumn Leaf' sheet. When covering such big areas with a decal, I like to provide an undercoat that comes close to matching one of the colors of the decal. For this, Model Master's 'Gloss Brown' in a spray can was an almost perfect match for the brown on the decal. Not only did the glossy surface provide a good base to settle the decals, but any errors in application were hidden by the brown paint.
The only problem with the decals came in applying them over some of the raised detail on the front fuselage. A lot of Solva-a-Set eventually got the decals to wrap themselves around the detail nicely. When everything was finished, I shot the model with a coat of Model Masters 'Dull' to give it the look like the Champlin D.I.
I was not able to find a lot of photos of aircraft in Autumn Leaf colors, so I decided to do a 'representativeî example, 38.53. This was one of the initial order of 72 Bergs built by Aviatik. I marked it with Flik 42Jís red and white wheel covers. The fin and rudder were left in clear doped linen on some D.Is, and since I didn't have a photo of 38.53, decided to go with the contrast.
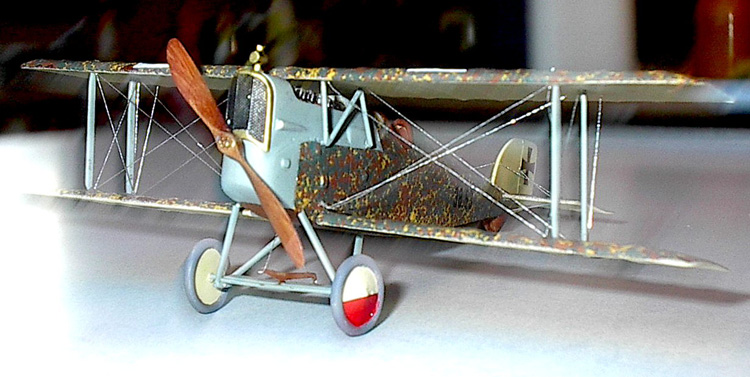
For clear doped linen, I used Model Masters 'Modern Desert Sand'. The brass around the radiator was Model Masters 'Brass' enamel. The wood grain effect on the propeller and belly of the fuselage was obtained following a two step process that is simple, quick and provides a nice representation of wood. I first air brush the wooden areas with Model Masters 'Wood'. This provides the base color. After letting it dry, I dip a small sponge used for house painting tight areas into an acrylic 'Burnt Sienna'. I then rub the sponge over the wood painted area in one direction, quickly. In no time at all, an easy wood grain representation.
BUILDING THE MODEL
 First, read the section on rigging that follows. All semi-holes and holes should be drilled before any construction begins. The cockpit has a nice selection of PE parts and a good-looking instrument panel. Unfortunately, the cockpit is so deep that almost all of it disappears once the fuselage halves are joined. Some trimming of the cockpit floor needs to be done, but overall the fit is pretty good.

I drilled out the locating holes on the fuselage for the lower wings and trimmed the mounting pegs to fit. I used gap filling CA and made sure that it had completely hardened before handling the airplane. The wing join is delicate and a little extra attention here goes a long way. To attach the top wing, I first glued the cabane struts to the fuselage. The fit was good and not too much jiggling had to be done to line up the top wing. The PE struts for the rudder and the claw brake for the landing gear bend easily, so be careful.
RIGGING
If you have never rigged a biplane, there is no need to be scared. The D.I has a pretty basic rigging scheme that isn't hard to duplicate. I like to use the technique that I learned about from Bob Laskodi. To do it, you need a pin vise, some super glue, thread, forethought and a little bit of patience. First, locate where the starter holes should go before any gluing takes place. Then, with a pin vise using a small drill bit (#78 or #79), drill holes partway through the plastic. This will be where the rigging starts. Apply a small amount of CA and insert the thread. If you can figure out how to locate more than one rigging wire from the same hole, all the better! Once the glue hardens, drill a hole all the way through where the wire ends up. Try to use the same end hole for as many rigging lines as possible. Apply a weight to the end of the thread(s), use CA again, wait a few minutes and cut off the end. Voila!, a taut rigging line.
The starting 'semi' holes should be on the underneath of the more visible top wing and tail plane. The 'full' holes I try to locate on the less visible, underneath bottom wing. A little putty and paint after the glue sets and no hole should be visible. The instruction sheet shows the basic rigging diagram to be followed. A little experimentation will result in a system you can quickly feel comfortable with.
CONCLUSION
This was a fun kit to build. The decals from Americal go on easy. The final product can look striking using any number of the Austro-Hungarian camouflage schemes. The rigging is not complicated and can be duplicated without too much trouble. Any questions I had about either building the model or applying the decals were quickly answered for me by the good people on the WW I Modeling List Thanks also to Gerry Geiger for helping in this article and to Bob Laskodi for the scanning of the photos.
SOURCES:
-
Peter M. Grosz, Aviatik D.I Datafile #45, Albatros Productions Ltd ISBN 0 948414 60 X
-
Peter M. Grosz, George Haddow & Peter Schiemer, Austro-Hungarian Army Aircraft of World War I, Flying Machines Press ISBN 0 9637110 0 8
-
Dr. Martin O'Connor, Air Aces of the Austro-Hungarian Empire, 1914-1918, Champlin Fighter Museum Press ISBN 0 912173 03 3


![]()


