AMtech 1/48 Ta183 "Huckbein"By John Lester |  |
History
It was late 1942 and Kurt Tanke and company were thinking ahead to the time when the Luftwaffe would want new high speed interceptors to replace the Fw-190's and Bf-109's then in service. Engineer Hans Multhopp was placed in charge of a team that was tasked with conducting aerodynamic studies for a new turbojet fighter.
 Their work resulted in the "Huckbein" (a German cartoon raven troublemaker) project or Design II, designated Ta183 in 1945. The aircraft was to be of composite wood and metal construction. The thin wooden wings would be mounted at mid-fuselage and swept back 40 degrees. A large tail fin, swept back 60 degrees, would be capped with a sharply swept horizontal tailplane. The rudder and elevons on the wing were to provide elevation and roll control; the tailplane surfaces would only be used for trimming. Pilots were housed in a pressurized cockpit and would have excellent all-around vision under a large bubble canopy. The aircraft was to be armed with four 30mm cannon, with four wing pylons and a small recessed ordnance bay allowing a variety of external stores to be carried, including the new X4R air-to-air wire-guided missile or up to 500 kg (1100 lbs) of bombs. While the prototypes would use the Jumo 004 turbojet, as fitted to Me-262's, production machines would be fitted with the He S 011 turbojet.
The Ta183 design was green-lighted for production by the OKL after the Emergency Fighter Competition in February, 1945. Prototypes were to take to the air in May or June, with production machines starting to roll off the assembly lines by October, 1945. This, of course, was never realized - the British captured the Focke Wulf production facilities in early April.
The story didn't end there, however. The Soviets captured factory jigs and complete plans for the fighter. These were delivered to the MiG design bureau and six examples were reportedly built, starting in early 1946. Powered by a Rolls-Royce Nene turbojet, the first Soviet Ta183 flew in June, 1947. Low speed handling and compressibility issues resulted in several changes to the design. The resulting aircraft took to the air on December 30, 1947; five months later the first production orders were issued for what was now called the MiG-15.
What You Get
 Amtech is a new manufacturer founded by folks who have been in the industry a long, long time. Their first release is an all-new tool of the Ta183 in 1/48. I have built the first and last test shots of the new kit, so all I had to work with were the sprues. When the kit is issued in September, 2001, you'll find the following in the box: ·

-
Two sprues of grey styrene ·
-
One clear canopy · Instructions ·
-
Decals (by ThreeGuysReplicas) for six different aircraft
-
Black "1" of 1/JG2
-
Raben Staffel 5/JG26
-
III/JG2
-
Black "14" of 1/JG52
-
Black "3" of III/JG54 (that's the one on the box)
-
White "2" of Karaya-Staffel/JG52)
-
Designed from original Focke Wulf plans, the kit is injection molded in a hard, grey plastic in Korea using steel and cast copper-beryllium molds. It sports nicely engraved panel lines and airfoil-shaped control surfaces. The detailed cockpit includes and ejection seat, instrument panel with finely detailed front and raised instrument backs on the flip side, more crisply detailed switches and gauges on the cockpit tub, and EZ42 gyroscopic gunsight (but no throttle or joystick for the X4R missiles). There's an optional, detailed ordnance bay and a drop tank with sway braces to put in it (or a plate to cover the space), and pylons for the four nicely done X4R missiles (or whatever bombs you might have in the spares box). You get jet pipes to do either the Jumo 004 or Henschel He S 011 powered versions. The tires are even slightly flattened (but not bulged). A single piece, crystal-clear canopy is provided, molded in the closed position.
 In all respects, this kit is the equal of anything Tamiyagawa is putting out (or the new Eduard stuff). The engineering of the kit is especially noteworthy. The tailpipe and intake are molded as separate pieces. Despite the complexity of the curves, the pieces fit beautifully - and without those nasty, impossible-to-fix seams on the inside surfaces that one gets in other jet models. Both are blanked off, so you can't see straight through the model, another plus. About the only negatives I could find are some ejector pin marks (tires and inside of the gear doors) and missing a pitot tube, D/F loop and radio masts (which the Focke Wulf drawings don't show). The X4R missiles are molded in two halves, one of which has the body that's not completely circular. As I didn't use the missiles, this didn't bother me though.
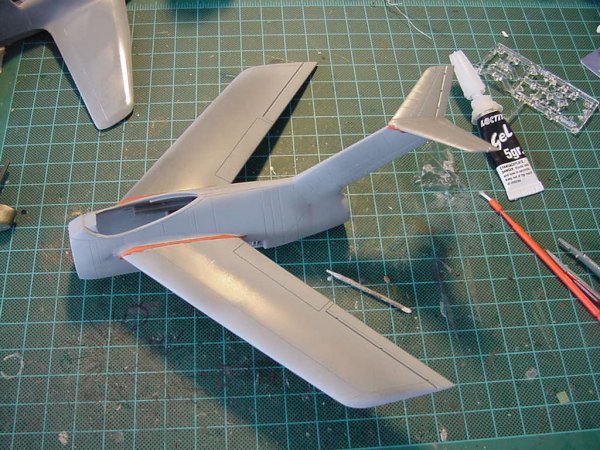
Construction
 Again, the models I build came from test shots - the first and the last, pre-production ones. I had no decals and no instructions - but real model builders don't need those, right? The first test shot had some fit problems, which I'll relate below. The last one, which is what will be in the box when it hits the hobby shop shelves, had none. You heard that right - I had no problems building the pre-production kit (well, none that weren't of my own making!).

The first thing to do was puzzle out where everything went . which was my first mistake. I should have looked up references first, and why that simple idea didn't occur to me, I dunno. Anyway, fiddling with the parts and taping them together led me to a surprisingly sound plan of action:
-
Glue in main gear wells
-
Glue fuselage halves together
-
Add the weapons bay or its cover
-
Affix the tail cone
-
Glue wings and tailplane on
-
Insert cockpit from the front, followed by the nose gear well
-
Glue the nose cap on
-
Add gear, gear doors and pylons.
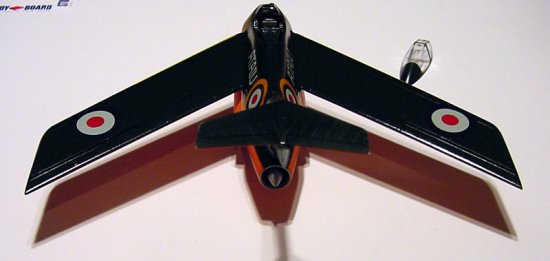
 With that plan in mind, I embarked on my building odyssey. I had decided to do the first test shot as a Japanese Navy license-built copy, which turned out to be a good idea - between my goofs and the nature of the first take on the kit, there are enough differences that the Ta183 police would be all over me if I tried to pass the model off as German. Just to cheese off those experten, I decided to do the pre-production version of the kit as a [I] Kriegsmarine[/I] carrier-borne variant, complete with tailhook and folding wings.
To start off, I spray painted as many parts as I could prior to assembly. On the Japanese model, this meant the cockpit would be IJN Green and wheel wells, doors and landing gear struts aluminum (I decided against an aotake-style finish, reasoning that this was often skipped in the closing days of the war). On the German machine, this meant that pieces outside of the cockpit became RLM 02. Gunze paints were used for the Japanese model, appropriately enough, while Testors Model Master (TMM) was used exclusively on the German.
 Had I bothered to look at a reference such as Dan Johnson's Luft '46 website first, I would not have put the main gear wells in backward (the big hole goes to the back, so the vertical main strut is aft and the angled bracing strut is forward). Construction went fast - I had the main assemblies built in just under two hours. On the first test shot, there was a noticeable step between the tailpipe and the fuselage, and the wings were somewhat thicker than the wingroot. Putty (less than I would have used on the typical limited-run kit) and vigorous sanding took care of that. Also on the first test shot, I had problems aligning the wings - one wanted to have a bit of dihedral, the other anhedral with a fore-and-aft twist (sounds like a trendy coffee drink, doesn't it?). That's something you learn to deal with when you build limited run kits; I made a simple jig to keep everything aligned while the glue set. After putty to address the wingroot problem, I rescribed the panel lines I'd sanded off - and added one next to the wing root join, because it looked silly not to have one there. On this one, I decided to use the pylons but forgo the weapons bay, so I affixed the cover plate under the fuselage and drilled out the flashed-over holes in the wings for the pylons.

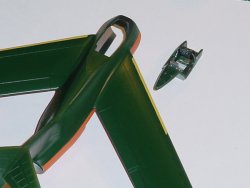
On the pre-production kit I had no fit problems, and all seams (the little that there were) needed just a bit of Mr. Surfacer 500 to go away. I also managed to get the main gear wells correctly positioned. So far, so good. The wings on this kit were significantly thinner than on the first one, which allowed me the conceit of deciding to make them all-metal instead of wooden ribs and bonded plywood mounted to a duraluminum spar, as on the "real" thing. I scribed leading edge slats - which I figure the Germans could have done, rather than adding the boundary layer fences as did the Soviets. I then lopped off about an inch of the outer wing panels so I could display them folded (hey, it's the carrier version!). Styrene stock covered the resultant holes in the wings, with various strips, wires and greeblies from the parts box serving to detail the structures. The gap between the wing root and wings was exactly as thin as the engraved panel lines, so I left it alone. This model then got the recessed weapons bay and the pylons for external stores.
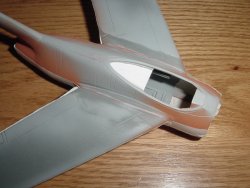
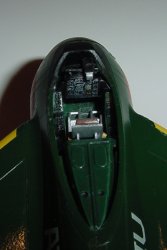
 While the models were setting up, I turned to the cockpits. Detail here is fantastic, and pops right out with a bit of drybrushing. I especially like the way that detail is molded to the front AND back of the instrument panel. Since it was to represent an IJN airframe, the first test shot's cockpit tub was painted IJN green, with an aluminum ejection seat, leather seat cushions and flat black instrument panel and switch banks. I added photoetched shoulder and lap belts from an Eduard set to dress up the seat. The German model got RLM 66 cockpit tub and seat, with flat black instrument panel and switch banks and leather cushions, plus another set of photoetched seatbelts (this time, the shoulder belts were run through slots I cut in the seatback). I also added a throttle quadrant and joystick for the X4R missiles to the left and right cockpit sills respectively. On the first test shot, the ledge behind the seat was significantly smaller than the hole in the fuselage for it, so I covered the gap with a piece of .010 stock. I also managed to break off the gunsight - fortunately, I was able to find it before the carpet gremlins made it disappear forever.

 After painting the majority of the airframes, as described below, I glued the cockpits in place. On the first test shot, I needed some careful work with a file to get it to fit; on the second model, it all fit perfectly. Then the canopies were affixed in place. After that I added the nose gear well (no problems on either kit) and the nose cap (again, no problems). Then came the landing gear. Because I had things backwards, and because the bracing struts were a bit long, I had do get creative with the first test shot. I had no problems with the other kit. Then came gear doors, actuating rods and finally, pylons for both. I added a pitot tube to the port wing for the Japanese plane, and arrestor hook, pitot tube, Moraine mast and D/F loop from the spares box to the German one.
Painting/Marking
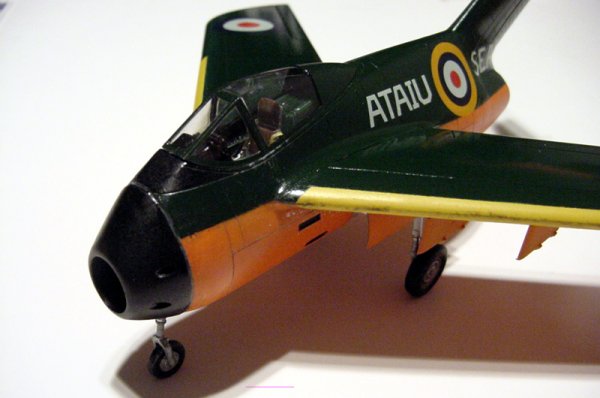
 The really cool thing about this kit is that one can paint it any old way one pleases - and no one can say you're wrong. The Japanese plane got Gunze IJN Green over Humbrol orange, in order to represent a pre-production testbed. The nose, inside canopy framing and a portion of the upper fuselage in front of the windscreen were painted a sooty black. The Humbrol sprayed fine, but the Gunze - I had no end of problems with it, and I still don't know why? Excessive humidity? Improper thinning? Beats me, but the first coat orange peeled. I sanded that off and repainted. That coat stayed tacky for days, collecting thumbprints and cat hair like I collect models. Sanded that down, resprayed. That coat stuck to the low-tack drafting tape I used to mask off the yellow wing ID strips. Sanded, repainted, and still the surface was uneven. I'd had enough, though, so I rationalized the Japanese had just as much trouble as I did getting their paint to adhere to the wooden wings and went hunting for decals.
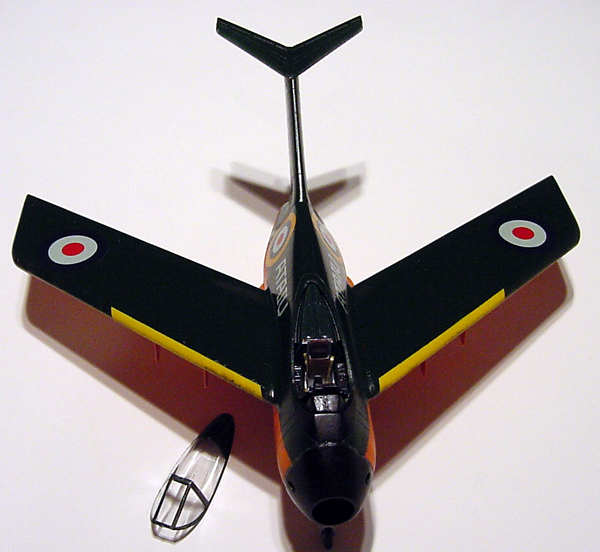
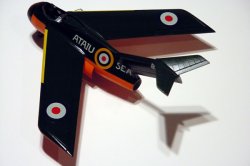
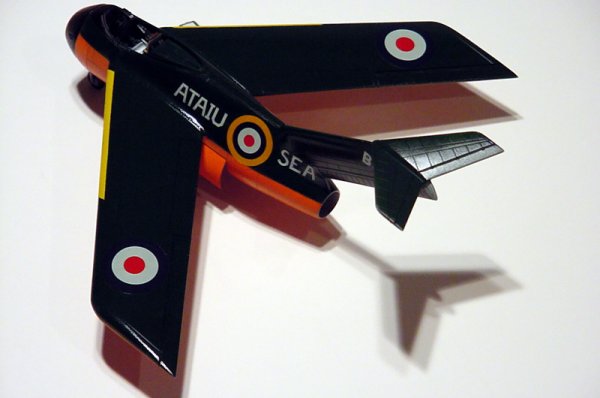
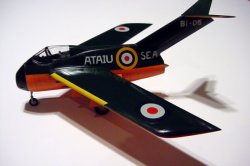
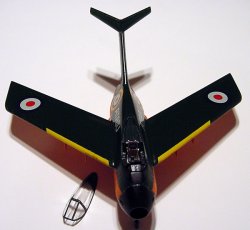
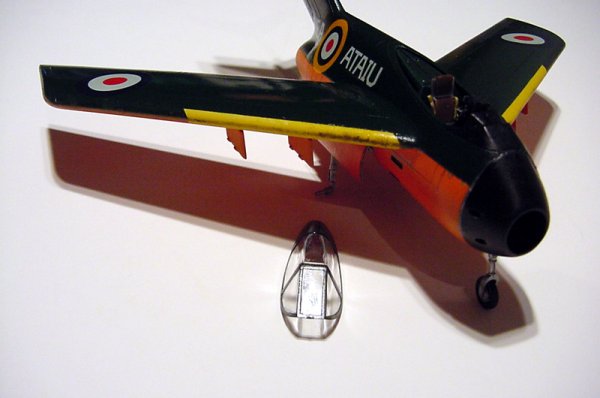
 I'd originally planned to do a Japanese Navy version with B-29 kill markings, but then stumbled across an old Hasegawa Zero in "Strange Markings" - captured airframes evaluated by the British and US forces. Cool! The British AIATU-SEA markings were applied for that "captured pre-production version evaluated by the Allies" look that's all the rage around my house. Despite being printed in 1989, they went on fine, needing just a bit of Micro-Sol to settle in place. Unfortunately, the white is just a bit translucent. Ah, well.
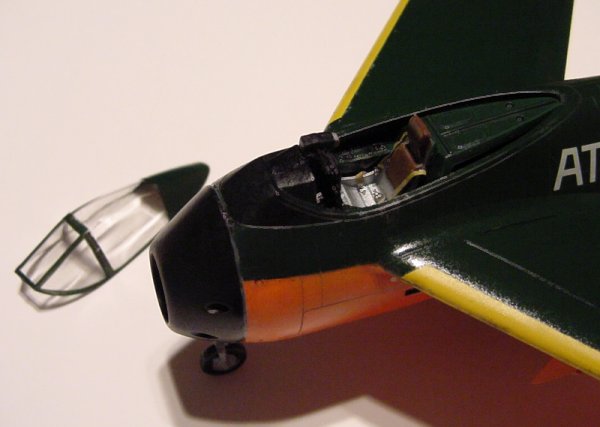
 The German plane was much easier, maybe because I'm more familiar with enamels. I painted it in RLM 02 over flat white for North Atlantic service, with RLM02/RLM74 splinter scheme on the upper wings and RLM74/75 mottle on the fuselage sides. The nose was painted yellow, just because I could.

Conclusions
All-in-all, this is a fun kit - and despite the trouble with the first test shot, I'm happy with the way they turned out. There's enough detail that you can be happy building one straight from the box, with plenty of room for the super-detailer to go nuts. Assembly is simple and straightforward, so you'll have the energy to add all those little details. It's a kit I can enthusiastically recommend to anyone - and I know I'll be getting a couple more when the hit the shelves.
Amtech has a whole slew of new kits coming out in the next year - you can read all about that here.


![]()


