Hasegawa 1/48 Supermarine Spitfire Mk.IXBy John Tate | 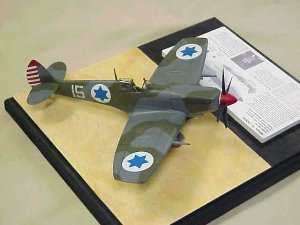 |
Background
In June 2001, after six years of rumors, Hasegawa finally released a new-tooled, 1/48th scale Spitfire Mk. IX model to the U.S. market. How good is it? First, let's examine the history of mainstream, 1/48th scale Spitfire IX model kits.
Monogram released the first quarter-scale Spitfire IX kit back in the early 1960s. Like many kits of the era, it was more toy than model but was the only 1/48th scale, late Merlin-engined Spitfire kit around until Arii/Otaki released their Mk. VIII in the 1970s. The Otaki kit was a good, clean model and the basis of many modeling efforts. However, the kit lacked a realistic cockpit and did not have those pesky wing fillets, among many other shortcomings. Only a master modeler could turn it into a contest winner.
After Hasegawa and Tamiya released their modern-tooled Spitfire Mk. Vb's in 1994, many modelers hoped the Japanese plastic giants would do a Mk. IX as well. However, despite persistent rumors, no Hasegawa or Tamiya Mk. IX appeared on hobby shop shelves. To fill the void, two upstart model companies gave the Mk. IX a try, Ocidental Replicas and ICM. Ocidental's kit was released in 1998 but failed to capture the Spitfire's aerodynamic lines and compound curves. The ICM model was next, but despite better detail, had fit problems and like Ocidental's kit, failed to accurately capture the Spitfire's graceful shape. After 40 years of plastic modeling, there was still no accurate, 1/48th scale Spitfire Mk. IX.
That brings us to Hasegawa's newly-released Spitfire IXc. Finally, an accurate, late-model Spitfire! Let's take a look:
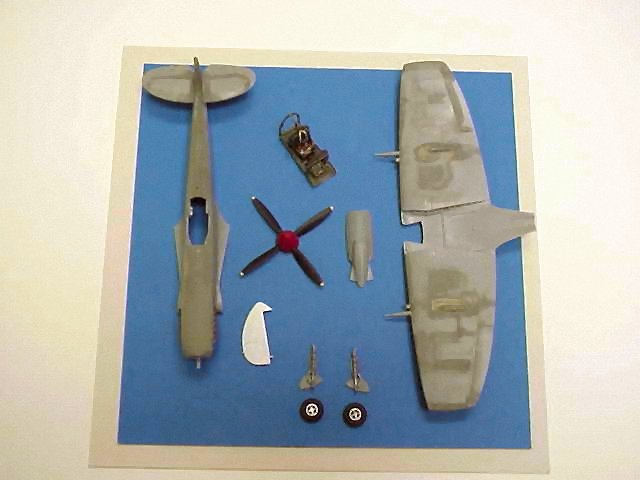
The Kit
The kit's box art was dramatic, featuring a Spitfire IXc of No. 316 (Warszawski) Squadron. The kit itself was molded in a medium gray plastic, softer than the usual Hasegawa plastic and similar to an Accurate Miniatures kit. Two marking schemes were provided, for the boxtop No. 316 Squadron machine and a Spitfire XVI from No. 423 (Hornet) Squadron, RCAF.
 The kit instructions were clear and simple, a Hasegawa trademark, and construction began with the cockpit. It was a beauty, probably the best out-of-the-box Spitfire cockpit modelers have yet seen and a far cry from the simplified, inaccurate cockpit found in Hasegawa's Mk. Vb kit. Two types of gunsights were included, the early reflector and later gyroscopic type. The only missing items were the seatbelts, which should be rigged through the armored headrest and attached via a retaining wire to the rear cockpit frame. I used the excellent Cooper Details resin and photo-etched Mk. V seat, since it was identical to the seat found in the Mk. IX. However, the kit seat is fine if you opt to use it. A color note: the instructions indicate the pilot's seat should be painted British Interior Grey-Green, but many Spitfire seats were left an unpainted, red-brown resin. Seatbelts were khaki or medium blue.
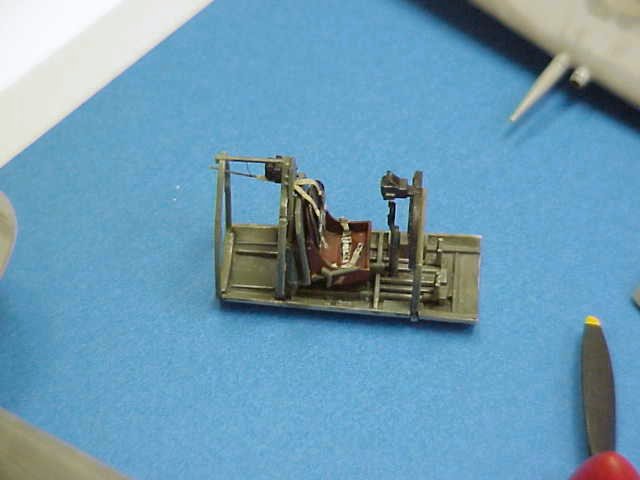
The cockpit plugs into the assembled fuselage from the bottom, a nice touch that made this assembly step easier. However, I found it was better to leave off the seat frame strengthening rib (which runs from the top of the pilot's headrest back to the rear cockpit frame) until the cockpit is firmly in place. Once the cockpit was inside the fuselage, I noticed the seat frame was too small and did not touch the cockpit sides, a problem also found in Hasegawa's Mk. Vb. I added scrap plastic to fill the gap.
Another minor shortcoming was the cockpit access door. It was molded shut and unlike the Tamiya Mk. Vb, there was no provision for a separate door. I cut the door out anyway and added a door from the Tamiya kit.
 The wings came next, and the modeler needs to make a decision about what version of Spitfire he wants to build. This is as good a place as any to clarify Spitfire IX wing configurations. There were only two: the "c"-wing and the "e"-wing. The Spitfire Mk. VII, VIII and IX wings were all based on the "c"-type, universal wing found on the Spitfire Mk. Vc. The confusing, wartime nomenclature about Mk. IXa's and b's refers to engine type, not wing type. Likewise, F, LF and HF Mk. IX refers to engine type, not wing-tip type, unlike the Mk. V. For that matter, the main difference between the Mk. IX and the Mk. XVI was also engine type, although many Mk. XVI's had bubbletop canopies. Unfortunately, there is no easy way to tell if a Spit IX had clipped or standard, "c" or "e"-wings without checking references and looking at a photograph of the real thing.
If you decide on a clipped or standard-winged IXc, build it out of the box per the kit instructions, using the kit's separate "c"-type gun panels. However, if you want a IXe, you are going to have to work for it, since Hasegawa carefully omitted the "e"-wing gun panels. Why? So you can buy Hasegawa's Spitfire IXe kit when it is released six months from now, of course.
Never one to be satisfied with an easy build, I decided to make my Spitfire with an "e"-wing. This wing type began to appear in late 1944 and in terms of gunnery was a big improvement over the earlier "c"-wing. The "e"-wing eliminated the outer-wing, rifle-caliber machine guns and instead had U.S. 50 caliber machine guns installed in the inboard cannon slots. The outboard slots were fitted with standard 20mm cannon. With heavy caliber guns mounted close to the centerline and sighted with the "ace-maker" gyroscopic gunsight, the "e"-wing Spitfires were killers.
Rather than cutting apart the kit's "c"-wing gun panels to make "e"-wing panels, I borrowed the resin "e"-wing panel covers from the MPM re-issue of the Ocidental Mk. IX kit. The MPM panels fit OK after some minor trimming and the next step was filling the outer-wing machine gun holes and shell ejection ports. The kit had three types of cannon barrels so I used a pair of the shorter, rounder barrels for the outboard "e"-wing cannon. While examining the wings, I noticed some large bumps on the outer-wing machine gun panels. These did not appear to be present on "e"-wing Spitfires so I removed them. After some minor modification work, I had an "e"-wing Spitfire. Score one for the plastic model consumer.
One last word about the wings. The ailerons have a break line short of the end of the aileron span. This line is correct for a Mk. VIII, marking the end of the aileron span. Fill it if building a Mk. IX.
 The wings mated with the fuselage OK but filler putty was required along the wing-root seam. A bigger problem was the fit of the horizontal stabilizers. Hasegawa molded the stabilizers with interlocking tabs but these did not align properly with each other or the fuselage slot. I trimmed off the tabs and attached each stabilizer separately.
If building a Mk. IX, the modeler must carefully remove the oval-shaped wheel bulges near the wing root on the top of the wings. The bulges were correct for the Mk. XVI but not for most Mk. IX's.
At this stage I also attached the undernose air-scoop. This was a disappointment. Hasegawa molded the air-scoop assembly in two halves and the seam line cuts right through the air-scoop intake, a difficult place to fill and sand. After building the air-scoop, I attached it to the bottom of the engine cowling. The rear portion of the air-scoop did not align properly with the fuselage and I spent a lot of time filling and sanding the join line to properly mate these two assemblies. Hasegawa should have engineered this area for a better fit. By the way, the air-scoop intake hole on the Spitfire IX had a flap immediately inside the intake that diverted airflow up into the carburetor. The modeler may be deceived into thinking Hasegawa cheated and installed a plug where there should be a clear airflow hole. Not true. Hasegawa got it right. Leave the plug in place.
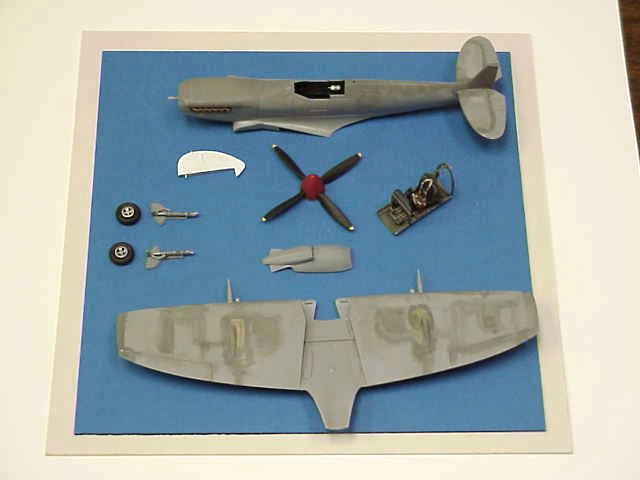
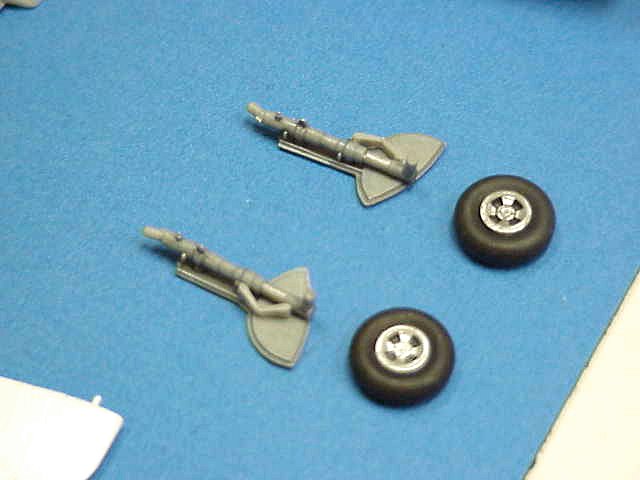
With the airframe together, I built the propeller and landing gear and attached them to the model. The propeller hub has one of those vinyl o-rings that makes attachment easier.
 The landing gear were nicely detailed and went together without trouble. However, the modeler should refer to reference photos to obtain proper gear alignment angles.
Hasegawa included parts for both the retractable Mk. VIII and the external Mk. IX tail wheel. The retractable tail wheel, pointed rudder and shorter ailerons were the only external difference between the Mk. VIII and the Mk. IXc so the modeler has all the parts in this kit necessary to build a Mk. VIII. Just add decals.
The last hurdle in completing the kit was the canopy. Amazingly, Hasegawa repeated the mistake of the Academy Mk. XIV series and had an extra notch just aft of the cockpit door panel line. The mistake is confirmed when the modeler tries to seat the rear cockpit transparency on the cockpit rim. The transparency is too long for the cockpit rim it sits on. Since the transparency was the right length, I filled the notch on the cockpit rim and then seated the transparency without difficulty. The sliding canopy hood fit perfectly over the rear cockpit area and did not even require cement to hold it in place.
Fitting the windscreen, I found it did not seat properly on the cockpit coaming and appeared underscale. Borrowing once again from the Tamiya Mk. Vb kit, I added a late-Mk. V windscreen, which fit fine after trimming the cockpit coaming area and gave a more realistic appearance.
 As a finishing touch, I removed the upper-fuselage ID light, located just aft of the radio mast. Most Mk. IX's did not have this light. Also, do not make the classic mistake of Spitfire modelers everywhere and add a bloody radio antenna wire to a late-model Spitfire. Beginning with the Mk. V, this wire was removed with the installation of the VHF radio set, although the mast remained. Only Royal Navy Seafires, and Spitfires shipped to the Soviet Union, kept the radio antenna wire.

Two final nit-picks: the rudder hinge control-rod and the underwing bomb racks. There was nothing wrong with the rudder hinge control-rod, which is molded separately, but the kit instructions have it placed too far forward on the fuselage, unconnected to the rudder. Refer to reference photos and attach it properly to the rudder. Regarding the bomb racks, they fit onto the wing OK but the kit instructions were unclear about the placement of the bomb crutches. The double-crutches should be placed outboard, the single crutches inboard.
Painting & Marking
Now for the fun part of modeling- painting and decaling. The No. 316 squadron markings are probably correct for a mid-production Mk. IXc but I was unable to find photographic confirmation. As much as I admire the Poles and their WWII fighting record, I found this marking choice curious because 316 Squadron only used Mk. IX's for a short time before trading them in for Mustang III's in April 1944. The other marking choice was for a "Mk. XVIc" of 443 Squadron, RCAF. Wrong! First, there were few, if any, Mk. XVIc's. Almost all Mk. XVI's had the "e"-type wing. I never found a reference description or photo of a "Mk. XVIc." The second error was Hasegawa's marking scheme choice. In Alfred Price's book, "Spitfire: The Fighting History," page 238 has a clear photo of the kit's "Ladykiller," coded 2I-D, flying with its wingman over Schneveringen, The Netherlands, in mid-1945. The kit's marking sheet shows this plane with a "c"-wing but the photo clearly shows it with an "e"-wing. In other words, the decals are nice but not right for this model. The modeler must make the "e"-wing conversion for an accurate representation. A case in point for photographic verification of any Spitfire marking scheme.
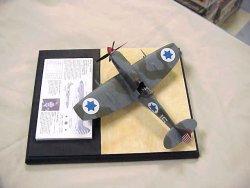
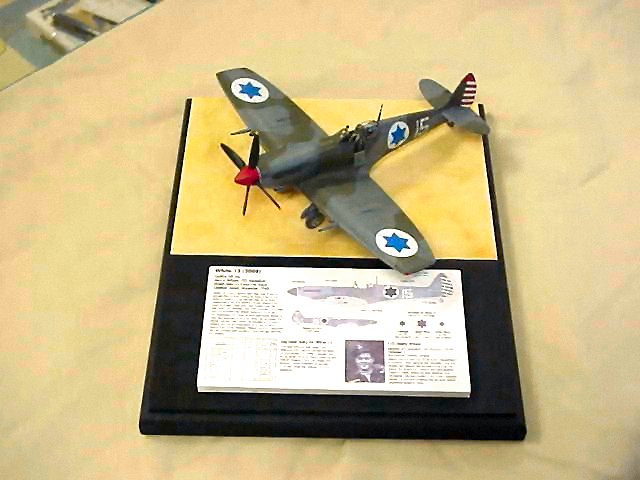
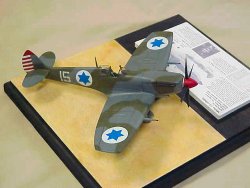
 I opted for something completely different, a Mk. IXe in Israeli markings. The service history of the Spitfire in Egyptian and Israeli service during Israel's 1948/49 War of Independence has always interested me and I could not resist the attractive red/white striped rudder of 101 Squadron, IDF/AF. I used Israeli markings from the MPM/Ocidental kit and from a Watermark Canadian Spitfire sheet for the model. The particular aircraft depicted, White 15, Serial 2008, was an ex-Czech Air Force machine flown by a number of experienced, ex-Allied pilots during Israel's War of Independence. Several Egyptian aircraft, including at least one Spitfire, were downed with this machine.
Conclusion
 To sum up the Hasegawa kit, it is the best Mk. IX to date and generally worth the wait. It is not perfect, and there are plenty of small flaws and minor fit problems. However, an intermediate or master modeler should have no difficulty turning this kit into an attractive, accurate model. The price, about $25, is reasonable for a kit of this type. Aftermarket decals for the Spitfire IX are surprisingly plentiful and many modelers will probably end up with several of these models on their shelves. I recommend this kit to all modelers interested in the Spitfire, RAF and WWII subjects.


![]()


