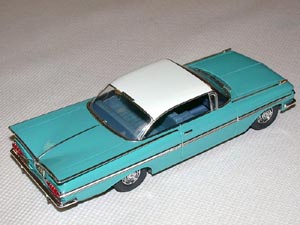
Rebuilding a 1/32 ’59 ImpalaBy Andrew Bertschi | 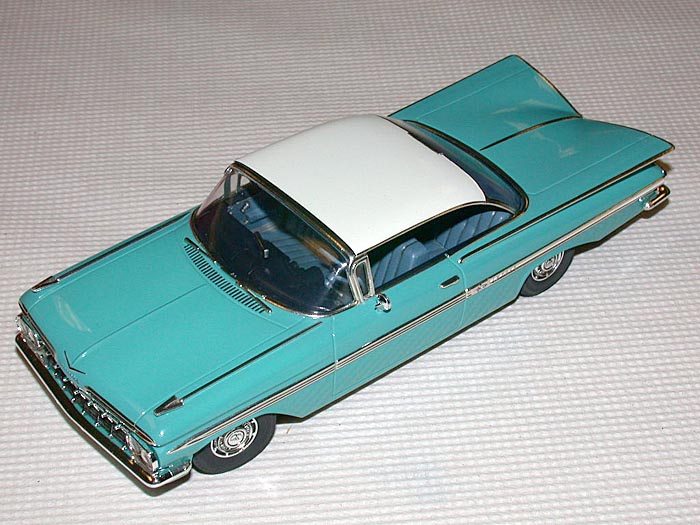 |
Overview
I completed this project about a year ago. It was given to me half-built by a friend and it sat around for at least a year before I decided to rebuild it. Normally I don’t take up kits in a semi-finished state except to use as filler for the spares box. But in this case it looked quite nice and I’ve always found the ’59 Chevy and other US automotive excess of the late 50s to be quite interesting cars to look at. What an era! The kit itself dates back to the mid-late 1980s when Gunze-Sangyo did a series of US cars in a 1/32 American car series that included a -59 Cadillac Coupe de Ville, a ’59 Ford Galaxie Starliner, a ’55 Chevy Nomad, a ’63 Ford Thunderbird and a couple of others, I believe. From what I understand all seem to be relatively easy to find, but whether or not you can source one depends on your local supplier of older kits. This is the only one from their series that I have had in my collection or built so far.
The Kit
This is a typical Japanese curbside kit with all parts molded in a grayish green plastic that’s easy to work with. It includes a clear tree, plus rubber-like tires and a large tree of chrome plated ‘accessory’ parts. It can be built either as a coupe or convertible and there are a good number of ‘custom’ options like fender skirts, a continental kit, hood louvers, and otherwise on the chrome tree, but I built the kit more or less out of the box as a stock coupe, with the exception of replacing the headlight lenses with MV lenses (2 of the 4 originals were missing when I received the kit), posing the front wheels, and adding my own rear sections on the dual exhaust system. Other than these details, it is ‘as packaged’.
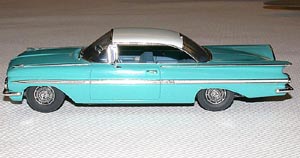
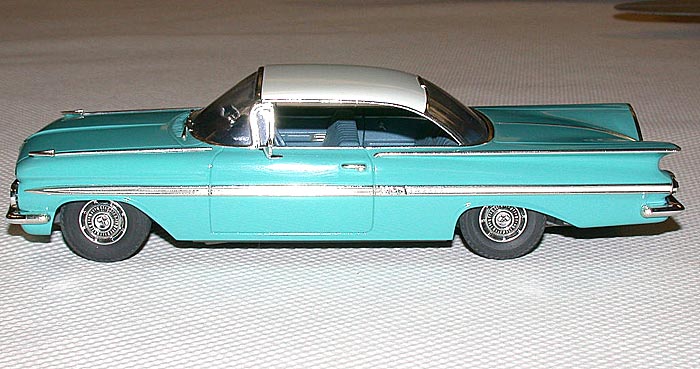
 The body molding is crisp and quite good, typically Japanese in execution, but owing to its age not quite on par with Tamiya and even Revell-Germany kits of today. Everything fits well though and the way things are laid out allows for detailing to be done quite easily. The chassis is really poor, at best toy-like, although several of the other kits in this series (especially the ’55 Chevy and ’59 Ford) are from what I’ve see, the opposite and have very well detailed chassis’. The body’s proportioning, while a bit on the ‘wide and low’ side, captures the look of the’ 59 Impala quite well.

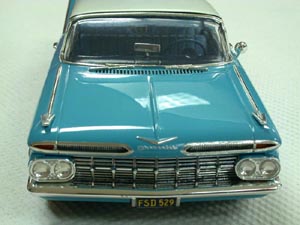
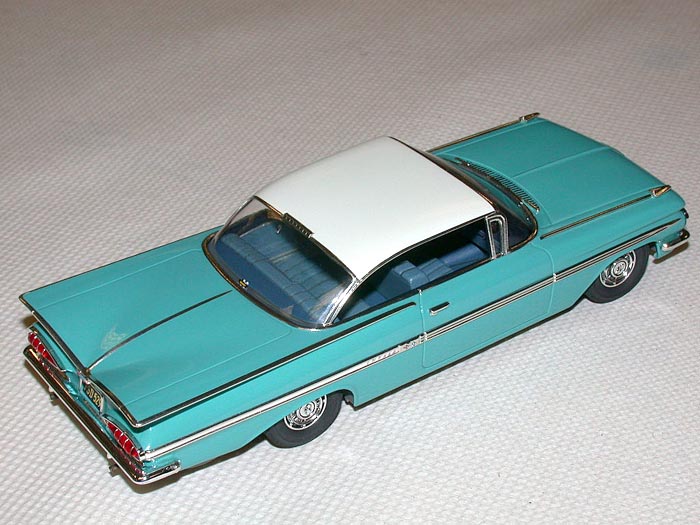
The interior pan is quite simple, with separate upper and lower dash halves (likely to facilitate detailing), a steering wheel with separate column with 3 on the tree shifter, a rear view mirror, separate front seat, and molded in rear seat. The door panels are separate pieces that are to be assembled in the platform style, and are easy to detail. The chassis itself does not have separately molded suspension or exhaust. I chose to replace the rear of the dual exhaust system to enhance its look and this required some minor modifications to the chassis. The wheels are simple one-piece units and there is no brake detail given. I added an inner part to each wheel to replicate simple brake drums. The chrome pieces were OK and I was able to use a dark wash to the chromed factory hubcaps to bring out their detail. The instructions are mainly in Japanese, rather simplified, and are focused on the ‘custom’ options. There was a color insert included in the box which has some nice picture examples of built-up models that helped me choose the colors and which wheels I used in building my kit. A small decal sheet is also provided with some blue/yellow 1970s-80s vintage California license plates along with a pair of white ‘The 50s-60s Collection’ plates.
 Basic Chassis Construction
When I received the kit, the body had already been painted a metallic orange color and the interior a flat red. I toyed with the idea of using those colors but felt a ‘softer’ pastel shade would suit the massive fins of the Impala better. I opted to try a bottle of Testors old ‘Boyd’s’ Pacific Blue paint (a lighter shade of blue) which had been sitting on my worktable. I began to strip and clean up the body and interior pieces with Easy Lift Off and a toothbrush and assemble the very basic chassis. Outside of filling in holes where the motor and gears were located (yes, it is intended to be a motorized kit), the only structural thing I changed was to thin down and re-contour the rear chassis rails so they looked more ‘scale’. From the side, they looked very odd before reworking.
While doing research on the car, I opted to add straight out rear exhausts that I noticed were a popular way to run them on the few fifties cars I’d seen on the road today. I made a set of pipes and painted/weathered them, although their installation didn’t happen until the final assembly. I’d intended to model the car as one owned by a person who used it on a regular basis ‘today’. To me that meant no wide-whites, fender skirts or continental kit. Once assembled, I painted the chassis a weathered black and then sprayed on clear to allow for detail painting, did an oil wash, another sealing coat and then foiled the two molded-in mufflers. Once that and other detail painting/foiling was completed, I did some dry brushing and sprayed certain areas of the chassis with a Gunze acrylic paint ‘grime’ that I had mixed up to simulate road dirt, etc. The end result was typically used looking chassis, just what you’d see on a regularly driven road car.
 Painting and Detailing the Body
Once I had all the paint stripped off and was happy with the body’s clean up, I began to apply white primer to form a base for the Pacific Blue. I put on about four or five coats, then sanded it first with 280, then 320 paper and finally with an old, worn Scotchbright pad. After that, I put on a couple more light coats (I use Model Master flat white paint as white primer) and Scotchbrighted that until the whole body was uniformly smooth and free of orange peel.
I put a few coats of white on the clear plastic hardtop piece used on the coupe version I’d planned to build and then sanded/polished it with a Scotchbright pad also. Once it was smooth enough for my liking, I went over the paint with a polishing kit to get a smoother and more lustrous finish. As it turned out quite good, I didn’t bother to use Duracryl clear on top of the white paint on the hardtop piece and just did the requisite trim foiling and polishing of the 'glass' with plastic polish. The inside of the hardtop was painted a medium which I mixed up from various shades of blue and gray purely on the basis of what I thought looked right with the exterior color. I then clearcoated that with Duracryl and washed it with artists oils to bring out the headliner’s texture. Once it had dried, I sealed it and painted/foiled the dome lamp that was molded to the inside of the hardtop piece. This ‘clear, wash, seal’ sequence is what I regularly do on just about any kit I build with few exceptions.
 Now it was time to paint the body. I masked off the white side trim and put on a bout two or three coats of Boyd’s Pacific Blue. When coverage was uniformly complete, I unwrapped that side trim area and applied five coats of Duracryl to the whole body (this would come back to bite me…) and put the body aside for a period of time to cure (in this case about six months as other things had come up). Normally I would let a painted body dry for a month or two, and the six month period was not my norm, but the general rule is that the longer paint and/or clearcoat can cure, the better off you are as automotive clears dry from the inside out and the harder the outside surface, the better it will polish out.
Construction and Painting of the Interior
 After painting the inside of the hardtop, I used the same shade of blue from the interior to paint the front and rear seats. They then received a coat of clear to allow for an oil wash. I thought of painting the rest of the interior bits (the dash, floor and door/side panels) in the same shade of blue, but I found several photos on the Internet of a ’59 Chevy in Sweden that had an interior in a similar shade and also appeared to be a stock tri-tone interior. It looked quite good and I decided to do the same thing with my model. I took the existing blue I had made and added a bit of dark blue and metallic gray to change the color for use as the carpeting and lower dash/door color. I’d seen 50s cars with a ‘glittery’ look in the material used in their carpeting and my technique came out looking similar with a bit of a ‘sparkle’ to it. Once that was ready, I took that slightly darker color and added a bit more black to it until I was happy with a now third shade of blue. That even darker color was used as the final color for the dash top and upper door panel area color. I just kept darkening the original interior blue to suit my needs for the other interior colors and this worked out very well.
Foiling and Making ‘Repairs’
 As I mentioned, once the multiple coats of clear had been applied, the Impala sat around in a box for at least six months before I got back to it. Eventually I had the time to return in earnest and began going over and polishing the body from back to front. Polishing a clear coat finish is a painstaking process that can often take a couple of days of tedious work (it’s best to separate into a couple hours at a time per night). When I was nearly finished, disaster struck. Having not quite put enough clear on the passenger’s side front fender, I had a slight color rub through. As it was on the top of the fender in an area that wouldn’t’ be covered up, I had no choice but to mask off the rest of the body and repaint and re-clearcoat that fender. Sort of like a real body shop, but in miniature. In spite of using the material from the same bottle of paint, the color match wasn’t quite a perfect one. With some fiddling I was eventually satisfied and yet again had to put it aside for a few weeks to allow that newest applied clear to cure. You live and learn. Next time I’ll put on SIX coats of Duracryl to play it safe.
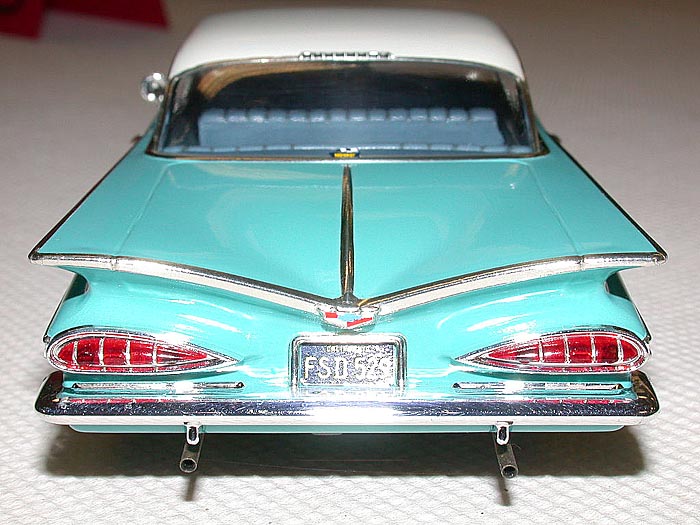
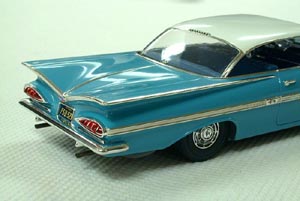
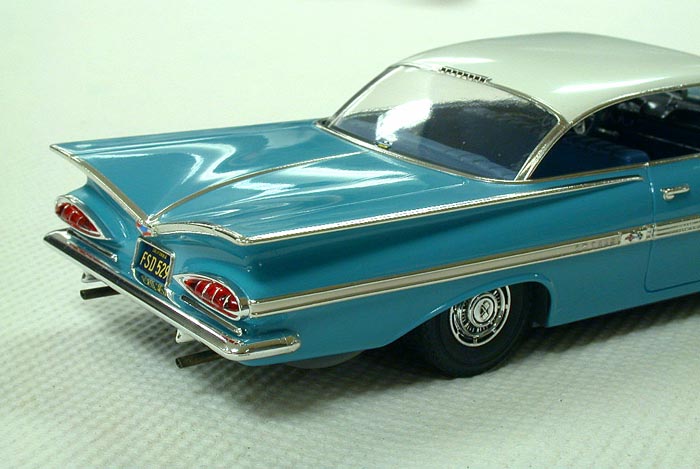
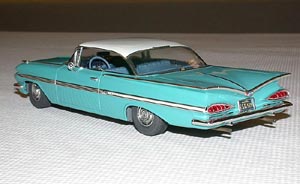
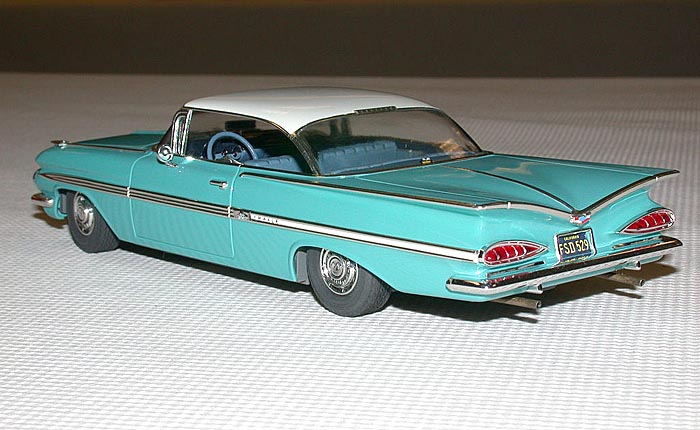
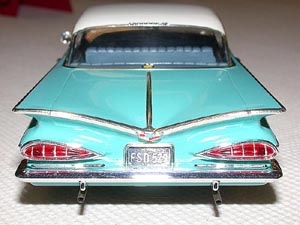
In the mean time, I began to foil the acres of chrome that this land yacht had as standard. In spite of the extra work, that is a big part of the allure of 50s American cars and to not replicate all that chrome would leave it looking strange. My normal method for applying foil is to use a series of ‘custom’ toothpicks that I’ve specially modified for applying foil and doing similar detailing work. The chrome foiling took me at least a week’s worth of time on and off to finish. I re-did several areas multiple times as I wasn’t satisfied with how a piece of trim had come out. This was the case with the edging on both of the rear fins and the ‘eyebrow’ trims on the leading edge of the hood above the grille/bumper. Most of the chromed parts in the kit were in good shape and their finish was free of flaws. The only problems I had were that the front and rear bumper’s sprue attachment points damaged the chrome finish upon their 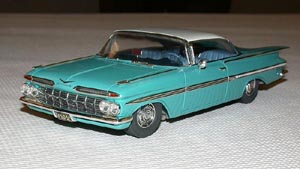 removal from the trees. I ended up sanding and polishing the ends of both the bumpers and making small chrome endcap-like foil patches to cover up the flaws. Again, by being careful, this isn’t really noticeable in looking over the finished car. When dealing with the body trim, if very careful, you can remove the foil and replace it without damaging the underlying finish if you misapply a piece. I ended up getting all the chrome pretty much spot-on and that is in my view a big part of why the car came out so well. Everything looks ‘right’ and the chrome appears to be an integral part of the car and not just added on. Paying attention to how trim follows curves and body lines and other edges is important for the end result to look right. I’ve seen other foiling work in which the chrome is very ragged and sloppy looking and appears to be an afterthought by the builder.

Final Assembly
I attached the completed interior assembly plus the front and rear bumper units to the body after washing the front grille with some dark artists oils. I painted the large clear plastic tail lamp lenses with Tamiya clear red and allowed them to dry. Once dry, I cut out a series of very narrow strips of chrome foil to install on the lenses to separate out the segments as I had seen on an actual car. This little addition made a big different is the outward appearance of the rear of the car. I fixed another small chrome flaw on one of the tail lamp surrounds and attached the completed lamp assemblies to the body itself. Then I made up a small Chevrolet ‘bowtie’ symbol from some very small pieces of decal stock and installed that in the center of the trunk lid’s chrome ‘V’ above the license plate. I then epoxied the hardtop/rear glass section to the body and installed the license plates and a small period decal on the lower center of the rear window.
Once done with all work relating to the body and trim, I attached the rear axle and wheels to the chassis. I also modified the front wheel attachment points to allow the wheels to be posed in a slightly turned position to give the car a bit of visual interest. The steering wheel had been turned accordingly to match that angle. The tires were also sanded to give them a more ‘used’ appearance. The chassis and body were next mated together and the ride height adjusted slightly. Then I attached the rear exhaust pipes and adjusted them to line up correctly. Once that was done, I then put a slight dusting of ‘grime’ on the bottom of the car and could finally call it completed.

![]()


